Ooblek Two Ways

ooblek-5

Ooblek comes from a Dr. Seuss book published in 1949, which I confess I’ve never read! But you don’t need to know the story to have fun with this mysterious substance – part liquid, part solid. They key lies in achieving the right ratio of cornstarch to water.

There are two ways I’ve found to do this: being precise, or just winging it.

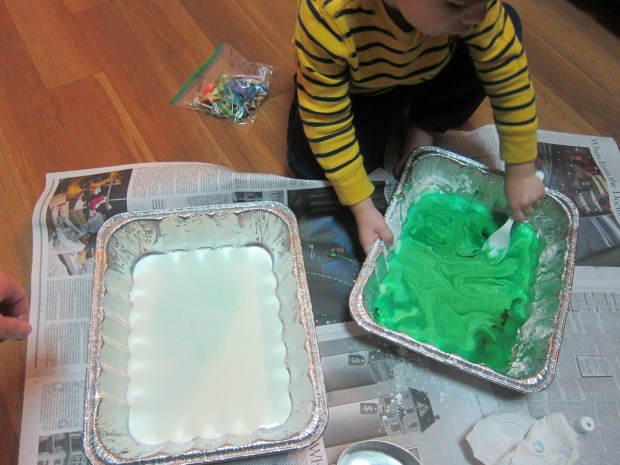
If you want to do the former, enlist your child to help you pour 1/2 cup water into a large container (a disposable aluminum pan works perfectly). Add 1 cup cornstarch, then use your hands or a spoon to stir the mixture.

ooblek-1

Travis prefers this method, because he enjoys measuring out recipes. Once we had our ooblek, he insisted on adding food coloring, so we made it green. This turned out to make the perfect neon green ooze.

ooblek-2

For the “winging it” method, I dumped cornstarch into a tray first, and then had Travis help me add water until the ratio seemed right. This can be a fun way for kids to tinker with figuring out how and why the mixture works; we discussed solid versus liquid as two states of matter while we played, and how ooblek is a little bit of both.

ooblek-4

Eventually Travis decided that this batch should be purple, but you can have fun with it plain white, of course!

ooblek-6

Kids will likely find all sorts of ways to play with ooblek, including adding objects to the pan, pressing on it, stirring it – and of course dipping in their hands.

ooblek-7

Have fun squeezing it and seeing what happens!

ooblek-8


Volcano for Toddlers

volcano-5

Big kids can purchase D.I.Y. volcano models and witness a bubbling eruption at home, but why should big kids have all the fun? All you need to make a version that will delight your toddler is a little but of playdough (as long as you don’t mind sacrificing that particular portion of playdough), baking soda, and vinegar.

Shape your playdough into a roughly conic shape resembling a volcano, and place in a tray. Hollow out a small portion in the center of your volcano for the crater.

volcano-1

Travis was intrigued as I worked, and couldn’t wait to help spoon baking soda into the center of the crater, already excited about what reaction might occur.

We then spooned in a small amount of red food coloring to make our volcano look like real bubbling lava, although this step isn’t necessary.

volcano-2

Finally, I poured on vinegar – any kind will work, and I used rice vinegar since that was all I had at home. Now enjoy the bubbling!


volcano-6

Travis wanted to do this again and again, which we proceeded to do until my baking soda and vinegar ran out. He even took over dumping on the vinegar himself.

volcano-7

Once our ingredients were gone, he played with the leftover lava “goop” in the pan for quite some time, shoveling rivulets down the sides of our volcano, and breaking the playdough volcano into small pieces. So half the fun was in the mess we created!

volcano-8

Leaf Color Experiment

leaf-color-4

Our autumnal fun continues! Although the science behind this experiment is advanced for toddlers, even little kids will delight in seeing how the water changes colors. For preschoolers and older kids, you can go into more detail about chlorophyll and why leaves change color in the fall.

As with our leaf glitter project, half the beauty of this activity is going out to collect your leaves. Get outside and have fun!

leaf-color-1

Choose a variety of autumn-hued leaves, and return home to cook in boiling water for 5 minutes. Carefully use tongs (adults only!) to transfer the leaves to clear glasses or test tubes filled with rubbing alcohol.

leaf-color-3

Let sit for at least an hour, and you’ll see the alcohol “magically” change color to match each leaf. The results will only get better after time – at the 8 hour mark, Travis was really excited to note the changes. Leave over night for the most vibrant result.

leaf-color-6

Interestingly, our green performed the best, and our most vibrant fall orange leaf barely tinted the liquid. Even adults can be surprised by experiments!

Water to Ice

Water to Ice (3)

Use this simple experiment to introduce your toddler to two of the basic states of matter – liquid and solid.

Using an eye dropper, let your child fill the compartments of an ice cube tray with just a thin layer of water per compartment. You could also simply pour in a small amount of water, but the eye dropper is great practice for fine motor skills!

Wait 10 to 20 minutes for the water to freeze, then ask your child if they’re ready to see the exciting results… Has your liquid turned into a solid?

Travis loved playing with the ice that we made, dumping it from the ice cube tray and putting it back in again, and watching with delight as rivulets of water melted off and got us wet. As we played, I talked about how water + cold = ice, and how ice + hot = water. He loved this simple equation, and repeated it to himself when he took his bath later in the evening.

Water to Ice (2)

For added fun, you might try adding food coloring to the ice. If you try this version, please let me know how it goes in the comments! If you’re interested in ice play for slightly younger toddlers, check out my previous post on why Ice is Nice.

Water to Ice (1)

Grapes to Raisins

Grapes to Raisins (5)

Introduce the magic of chemistry with this easy at-home experiment. Does your toddler know that grapes can turn into… raisins?

When I presented this mystery to Travis and told him we needed heat in order to make them change, he immediately said, “We need an oven!” Chemistry 101, complete!

Grapes to Raisins (1)

Slice as many grapes as you like in half, keeping in mind that you’ll end up with a significantly reduced volume of raisins, then have your toddler helper assist you in sprinkling the grape halves evenly over a baking sheet.

Grapes to Raisins (2)

Or dumping them on:

Grapes to Raisins (3)

Place the grapes in the oven at 200 degrees F for 2 and 1/2 hours. Now we wait!

Grapes to Raisins (4)

To be honest, you can probably leave your grapes the oven in quite a bit longer (3 or 4 hours) for truly raisin-y raisins. Ours were a sublime mix that was half juicy grape, half condensed raisin, warm from the oven and very golden raisin-y in taste. Travis was thrilled with the result. The perfect dessert just before bed.

Grapes to Raisins (6)

If you’re even more ambitious, you can profit from the summer weather to make real sun-dried raisins. Place your grapes in a sunny spot for several days (yes, days!) covered with cheesecloth to prevent them from getting dirty. I hope to try this some day when we live in an area with less car traffic.