Pickled Veggies

Pickled Veggies (2)

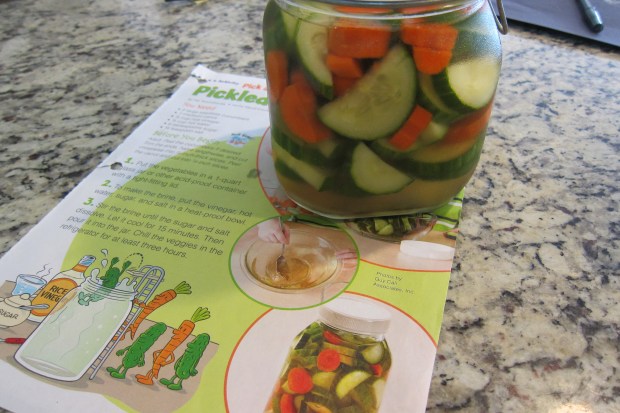
Thanks to High Five for this cute culinary idea! If you chop the veggies, your toddler can prepare nearly the entire rest of the recipe for quick pickles. It’s a neat way to introduce the idea of canning and preserving.

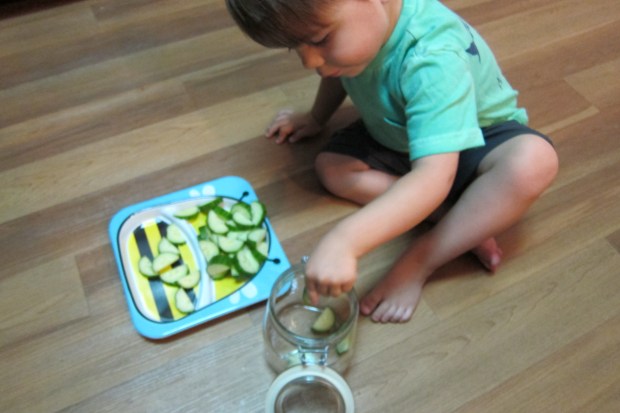
Adults, cut 1 large English cucumber in half, and then into 1/4-inch thick slices. Peel 1 carrot and cut into 1/4-inch thick slices.

Give your child the veggies and a glass jar with a tight-fitting lid. Travis was so proud to tackle the task of moving the veggies from plate to jar, doing so very studiously.

Pickled Veggies (1)

Next, prepare the brining liquid: Whisk together 3/4 cup hot water, 3/4 cup rice vinegar, 6 tablespoons sugar, and 1/2 teaspoon salt. Let stand for 15 minutes.

Help your toddler pour the brining liquid over the veggies. Travis was very careful to make sure all the vegetables were covered before we latched the lid. Now it’s time to wait! Let the veggies chill in the fridge for at least 3 hours before serving.


Advertisement

Introducing Zero!

zero games (4)

Travis and I had some toddler math fun this week, playing with the concept of zero.

He’s familiar already with “empty” and “nothing,” thanks to the age-old trick of hiding an item in one hand but not the other, and having a child guess which hand is full. Whenever I reveal the empty hand, I’ll splay my fingers and say, “I’ve got nothing!” He cracks up every time.

So it only seemed a small step from there to introduce the concept that nothing is another way of saying zero. To play with the idea, we did a few easy games.

zero games (1)

Label a piece of construction paper with 6 squares, numbered 0 to 5. Give your child pennies or other tokens, and see if he or she can put the correct number on each square. The 0 square should stay empty of course! Travis was great at leaving the zero blank, although his counting got creative on squares 4 and 5, still tougher concepts than 1 and 2!

zero games (2)

The second game involved eating Fruity Bunnies (no hardship there!) a favorite snack. Choose any treat or small candy that your child loves, and lay out 3 to 4 bowls, some filled with the snack, some without. Your toddler then gets to put a big 0 in the bowls that have no snack.

zero games (3)

As he continued eating, more and more bowls got a 0, making this a little introduction to the idea of subtraction, as well. Travis had so much fun laying down his orange 0 cards that he almost didn’t mind when the bunnies were gone!

zero games (5)

Finally, we played a game outside with cards numbered 0 to 5. If Travis drew a 5, he had to march 5 steps, and so on (his counting got a little creative here, too, of course!)

zero games (7)

But if he drew the 0, he had to… freeze! 0 steps. A cute movement-play way to introduce the idea of nothing.

zero games (8)

Broccoli Toss

Broccoli Toss

This recipe travels well, making it ideal to pack a full portion for school lunch or a 1/2 serving as a preschool snack! My toddler likes broccoli soft and cooked, but if you prefer, you can leave the broccoli raw and crunchy.

Ingredients:

  • 4 cups broccoli florets
  • 1 (15.5-ounce) drained and rinsed can Great Northern beans
  • 1 cup frozen shelled edamame, cooked
  • 2 tbsp. fresh-squeezed lime juice
  • 2 tbsp. olive oil
  • 1 tbsp. low-sodium soy sauce
  • 2 tsp. sesame oil
  1. Cook the broccoli in boiling water for about 8 minutes, until tender. Drain and transfer to a large bowl. Add the Great Northern beans and edamame.
  2. In a small bowl, whisk together the lime juice, olive oil, soy sauce, and sesame oil. Drizzle over the broccoli mixture and toss to combine.
  3. Let stand for at least 30 minutes before serving.

Pumpkin and Chick’n Curry

Pumpkin and Chick'n Curry

This is an easy first curry for toddlers because the spice is very mild. Your little one will never know pumpkin is hidden in the sauce!

Ingredients:

  • 1 tbsp. olive oil
  • 12 ounces Gardein chick’n strips
  • 1 tsp. ground ginger
  • 1 tsp. turmeric
  • 1 cup coconut milk
  • 1 cup canned pumpkin
  • 1 and 1/2 cups chopped baby spinach
  • 1  lime (optional)
  • Cooked basmati rice
  1. Heat the olive oil in a large skillet over medium-high heat. Add the chick’n and cook until heated, about 6 minutes. Remove the chick’n from the skillet, chop into bite-sized pieces, and set aside.
  2. Return the pan to the heat and add the ginger, turmeric, coconut milk, and pumpkin. Simmer over medium-low heat for 10 minutes.
  3. Add the chopped chick’n and spinach to the pan, and cook for a final minute, until the spinach wilts. Add a spritz of fresh-squeezed lime juice if desired.
  4. Serve over hot cooked basmati rice. For a toddler, I recommend about 1/4 cup rice per 1/2 cup serving of curry.

Water to Ice

Water to Ice (3)

Use this simple experiment to introduce your toddler to two of the basic states of matter – liquid and solid.

Using an eye dropper, let your child fill the compartments of an ice cube tray with just a thin layer of water per compartment. You could also simply pour in a small amount of water, but the eye dropper is great practice for fine motor skills!

Wait 10 to 20 minutes for the water to freeze, then ask your child if they’re ready to see the exciting results… Has your liquid turned into a solid?

Travis loved playing with the ice that we made, dumping it from the ice cube tray and putting it back in again, and watching with delight as rivulets of water melted off and got us wet. As we played, I talked about how water + cold = ice, and how ice + hot = water. He loved this simple equation, and repeated it to himself when he took his bath later in the evening.

Water to Ice (2)

For added fun, you might try adding food coloring to the ice. If you try this version, please let me know how it goes in the comments! If you’re interested in ice play for slightly younger toddlers, check out my previous post on why Ice is Nice.

Water to Ice (1)

Homemade Tambourine

Homemade Tambourine (4)

It’s easy to create your own musical collection at home without purchasing toy instruments. To wit, a paper plate and jingle bells from a craft store can turn into a tambourine in mere minutes!

To start, have your child decorate the backs of two paper plates with markers or crayons. After a little marker mishap, we switched to crayons for the other side! Good thing markers are washable.

Homemade Tambourine (1)

Once the decoration is complete, place the jingle bells on one plate, and cover with the other. You can use any number of bells, depending how jingly you want it, but I recommend at least 3.

Homemade Tambourine (2)

Seal the plates together with a stapler (or tape) and let your budding musician make some noise.

Homemade Tambourine (3)


Let’s Go Fly a Kite

Let's Go Fly a Kite

I’m not normally one for food art, but this whimsical snack was too cute to pass up – especially here in the lazy kite-flying days of summer! Preschoolers can definitely help you assemble this one.

Ingredients:

  • 1 slice whole wheat bread
  • 1 teaspoon eggless mayonnaise
  • 1 slice non-dairy cheese
  • 1 carrot stick
  • 6 raspberries
  • Popcorn kernels
  1. Lightly toast the bread and cut into a square, discarding the crusts.
  2. Spread the bread with the mayo, and top with the cheese. I cut the cheese into triangles for a cute, patterned-kite effect.
  3. Place the carrot stick at the bottom, and arrange the raspberries on either side.
  4. Add a few popcorn pieces for clouds!

PB&J Overnight Oats

PB&J Overnight Oats

Take a little crazy out of the morning by preparing this hearty bowlful the night before. It’s a nice twist to get you out of an instant oatmeal rut!

Ingredients:

  • 2 cups vanilla almond milk
  • 1 cup steel-cut oats
  • 1/3 cup creamy peanut butter
  • 2 tablespoons agave nectar
  • 4 tablespoons strawberry jam
  1. Combine the milk, oats, peanut butter, and agave in a saucepan. Bring to a simmer and continue to cook for 5 minutes, until the peanut butter is melted.
  2. Let cool slightly, then refrigerate overnight.
  3. Reheat individual servings in the microwave, and top each portion with 1 tablespoon jam.

Lemon Ink

Lemon Ink (1)

“Painting” with lemon juice sounded like a delightful trick to show a toddler. The ink goes on nearly invisible, but appears once the juice dries and is held up to a light. Turns out Travis was way more into the lemon itself, but that still meant we had fun!

Since toddlers don’t typically eat lemons, this is a great way to introduce the fruit and its color and texture. Travis had so much fun squeezing the lemon, and watching as I collected juice in a cup.

Lemon Ink (3)

Then it was time to “paint”! We used q-tips as paintbrushes, adding another layer of novelty to the project.

Lemon Ink (2)

To be honest, Travis was only mildly interested (he was still busy squeezing another lemon half), so I made shapes and spelled his name, in addition to his squiggles, for the big reveal. He had fun holding it up to our ceiling lights…

Lemon Ink (4)

…although the effect was best in the window.

Lemon Ink (5)


Microphone Craft

Microphone Craft (5)

Encourage a budding rock star with this cute, easy craft!

To make the base of the microphone, have your child help wrap an empty toilet paper tube in foil. Travis immediately loved how shiny and crinkly our creation was.

Microphone Craft (1)

For the top of the microphone, the best bet is really a small foam craft ball. Since I didn’t have one on hand, we used a ball from an old baby toy, which I wedged into place and secured with a bed of duct tape.

Good enough for now, though I hope to buy a craft ball as a replacement! Now, is this thing on? Testing, testing, one-two-three.

Microphone Craft (3)

Travis latched right onto the idea that it was a microphone, and loved singing songs from our local music class. Wait, is that a microphone or an ice cream cone?

Microphone Craft (4)

All around, good fun. I might even make a few of these, and keep one in the car for road trip sing-alongs.

What’s your child’s favorite song to sing? Please share in the comments!