New Year’s Traditions

New Years Traditions (4)

If ever there was a year to ring in with as many lucky traditions as possible, then 2021 is it! To wit, the kids had fun testing out customs from three other countries to start the year on the right foot.

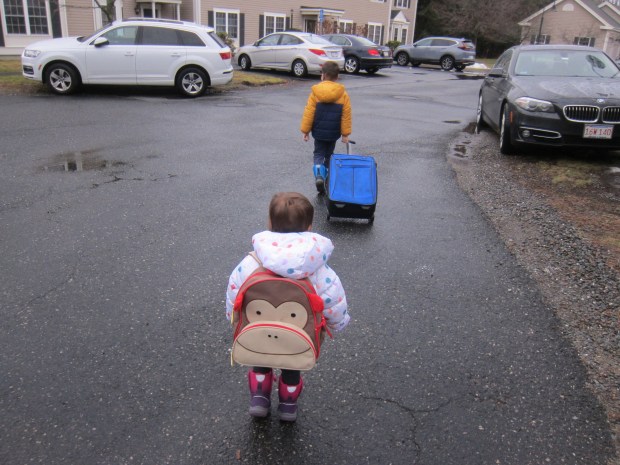
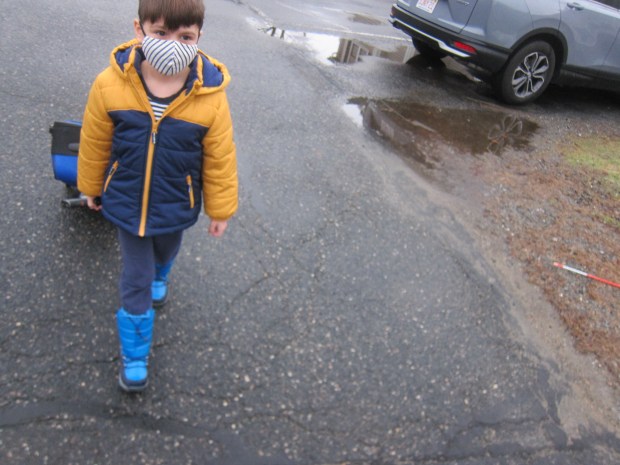
For the first, we tried this Colombian tradition of wishing for travel and adventure in the year ahead: take a suitcase for a walk!

New Years Traditions (3)

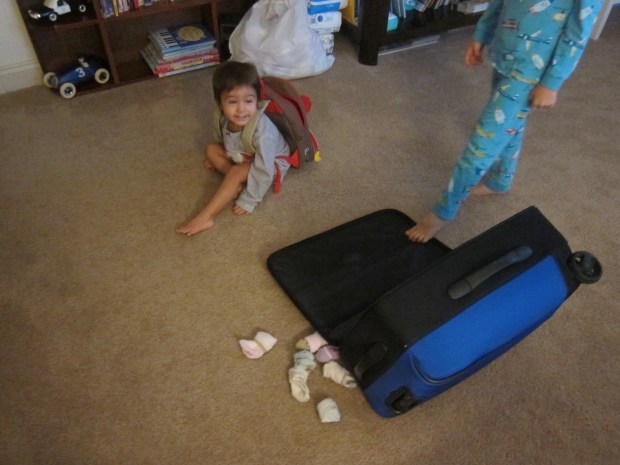
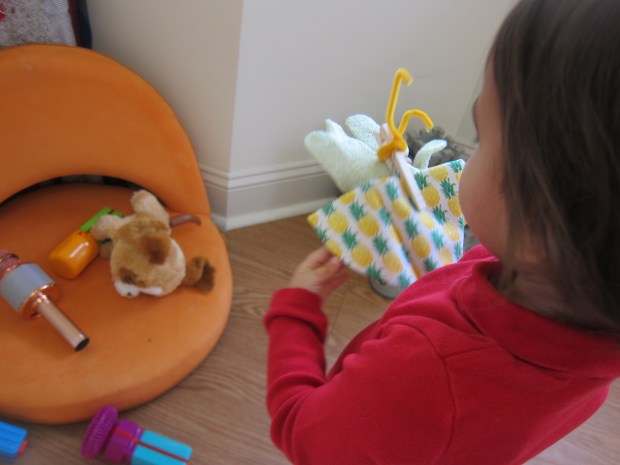
Of course the kids wanted to pack theirs up (with stuffed animals and socks!) before we took a silly stroll around the neighborhood.

New Years Traditions (5)

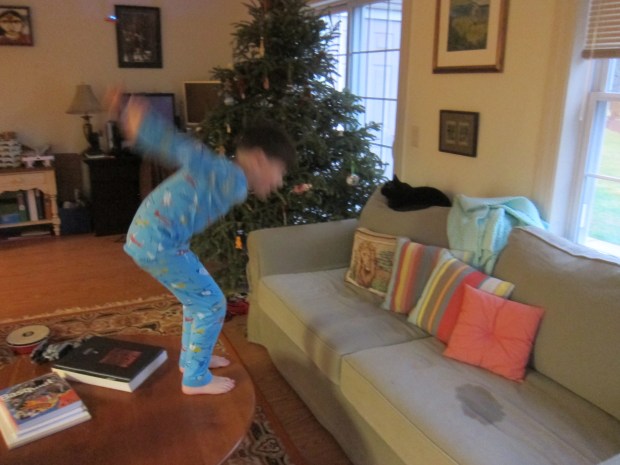
Next up, it was time to leap into the new year – literally! Apparently a Danish tradition, I gave Travis permission to jump from the coffee table to the couch. The kids also perfected their jumping skills from couch to floor.

New Years Traditions (1)

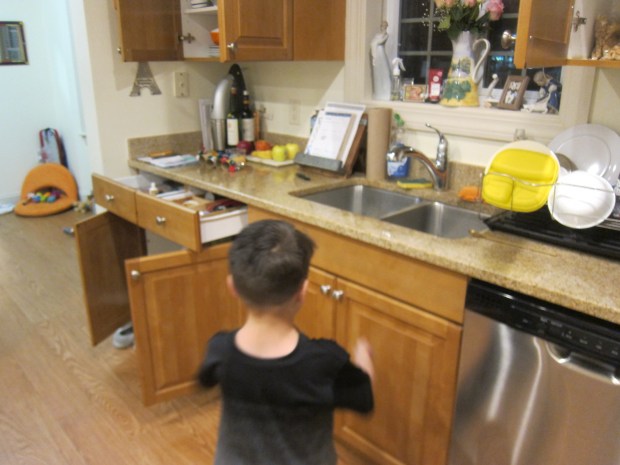
And finally, we invited good luck into our home by opening up all the kitchen cabinets just before bed, a tradition from the Philippines meant to bring good fortune. (If you live in a warm enough climate, open up doors and windows, too!).

New Years Traditions (6)

What lucky traditions will you use this New Years? Please share in the comments!

Advertisement

Chinese Paper Dragons

Dragon Puppet (8)

Chinese New Years won’t technically fall until February 12, 2021, but these dragon puppets still felt fun to make as we made the transition to 2021 as festive as possible!

To make each dragon, I first cut sheets of construction paper in half vertically, then glued them together into one extra long strip. You’ll need two pieces like this for each dragon; Travis chose black and blue and Veronika chose black and purple.

Dragon Puppet (1)

I wouldn’t normally recommend using hot glue on paper, but in this case it was the most secure way to glue one strip to the other, perpendicular to each other. Fold up accordion-style.

Dragon Puppet (2)

We then cut extra sheets of construction paper to be the heads and tails (rounding the heads slightly and cutting the tails into a triangle point). Use hot glue to add to either end of the body.

Dragon Puppet (5)

Just a few final touches were needed now! Veronika helped glue feathers and bright buttons onto each face, and we added additional features with marker.

Dragon Puppet (7)

Our dragons were ready to rock and roar.

Dragon Puppet (9)

We’re looking forward to the upcoming Year of the Ox!

Chinese Dragon alt

Party Creatures

Party Creatures (5)

Good bye to 2020; I don’t think anyone is going to miss it! We wanted to launch into the new year with the prettiest party possible from home, so put together these fun confetti poppers!

To start, knot a balloon and then snip off a bit of the end opposite the knot. Fit the balloon over an empty toilet paper roll and secure with duct tape.

Party Creatures (2)

Next, we chose a pretty patterned paper to cover each roll. After that, each tube needed some silly adornments! We glued wiggle eyes onto pom poms, which were then added to each tube along with twisted sparkly chenille stems.

Party Creatures (4)

These creatures were ready to party! Your kids might even want to name them. Popping Pat? Confetti Carly? Anything alliterative and silly fits the bill.

For confetti, Travis used a hole punch to make circles from sparkly construction paper (or cardstock would work, too). This was a neat homemade twist on confetti but took lots of effort, so we also added a few packs of sequins from the store.

Party Creatures (3)

Now set the creatures aside until it’s time to count down to midnight! After that, the kids helped fill up each tube with the confetti.

Party Creatures (6)

Pull back on the knot of the balloon to launch. Five, four, three, two, one: Happy New Year!

Party Creatures (7)

We are wishing a very happy and healthy 2021 to all.

Crayon Color Sorting

Crayon Color Sorting (6)

Veronika is obsessed with colors right now, not just in English but Spanish, too (thanks to big brother’s Zoom class!). So when I came home with a big new box of Crayola crayons, she immediately wanted all los colores. I seized the perfect opportunity for a color-sorting game.

To set up, simply tape paint chips (available for free at hardware stores) to the individual cups of a muffin tin, and then encourage your toddler to add each crayon to the correct cup.

Crayon Color Sorting (2)

I pointed out the first few, using both English and Spanish words. “Where should you put verde green?” I asked her. “What about blue azul?”

Crayon Color Sorting (4)

She was great about sorting at first…

Crayon Color Sorting (7)

…though of course she soon also wanted to mix and match, or transfer the crayons back into and out of the box.

Crayon Color Sorting (5)

In sum, an easy and fun color game for toddlers.

Crayon Color Sorting (8)

Memory

Memory (6)

Homemade cards in a variety of prints are a fun riff on the classic children’s game of Memory, and a nice way to introduce even a toddler to the game. My original plan had been to use leftover gift wrap from the holidays for the game but… we used it all up! In a pinch, I had sheets of patterned paper that worked just as well.

Memory (1)

Whichever material you use, glue an index card onto each pattern for sturdiness, then cut in half so you have two of each print. For extra security, you can also cover them with contact paper.

Memory (2)

At first I simply showed Veronika the cards and she loved all the patterns. Go through them with your toddler and name any familiar objects like clouds or stars.

Memory (8)

Next it was time to teach her how to play Memory! With a toddler, you’ll want to start with only 3 or 4 pairs. Flip them over and then take turns trying to find a match.

Memory (4)

She didn’t always understand the concept of taking turns, but certainly she could identify when she had two of a kind!

Memory (14)

For a seasonal spin, I then cut some of the patterns into mittens and we played Winter Mitten Memory.

Memory (15)

I had so many patterns that I set some aside as hearts (which we can use at Valentine’s Day) and a few as Easter Eggs for the spring.

Memory (11)

Clothespin Puppets

Clothespin Puppets (2)

It’s that time of the month when we’re emptying out the craft bin before stocking up for the month ahead, and I love projects like this that use up all the bits and bobs! Since Travis learned about puppets this month, we made one last simple type: clothespin puppets!

We wanted to decorate the body of the clothespin, but didn’t want to wait for paint to dry. The perfect solution? Strips of decorative washi tape.

Clothespin Puppets (1)

Once the tape was in place, we could decorate them in any way. Most of them received wiggle eyes, and we also glued down feathers, beads, pom poms, and more.

Clothespin Puppets (3)

All the kids had to do was pinch the clothespins to make the “mouth” of each little creature talk.

Clothespin Puppets (5)

These cute puppets are sure to make their way into all sorts of imaginative games.

Clothespin Puppets (4)

Butterfly Hand Puppet

Butterfly Puppets (3)

We’ve been having fun with puppets lately, and here’s a neat one that kids can wear right on their hands!

I had a few fabric swatches in different prints, so cut out circles for a blue butterfly and a rather whimsical pineapple one. Insert this circle of fabric into a clothespin. Ideally I would have used a peg clothespin, but a spring-type clothespin worked in a pinch (with a little hot glue for security).

Butterfly Puppets (1)

I then wrapped a pipe cleaner around the tip of each clothespin as the antennae.

Butterfly Puppets (2)

Now to get it onto the kids’ hands! Using some old exfoliating gloves from the drugstore, I hot glued one “butterfly” onto each glove.

Veronika loved fluttering hers around!

Butterfly Puppets (6)

Travis’s very quickly became a flying dragon involved in make-believe games rather than a butterfly, but that worked just as well! Either way, these puppets were simple but fun to make.

Butterfly Puppets (5)

Minestrone Soup

Minestrone (1)

Cold winter nights are just begging for a hearty soup packed with veggies, and this one fits the bill! I make it almost as thick as a stew, but if you want a more traditional minestrone soup, add an additional 2 cups broth to the pot.

Ingredients:

  • 1 tablespoon olive oil
  • 3 minced garlic cloves
  • 1 chopped red onion
  • 4 cups vegetable broth
  • 2 (14.5-ounce) undrained cans diced tomatoes with Italian herbs
  • 1 russet potato, cubed
  • 2 chopped celery stalks
  • 2 chopped carrots
  • 2 teaspoons dried thyme
  • 2 teaspoons dried oregano
  • 2 tablespoons chopped fresh basil
  • 1 (15-ounce) drained can cannellini beans
  • 2 cups corn kernels
  • 1 chopped zucchini
  • 1/4 cup chopped fresh parsley
  • 1 cup orzo pasta
  1. Heat the olive oil in a large pot over medium-high heat. Add the garlic and red onion; saute for 5 minutes.
  2. Add the broth, canned tomatoes, potato, celery, carrots, thyme, oregano, and basil to the pot. Bring to a boil, then reduce heat and simmer for 15 minutes.
  3. Add the cannellini beans, corn, zucchini, parsley, and orzo. Simmer for an additional 15 minutes, until the vegetables are tender.

Bread rolls are all you need to round out the meal!

Minestrone (2)

Shredded Paper Sandbox

Shredded Paper Sandbox (7)

I was looking for a relatively clean indoor sandbox material for Veronika (meaning, easy to clean up!), and realized that a pack of shredded crinkle party paper would be lots of fun. If you don’t have some from the store on hand (available in the gift wrap section), you can also use shredded paper right out of your home’s paper shredder.

The package I had was green paper, which made me think of green grass, so I decided to add lots of little toy ponies. This had the added bonus of making it feel like springtime on a cold winter day!

Shredded Paper Sandbox (1)

Veronika loved trotting the ponies through the “grass”…

Shredded Paper Sandbox (2)

…or burying them and then uncovering them.

Shredded Paper Sandbox (3)

I also added a cup on the side and she loved filling it to the brim with the green crinkles and then dumping it out.

Shredded Paper Sandbox (4)

This particular “sandbox” was great for auditory sensory play, too, since the paper makes great crinkling sounds as you play with it.

Shredded Paper Sandbox (5)

Eventually, she started spilling the “grass” beyond the tray I had set out, with ponies trotting to and fro, so it was nice to know that this material would be easy to clean up once she was through.

Shredded Paper Sandbox (8)

If you do use white shredded paper, this might be fun for a sensory box with a winter or arctic theme instead!

Shredded Paper Sandbox (6)

In sum, this was a great option for an indoor sandbox.

Bread Roll Puppets

Bread Roll Puppet (4)

Today, Travis had full permission to play with his food because we turned a bread roll into a puppet!

To start, I showed Travis how to make a “smile” in a French bread roll by cutting a slit in the middle like a mouth.

Bread Roll Puppet (1)

Poke two additional holes above the mouth with a butter knife to be the eyes. We filled these with chocolate chips, although raisins might have worked better.

For a silly tongue, fold up your favorite meatless deli slice (like Tofurky), and insert into the mouth.

Bread Roll Puppet (2)

Let the showtime begin! Travis immediately began both eating the puppet and being silly with it, squeezing so the mouth could move. The rolls were so delicious that the puppet didn’t last long! But if you manage to slow your hungry kids down, arrange the rolls on a plate with basil or lettuce leaves as hair for a cute photo-op first.

Bread Roll Puppet (3)