Naughty or Nice Jar

Naughty or Nice Jar (6)

We don’t do Elf on the Shelf in our house, because I don’t love the idea of the kids being “watched” for good behavior before Christmas. That said, if your kids’ attitudes could use a little tweak this holiday season, consider this Naughty or Nice Jar instead.

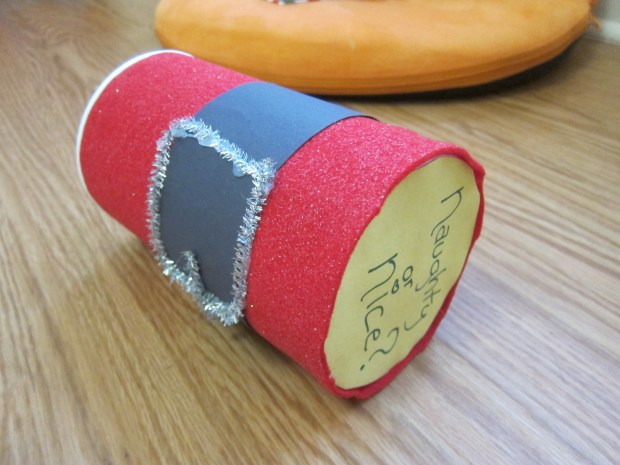
To make the jar, I first covered an empty oatmeal container with sparkly red felt. Empty coffee canisters or similar round containers would work well, too.

Naughty or Nice Jar (1)

Next, add a belt and buckle from craft material. I used black construction paper for the belt and a shiny silver chenille stem for the buckle, but black and yellow felt would also work for this part, or even aluminum foil for the buckle!

Naughty or Nice Jar (3)

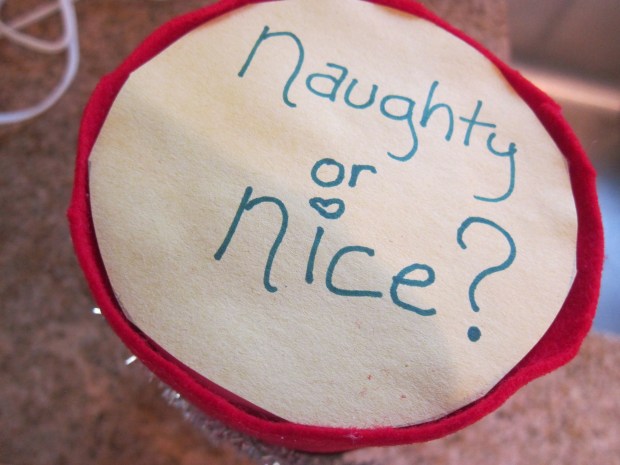
Trim the bottom of the felt if needed so the jar stands flat, then trace the bottom circle on yellow construction paper. Cut out and cover the bottom of the jar. Write in the words “Naughty or Nice?” in permanent marker.

Naughty or Nice Jar (4)

Now to put the jar to good use! Good behavior receives a reward in the jar and bad behavior earns a piece of coal. The goal is for kids to have more treats than coal as the month progresses, so they wind up on Santa’s nice list by Christmas Eve!

Naughty or Nice Jar (5)

Mini candy canes were our rewards for nice behavior and I found fun mini “coal” erasers in case of any naughty antics. Once Travis understood, he was doubly motivated to make Santa’s “nice” list this year!

Note: If you make a pair of these jars, you can fill one with all treats and one with all coal (real or fake), then seal. It makes a fun gag gift for a recipient who would appreciate the humor.

Ice Cream Cup Stick Snowflakes

Ice Cream Stick Snowflakes (10)

This is the first year Veronika is truly aware of our Christmas tree, and she absolutely loves it. If your toddler wants to put his or her own personal stamp on the tree, this is a great toddler-friendly craft that results in pretty ornaments.

Note: You don’t need to hoard ice cream cup sticks for the project, either; mini craft sticks are available for purchase at craft supply stores.

Ice Cream Stick Snowflakes (1)

I placed lots of these sticks down on a tray and showed Veronika how to squirt glitter glue on them. Glitter glue is a fantastic toddler art supply because not only is it sparkly and fun, but the squeezing is great for fine motor skills.

Ice Cream Stick Snowflakes (3)

As she drizzled the glitter over a stick, I then would press another across it, piling up 4 each time until they looked like the branches of a snowflake.

Sometimes she needed a little help and we would squeeze the tubes together. She loved watching the sparkly color appear on the next branch of the “snowflake”.

Ice Cream Stick Snowflakes (7)

Once we had four finished snowflakes, she wanted to continue the play with extra glitter glue, scooping it up with additional mini craft sticks for quite a while.

Ice Cream Stick Snowflakes (5)

Meanwhile, let the glitter glue dry completely (which can take a while), then use hot glue to attach a loop of yarn or gift ribbon to each snowflake.

Ice Cream Stick Snowflakes (9)

These were beautiful on the tree!Ice Cream Stick Snowflakes (11)

Felt Recreatable Christmas Tree

Felt Tree (12)

I’ve always loved the idea of a felt Christmas tree for the kids, but was never ambitious enough to make my own. Thanks to an early Christmas gift, we now have a version the kids can use. Although we didn’t craft ours, the idea is so wonderful that it merits a blog post.

If you are going to tackle a homemade version, you’ll need to start with a very large piece of green felt. Cut out a Christmas tree shape and then cut a stump from brown felt; use tacky glue or hot glue to attach them together.

Felt Tree (5)

Add Velcro dots at various intervals on the tree and hang on a wall.

For ornaments, you can then use additional colors of felt to cut out simple Christmas shapes: think yellow stars, red candy canes, or little squares for gift boxes. Use hot glue any time you want to attach two colors of felt together where details are needed, like ribbon on the gift boxes.

Felt Tree (6)

Needless to say, I wasn’t that crafty and was so thankful to receive this early gift for the kids. What’s wonderful about these felt trees is that kids can decorate them again and again without getting near the real (breakable!) ornaments.

Felt Tree (3)

Veronika in particular loved the tree. We talked about each item as she attached them to the Velcro squares, or the colors or shapes. She loved pointing out that the presents were squares, or the hooks of the candy canes.

Felt Tree (10)

She even pulled off one particular ornament in the shape of a lollipop and enjoyed “feeding” it to her stuffed animals. What a thoughtful Christmas gift!

Felt Tree (4)

I also appreciated how easy it was for her to attach or pull off the decorations, thanks to the Velcro dots.

Felt Tree (8)

Big brother Travis swooped in now and then to add an ornament.

Felt Tree (9)

And whenever the kids want to, they can take everything off and start all over again!

Felt Tree (7)

This is definitely a decoration that we’ll trot out to play with for years to come.

Felt Tree (13)

Gobble It Up: Thanksgiving Leftovers on a Waffle

Gobble Waffle (4)

Forget Thanksgiving leftovers on a sandwich; here are four breakfast ideas for leftovers on a waffle. Needless to say, this helped us clear out our fridge in the long weekend following the holiday.

The Classic: Start with the basics, using leftover Field Roast (or your favorite vegan turkey alternative), along with mashed potatoes and mushroom gravy. The kids loved this savory spin on breakfast!

Gobble Waffle (2)

Tart and Tasty: In a small bowl, combine 1/3 cup cranberry sauce and 1/4 cup maple syrup; microwave for 15 seconds, then whisk together until smooth. Serve drizzled over waffles topped with stuffing and chopped apple!

Gobble Waffle (1)

Pumpkin Paradise: For a super-sweet version, stir together 1 tablespoon sugar and 1/2 teaspoon cinnamon in a bowl; set aside. Top each waffle with a spoonful of canned pumpkin pie filling, a dollop of non-dairy whipped cream and some of the cinnamon-sugar to taste.

Gobble Waffle (3)

Gooey Gobbler: For the final morning, we topped waffles with leftover mashed sweet potatoes, mini marshmallows, and chopped walnuts.

Gobble Waffle (6)

Which one do your kids like best? Please share in the comments!

Flurry in a Hurry

Flurry in a Hurry (4)

If your kids are like mine, then they are so excited for snow this winter. To help them wait it out, make a snowstorm in a jar instead!

This is one of those classic experiments that never grows old. Simply stir together 1 teaspoon white paint and 1 cup water in the bottom of a mason jar. Fill nearly the rest of the way with baby oil.

Flurry in a Hurry (1)

Now drop in Alka-Seltzer tablets, one at a time. Veronika loved plopping these in!

Flurry in a Hurry (5)

The resulting bubbles will immediately make the white paint rise up and then down again, a little snowstorm in miniature.

Flurry in a Hurry (3)

If we added two tablets in at once, it was more like a blizzard!

Flurry in a Hurry (2)

After watching for a little while, we decided it would look even prettier in blue stormy skies, so added a few drops of blue food coloring.

Flurry in a Hurry (6)

It was a little harder to see the white paint as “snowflakes”, now, but Veronika was equally delighted watching this stormy sky.

Flurry in a Hurry (8)

We went through six Alka-Seltzer tablets before she tired of it!

Barbecue Meatloaf Muffins

IMG_0001

Kids love meals that come in kid-sized portions, and these individual meatloaf muffins fit the bill perfectly.

Ingredients:

  • 1 tablespoon flaxseed
  • 3 tablespoons water
  • 1 (12-ounce) package meatless crumbles
  • 1 cup tomato juice
  • 3/4 cup rolled oats
  • 1/4 cup chopped onion
  • 2 minced garlic cloves
  • 1 tablespoon dried oregano
  • 1 cup barbecue sauce
  1. Whisk the flaxseed and water together in a small bowl; let stand for a few minutes.
  2. Meanwhile, combine the meatless crumbles, tomato juice, rolled oats, onion, garlic, and oregano in a bowl. Add the flaxseed mixture and knead with your hands until the mixture comes together.
  3. Divide the mixture evenly among 8 muffin cups. Top each serving with 1 tablespoon barbecue sauce.
  4. Bake at 350 degrees F for 25 minutes and let cool slightly before serving.

Barbecue Meatloaf Muffins

Threaded Orange Garland

Orange Garland (6)

Kids will love helping thread dried slices of orange onto pretty ribbon, making this an easy Christmas decoration for the whole family to put together. Plus the oranges will make your house smell amazing while they dry out in the oven.

To start, cut thin slices from navel oranges, and place on a baking sheet in a single layer. Bake at 225 degrees F until completely dried. Depending on the thickness of your slices, you’ll need anywhere from 1 hour to 90 minutes per side.

Orange Garland (2)

Cut a small slit in each slice once cool, then string along plaid ribbon.

Orange Garland (4)

We wound the ribbon alongside a pine garland on our banister for a fantastic holiday look!

Orange Garland (5)

Snowman and Santa Wobblers

Santa Wobbler (4)

These cute holiday items from Kiwi Co. come together quickly, but make adorable stuffies that wobble back and forth thanks to a weight inside. You can opt for just a snowman, just a Santa, or both!

Either way, start the craft by adhering a metal weight into the bottom of a plastic base with a sticky foam dot. Take care in this step that the weight doesn’t fall on any toes; it’s heavy! Insert the base and weight into the provided sock.

Snowman Wobbler (1)

Stuff the socks with the provided cotton fluff. Travis loved how soft this material was!

Santa Wobbler (1)

We secured the top of each sock with a thin elastic band, then pushed a second, thicker elastic about 1/3 of the way down each. This divides the wobbly toys into a head and body.

Now decorate! There were stickers for the snowman’s face, as well as stick-on buttons and arms, and a strip of red fabric to tie on for a scarf.

Snowman Wobbler (5)

Meanwhile, Santa gets a beard that slips over the head and a little red shirt that slides on from the bottom. Stickers for facial features, belt, and hands complete the look.

Santa Wobbler (3)

Travis loved that these toys were meant to be played with, unlike some of our Christmas decor that is just display.

Snowman Wobbler (6)

The wobblers even curled up to watch a Christmas movie with him, and Santa pretty much comes everywhere with us now. That’s what I’d call Christmas magic!

I Spy Baggy

I Spy Baggie (5)

Veronika is at an exciting stage where she’s mastered shape-recognition games, so we’re moving on to letters! I realized she knows some from others when she grabbed letter puzzle pieces and said she wanted to sleep with “I” and “S” (!) so clearly she’s ready.

It’s great to start with letters in your toddler’s name, since this is often the first word he or she will need to write in preschool. I used just Veronika’s nickname today (V-I-K-A) and placed chunky magnet letters in a zip-top bag. We filled the bag with white rice and then could play a game of I Spy!

I Spy Baggie (1)

“I spy a V,” I told her, and she quickly followed suit, digging through the rice grains to unearth the letters. “An I!” she said.

I Spy Baggie (4)

She thought it was hilarious to see letters in rice, and soon was trotting over to the fridge to add more to our bag.

I Spy Baggie (7)

“Let’s at the red O,” she might say, or the green A, etc. I was so proud to see how many she knew already!

I Spy Baggie (6)

For variation, I then wrote a few letters on index cards and placed these with only a small covering of rice in sandwich-sized zip-top bags.

I Spy Baggie (12)

These were fun because she could swipe the rice aside with a few fingers and reveal the letter underneath.

I Spy Baggie (11)

This was a great first letter-recognition game, and can easily grow with your child.

I Spy Baggie (10)

For preschoolers, try writing early sight words on the index cards instead. For younger kids, draw shapes!

I Spy Baggie (3)

Flashlight Fun

Flashlight Fun (9)

You don’t need to wait until after dark for flashlight games. If clouds or rain have you stuck indoors, kiddos in want of entertainment will love pulling out flashlights even by day!

To wit, we had dark, cloudy skies today (though no rain), and Veronika seemed a bit aimless. So I pulled out a flashlight and shined it into the toy purse she was fiddling with. The game was instantly more fun! What else could she shine it on?

Flashlight Fun (1)

She loved body parts. “Mommy’s hand! Mommy’s arm! Mommy’s knee!”

Flashlight Fun (3)

And then she searched for corresponding bits on herself with her beacon of light.

Flashlight Fun (4)

Reflective or shiny surfaces were fun, like the wood of our coffee table…

Flashlight Fun (6)

…or the glossy pages of a photo book. Be sure to name everything the flashlight lands on; Veronika proudly narrated as she spotted a chair, her ears, and more.

Flashlight Fun (7)

Then she went hunting for favorite toys with it. She loved the way the light looked in her stuffed puppy’s eyes.

Flashlight Fun (8)

Last stop: don’t forget to shine up at the ceiling! I’d say we brightened up a gray day.

Flashlight Fun (2)