Motion Magic

Motion Magic (%)

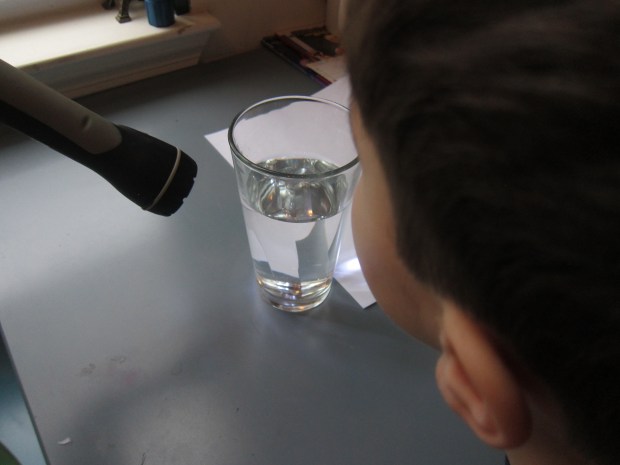
You’ll stun your kids with the way a penny doesn’t move in these games, a fantastic illustration of inertia. You can give a quick physics lesson – basically, things that aren’t moving want to stay put – but whether they grasp the concept or not, they’ll be amazed by the results.

We tried out the motion magic in two ways. For the first, we cut a square of cardboard as a base (using a bit of our Kiwi Crate from the Disk Launchers set). Place the cardboard over a glass, and put a penny on top.

Motion Magic (2)

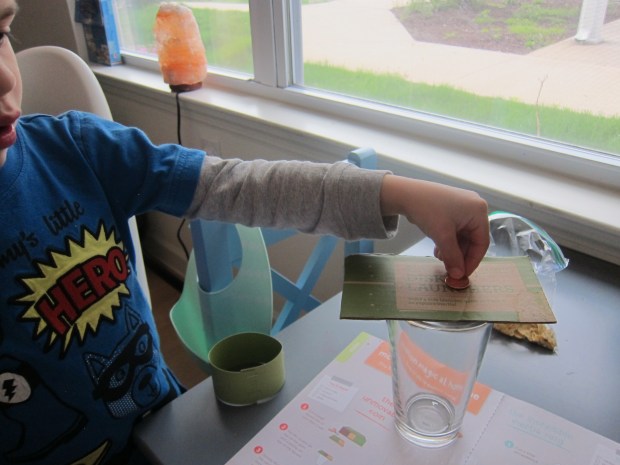
Quickly flick the cardboard away (from the side, not from underneath). The cardboard will fly away but the penny…

Motion Magic (3)

…falls in the glass! This got a whoa from Travis, who then tried himself and was so proud it worked.

There is something sort of magical about inertia, even for grown-ups. Logically we want that penny to fly away, and every time we heard the clink of the penny in the glass, we were excited.

For the second method, we cut a strip from cardstock. Form it into a circle and staple the edges.

Motion Magic (1)

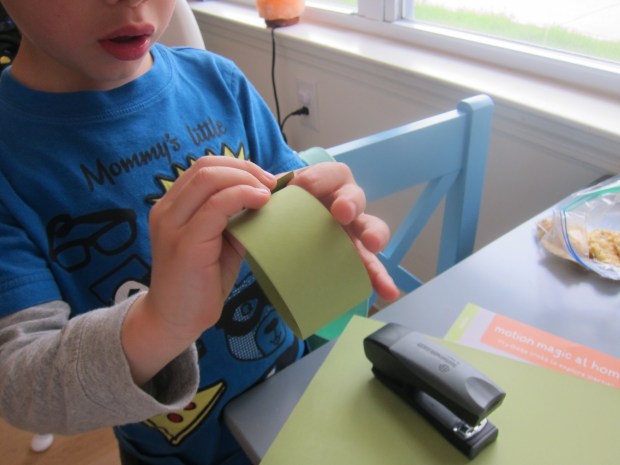
Place the circle over the glass, with the penny on top.

Motion Magic (6)

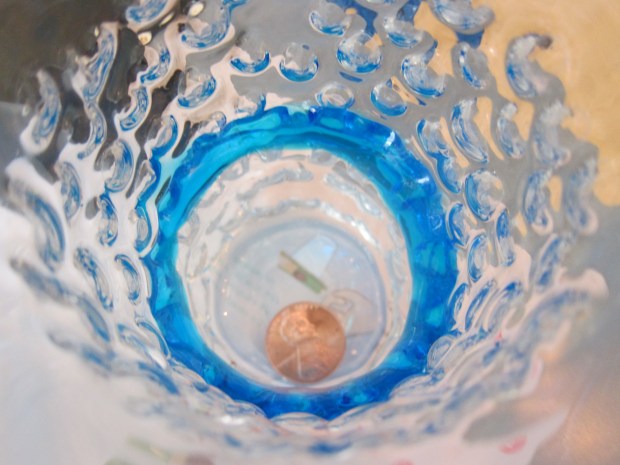
Very quickly, put a finger inside the cardstock circle and flick it out of the glass. Where did our penny go?

Motion Magic (7)

Down inside!

Motion Magic (9)

Want to really up the wow factor? Try the classic trick of pulling a tablecloth out from under a plate (you might want to use a paper plate, just in case).

Motion Magic alt.JPG

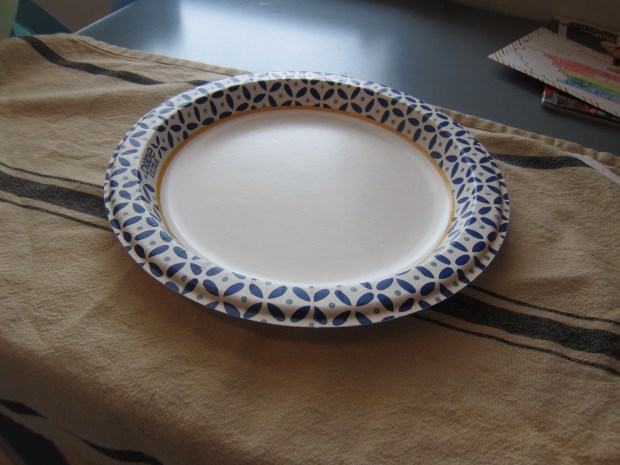
Is it magic? Nope, it’s inertia of course.

Learning to Reach

Reaching Game (6).JPG

Veronika is six months old! This is such an exciting age for babies, with so much that happens right around now: rolling if your baby hasn’t already; sitting up unaided; and making the first moves toward crawling.

We do lots of tummy time with Veronika, which is one way to encourage crawling. Right now she pushes with her legs but arches her arms back like a swimmer doing the butterfly and screams when she can’t reach something. She’ll figure it out eventually!

Reaching Game (10)

Another way to encourage crawling, other than tummy time, is to have your baby sit and lean forward. This not only builds the abdominal muscles for sitting, but can actually turn into a crawl, if a reach forward turns into a belly flop.

Today, I sat Veronika up with a supportive pillow, and placed a few tantalizing toys just out of reach.

Reaching Game (1)

We soon found that this worked best with her foam blocks.

Reaching Game (4)

She really wanted to reach them.

Reaching Game (5)

As she reached, I gave lots of encouragement. Resist the urge to move the blocks or toys closer, and let your baby truly stretch.

Reaching Game (9)

One time she did flop forward onto her belly and looked quite surprised, but then happily was at her target. The other times, she was simply stretching as far forward as possible, so happy and so determined.

Reaching Game (7)

I can say with 100 percent certainty that this game was the difference between a day where she was still sitting with a wobble, and the next day where she suddenly had the muscle control to stay steady. Will it lead to crawling next? I’ll report back once we have a crawler!

Balloon Propeller

Balloon Propeller (6)

We were dealing with big stuff for a four-year-old today! After our disk launchers from Kiwi Co introduced Travis to physics in a way even a preschooler could grasp, now we were talking about Newton’s laws of motion. Full disclosure: this required some review for mommy, who hasn’t touched this kind of material since college!

Here’s my quick recap: Newton’s third law of motion states that for every reaction, there is an equal and opposite reaction. So if the air from a balloon is escaping in one direction, the balloon will try and move forward in the opposite direction, making it spin, in this case.

Here’s how we set it up:

Slightly tug on a balloon and partially inflate it, just to loosen it up – don’t tie off. Now tape the balloon securely to the end of a straw (on the non-bendy side).

Balloon Propeller (1)

Travis immediately wanted to test out if he could blow up the balloon through the straw – neat!

Balloon Propeller (2)

Hold the straw on your fingers to identify the point where the straw balances. This is where you’ll insert a straight pin. Poke the pin all the way through the straw, then down into the eraser of a pencil.

Balloon Propeller (3)

Now blow up the balloon. Have your child hold the pencil, making sure their hand and arm won’t interfere with the motion of the balloon.

Balloon Propeller (5)

Let go and watch! The balloon will deflate, which causes it to spin around on the pin (Note: You may have to tug on the pin or spin the propeller by hand a few times to loosen things up enough).

Balloon Propeller (7)

We did this experiment over and over – a great visual of forces and energy, understandable even at the preschool level!

Balloon Propeller (8)

Mirror Play

Mirror Magic (2)

There are so many ways to play with babies and mirrors, and they just keep getting more fun as your little one gets older! Today – on Veronika’s six month birthday! – we tried out a few new variations.

First, I sat her down in front of a mirror to do some body part and language learning. To the tune of “Here We Go Round the Mulberry Bush,” I sang:

This is what I call my head,

Call my head, call my head.

This is what I call my head,

Listen, look, and see.

Repeat for other body parts, making sure to touch each one as you sing about it.

Mirror Magic (3)

For the final verse, I sang:

Now I know the parts of me,

Parts of me, parts of me.

Now I know the parts of me.

Listen, look, and see.

Mirror Magic (1)

From there, we played around with some of those parts! Once we’d identified the tongue, for example we could wiggle it around.

Mirror Magic (5)

Once we’d identified the cheeks, we could puff them up with air.

Mirror Magic (7)

Once we’d identified the mouth, we could blow a big kiss. Big brother Travis loved helping with these demonstrations!

Mirror Magic (6)

If your baby happens to make a silly expressions, copy that back to him or her!

Mirror Magic (4)

We finished off the day’s mirror play by bringing in a stuffed animal friend. Use any favorite toy or stuffed animal for this part, and have it talk into the mirror or interact with baby.

Mirror Magic (9)

Veronika got a big kick out of this!

Mirror Magic (10)

Berry Good Muffin Bites

Berry Muffin (3).JPG

Is it just me, or does everything taste better when it’s in miniature form? These adorable muffin bites are almost too cute to eat. Almost. Serve these as part of a brunch, or throw a couple in a lunchbox for a sweet snack.

Ingredients:

  • 3/4 cup unsweetened almond milk
  • 2 Ener-G eggs
  • 1/3 cup agave nectar
  • 1/4 cup melted Earth Balance butter
  • 1 teaspoon vanilla extract
  • 1 teaspoon lemon extract
  • 3/4 cup whole wheat flour
  • 3/4 cup all-purpose flour
  • 1 and 1/2 teaspoons baking powder
  • 1/2 cup crushed freeze-dried strawberries
  • 1/3 cup plain non-dairy yogurt
  • 1/4 cup powdered sugar
  • 1 tablespoon lemon juice
  1. In a large bowl, whisk together the milk, Ener-G eggs, agave, butter, vanilla, and lemon extract.
  2. Fold in the flours, baking powder, and crushed strawberries.
  3. Divide the batter evenly among 24 mini muffin cups coated with cooking spray. Bake at 400 degrees F for 11 minutes. Let stand in the pan for 8 minutes, then transfer to a wire rack and cool completely.
  4. To prepare the glaze, whisk together the yogurt, powdered sugar, and lemon juice Drizzle over the cooled muffins.

Berry Muffin (2)

Game of Soccer

Game of Soccer (4).jpg

Now that spring is here, I’m taking Veronika on more outdoor excursions. One great way to spend time with your almost-six-month-old is to catch a local game of soccer! Not only will watching the action strengthen his or her eye muscles and tracking skills, but there is so much to see and talk about, and great new vocab to teach.

For Veronika, the soccer “game” was actually big brother’s practice. If you don’t have a big sib or friend to watch play, consider catching a local elementary school game, or even watching the big kids from a high school nearby!

Either way, Veronika seemed to love the atmosphere right away, soaking up the sun on a blanket despite an unusually chilly spring morning. I brought along a little ball so she could enjoy the tactile element, as well.

Game of Soccer (2)

We watched the big kids move down the field. I pointed out all their motions to her, which involved some great verbs. Running:

Game of Soccer (1)

Kicking:

Game of Soccer (5)

Drills where they dribbled or tapped cones with their feet:

Game of Soccer (7)

She was very absorbed watching it all – quite the little spectator!

Game of Soccer (6)

In sum, a game of soccer is a beautiful way to spend some time with your baby, long before he or she is old enough to play.

Game of Soccer (3)


Rainbow Science

Make a Rainbow (8).JPG

With all the talk about rainbows this month, whether cooking or crafting, it was time to get scientific. What exactly makes a rainbow appear? Today Travis and I answered the question in two ways, one more scientific, and one more artsy!

First, following the lesson plan provided by Raddish Kids, we did a visualization exercise. This was a first for Travis, but with a few prompts he got the idea. I told him to close his eyes and imagine and rainbow. He said he could see his rainbow through the trees in the morning, and it was star-shaped! Guide your child through this: what does the air feel like? Where is the rainbow? What time of day is it?

Next we did the quick run-down on the science. Raddish Kids provided two great video links to add some visual fun to hte science.

Make a Rainbow (1).JPG

We watched a few suggested video clips, to understand the science behind refraction. Raddish provides a very detailed write-up that older children can study, too.

Make a Rainbow (2)

Next up was a challenge: Could Travis make a visual of a rainbow that not only showed all the colors, but also showed how the rainbow is formed? It turns out this is called process art, and I laid down lots of material for Travis to choose from but provided little direction beyond that.

Make a Rainbow (3)

He decided he wanted a ribbon rainbow, so used lots of glue to adhere the lengths.

Make a Rainbow (4)

I was so proud when he realized he was gluing in the wrong order, and fixed things with his red placed first!

Make a Rainbow (5)

Next he needed to add the science part. He chose to use marker for sun and rain drops, and cotton balls for clouds. Now he had all the ingredients necessary for a rainbow to form!

Make a Rainbow (7)

I made a second version alongside him to show him how open-ended this project is: cotton ball clouds, tin foil raindrops, and pom poms for my sun and rainbow.

Make a Rainbow (6)

Finally, we formed a rainbow with science! Place a prism in a glass of water. Shine a flashlight or other light source on it.

Make a Rainbow (9)

Hold up a piece of white paper behind the glass, and you should see a rainbow reflected on the paper. It’s a bit tough to see in the photograph, but it was there!

Make a Rainbow (10)


Screen Scream!

Screen Scream (11)

With firstborn baby, I wouldn’t have dreamed of going to a movie theater. I intended to allow no screens for my baby until age 2, and I worried about the noise level, or him making a fuss, or so much more.

Well, I’m a little more relaxed with Veronika as my second baby, and although I never sit her down in front of a screen, she’s no stranger to ambient movies, thanks to big brother.

Screen Scream (1)

Today, I learned that even a movie theater can be an adorable outing with an infant! Even if you don’t have a big kid to take along, I recommend seeking out a matinee – it might be just the outing you need as a stay-at-home new parent, and baby is going to love it.

Here’s what Veronika did. She slept for the first 45 minutes, the loud audio of a dragon movie be darned. You can just see her stroller in the foreground.

Screen Scream (2)

When she woke up, she looked nervous for a moment, but then nursed on my lap and peeked with big wide eyes at the screen. The lights and colors and music will be fascinating to a baby, even though they can’t follow the story!

I bounced her on my lap to keep her happy, which got little giggles. When she grew a bit fussy, I stood up with her in the aisle. Again, this is why I recommend a matinee. There was only one other family in the audience – a grandma with her granddaughters – and they weren’t at all troubled by me standing and bouncing Veronika off to the side.

After that she was tuckered out! She passed back out for the last half hour of the movie, sleeping peacefully on my tummy.

Here we are in the lobby after!

Screen Scream (3)

I wish I’d been able to take pictures in the dark theater, because she was adorable and grinning while the movie was in progress. Here she seems to be asking Travis, “What on earth was that place?”

If a movie theater seems too daunting, consider checking out a puppet show! The kid-friendly atmosphere makes for a great showtime experience. I located a local theater and headed off with the kids to see Little Red Riding Hood.

Screen Scream (5)

There was so much carnival atmosphere to take in that Veronika was instantly enchanted.

Screen Scream (6)

I think she would have been happy just hanging out in the lobby!

Screen Scream (7)

The kids even got a demonstration before the show began.

Screen Scream (8)

Once in the theater, my little girl was wide-eyed and rapt. No sleeping here!

Screen Scream (10)

Obviously the story was way over her head, but the idea is that your little one will take in the motions and colors and movements on the stage, plus get a first experience being part of an audience.

Screen Scream (9)

Then there was a laser-lit dance party for the kids at the end. So yes, definitely a more kid-friendly atmosphere than a movie theater.

Screen Scream (12).JPG

What show will you take your baby to? Please share in the comments!

Where, Oh Where…

Where o Where (7)

I’ve been saying the same little rhyme to Veronika each night at bedtime since she was about three months old. Here’s a cute corollary we now say in the morning while she’s getting dressed.

Where, oh where, are your little fingers?

Where, oh where, are your tiny toes?

Where, oh where, is your belly button?

Round and round it goes!

Where, oh where, are you two small ears?

And where, oh where, is your nose?

Where, oh where, is your belly button?

Round and round it goes!

Touch each part as you recite of course. It’s so fun to identify those little fingers…

Where o Where (1)

And tiny toes.

Where o Where (3)

And when you get to the belly button, make little circles around on the tummy!

Where o Where (4)

This one always gets giggles and smiles!

Where o Where (2)

Play the Pots and Pans

Play Pots (7)

A few days ago, the family formed an impromptu band and entertained Veronika. Today it was her turn to play! Make sure your child is sitting comfortably for this game; if he or she can’t sit unsupported yet, add a pillow so there’s no falling over near the “drums”!

Play Pots (1)

I set out a few small pots, and gave her a variety of tools with which she could make percussive sounds. We had fun testing the differences between each one.

The whisk was soft but very metallic.

Play Pots (3)

The wooden spoon made a fun boom boom.

Play Pots (2)

You can even hit the pans with a baby rattle or plastic spoon! And of course I demonstrated simply drumming with my hand.

Play Pots (8)

In all honesty, Veronika had way more fun putting each item in her mouth than drumming with them.

Play Pots (6)

But she looked so pleased every time she made a sound by accident.

Play Pots (9)

Drum drum drum!

Play Pots (5)