Kiwi Frozen Yogurt Bark

Kiwi (2)

Memorial Day is behind us and the weather is hot and that can only mean one thing… We need frozen desserts! This non-dairy frozen dessert is healthier than ice cream, and fun to make besides.

Ingredients:

  • 2 cups plain non-dairy yogurt
  • 3 tablespoons unsweetened cocoa powder
  • 1 tablespoon agave nectar
  • 5 kiwi fruit
  1. In a large bowl, whisk together the yogurt, cocoa, and agave. Set aside.
  2. Peel and slice the kiwi fruit.
  3. Line a baking sheet with foil or parchment paper, and spread a layer of the yogurt mixture evenly. Top with half of the kiwi slices, then repeat the layers.
  4. Freeze completely before breaking into chunks.

Kiwi (1)

Grow a Science Garden

Grow Garden alt.JPG

This indoor way to show your kids how vegetables grow is almost trippy! All you need is a head of romaine and a small glass jar. Then watch the magic happen.

Cut the leaves from the base of the romaine. Use the leaves for a big salad of course. I also gave my budding chef some of the leaves to play with in his set of pots and pans.

Grow Garden (4)

Meanwhile, trim the very bottom of the romaine head off thinly – this will help it absorb more water.

Here is a slightly skeptical Travis checking out the early stage of our experiment.

Grow Garden (2)

Place in a glass of water, making sure the base is completely covered, and place somewhere sunny. Change the water every day and watch your romaine sprout!

Grow Garden (3)

Within a day we had a few little leaves.

Grow Garden (6)

The picture at the top of this post shows growth after about 4 days. We can’t wait until we have enough for a fresh salad!

If you want to continue the fun, try the same experiment with a fennel bulb. You can also save the tops of carrots or radishes, place in a shallow dish with water, and watch for fresh greens to emerge. Thanks to Parents magazine for the idea!

Update: Here’s the lettuce about a week in, as tall as we let it grow. Honestly it was beginning to brown slightly around the edges, so I’m not sure I’d recommend growing it longer.

Grow Garden alt

But needless to say, Travis was thrilled!

Grow Garden var


Farm Land

Farm Land (7)

Farming is naturally on our minds this time of year, with local farmstands around us beginning to brim with late spring and early summer produce. This project is a neat visual if you are doing a unit at home about farming, about where food comes from, and about different landscapes children might see on a farm.

To get the most out of the craft, I recommend first looking at a book with a good visual of farmland, or finding a few pictures online. Although not very vegan-friendly, my son loves the description of farm life year-round in Gail Gibbon’s Farming.

Farm Land (1)

We talked about the different portions of land he saw in the picture, starting with what was up top – sky – and what was on the bottom – garden dirt.

Next I cut paper into 4 pieces, and we took turns painting them in color blocks just like in the picture: blue for sky, green for grass, yellow for hay or wheat, and brown for the vegetable patch.

Farm Land (2)

Let your colors dry, then come back to add details. For added fun, we raided mommy’s bathroom cabinet and used cotton balls for clouds:

Farm Land (4)

… and q-tips to paint details like flowers in the meadow and brown wheat in the yellow section. Let dry again.

Farm Land (5)

The final step was to use a glue stick to put it all back together again on a large piece of construction paper. This is neat because it will be almost like a puzzle for the kids. Don’t worry if a few sections get mixed up along the way.

Farm Land (6)

If you can, cap things off with a trip to a local farm; lots of places have pick-your-own veggies and berries getting underway now that we’re almost to June!


Seaside Stepping Stone

Stepping Stone (5)

Happy Memorial Day! We’re officially kicking off summer, beaches, and all things seashore with this craft, care of High Five magazine. The resulting hand- or footprints would make a beautiful hostess gift if you’re visiting friends or relatives by the ocean this year. Happy summer!

To start, roll air-dry clay flat with a rolling pin. The instructions suggested placing a bowl upside down on top of the clay to cut it into a perfect circle, but I didn’t have a bowl the right size. We decided we liked the rather imperfect result of ours anyway.

Stepping Stone (2)

Have your child step into the clay hard enough to leave a foot imprint (or, alternatively, press in a hand).

Decorate around the print with pretty sea-inspired bits, like seashells, or ocean-hued jewels and beads.

Stepping Stone (3)

The seashells were a huge hit, and Travis loved sorting through them and selecting his favorites.

Stepping Stone (1)

Let the clay dry completely before placing the stepping stone on the path to the ocean or beach!

Stepping Stone (6)

Rubber Band Splatter Painting

Rubber Band (8)

Following on the heels of outdoor painting and yoga, here’s still-more fresh air fun. Technically you could do this inside, but it’s so messy you’re really going to want to be out in the grass.

To set up, you’ll need an old picture frame (or one that you don’t mind getting a little paint-splattered), ideally about 8×10. Remove the backing and glass, and attach large rubber bands at intervals around the frame.

Rubber Band (1)

Set up newspaper under your work surface, and then place construction paper (or other heavy paper) underneath the frame. Travis wanted black as the background – why not!

I set him up with a tray of paints, and showed him how to paint just along the rubber bands (drips are okay, of course). Travis liked the tricky wobbly nature of this.

Rubber Band (3)

Imagine his surprise when I showed him the next step: Snapping back a rubber band and letting the paint on it splatter onto the paper below. Boing!

Rubber Band (5)

Because the black wasn’t the best background, I suggested lighter colors like pink and yellow for our next few rounds.

Rubber Band (7)

The result is very neat, splattered paintings. Don’t forget the art smock for this one!

Om in the Outdoors

Om Outdoors (5)

Our beautiful morning sunshine is inspiring us to get outdoors these days, for everything from exercise to painting. This morning, I asked Travis if he thought it would be fun to take mommy’s yoga mat out into the grass, which was met by a super-enthusiastic “Yes!”. We’ve done mommy & me yoga together since he was a toddler, but sometimes changing up the location is all it takes to re-ignite a child’s excitement.

First we did some old favorites. Tree pose!

Om Outdoors (2)

We also like doing the blossom move: Lie flat on your back with your arms stretched above your head. Sit up slowly and bend all the way forward to reach your toes. Lie back down again and repeat.

Om Outdoors (4)

Travis then announced he wanted to make up his own poses! Most of these were inspired by the items in his immediate vision, so soon we had pinwheel pose (spinning around):

Om Outdoors (6)

…and pipe pose (standing straight with arms up above head).

Om Outdoors (3)

What poses would you and your child come up with? Head outside and enjoy the sunshine and the mindfulness! We can’t wait to hear about it in the comments.

Om Outdoors (7)

Handprint Farm

Hand Farm alt

My formerly fingerpaint-averse boy finally doesn’t mind paint on his hands, thanks to some crafts at his preschool, and I seized the opportunity to put together this adorable handprint painting. It’s a cute way to learn about animals on farm sanctuaries while capturing a palm-sized memento.

The goal was to make 3 animals: a pig, a cow, and a sheep. For the pig, paint your child’s palm completely pink. Press onto a piece of paper with the fingers pointing down as the legs. Whoops, our pig was sideways, but we just worked around the oops!

Hand Farm (1)

For the cow, dot black or brown paint onto your child’s fingertips, and make a few additional dots in the palm. These will be the cow’s hooves and spots. Press onto the paper.

Hand Farm (2)

I didn’t have yellow tempera paint at home, only dot markers, which Travis didn’t want all over his hand. So we ended up with a mommy-sized yellow chick! Press onto the paper with the fingers to the side, as the tail feathers.

Hand Farm (3)

Once the paint dries, you can draw in noses, beaks, tails, eyes, and other features to complete the picture.

Hand Farm (5)

Your kids may want to paint a farm background as well!

Hand Farm (7)

Painting on the Fence

Paint on Fence (4).JPG

The sun was streaming through our windows and onto the little patch of grass outside our patio this morning, and I just had to get us outside. To motivate Travis, I did something taboo – painting outside!

Of course plein air painting has a long tradition, but so many of our kids’ crafts nowadays are indoors at craft tables or classrooms or easels. There is something so beautiful about being outside with a paintbrush and paper.

To contain any mess, I poured a few paint colors into a foil tray and gave Travis thick brushes.

Paint on Fence (1)

Use painter’s tape to secure a large piece of craft paper to a fence. If you don’t have a fence, the outside wall of a house would probably work, just make sure you’re using washable paints!

Paint on Fence (2)

The large surface will encourage big strokes – sideways, up and down, or whatever else inspires your little artist.

Paint Fence (6)

My little artist at work.

Paint on Fence (3)

All the more beautiful in the sunshine!

Paint on Fence (5)

Make a Changing Caterpillar

Butterfly (9)

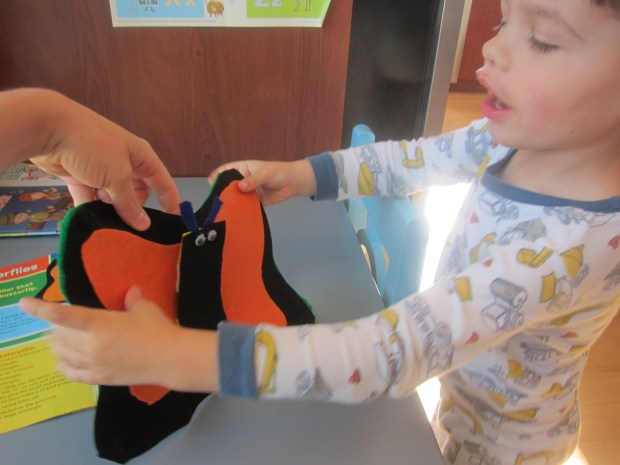
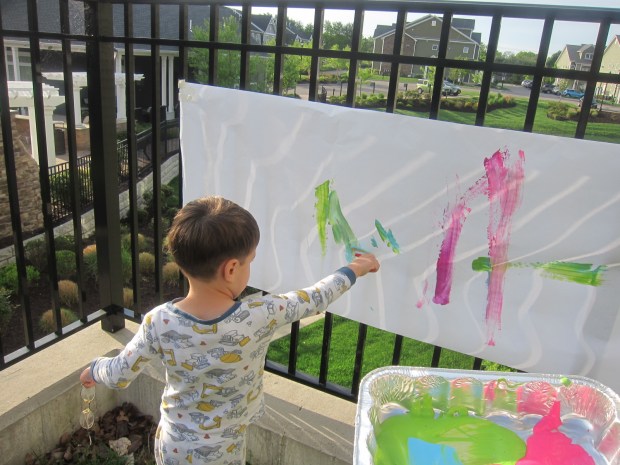
After a recent documentary on Bugs, Travis is in love with caterpillars. It was perfect timing for a story unit on caterpillars turning into butterflies in our latest Ranger Rick Jr. We downloaded the template and put together this neat felt project that illustrates metamorphosis beautifully.

A note on the project: unless your kids are at the upper age range of Ranger Rick Jr., grown-ups will likely need to assemble the caterpillar and butterfly. But then the kids can play with it!

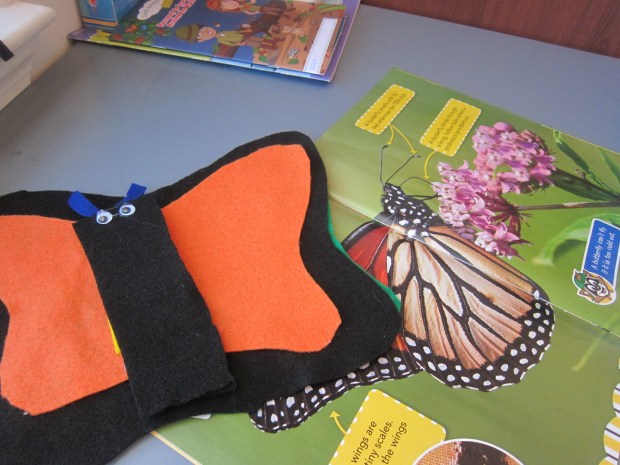
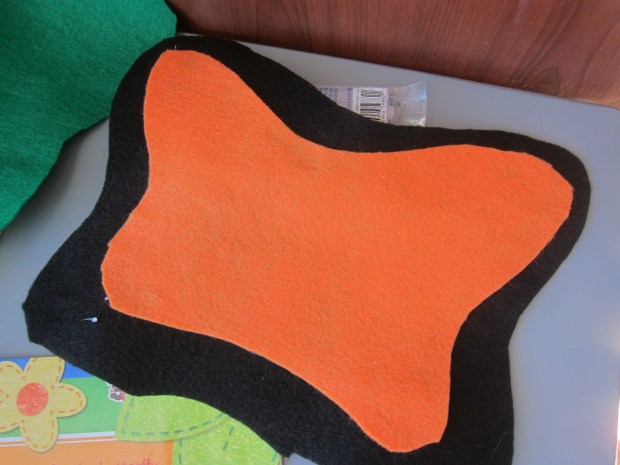
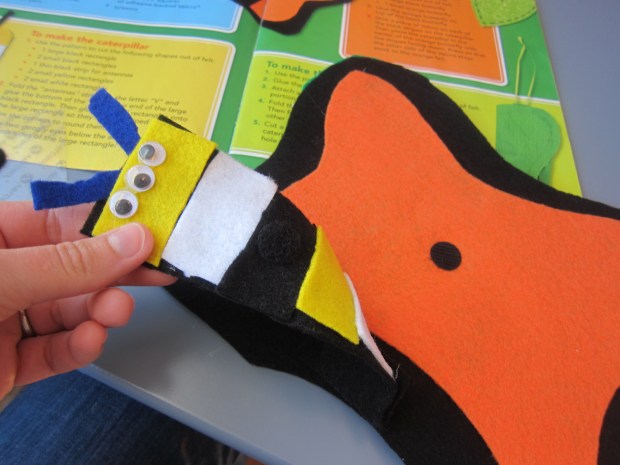
First, use the template to cut the large butterfly shape from black felt. Cut the small butterfly shape from orange felt, and glue onto the black. (You’ll need fabric glue or a hot glue gun). Set aside.

Butterfluy (1)

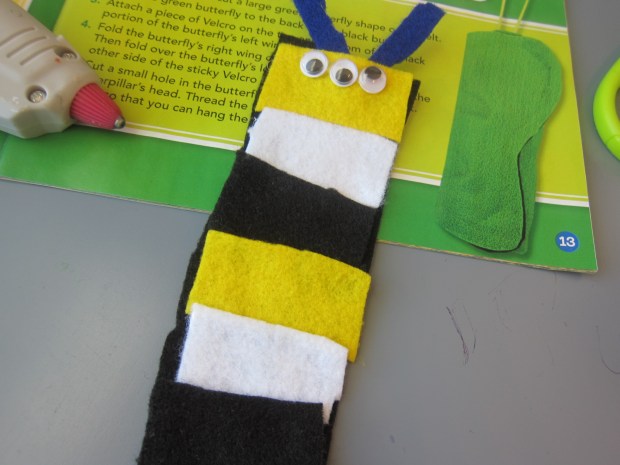
To make the caterpillar, cut a rectangle from black felt. Cut a long strip from felt for the antenna (Travis wanted blue instead of black). Fold the strip into a V and glue onto the top of the black body. Add two stripes each of yellow, white, and black felt. Glue on googly eyes (Travis wanted 3 eyes, not 2, hence the odd appearance!) and then 2 eyes onto the back.

Butterfly (2)

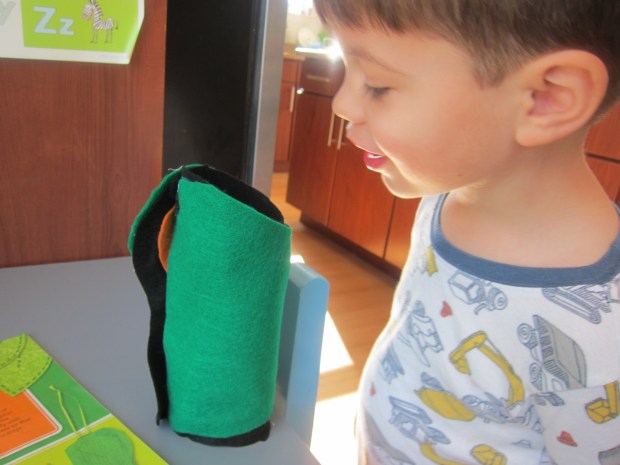
For the final component, cut the large butterfly shape from green felt. Glue onto the back of the black butterfly; this will be your chrysalis.

To put it all together, attach 2 Velcro dots to the body of the caterpillar on the black stripes, and line up with Velcro dots on the butterfly’s body.

Butterfly (4)

Place additional Velcro dots on the left top and bottom of the black butterfly wing, and then on the opposite sides of the green “chrysalis” so you can fold it closed.

Butterfly (5)

Now it was time for Mr. Caterpillar to crawl into his butterfly wings and fold himself up into a cozy chrysalis.

Butterfly (6)

Travis loved it! Note: You can also attach a string to the green felt so the chrysalis can hang.

Butterfly (7)

Open back up again for the butterfly transformation.

Butterfly (8)

Blender Oat Pancakes

Oat Pancakes (2)

Adding oats to these hearty pancakes will get a weekend morning off on the right foot! Kids will love adding ingredients into the blender and pressing go when the time comes.

Ingredients:

  • 2 Ener-G eggs
  • 1 and 1/2 cups plain non-dairy yogurt
  • 3 tablespoons canola oil
  • 1 cup flour
  • 1/4 cup sugar
  • 1 and 1/2 teaspoons baking powder
  • 1/4 teaspoon baking soda
  • 1/4 teaspoon salt
  • 1 cup rolled oats
  • Maple syrup
  1. Combine the Ener-G eggs, yogurt, and oil in a blender; process until combined.
  2. Add the flour, sugar, baking powder, baking soda, and salt. Blend until combined.
  3. Remove the blender from its base and stir in the oats.
  4. Spoon the batter onto a griddle or skillet coated with cooking spray and cook for about 4 minutes on each side. You’ll have enough batter to make 6 to 8 pancakes, depending on size.
  5. Serve with maple syrup!

Oat Pancakes (1)