Santa Hat Pizzas

Santa Hats (2)

Put a Christmas spin on pizza night in the days leading up to the holiday with this quick recipe!

To start, we stretched out a store-bought pizza dough and then cut into triangles with a pizza rolled. Fold up the bottom edge of the triangle to make a cuff.

Next, we spooned tomato sauce over the triangles, leaving the cuffs plain. Add non-dairy cheese along the cuff for Santa’s white trim. We used vegan feta, but next time I would probably dollop on crumbled tofu instead for a fluffier look!

Santa Hats (1)

Bake at 430 degrees F for 8 minutes, or until the crust just starts to brown. This made pizza night a ho-ho-holiday treat.

Advertisement

Reindeer Mix

Reindeer Mix (2)

Really this is just an ordinary snack mix that you could make any time of year. But if you tell your kids it’s “Reindeer Mix”, all of a suddenly ordinary becomes extraordinary!

Ingredients:

  • 3 tablespoons Earth Balance butter
  • 3 tablespoons brown sugar
  • 1 teaspoon minced fresh thyme
  • 1/2 teaspoon salt
  • 1/2 teaspoon cinnamon
  • 1 cup almonds
  • 1 cup walnuts
  • 2 cups pretzel twists
  • 1 cup Puffins cereal
  • 1/2 cup dried cranberries
  • 1/2 cup vegan white chocolate chips
  1. Combine the butter, brown sugar, thyme, salt, and cinnamon in a small saucepan. Cook over low heat for about 3 minutes, just until the butter melts and the sugar dissolves.
  2. Arrange the almonds and walnuts on a baking sheet lined with foil and pour half of the brown sugar mixture over the nuts, tossing to coat. Bake at 375 degrees F for 7 minutes.
  3. Toss the pretzels with the remaining brown sugar mixture. Add to the baking sheet and bake for a final 3 minutes. Let cool for 30 minutes.
  4. Transfer the nut mixture to a large bowl and add the cereal, dried cranberries, and white chocolate, stirring to combine.

Reindeer Mix (3)

Be sure to snack on this mix while you track the reindeer and Santa across the sky on Christmas Eve!

Cute Winter Snowman Sensory Bin

Snowman Sensory Bin (4)

Instead of painting a snowman today, it was time for a 3-D snowman that was all about sensory play. This little sensory bin of winter goodies was pure fun for Veronika.

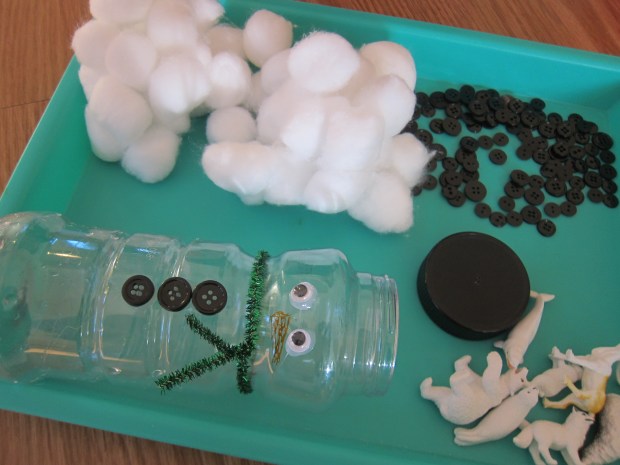
To set it up, you’ll need an empty plastic bottle. One with a wide opening will work better than a narrow-necked water bottle in this case; we used a dry-roasted peanut jar.

I added two wiggle eyes and 3 black buttons with hot glue, attaching them roughly where they would be a snowman’s body, then twisted on a sparkly green chenille stem for a scarf and drew a carrot nose with orange marker.

Snowman Sensory Bin (1)

Next, I added lots of cotton balls to the tray. Once stuffed inside the bottle, it looks just like a little snowman, and one that will never melt!

Snowman Sensory Bin (3)

The fun (and challenge!) now was for Veronika to put the cotton in and then take it back out again. I added chopsticks to the tray for her to use as a tool (tongs would be great, too).

Snowman Sensory Bin (6)

But after a few tries, she preferred to use her fingers.

Snowman Sensory Bin (7)

Or just to upend the bottle and dump it!

Snowman Sensory Bin (8)

To round out the tray, I added a collection of plastic arctic animals and lots more black buttons.

Snowman Sensory Bin (2)

After she tired of transferring cotton balls in and out of the jar, she loved putting the little animals inside and then practicing screwing on and off the lid.

Snowman Sensory Bin (9)

All in all, this was great little bin full of wintry fun.