History Behind Hanukkah Traditions

Shining Menorrah Hanukkah (7).JPG

Hanukkah begins tonight, and although it’s not a holiday we celebrate, Travis’s latest Raddish kit contained a yummy traditional recipe (latkes) as well as an interesting lesson plan about the holiday. So we were intrigued to delve into it!

As background, we read a quick poem about Hanukkah and enjoyed the suggested video on the history of the holiday.

Shining Menorrah Hanukkah (2)

There were several suggested ways to craft a menorah, thereafter. We tried a very simple version made simply with painted clothespins clipped to craft paper or folded paper plates…

Shining Menorrah Hanukkah (8)

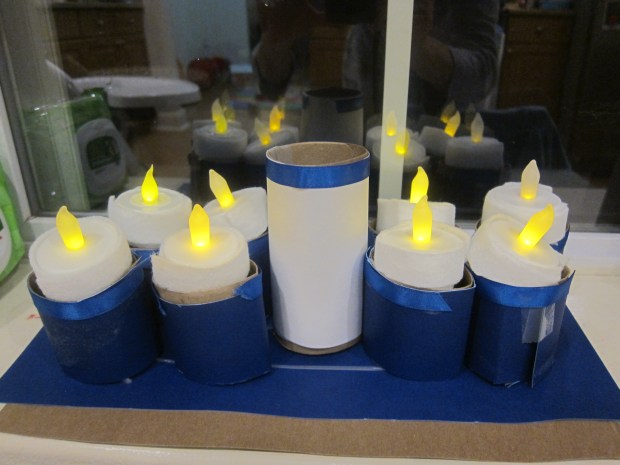
…but then also copied the method we used earlier this month for advent candles. This time, I cut toilet paper tubes in half for shorter candles and we wrapped them in blue cardstock with blue ribbon.

Shining Menorrah Hanukkah (1)

Wrap a taller candle in white cardstock for the center shammash. Add a felt-wrapped tea light to each candle. I brought this menorah to the table for Travis and I to discuss. We counted the candles, and talked about how each one represented one night of the miracle.

Shining Menorrah Hanukkah (5)

Time to light it, making sure to work our way right to left!

Shining Menorrah Hanukkah (3)

To add to our discussion, we waited until dark and then turned out all the lights except the candles. Travis helped brainstorm a list of other light sources, including flashlights, light bulbs, and the sun.

Shining Menorrah Hanukkah (11)

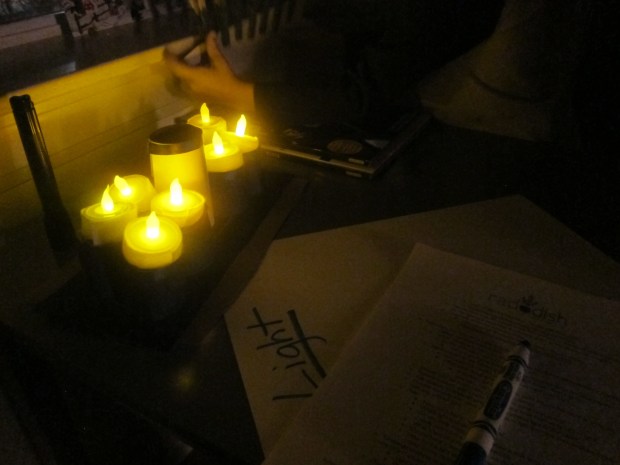
We discussed the differences among them, and he completed the sentence: “Light is important in my life because…” citing the ways it helps him see and focus and feel unafraid.

Shining Menorrah Hanukkah (10)

I was glad this lesson offered the chance to learn about another culture and customs. For bonus fun, don’t forget to play a game of dreidel with chocolate gelt for a reward.


Yarn Christmas Trees

Yarn Tree (10).JPG

Be forewarned: This holiday decoration project is a messy one! In other words, perfect if your kids love getting their hands dirty and helping deck the halls around the house.

For materials, you’ll need Styrofoam cones (available at craft stores) with the plastic wrap still on. You’ll also need red and green yarn. I had pastel shades of each in my craft bin, which would look lovely if you’re taking a pastel approach to decorating this year! Ideally, I would have had darker red and green, but we were eager to do the project so made do.

Yarn Tree (1)

Cut the yarn into pieces about 20 feet long. Yes you read that right, 20 feet! Travis loved helping measure out the long lengths by standing at the opposite end of the apartment from me.

Yarn Tree (2)

Next we needed glue. You can use watered down store-bought glue, but we made a neat homemade version simply by mixing 1/2 cup flour with water until the consistency of a thick paste.

Yarn Tree (3)

I worried Travis might not get his hands in there, but to my surprise, he was eager to see how it felt. Goopy!

Yarn Tree (4)

Soak your stands of yarn in the “glue,” one strand at a time. Once it’s coated, wrap around one of the Styrofoam cones, wrapping and wrapping until completely covered – the more the better!

Yarn Tree (5)

The key is not to let the yarn get tangled, or you’ll wind up with a clump you can’t continue to wrap. After a few successful trees, we encountered a tangle. Whoops!

Yarn Tree (6)

Luckily the cone was just covered enough.

Let dry overnight. Travis had to come over and touch our flour glue occasionally, to see how the drying process was coming along.

Yarn Tree (7)

In the morning, snip the plastic wrap from the cone, and slide the yarn tree off – you’ll have to tug the cone out a bit forcefully. Remove the inner plastic, and the yarn tree now stands alone.

Yarn Tree (8)

We thought it might be fun to decorate one with little gems and beads, although it was hard to get them to stick on, as the beads were heavy.

Yarn Tree (9)

Pinecones made lovely tree toppers though!

Yarn Tree (11)