Feed the Frog

Feed Frog (7)

Ha, this activity is probably more suited to a creepy-crawly time of year like Halloween, but how do you keep a 4-year-old busy on the day before Christmas? With some good, spider fun, it turns out!

Travis spotted an old trove of spider rings in our craft bin, so we set up this game.

We needed a tissue box, and I let Travis go to town emptying the box and playing with the leftover tissues – something I wouldn’t normally encourage, but every once in a while, you need a sacrificial tissue box.

Feed Frog (2)

Ideally, use a green box. Ours had streaks of green as well as other colors, so I guess looked more like one of those tropical bright frogs – why not!

Feed Frog (3)

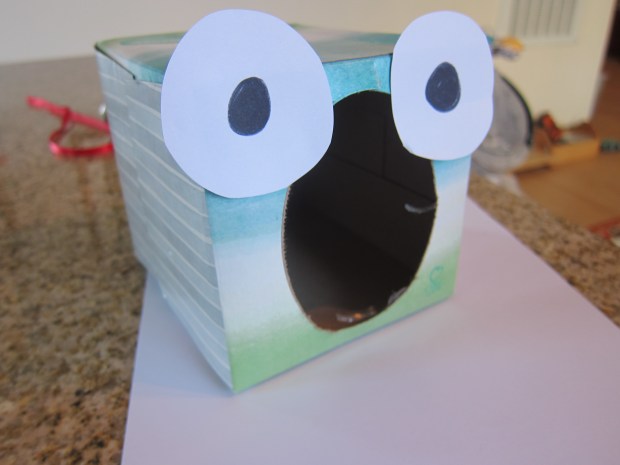
I made two big eyes for the frog, simply drawing black circles onto white paper and taping to the frog. Cut out the plastic around the hole of the tissue box, and your frog is ready to eat.

Present your child with the “frog”, a pair of tongs, and a set of spiders, and challenge him or her to feed the frog. Tongs are great for fine motor skills!

Feed Frog (4)

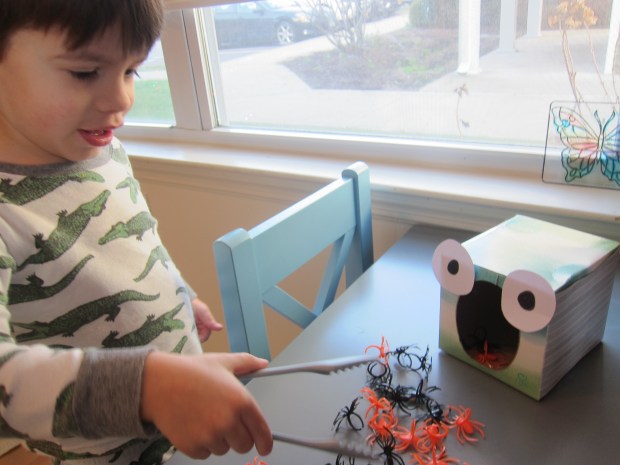
Travis would happily have done this all day. To throw in a little education, I asked if he could think of a pattern to feed the frog. “Black, orange, black, orange,” he suggested. Yes!

Feed Frog (5)

Next we tried rolling a dice, taking turns and feeding the frog the appropriate number of spiders.

Feed Frog (6)

When our frog got full, we simply dumped him out and started over.

Travis wanted other things for froggie to eat, so we found red pom poms, which he decided were poisonous bugs.

Feed Frog (8)

He even suggested we make a little mouth for froggie that could open and close, to keep all the food inside.

In sum, a great way to keep your kids entertained!

Spider Web Snacks

Spider Snack (2)

To continue with some recent web-filled fun, we made edible spiderwebs for snack! This project has a few steps that kids can help out with for hands-on cooking fun.

Let your child help arrange 5 pretzel sticks on wax paper so they form a five-pointed star. Make as many arrangements of 5 as you’ll need to feed all the children snacking in your household.

Spider Snack (1)

Adults: Microwave chocolate chips at 20 second intervals until melted (about 1 minute total). Transfer the melted chocolate to a zip-top plastic bag, then pipe the chocolate “web” in circles around the pretzel rods.

Spider Snack (3)

Travis loved helping with this step, so our webs weren’t always perfect circles – nothing wrong with a few globs!

You can add a big clump of raisins in the center as big scary spiders. Single raisins around the edges made perfect flies caught in the web.

Spider Snack (4)

Transfer the wax paper to the fridge and let the chocolate set. Once it cools, you can remove the spider web directly from the wax paper. Impatience meant that ours didn’t last nearly that long, so instead we ate a snack that looked more like chocolate-dipped pretzels – delicious either way!

Spider Snack (5)

Spider Web Walk

Spider Walk (4)

Travis recently fell in love with finding spider webs at our vacation house – so I surprised him this morning with a giant tape web on the floor! The web lends itself to lots of games.

First, we made “bugs” to get stuck in the web. I only had 3 pipe cleaners on hand but go ahead and scrunch up as many pipe cleaners as you like to form creepy crawlies.

Spider Walk (2)

We then made up games of tossing the bugs into the sticky web and finding silly ways to get to them: on hands and knees; on tip toes; etc.

Spider Walk (3)

I thought he might also enjoy driving cars through the web, since the tape lines made for perfect racing markers.

Spider Walk (6)

Far more fun than this, however, was Travis’s decision to make his own spider web! He loved putting down each piece of sticky tape, which became a great chance to talk about how real spider webs are sticky, too, and why.

Spider Walk (5)

He was so proud of his final creation!

Spider Walk (7)

More Spider Fun!

paper-plate-spider-3

Between spider lanterns and spider rocks, we’ve been having fun with all manner of creepy-crawly arachnids leading up to Halloween. Today we not only made a new spider, but gave him a web to call home!

For the spider, invite your child to color on two paper plates with crayons however they like. Preschoolers can draw their own spider face, but I helped by drawing a spider on one plate and letting Travis have free reign on the other.

paper-plate-spider-1

Punch a hole in the center of one plate, and thread through a knotted piece of string. You’ll be able either to hang your creation, or to jump it about like a jumping spider once complete!

We then glued 8 strips of black construction paper onto the inside rim of one plate before gluing the two plates together.

paper-plate-spider-2

Let dry completely before the play begins.


Paper-Plate Spider (4).JPG

I had leftover cooked and cooled spaghetti on hand, so for Itsy Bitsy’s web, we got nice and goopy again!


Fill a shallow plate with glue, and show your child how to dip the spaghetti strands in the glue before arranging in a “web” on waxed paper.

spider-web-2

Travis couldn’t wait to get his hands on the spaghetti, and very quickly decided they also looked like worms. I finished our web while he had a blast stirring the worms around and making them “wiggle” a nice reminder that toddlers are very good at creating their own games no matter what materials we present to them!

spider-web-3

Let the web dry completely, then peel off the wax paper. Because the web is very delicate, I found it was best to leave some of the wax paper behind as backing.

img_0009

Don’t forget to add one of your spider friends to live inside!

img_0032


Spider Rocks

Spider Rocks (5).JPG

Following up on our spider lantern decorations, Travis helped me create a few more spider friends to populate our house for the Halloween season!

Find a few small, round rocks and paint in any color – we used blue and black for a dark Halloween feel, but neon bright colors might be fun too! Let dry overnight.

spider-rocks-1

Cut pipe cleaners in half. For the legs of each spider, wrap one pipe cleaner piece around the middle of three others, then bend the ends out to make the legs. This part was a bit complicated for Travis, but he loved watching me do it, and thought the legs made great “crickets” to jump around for a while.

spider-rocks-2

Glue one rock onto each set of pipe cleaner “legs” and let dry completely – I recommend lying them upside down.

spider-rocks-3

All you need to add are stickers or googly eyes for the cutest little spiders I’ve ever had in my house!

spider-rocks-4


Spider Lantern

spider-lantern-5

It’s beginning to look a lot like Halloween around here! Since Travis loves spiders, I knew this easy decoration would be a big hit. It was our first Halloween craft of the season, so as we made the lantern I talked about the creepy crawly things that come out on All Hallow’s Eve!

Cut the top off an empty 1-liter bottle of soda; tape around the rim to cover any sharp edges.

spider-lantern-2

Wrap the bottle in cheesecloth, draping the excess inside, then wrap colored yarn around the bottle. Kids can help with this step!

Once finished, tuck a plastic or rubber spider into your web. Add a battery-operated candle for spooky glowing decor come nighttime.

spider-lantern-4