Continent Cookies and Pen Pals

Passports World (1)

Travis has a new subscription to the World Edition of Little Passports, having graduated from Early Explorers. With this big kid subscription, he’ll now get to explore a specific country each month instead of a worldwide theme.

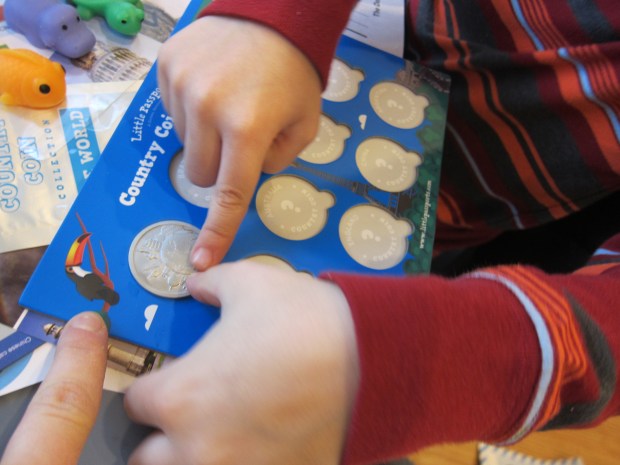
The starter kit contained everything he’ll need moving forward, including: a suitcase; a letter from our guides “Sam and Sofia”; a first luggage tag; a passport; a world map; and a coin chart that he’ll fill in each month.

Passports World (2)

The activities in his first booklet are great for early elementary school age, including simple addition, mazes, and word scrambles.

As an activity to kick start things, we made the suggested Continent Cookies. Prepare sugar cookies according to your favorite recipe (full disclosure: we used a mix!).

Divide the dough into thirds. Tint one third with about 10 drops of green food coloring; this will be your land. Tint the remaining two-thirds dough with about 10 drops of blue food coloring; this will be your ocean.

World Passports (4)

Pull off about 2 tablespoons of the blue dough and press into a disk. We followed along with Little Passport’s handy instruction sheet and tried to shape pinches of the green dough into the shapes of the continents. Travis enjoyed this challenge, and also made up his own pretend continents.

World Passports (5)

Our full world didn’t turn out too badly!

World Passports (6)

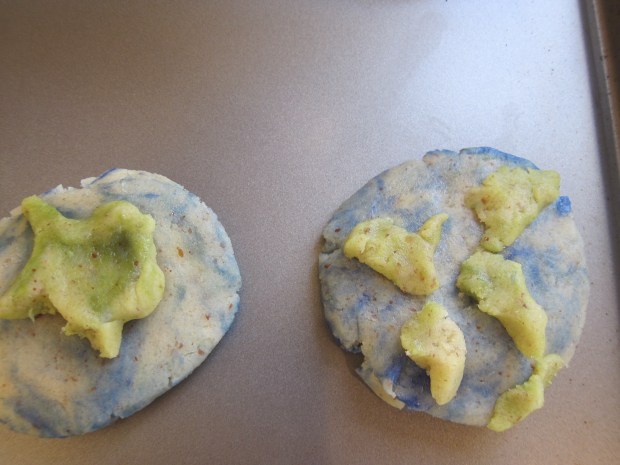
Bake according to recipe instructions, then enjoy a taste of the world – literally!

For some final fun, we checked out extras online like how to say hello in multiple languages.

World Passports (8)

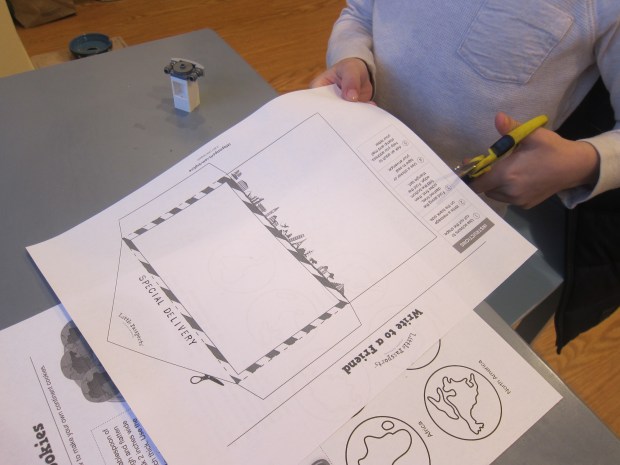
We also printed out a pen pal template and decided to start a correspondence with his cousin, who lives a few states away.

World Passports (9)

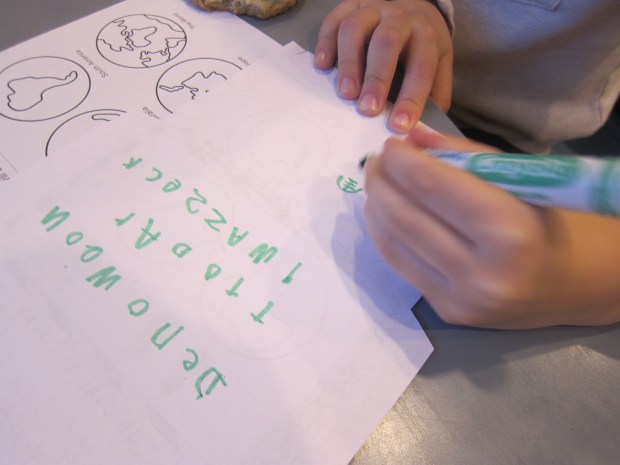
Your kids might even have friends or relatives in another country to write to! We’re excited to see what arrives in the first country kit next month.

Pom Pom Push

Pom Pom Push (4)

This game is sort of like a DIY shape sorter, only all the shapes are circles and it’s more about dexterity than exact shape matching. Regardless, it was a huge hit with Veronika at just shy of fifteen months old.

Make holes in the lid of a large (empty and clean) yogurt container. You can use a drill for this, but I found it worked just fine to poke the initial hole with an Xacto knife and then use scissors to snip into an even circle. Just make sure you have no jagged edges, as cut plastic lids can be sharp. Return the lid to the top of the container.

Pom Pom Push (1)

I then presented Veronika with the container and pom poms. Since the pom poms were on the smaller side, you’ll definitely want to supervise this activity closely and make sure none find their way to your child’s mouth.

Pom Pom Push (3)

We had two sizes: tiny green ones that slipped right into the holes and slightly bigger red ones that needed a push with the thumb. She loved them both! I loved watching her dexterity as she plucked the small green ones from my palm and inserted into a hole.

Pom Pom Push (2)

Of course once the container is filled, the lid can be taken off, the pom poms dumped out, and the fun begun again!

Pom Pom Push (5)

And don’t be surprised if your toddler finds other uses for that empty yogurt container. Apparently it made the perfect seat for Veronika’s “baby”!

Pom Pom Push (7)


Muffin Tin Color Sort

Matching Muffin Tin (3)

Although a toddler at Veronika’s age (14 months old) probably won’t be able to sort colors yet, this activity introduces the idea of color matching, plus includes all sorts of fun elements to play with.

I lined the bottoms of a 6-cup muffin tin with circles of colored paper. Use colored construction paper for this (or in a pinch, you can use marker on white paper for any colors you are missing).

Matching Muffin Tin (1)

Next, I set out a rainbow assortment of colored sensory balls. I couldn’t find our purple ball (which is course turned up right after!) so substituted a small purple toy.

Finally, I handed Veronika an ice cream scoop with an eye towards teaching her to transfer the balls from the bucket to the muffin tins. She loved this element of the game…

Matching Muffin Tin (2)

…though needless to say her colors weren’t always right.

Matching Muffin Tin (5)

She also wanted to move the balls from cup to cup, which left ample opportunity to talk about the pieces of colored paper she revealed and where each ball “should” go.

Matching Muffin Tin (4)

Again, this was not meant to be an activity for Veronika to get correct, but rather a great chance to introduce color matching as a concept.

Indoor Hopscotch

Indoor Hopscotch (3)

Do your kids need to jump jump jump their jiggles out first thing in the morning? This quick hopscotch game is great any time it’s too early/cold/rainy to go outside but you already have bundles of energy on your hands.

I also secretly hoped to put Travis’s design skills to work as we put our “hopscotch” course together. So first I asked him how many pieces of tape we would need for each square, and he quickly answered 4.

Indoor Hopscotch (1)

He helped set up the first few squares, and my hope was that he’d continue a course all over the room. But tearing the tape grew tedious quickly so we kept it smaller. That said, there’s no reason your kids can’t cover the whole house with this game!

Using bean bags as our playing pieces, we took turns tossing and hopping to the square the bean bag landed in. This is great for gross motor skills, especially for Travis who still struggles with hopping on one foot.

Indoor Hopscotch (5)

Stuffed animal friends wanted to hop along, too!

Indoor Hopscotch (4)

This game will definitely get everybody moving. Prefer games that work fine motor skills instead? Try our Can Toss Tumble. Prefer games that are more cerebral? Flashlight Word Game is for you!

Build Science Skills

Build Up Science (4)

The title of this post is meant quite literally; to build your child’s science and engineering skills, help them… Build! For a long time, Travis has enjoyed playing with Lego figures, but preferred to leave the actual building to me. I’ve been thrilled then to see a difference in his Lego play lately, insisting he do each step himself and learning to read and follow the diagrams in each instruction booklet.

Build Science (2)

Yet while there’s nothing wrong with building a Lego exactly according to plan, you can give things a STEM twist by building off-book. I set out a bunch of Travis’s Lego pieces and challenged him to make a bridge. How wide could he make it go?

At first he wanted it to span from a stool to a side table, but he quickly realized that the distance was too great.

Build Up Science (1)

Dialing back expectations, he moved them closer together an next puzzled out how to build up supports, then started laying the longest pieces across the gap. Black rectangles helped piece it all together.

Build Up Science (2)

We encountered a glitch when the table was lower than the stool. Thinking quickly, I helped him build up a base for extra height on that end. Success!

Build Up Science (3)

He was so proud of this construction, and continued to build a structure around the base of the bridge. When it tumbled to the ground at one point, I was so proud that he didn’t grow frustrated and used it as a chance for improvements.

Build Up Science (5)

Any Lego engineering challenge like this will work those STEM skills. Consider asking your child to build the tallest tower he or she can, or seeing if a bridge or roof can support a weight like a toy ball. Happy building!


Popsicle Stick Drop

Popsicle Drop (1)

Coordination, learning colors, and the endless surprise of watching a stick disappear and then reappear; this game has it all for toddlers!

As prep, simply use masking tape to attach an empty paper towel tube to a wall. I recommend using multiple strips of tape for extra security. I then provided Veronika with craft sticks to drop into it and placed a bucket at the bottom to catch them. That’s it!

Popsicle Drop (3)

The game will have the most visual appeal if you use a rainbow assortment of craft sticks (which you can purchase already colored at the craft store).

Popsicle Drop (6)

It took Veronika a few tries watching me release a stick into the tube before she realized she needed to release her grip to achieve the same affect. And then she was hooked!

Popsicle Drop (2)

Of course toddlers will also just love playing around with the sticks in the bucket at the bottom.

Popsicle Drop (4)

For a touch of color learning, I sorted the sticks for her into different colored piles. Needless to say, they didn’t stay sorted for long!

Popsicle Drop (5)

Creamy Pasta Salad

Creamy Pasta Salad a

A creamy dressing is a nice way to dress up pasta, making this one appeal to the whole family!

Ingredients:

  • 1/2 cup vegan mayonnaise
  • 1/4 cup non-dairy ranch or goddess dressing
  • 3 tablespoons unsweetened almond milk
  • 2 tablespoons red wine vinegar
  • 1/4 teaspoon mustard
  • 1 and 1/2 cups rotini pasta
  • 1/2 cup chopped carrot
  • 1 cup chopped cucumber
  • 1/2 cup quarter cherry tomatoes
  1. In a bowl, whisk together the mayonnaise, dressing, milk, vinegar, and mustard. Set aside.
  2. Meanwhile, cook the pasta and carrots in boiling water for about 7 minutes, or until the pasta is al dente and the carrots are tender. Drain.
  3. Add the pasta mixture to the bowl with the dressing, along with the cucumber and tomatoes.

Creamy Pasta Salad b

Contact Collage

Contact Collage (7)

Sticky contact paper might just be the perfect medium for art projects with toddlers; everything sticks instantly but there’s no glue required (i.e. no mess and no drying time). This particular project also incorporates great ways to talk about shapes, build vocabulary, and more.

To start, I taped a piece of contact paper up to the wall, and peeled off the backing so the sticky side faced Veronika. You can make this surface as small or as large as you want. Feel free to cover the full length of a wall! Veronika trotted over and was quite curious about the way the paper stuck to her fingertips.

Contact Collage (2)

I gave her a pile of things to stick up on the paper, including pictures cut from magazines and fabric scraps in various textures, everything from soft cotton to bumpy burlap to fuzzy felt.

Contact Collage (1)

She immediately began sticking things up, declaring, “Sticker, sticker!”

Contact Collage (3)

I let her select which items to put on where. The magazine pictures interested her far more than the fabric to begin with, and I said the name of each item (“dog!”) as she applied it.

Contact Collage (5)

For a little learning, I cut some of the fabric scraps into squares and others into triangles. I also pointed out the different textures as she hung them, using descriptive words for how each one felt.

Contact Collage (6)

She was so proud arranging and rearranging her canvas. Although the magazine pictures were stuck in place, the fabric could be pulled off and moved elsewhere.

Contact Collage (7)

My girl looked so big, standing at her artwork. This one really made me feel like I have a toddler, no longer a baby.

Contact Collage (8)

What a masterpiece!

Contact Collage (9)

Crumple Crazy

Crumple Crazy (4)

Glue + crinkly tissue paper? This art project is a toddler’s dream come true!

To make a glue solution that isn’t quite so sticky, I first mixed a little white glue with a splash of water in each compartment of a paint tray. This turned into a nice solution that was just sticky enough, but wouldn’t immediately do damage if Veronika got it on her hands or face.

Crumple Crazy (1)

She was wild about dipping a paint brush into it! I showed her how to smear the gluey mixture over cardboard. (Note: Use any piece of cardboard from packaging for this project, or an old cereal box, or even sturdy construction paper).

Crumple Crazy (3)

Next, I tore off pieces of white tissue paper and showed her how to crumple them into little pieces. These could stick perfectly onto her gluey cardboard. Could we hide all the glue?

Crumple Crazy (5)

It turns out that she loved lifting off the crumpled pieces, pulling them off the sticky surface and then putting them right back on again. Or tossing them to the floor!

Crumple Crazy (6)

Once there had been enough sticky glue play, the fun continued with extra tissue paper on the ground. Shake the pieces overhead, or crumple them close to the ear and talk about the sound it makes.

Crumple Crazy (7)

I thought for sure she would want to tear the tissue paper up, but that didn’t interest her. Instead, we crumpled them into tight balls that were great for tossing… and kicking!

Crumple Crazy (8)

How will your toddler play with tissue paper? Please share in the comments!

Doll Up Storytelling

Doll Up Storytelling (6)

Travis has such an imagination, a beautiful thing to foster in children, especially when it comes to understanding narrative and how to build a story. Lately, Travis has bemoaned that he’s not sure what to play with his action figures, having run through the usual games. To engage those storytelling muscles, I pulled out this neat activity.

We filled a box with a few odds and ends from around the house, the more random the better, including toy food, swords, real avocado, and sunglasses.

Doll Up Storytelling (2)

Next we made a pile of a few action figures, everyone from Star Wars characters to ninja turtles to superheroes. (Note: This game works equally well with dolls or stuffed animals, whatever friends your child plays with the most!).

Doll Up Storytelling (1)

Travis and I took turns first selecting a character and then giving him or her an item from the object box. We then took turns narrating the next part of our story based on the character and item.

Things rapidly got very silly, of course, including energy smoothies drunk before battle…


Doll Up Storytelling (5)

…sunglasses to shield off an attack…

Doll Up Storytelling (3)

…and laser-blasting keys.

Doll Up Storytelling (4)

Once the bin was empty, we immediately filled it with a new set of objects to continue the tale.

Doll Up Storytelling (8)

Hopefully a game like this keeps your kids busy the next time they’re tempted to say, “I don’t know what to play!”

Doll Up Storytelling (7)