Seaside Stepping Stone

Stepping Stone (5)

Happy Memorial Day! We’re officially kicking off summer, beaches, and all things seashore with this craft, care of High Five magazine. The resulting hand- or footprints would make a beautiful hostess gift if you’re visiting friends or relatives by the ocean this year. Happy summer!

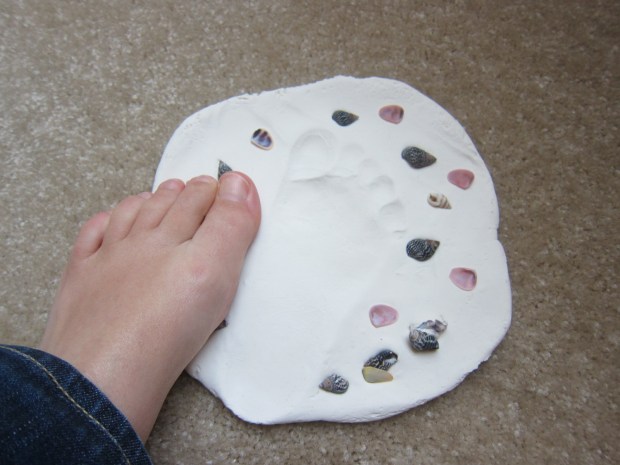
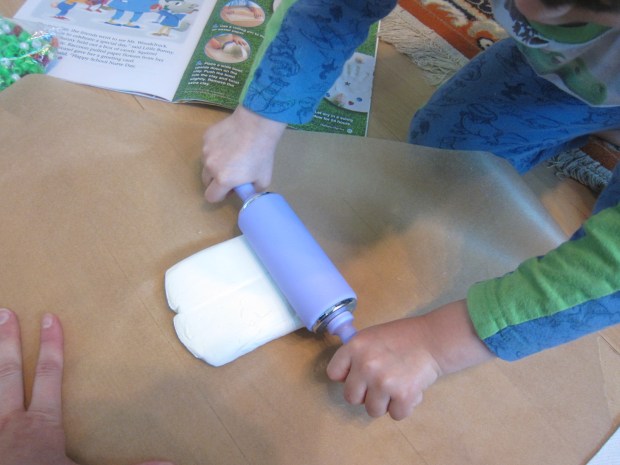
To start, roll air-dry clay flat with a rolling pin. The instructions suggested placing a bowl upside down on top of the clay to cut it into a perfect circle, but I didn’t have a bowl the right size. We decided we liked the rather imperfect result of ours anyway.

Stepping Stone (2)

Have your child step into the clay hard enough to leave a foot imprint (or, alternatively, press in a hand).

Decorate around the print with pretty sea-inspired bits, like seashells, or ocean-hued jewels and beads.

Stepping Stone (3)

The seashells were a huge hit, and Travis loved sorting through them and selecting his favorites.

Stepping Stone (1)

Let the clay dry completely before placing the stepping stone on the path to the ocean or beach!

Stepping Stone (6)

Rubber Band Splatter Painting

Rubber Band (8)

Following on the heels of outdoor painting and yoga, here’s still-more fresh air fun. Technically you could do this inside, but it’s so messy you’re really going to want to be out in the grass.

To set up, you’ll need an old picture frame (or one that you don’t mind getting a little paint-splattered), ideally about 8×10. Remove the backing and glass, and attach large rubber bands at intervals around the frame.

Rubber Band (1)

Set up newspaper under your work surface, and then place construction paper (or other heavy paper) underneath the frame. Travis wanted black as the background – why not!

I set him up with a tray of paints, and showed him how to paint just along the rubber bands (drips are okay, of course). Travis liked the tricky wobbly nature of this.

Rubber Band (3)

Imagine his surprise when I showed him the next step: Snapping back a rubber band and letting the paint on it splatter onto the paper below. Boing!

Rubber Band (5)

Because the black wasn’t the best background, I suggested lighter colors like pink and yellow for our next few rounds.

Rubber Band (7)

The result is very neat, splattered paintings. Don’t forget the art smock for this one!

Handprint Farm

Hand Farm alt

My formerly fingerpaint-averse boy finally doesn’t mind paint on his hands, thanks to some crafts at his preschool, and I seized the opportunity to put together this adorable handprint painting. It’s a cute way to learn about animals on farm sanctuaries while capturing a palm-sized memento.

The goal was to make 3 animals: a pig, a cow, and a sheep. For the pig, paint your child’s palm completely pink. Press onto a piece of paper with the fingers pointing down as the legs. Whoops, our pig was sideways, but we just worked around the oops!

Hand Farm (1)

For the cow, dot black or brown paint onto your child’s fingertips, and make a few additional dots in the palm. These will be the cow’s hooves and spots. Press onto the paper.

Hand Farm (2)

I didn’t have yellow tempera paint at home, only dot markers, which Travis didn’t want all over his hand. So we ended up with a mommy-sized yellow chick! Press onto the paper with the fingers to the side, as the tail feathers.

Hand Farm (3)

Once the paint dries, you can draw in noses, beaks, tails, eyes, and other features to complete the picture.

Hand Farm (5)

Your kids may want to paint a farm background as well!

Hand Farm (7)

Painting on the Fence

Paint on Fence (4).JPG

The sun was streaming through our windows and onto the little patch of grass outside our patio this morning, and I just had to get us outside. To motivate Travis, I did something taboo – painting outside!

Of course plein air painting has a long tradition, but so many of our kids’ crafts nowadays are indoors at craft tables or classrooms or easels. There is something so beautiful about being outside with a paintbrush and paper.

To contain any mess, I poured a few paint colors into a foil tray and gave Travis thick brushes.

Paint on Fence (1)

Use painter’s tape to secure a large piece of craft paper to a fence. If you don’t have a fence, the outside wall of a house would probably work, just make sure you’re using washable paints!

Paint on Fence (2)

The large surface will encourage big strokes – sideways, up and down, or whatever else inspires your little artist.

Paint Fence (6)

My little artist at work.

Paint on Fence (3)

All the more beautiful in the sunshine!

Paint on Fence (5)

Confetti Heart Art


Confetti Heart (8).JPG

The heart-shaped sentiment of love in this artwork makes it perfect as a card or gift to a loved one. And kids will love making it, since it involves quite a few novel steps!

I told Travis that the first thing we needed for our craft today was lots of confetti, and he eagerly grabbed a pair of safety scissors and begin snipping construction paper alongside me. You’ll need the pieces to be quite tiny for the heart to come out right, so adults and bigger kids can make sure all the pieces are small enough. Note Travis’s look of concentration!

Confetti Heart (1)

Next we put all the confetti in a brown paper lunch bag, closed it tight, and shook it up for all the colors to mix. Set the confetti aside.

Draw a heart on one piece of paper (or use a heart-shaped stencil) and tape down to a second piece of paper. I recommend a sturdy background like watercolor paper.

Confetti Heart (2)

Next, have kids smear glue all around the heart – it doesn’t matter if a little gets on the heart cut-out as well, since you’ll be lifting that off shortly.

Confetti Heart (3)

Now it’s time for an explosion! Blow into the bag a few times to inflate it, then hold over the gluey paper and have your kids smack it with both hands for a pop. Blurry photo!

Confetti Heart (4)

Travis was thrilled to see the confetti flutter down.

Confetti Heart (5)

Clean-up was half of the fun for this one!

Confetti Heart (6)

Once the glue dries, peel off the heart shape, and you’ll have a beautiful confetti-outlined heart left in the center.

Confetti Heart (7)

Mother’s Day Pocketbook

Pocketbook (9).JPG

Travis’s nursery school is hosting a Mother’s Day tea for the moms next week… and he couldn’t wait to make me this pocketbook to carry to it, once he spied in his latest Ranger Rick Jr.!

First we printed out the pocketbook template from online. Cutting it exactly was a bit too much for Travis, but I cut the shape from construction paper while he snipped out another “pocketbook” for fun.

Pocketbook (1)

Next we punched holes all around the edges.

Pocketbook (2)

To lace it up, use either yarn or string. Because I worried our string might fray, I created an “aglet” for Travis by taping around the end.

Pocketbook (3)

This was definitely his favorite part! He loved lacing up and down with our long piece of string until he’d completed every hole.

Pocketbook (4)

Next up was coloring the decorations, also available for print from the template.

Pocketbook (5)

Travis enjoyed selecting colors, like a light blue butterfly since I love blue.

Pocketbook (6)

I cut out the shapes and we glued them to the front of the purse.

Pocketbook (7)

As the final step, thread a 2 inch piece of string through a button, and slip through the slit in the back pocketbook template; secure with tape.

Pocketbook (8)

Now it will secure the purse shut through the slit in the front pocketbook template. I’ll have to pack it with a tea bag or two for the Mother’s Day tea. Travis was so proud to make me this, and I couldn’t be prouder to carry it!

Textured Paint Collage

Texture Paint (11)

This easy painting method is a neat way to add textures to your child’s next art creation… and all you need to do so is an old cereal box!

Cut portions of the cereal box so they are like combs that can be raked across a painting; I made Travis two version, one with boxy points and one more pointed like shark’s teeth.

Texture Paint (1)

But first we needed to make artwork with really thick paint! Travis was delighted when I told him the thicker the better for this particular project.

Texture Paint (7)

Once he’d covered the surface of his paper, he tried out the combs to see what kinds of lines or designs they made.

Texture Paint (5)

At not quite four years old, Travis’s artwork is still very abstract. Big kids can be more purposeful in their painting – think of textures like the bark of a tree, the waves of the ocean, blades of grass etc. I made a picture with an ocean, sun, and sky for Travis as an example, as well as some abstract shapes.

Texture Paint (6)

He filled two pages with color and shapes, which we left to dry overnight.

Texture Paint (8)

The next morning, we cut one picture into smaller pieces and used a glue stick to add them to the intact picture – this added still more texture to the final product!

Texture Paint (10)

Cotton Cherry Blossom Painting

Cherry Blossom (7)

We had a little fun exploring different tools that we could paint with about a week ago, and that turned into the idea for this quick springtime craft. Soft items like cotton balls or pom poms are perfect for making the delicate flowers of a cherry blossom tree!

To start, I drew the outline of tree trunks for me and Travis, with plenty of branches to fill in. Big kids will probably like to draw their own trunk!

Cherry Blossom (1)

Attach a clothespin to each cotton ball, and set out a big dish of pink paint – exciting!

Cherry Blossom (3)

I showed Travis how to dip in the cotton ball and then press and lift off the paper to recreate these pretty springtime blooms.

Cherry Blossom (2)

His was a bit more smeared, but he still liked the mechanics of the craft.

Cherry Blossom (4)

We ended up with two pretty cherry blossom trees, one by Travis and one by mama. Big kids may wind up with something closer to this:

Cherry Blossom (6)

We’ll have to cap things off with a visit to see the cherry blossom trees in the neighborhood!

“Watercolor” Art

Art Straw (5)

We revisited two old art ideas today – both of them imitating watercolor painting without use of actual watercolors! – when Travis stumbled across something by accident. We were playing with his magnet set in water (yes, magnets work in water!) and he decided he wanted to dip his markers in as well.

Art Straw (7)

I pulled out watercolor paper for him, and he loved the way that the wet marker tips looked smeary on the paper – just like watercolor paints. This was an activity I first did with him as a two year old – so long ago this blog didn’t exist! Quite fun to revisit with him at an older age.

Art Straw (6)

It reminded me of a time we turned regular paint into something closer to “watercolors.” This was back in the fall, so our final product was Halloween “monsters”. This time we chose pretty spring pastels.

Mix your tempera paint with a little water, and you have a nice thin consistency that will work for this project.

Art Straw (3)

Place a straw in each color; put your finger on top of the straw to create a vacuum, then drip onto watercolor paper.

Art Straw (1)

Blow into the straw (make sure your children are old enough to blow out, not suck in!), and the paint will spread in beautiful patterns all over the paper.

Art Straw (2)

Travis tired of the straw quickly, but loved telling me which color to put where until we had a beautiful spring picture.

Art Straw (4)

We decided it looked like the tulips we’d seen in the park that day!

tulip (1)

Sombrero Station

Sombrero (8)

This adorable craft will keep kids busy if you have Cinco de Mayo plans for tomorrow! Travis and I made ours early, but the craft easily multiplies to keep kids of various ages entertained.

First, I hot glued one paper cup upside down onto a paper plate for each sombrero. Pretty, colorful plates work best, although you could use white if kids will want to decorate them with markers.

Sombrero (2)

We set out an assortment of decorations, including tassels, pom poms, pipe cleaner pieces, and a big dish of glue.

Sombrero (1)

Travis’s favorite decoration by far was to dip a pom pom in glue before finding the perfect spot for it on his sombrero.

Sombrero (4)

Ole!

Sombrero (3)

To attach tassels to the brim of the sombrero required more hot glue, so that was another grown up step.

Sombrero (6)

Now place atop your head and celebrate (glass of leche optional)!

Sombrero (7)