Dyed Rice

Dyed Rice (4)

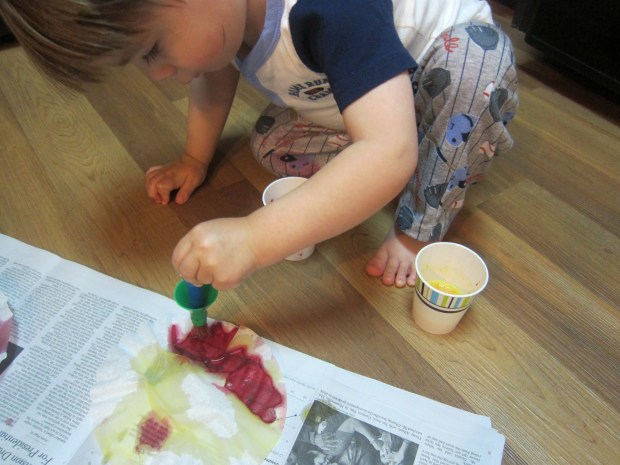
Here’s a simple idea to take your sensory play with materials like rice or pasta up a notch. I’ve read about versions of this game using Kool-Aid powder, but since I’m leery of a few of the ingredients in Kool-Aid, I wondered if I could copy the method with natural paint powders. The result wasn’t quite as vibrant as Kool-Aid… but that’s probably a good thing!

Set-up is a little messy. If your child is under 3, you’re probably going to need to do most of the work, although I let Travis sit in on the action. Place about 1 cup rice in large zip-top freezer bags, making as many portions as you want colors. Add 1 to 2 teaspoons paint powder to each bag. Travis did enjoy this part, so I didn’t mind a little mess!

Dyed Rice (1)

Add 1 teaspoon rubbing alcohol to each bag, then seal the bags and let your toddler shake or knead to incorporate the color.

Dyed Rice (2)

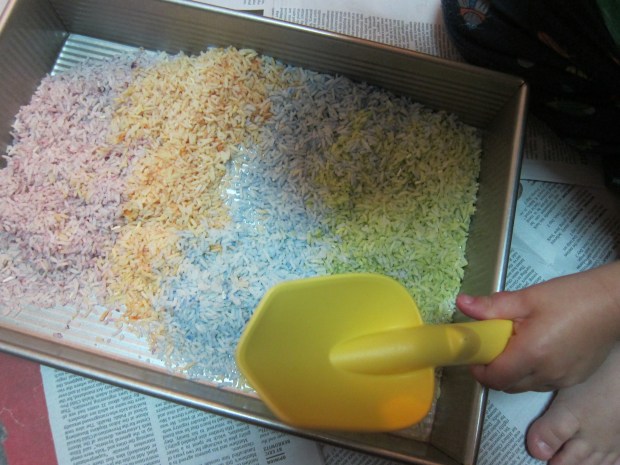
Transfer the colored rice to a foil-lined baking sheet. Note: you may want to separate each color with a strip of foil as well, until they are dry. Let dry overnight.

Dyed Rice (3)

The next morning, it’s exploration time! I poured the rice into a bin for Travis, and he was amazed to see colors instead of plain white. First we explored the rice by hand.

Dyed Rice (5)

Then of course it was time to mix them all together!

Dyed Rice (6)

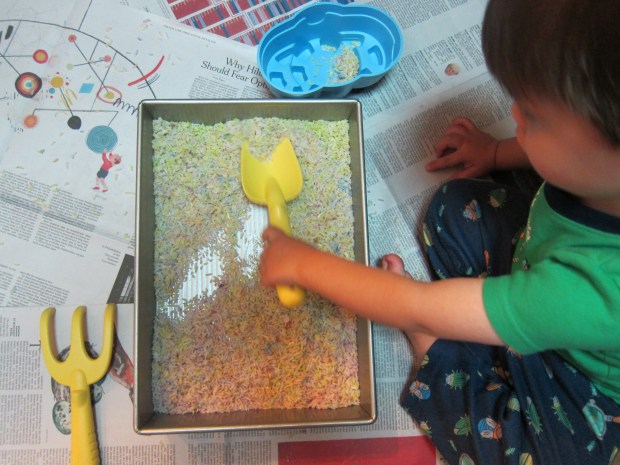
Travis would fill a smaller container and then dump it back into the larger bin, talking about the colors as they poured. Overall, the game was a nice variation, since regular rice has become old-hat around here.

Toddler Tie-Dye

Toddler Tie-Dye (4)

Here’s a simple – groovy! –  way for even the youngest toddler to make his or her own tie-dye. Preschoolers will no doubt enjoy the craft, too… and perhaps more so, knowing you’re allowing them to play with normally-taboo permanent markers.

Stretch any white fabric over the rim of a wide plastic jar (like an empty peanut butter jar), and secure with an elastic. Since we have so many plain white onesies, I decided it would be fun to let Travis make a few into one-of-a-kind pieces! If you don’t want to sacrifice white onesies, napkins or handkerchiefs would also be fun.

Toddler Tie-Dye (1)

Let your toddler use colorful sharpie pens on the fabric, adding dots, lines, or circles.

Toddler Tie-Dye (3)

Using a water dropper, add drops of rubbing alcohol until all of the ink has been moistened. The sharpie colors will bleed, producing a beautiful tie-dye effect. I was impressed to see how Travis’s skill with the dropper had improved, even over the course of the few days since we used it to make a rainbow tote bag.

Toddler Tie-Dye (2)

Shift a clean section of fabric to the mouth of the jar, securing with the elastic again, and repeat as many times as desired. Once finished, place in the dryer for 15 minutes to set the colors.

Since our first onesie was purely a toddler creation (in every color imaginable!) I made a second version after Travis was busy elsewhere, this time with a unified color scheme. I look forward to having him wear these!

Toddler Tie-Dye (5)

Rainbow Painting

Rainbow Painting (2)

We’ve enjoyed exploring rainbows recently, and I read about this neat painting method to continue our fun – perfect for little hands not yet ready to draw an arced rainbow line by line. It’s a little bit messy, but great fun!

Paint the colors of the rainbow in order on a clean sponge, making the paint quite thick. Preschoolers can paint the rainbow on themselves, but toddlers will no doubt need adult help. This craft was a great opportunity for us to try out our new Glob paints, another great vegan and all-natural option. When the powder is mixed with water, the paints were as globby as their name would suggest, with wonderfully vibrant colors, and a rich texture on paper whether we used sponges or regular paintbrushes.

Rainbow Painting (4)

Flip over the painted sponge, drag it across white construction paper or poster board, and you’ll create a perfect rainbow – wow!

Travis did rather quickly lose interest in the rainbow exploration, but thought painting the globby paint on the sponges was fantastic fun, so we continued that for a while. We had a good time seeing what other prints we could transfer from sponge to paper (I made this little flower for him to press down):

Rainbow Painting (8)

….painting on other color combinations of stripes:

Rainbow Painting (5)

… and just painting on the sponges!

Rainbow Painting (7)

Travis loved when his hand got messy in the process, too. “I have a rainbow on me!” he told me proudly. And then of course it was clean up time!

Rainbow Painting (6)

Cupcake Crayons

Rainbow Crayons (6)

Ever wonder what to do with all the broken crayons a toddler seems to endlessly generate? I sure did! We had so many crayon pieces that I began compiling what we called our “broken crayon collection” – a plastic bag filled with all the bits and pieces. Travis even comes running now with a broken one, and watches with fascination as I add to our growing pile. It was finally time to do something about it!

Remove the paper wrappers from all the crayons. This is really an adult task, since I recommend making a small slit with an x-acto blade in each wrapper; this way, the two halves peel away easily from the crayon. Preschoolers can probably help with a bit of the peeling and unwrapping though!

Rainbow Crayons (2)

Break the crayons into small pieces, and arrange in muffin tins lined with cupcake liners – don’t fill the cupcake liners very high, just a layer or so of crayon pieces on the bottom of each.

Rainbow Crayons (3)

Bake at 170 degrees for 20 minutes, until the wax is melted. Cool completely, then peel away the liners.

Rainbow Crayons (4)

Kids will be fascinated  by the circular shape of these crayons, since they’re used to straight ones, and will love how each crayon produces a “rainbow” of colors, as they rotate it from side to side.

Rainbow Crayons (5)

To be 100% honest, Travis turned to me after a bit of exploration, and asked for his “pointy crayons” back. Can’t win ’em all!

Update: Turns out the third time was a charm! When I pulled out our cupcake crayons about ten days later, Travis was suddenly fascinated. He loved the “magical” way that each crayon could change color. “It turned blue!” he would cry with delight. “It turned orange!” We also tested out what he needed to do if he wanted a particular color to appear on the page – perhaps he needed to rotate his wrist, or turn the crayon a certain way? In sum, wonderful exploration.

Rainbow Crayon alt

Rain-Themed Day!

Rain Theme (2)

We have blazing sunshine here today, and we’re waiting for a rain storm to come break the heat. In the meantime, Travis and I are making our own rain at home!

He loved the gross motor play to fit our theme – making a downpour with various kitchen colanders and sieves. The kitchen sink was a bit high for him, even on his stepstool…

Rain Theme (1)

So I moved things to the kitchen floor. Spread a towel underneath, and you won’t need to worry about “puddles”!

Rain Theme (3)

Travis loved scooping and pouring, as well as seeing the way water ran through the holes of the colander.

Rain Theme (4)

When he tired of that, he asked if he could get in the basin of water we were using. I rolled up his pants and had him pretend it was a real puddle, and he had a blast stomping and making bubbles and waves with his feet.

Rain Theme (6)

Even better, if you’re doing these activities on a real rainy day, put on some rubber boots and head outdoors to stomp!

For fine motor skills, we made a raincloud. Trace a rough outline of a cloud on blue construction paper, and have your child cover the area with glue before pressing down cotton balls. Don’t worry if the cotton ends up outside the lines, of course!

Rain Theme (9)

Travis loved this part, so much so that he needed to make a second cloud while our first was drying.

Rain Theme (11)

I was surprised he wasn’t more into the idea for raindrops – little teardrop shapes cut from shiny foil. So after he dabbed on more glue, I arranged the “rain” myself.

Rain Theme (10)

Round out your themed day with other rain toys you can think of – shake rain sticks, do a rain dance, or bring out bath toys and have a “storm” at bathtime.

A great nursery rhyme to recite is Doctor Foster:

Doctor Foster went to Gloucester

In a shower of rain.

He stepped in a puddle

Right up to his middle

And never went there again.

We also sang our favorite rainy day songs (Rain Rain Go Away; I Hear Thunder), and ended the day with a book about rain (Soggy Saturday).

And how perfect: by bedtime we were rewarded with this:

Rainy Day

Backyard Grill

Backyard Grill (9)

This one’s a little complicated, parents, but I promise it’s worth it!

The idea came from our August High Five magazine, and although I wondered if Travis would understand the concepts – we’ve never grilled dinner with him! – he has lately been very curious about the grills in our building’s courtyard, and took to the whole game with alacrity.

You’ll need to do some set-up the day before. Cut sponges into circles and have your child paint some brown and some yellow to make (veggie) burgers and buns. Our yellow is on the brown-ish side anyway, but if yours is bright yellow, you might want to tone it down with a drop of brown for better bun color.

Backyard Grill (2)

Travis had a blast painting the sponges, proudly saying, “We’re making burgers!” Make sure to let dry overnight – the sponges will absorb a lot of paint.

Backyard Grill (1)

While he slept, I did a little mommy work: roll toilet paper tubes in yellow tissue paper, and tuck in the ends. Add a piece of green tissue paper to one side, securing with tape; twist the overhanging end and secure with a rubber band. Draw on corn kernels with brown pen. Now you have corn on the cob!

Backyard Grill (7)

If your child is a preschooler instead of a toddler, they can probably help out with this part too!

Backyard Grill (10)

In the morning, I told Travis we were setting up the grill, and he was so excited. We used castle blocks as the base, but any blocks or Duplo you have around the house will work. We crumpled up black construction paper for charcoal, and then I told Travis we needed to add fire so our grill would be hot like the oven. He loved adding wads of red and yellow tissue paper, and helped me blow on the coals to start our fire!

Backyard Grill (3)

We added a cookie rack as the grill itself. Then it was time to cook our burgers!

Backyard Grill (4)

Travis became an expert burger flipper:

Backyard Grill (5)

Added green tissue paper “lettuce”:

Backyard Grill (6)

And liked the corn even though he seemed very unsure what it was:

Backyard Grill (8)

And after about 20 minutes of good fun, toddler happened:

Backyard Grill (11)

A good ending!

Cloud Blobs

Cloud Blobs (4)

This simple art project was a fun way to introduce Travis to the idea of cloud-watching, and is also great for sparking imagination.

Use any dark-colored construction paper as the background, since you’ll be using white paint. I chose blue and black so we could have clouds in both a “daytime” and “nighttime” sky.

Have your toddler dip a spoon into the white paint, and drizzle in the middle of the paper. Travis was very into the novelty of using a spoon instead of a brush, and needed to cover a few more sheets of paper once we’d completed the project itself.

Cloud  Blobs (1)

Fold the construction paper in half and smooth down, then open back up again – you’ll have a “cloud” blob of white paint. Encourage your child to tell you what he or she sees in the image. I joked that this was a little like a toddler Rorschach test!

Cloud Blobs (3)

To wit, I thought our cloud on blue paper looked like a bee, but Travis told me he saw an octopus. If you like, have your toddler use white crayons (or other colors) to embellish the paintings, but Travis mostly lost interest at that point.

Cloud Blobs (5)

To end the fun, we took a trip outside to look at real clouds, and I encouraged him to spot shapes in the sky as well. Overall, a nice introduction to the wonderful art of cloud-watching!

Cloud Blobs (2)

Fireworks Circle Prints

CIrcle Prints (5)

This easy art project is a fun way to talk about a specific shape. Travis and I used circles, but if you’d rather focus on squares, triangles, or any other shape, it lends itself perfectly!

For the circle version, seek out a variety of round items in your home that you can dip into paint – jar lids and small (washable) circular toys work well.

Circle Prints (1)

Fill pie tins or paper plates with paint in two or more colors, and show your child how to press the circular objects in the paint and then onto the paper. Travis quickly picked up on the fact that we were making only circles, and had fun playing with the different sizes and making small circles inside larger ones.

Circle Prints (2)

Although we used purple and red paint for this project, the purple was so deep it dried nearly blue. When Travis had finished, I realized the resulting, overlapping circles looked like fireworks bursting in air!

Circle Prints (4)

It turned out to be very appropriate for so soon before the Fourth of  July, and will hang on the fridge in celebration for the next week or so.

Toy Airplane

Toy Airplane (5)

Here’s a trick for when you need to devote your attention to packing up for vacation – but have a toddler to entertain in the meantime! Pick an easy craft, ideally one where not only the end product but also the various components used during construction make for a great solo play.

Since we’re headed on vacation, I figured what better craft to make than a toy airplane?

Cut two slits in the sides of a paper towel tube. Cut “wings” from poster board, and slide into the slits. Squirt a little glue in the bottom of a paper cup and attach to one end of the tube as a “cockpit.” Make sure you let the glue dry before moving on to decoration!

Travis enjoyed helping glue on pieces of old tissue paper with a glue stick.

Toy Airplane (4)

If you have the time, add windows or other airplane embellishments with markers. We skipped that part, and probably for the best; in full honesty, Travis soon discovered it was more fun to tear the tissue paper off his plane than it had been to glue it on!

Toy Airplane (7)

As mentioned, although the assembly of this craft is largely for adults, the supplies (poster board, a few extra paper cups, tissue paper), are all materials that foster great creative play in toddlers. Travis was very happy with his crafty items while I went about packing. The paper cups in particular were a huge hit, both for stacking and for playing games of “kitchen.”

And then of course there’s the plane itself! Travis loved piloting his plane from on top of my suitcase:

Toy Airplane (2)

And while running around the apartment:

Toy Airplane (6)

It also makes for great shadow play. And now, bon voyage!

Toy Airplane (1)

Coffee-Filter Butterflies

Coffee-Filter Butterflies (10)

I decided last minute to put together this craft today, but I’m so glad we did! Because there are various periods of drying involved (for paint and glue), we spread it out over most of the day.

First, lay coffee filters flat (I recommend a layer of newspaper underneath), and have your child use a dropper to apply food coloring in various colors. I only had yellow and red left at home, but I liked the uncomplicated designs that Travis achieved as a result. Squeezing the dropper to apply the color was great fine-motor practice, which Travis took very seriously!

Coffee-Filter Butterflies (1)

We finished with a paintbrush to apply the color more deeply in a few places.

Coffee-Filter Butterflies (2)

Make sure you let the filters dry completely before moving on to the next step.

Coffee-Filter Butterflies (3)

As a side note, extra coffee filters make for a fantastic toddler distraction while you get something else done around the house!

Coffee-Filter Butterflies (4)

I found various methods online for pinching together the “butterflies” around clothespins, and liked the following method best. You’ll likely have to do this part yourself, unless your child is pre-school age or older. Pinch the coffee filter in the center, and clip a clothespin vertically to the filter. Fan out the “wings” of the butterfly on either side.

Coffee-Filter Butterflies (5)

Clip pipe cleaners into 1-inch pieces, and let your child dip in glue before applying to the butterflies for antennas. (I had to help here as well, as the surface was very uneven for gluing, but Travis enjoyed dragging pipe cleaners through the glue nonetheless).

Coffee-Filter Butterflies (7)

Once the glue dries, you can finish your butterflies with marker designs. Travis had a little fun coloring randomly on one butterfly, but I added the faces to the others.

Coffee-Filter Butterflies (8)

The clothespins provide the perfect handle so your toddler can flit the butterflies all around your home. And they were quite simply magical in the window at sunset.

Coffee-Filter Butterflies (9)