Halloween Tote

koala halloween (4).JPG

Instead of purchasing a bag for all the upcoming Halloween loot, engage your child’s creativity and have them decorate their own tote! We got ours care of Koala Crate, but you can easily buy a blank canvas bag and cut shapes from felt to adhere.

Although our kit came with suggestions for animal faces, Travis had other plans. He dove right in, telling me which shape he was holding and assembling into an ever-intricate design.

koala-halloween-1

He had so much fun that I simply sat back and let him decorate. On the reverse side, I added a face with the leftover stickers, something sort of resembling an owl!

koala-halloween-3

It will be Travis’ first Halloween going door-to-door, so I hope this tote helps create special memories.

koala-halloween-2

Pumpkin Peepers

pumpkin-peepers-2

It wouldn’t be Halloween without pumpkins of course, but toddlers are too young for carving… So what to do?

This cute idea, adapted from Parents magazine, couldn’t be easier, and allows toddlers to make a silly face, no knife required.

pumpkin-peepers-1

Simply cut various-sized circles from craft foam, and use glue dots or sticky Velcro dots to attach the eyes and a pupil to each pumpkin. We used goofy colors, but you could also stick with a more traditional black and white palate.

To finish the faces, simply use a sharpie for noses and mouths.

More Spider Fun!

paper-plate-spider-3

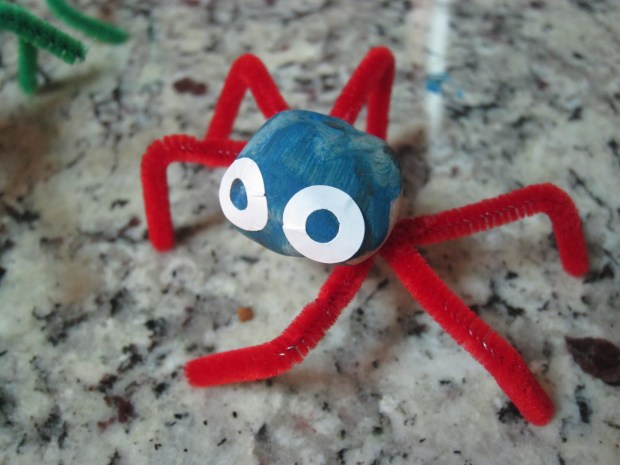
Between spider lanterns and spider rocks, we’ve been having fun with all manner of creepy-crawly arachnids leading up to Halloween. Today we not only made a new spider, but gave him a web to call home!

For the spider, invite your child to color on two paper plates with crayons however they like. Preschoolers can draw their own spider face, but I helped by drawing a spider on one plate and letting Travis have free reign on the other.

paper-plate-spider-1

Punch a hole in the center of one plate, and thread through a knotted piece of string. You’ll be able either to hang your creation, or to jump it about like a jumping spider once complete!

We then glued 8 strips of black construction paper onto the inside rim of one plate before gluing the two plates together.

paper-plate-spider-2

Let dry completely before the play begins.


Paper-Plate Spider (4).JPG

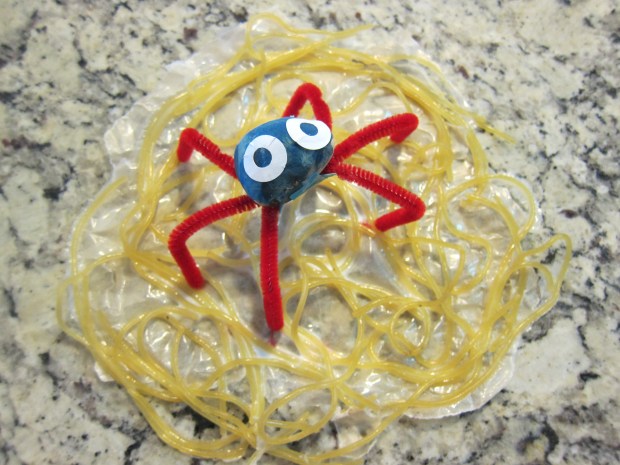
I had leftover cooked and cooled spaghetti on hand, so for Itsy Bitsy’s web, we got nice and goopy again!


Fill a shallow plate with glue, and show your child how to dip the spaghetti strands in the glue before arranging in a “web” on waxed paper.

spider-web-2

Travis couldn’t wait to get his hands on the spaghetti, and very quickly decided they also looked like worms. I finished our web while he had a blast stirring the worms around and making them “wiggle” a nice reminder that toddlers are very good at creating their own games no matter what materials we present to them!

spider-web-3

Let the web dry completely, then peel off the wax paper. Because the web is very delicate, I found it was best to leave some of the wax paper behind as backing.

img_0009

Don’t forget to add one of your spider friends to live inside!

img_0032


Spaghetti Monsters

spaghetti-monster-7

If ever there was a time for oopy goopy fun, Halloween is it! Travis is too young for classic Halloween gags like a bowlful of spaghetti “brains,” but it’s the perfect time to play with cooked spaghetti and make friendly “monsters” instead.

Present your child with a bowl of cooked and cooled spaghetti. Demonstrate how to take a handful of spaghetti, dip it in a shallow plate or pie tin filled with tempera paint, and then smear onto construction paper.

spaghetti-monster-2

I thought Travis might be hesitant to get so messy, but he dove right in! He had so much fun dipping the spaghetti in the paint that I had to remind him to transfer over to the paper on occasion.

spaghetti-monster-4

When the paint is dry, finish your friendly “monsters” with googly eyes and any other scraps you have on hand, like ribbon, yarn, or fabric.

spaghetti-monster-6

The silly looking monsters are a nice way to decorate with non-threatening creatures around the house, making sure the holiday isn’t too scary for little ones.

spaghetti-monster-8

Tissue Paper Ghosts

Tissue Ghosts (6).JPG

Probably the simplest and oldest Halloween craft in the books, this one still delights adults and children alike. You can make just a few ghosts, but I think it’s better to make a whole bunch of them and hang all around the house (or yard if you have one).

Show your toddler how to fold a tissue paper over a cotton ball, and then secure the tissue just under the cotton ball with a piece of masking tape. If you’re going to hang the ghosts, make sure to stick a length of string or yarn under the tape as well. Travis helped with a couple, but then just loved playing with the materials involved while I prepared more.

tissue-ghosts-1

We had a big pile pretty soon!

tissue-ghosts-2

Decorate the faces with marker. For the best ghost-y mouth, show your toddler how to press a marker firmly into the tissue paper for a big spooky O.

tissue-ghosts-3

Travis liked fluttering the ghosts about by hand, and helping me hang them.

tissue-ghosts-4

I confess the resulting ghosts look a bit morbid, dangling from their necks, but heck, it IS Halloween…

tissue-ghosts-5

Spider Rocks

Spider Rocks (5).JPG

Following up on our spider lantern decorations, Travis helped me create a few more spider friends to populate our house for the Halloween season!

Find a few small, round rocks and paint in any color – we used blue and black for a dark Halloween feel, but neon bright colors might be fun too! Let dry overnight.

spider-rocks-1

Cut pipe cleaners in half. For the legs of each spider, wrap one pipe cleaner piece around the middle of three others, then bend the ends out to make the legs. This part was a bit complicated for Travis, but he loved watching me do it, and thought the legs made great “crickets” to jump around for a while.

spider-rocks-2

Glue one rock onto each set of pipe cleaner “legs” and let dry completely – I recommend lying them upside down.

spider-rocks-3

All you need to add are stickers or googly eyes for the cutest little spiders I’ve ever had in my house!

spider-rocks-4


Spider Lantern

spider-lantern-5

It’s beginning to look a lot like Halloween around here! Since Travis loves spiders, I knew this easy decoration would be a big hit. It was our first Halloween craft of the season, so as we made the lantern I talked about the creepy crawly things that come out on All Hallow’s Eve!

Cut the top off an empty 1-liter bottle of soda; tape around the rim to cover any sharp edges.

spider-lantern-2

Wrap the bottle in cheesecloth, draping the excess inside, then wrap colored yarn around the bottle. Kids can help with this step!

Once finished, tuck a plastic or rubber spider into your web. Add a battery-operated candle for spooky glowing decor come nighttime.

spider-lantern-4