Glow in the Dark Flower

glow flower (7)

Get ready: There is some serious wow factor to this project. You will need a few special supplies for it, including a black light, which you can purchase from sellers like Amazon, as well as a highlighter pen you don’t mind sacrificing (hint: you’re going to cut it open). But armed with those items, kids will adore this project!

First, I showed Travis the black light, and how it works. Keep exposure to a minimum, because as a reminder, black lights use UV rays.

glow flower (1)

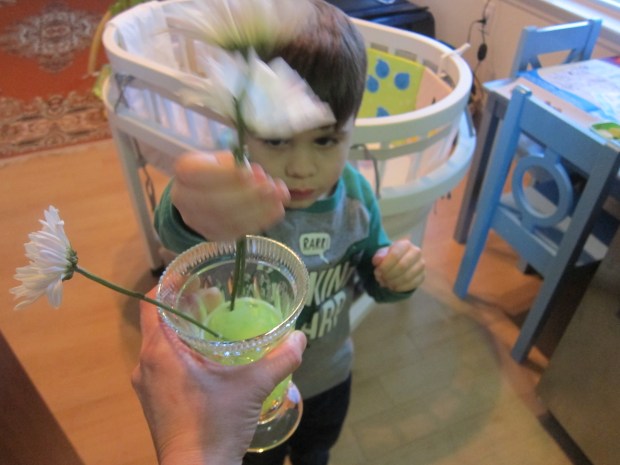
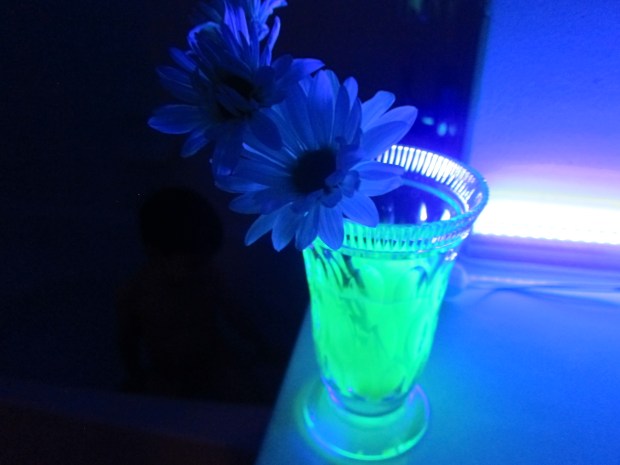
Next, we filled a clear vase with water, and set aside a few white flowers from a bouquet we’d purchased.

I showed Travis how the highlighter pen would look in the black light. He couldn’t believe the way the yellow streaks glowed!

glow flower (6)

We returned to regular light, where I very carefully cut open the highlighter crosswise using a sharp knife; any box cutter should work; just go slowly and carefully.

Inside will be a strip of fibers that contain the highlighter ink. This was so neat to see!

glow flower (3)

We added the fibers to our vase of water, where the highlighter color seeped down.

glow flower (4)

Travis very seriously added our flowers. Now we had to wait, but were rewarded with glowing flowers a few hours later!

glow flower (5)

Glowing Planets

Glowing Planets (6).JPG

One of the bonuses about winter’s early sunsets is that even little kids are awake to see the stars and planets. Travis and I talked recently about what it is that makes planets glow; they don’t make their own light the same way stars do, of course, but they do reflect the light of the Sun and thus give off a glow – sometimes the brightest one in the sky!

We came in to make our own glowing planets, thanks to a few simple materials.

glowing planets (1)

First, I asked which planets Travis wanted to make, and for each, we brainstormed a little diagram of what he knew about it. Earth, for example, would appear blue and green from space, and has oceans and continents.

glowing planets (2)

Saturn was made of gases, has rings, and is colder than Earth.

glowing planets (4)

We finished out diagrams for Earth, Mars, Saturn, and Neptune (the four that Travis picked) and colored four golf balls accordingly. Travis loved making Mars bright red! Use permanent marker for the best results.

glowing planets (3)

Now make a slit in the bottom of each ball with an X-acto knife (grown-up step), and place over the flame of a tea light.

glowing planets (5)

We found that small tea lights worked better than tall ones, even though we had more of the latter.

glowing planets (8)

Now your planets glow just like the ones in the sky! These were especially fun in the bedroom at night.

glowing planets (9)

Glow in the Dark Moon and Stars Painting

Glow Moon (6).JPG

Travis loves the craters on the moon, and is always asking how they’re made. So we’ve done a few fun projects where he gets to make craters, everything from poking holes into clay to making explosions outside. This little project was also another way to add a comforting glow to his bedroom at night. We just needed glow-in-the-dark paint, and a fun tool – q-tips! – and we were ready to start.

glow moon (1)

First, I marked off a section of dark construction paper with masking tape. The area within the tape would be the moon, and the rest of the paper was for the stars.

glow moon (2)

We filled in the moon with glow-in-the-dark paint, then used a q-tip to form lots of craters.

glow moon (3)

The only glow paint we had is actually meant to be squeezed from a tube, not brushed on, so to make stars we squeezed out dots of paint and then smooshed them with a q-tip.

glow moon (4)

Travis loved this step!

glow moon (5)

Now we just had to wait until dark. We let the painting dry under bright lights, and transferred to his room at bedtime.

Glow Moon alt.JPG

A beautiful glowing (crater-filled!) moon.

Starry Night Constellations


starry night (4)

Our star-themed fun continues, here in the dark days of winter. January is a great time of year to talk with little ones about stars, because the sky gets dark so early; in the summer, it’s still light when Travis goes to bed, and he hardly ever gets a chance to star gaze!

Tonight, we had flashlight fun with some of our now-familiar constellation forms. Ahead of time, I used permanent marker to make a dot for each star on construction paper, making the shapes of favorites like Orion, Canis Major, the Big Dipper, and the Southern Cross.

starry night (1)

Now it was up to Travis to punch out the holes, using a pen (or a sharp pencil would work).

starry night (2)

I was quite impressed with how exact he managed to be, puncturing the paper only where I’d made dots. He loved the challenge!

starry night (3)

Now stand in a dark room, and shine a flashlight through the holes onto the wall. Voila, you’ll see the starry sky suspended before you! Travis loved being the one to hold the flashlight, and line up the beam so a particular constellation appeared.

starry night (5)

Indeed, he loved it so much he had to punch holes all over a second sheet of paper. Now it looked like the Milky Way was flooding our wall with stars!

starry night (8)


Fresh Water, Salt Water

fresh water (4)

This activity from Travis’s January issue of High Five magazine provided a nice dose of STEM learning, alongside the usual monthly craft. We’ve done a similar experiment before, but liked the set-up for this version!

Fill 2 large clear glasses with 1 and 1/2 cups warm water each.

fresh water (1)

Add 1/3 cup salt to one cup, and stir until dissolved.

fresh water (2)

The instructions said to tint the other cup blue with food coloring so you can tell them apart. Because the salty cup is cloudy, this step isn’t really necessary, but blue water is cool, so why not!

Now add the same object to each of the two cups, and observe any differences. We tried the magazine’s suggestions of aluminum foil balls, which floated to the top in both versions.

Next we tested plastic dinosaurs. Both sank. Hmm, no difference!

fresh water (5)

Finally, when we tried tomato slices, the tomato in the salt water seemed to pop above the surface with more buoyancy.

fresh water (6)

But why hadn’t the others been different? We added more salt to the salty cup, liberally pouring in and stirring. After two more tries, we had a crayon that floated!

fresh water (7)

The crayon in the opposite cup, down at the bottom, helped illustrate buoyancy best for Travis.

fresh water (8)

Overall, he loved the set-up and scientific nature of the project, plus adored pouring the salt. Great for budding scientists.

Map the Stars

Map the Sky (3).JPG

Travis has been a bit afraid of the dark lately, and we’re working on making his room feel safe at night. These glowing star pictures were the perfect activity to make the dark less scary!

First, we needed to paint backgrounds for a night sky, on sturdy watercolor paper. I suggested a mix of blue and black, but Travis insisted on using only black for his backdrop. “Because I made it too late, Mom! It’s not twilight, it’s pitch black.” I couldn’t argue with that!

map the sky (1)

We left our backdrops to dry while he was at school. When he returned, I set up a page from Usborne’s Big Book of Stars and Planets showing constellations. We selected Orion, and I had him count the stars in each portion (the belt, the shoulders) as I added a drop of glue for each.

Affix a glow-in-the-dark star to correspond to each point.

map the sky (2)

To finish each picture, we drew lines in white chalk connecting the stars.

map the sky (4)

Now we had beautiful starry pictures for his wall! Make sure to leave a bright light source near the pictures until just before bedtime, then turn them off and watch the room glow.

map the sky (5)

Edible Constellations

Edible Constellations (4)

Travis and I put together this super smart snack on the heels of fun starry night exploration. Your kids get a sweet treat plus an astrology lesson – a win-win!

Using Dandies mini marshmallows and pretzel sticks, we mapped out what the Big Dipper would look like. Attach 1 marshmallow to the end of a pretzel stick for each star.

Edible Constellations (2)

Repeat three times to make a square.

Edible Constellations (3)

Stick a fourth “star” into the marshmallow at the upper right corner to begin the Dipper’s tail.

Break a pretzel stick in half, and add two smaller pieces of pretzel + marshamllow to complete the constellation.

Travis watched as I tested out a couple of others, too, including Cassiopeia (the Queen)…

Edible Constellations (5)

… and Cepheus (the King). These didn’t last long before they were gobbled up!

Edible Constellations (6)

I noticed he wasn’t eating the Big Dipper, and asked if he wanted more of his snack. He said he didn’t want to ruin our constellation!

If your kids want to get even more creative, test out Cygnus (the Swan) or Canis Major, too.

Edible Constellations (7)

Travis wanted to know if we could make Orion (which he calls Bow Hunter), next, and I was so proud he remembered that constellation without any prompting.

Edible Constellations (1)

Happy snacking!

Sunken Treasure

Sunken Treasure (4)

After lots of fun dressing up as pirates, Travis and I needed to head off on a treasure hunt for “booty.” I involved a little STEM learning in the game by turning it into a test – which treasure will float, and which will sink to the bottom of the ocean?

First, I made a list of items to find around the house, and Travis helped check them off as we went.

Sunken Treasure (2)

He found a little box to gather his treasures into, and already loved the game!

Sunken Treasure (1)

Items included: things from the kitchen like cucumber slices, toothpicks, and cookie cutters; things from his room like toy dinosaurs, marbles, and bouncy balls; and things from outside like leaves, rocks, and sticks.

Next we filled a glass of water and set about testing all of our items.

Sunken Treasure (6)

Travis loved dropping things in the glass!

Sunken Treasure (5)

We soon detected a pattern – metal objects tended to sink and wooden ones tended to float. The rubber bouncy ball surprised us by sinking! When we were done, I fished the objects out of the glass, and “Pirate Travis” had to dry and polish all his treasures.

Sunken Treasure (7)


Magic Thermostat Hands

Thermo Hands (2)

Brr! It’s getting chilly out there, that time of year where suddenly a 60 degree day feels downright warm, if you’ve had a spell in the 40s or 50s. I always marveled at this phenomenon myself as a child, and it was a great prompt to teach Travis about how temperature to our bodies is relative. All you need are three buckets of water. Ready, set, chill!

Fill one bowl or bucket with ice water. Fill a middle bucket with lukewarm water. Fill the third with hot water (make sure to test this one first, so it won’t hurt your child’s skin).

Thermo Hands (1)

Encourage your child to put one hand in the ice water and one in the hot. Let sit for about 30 seconds, then transfer both hands to the lukewarm water.

Thermo Hands (3)

They will discover that the ice water hand feels warm now, and the hot water hand feels cooler. Voila, a lesson on relative temperature!

Thermo Hands (4)

Crunch Time

Crunch Time (7).JPG

After a fun snack time making and eating apple nachos, we had a big green apple leftover on the counter. I realized I could easily entertain Travis by turning this last apple not into a snack but into a building material. This activity is great for keeping kids busy, whether you’re nursing a younger sibling, cooking a family dinner, or prepping for a big holiday feast later this month!

Crunch Time (1)

Travis and I started with a firm base, and I showed him how he could attach two apple pieces together with a toothpick.

Crunch Time (2)

Pretty soon he was off and running with it, building up up up.

Crunch Time (3)

He loved seeing how horizontally-added toothpicks helped stabilize the structure – a little engineer at work!

Crunch Time (5)

Kids can make the design as simple or as complicated as they like. We finished ours with a triangle tower on top.

Crunch Time (6)

And soon it was home to a Duplo bunny.

Crunch Time (8)

How do you keep kids entertained while you’re busy in the kitchen? Please share in the comments!