Icy Summer Favorites

This summer we’re recycling a few old summer favorites, but with a fresh spin on each!

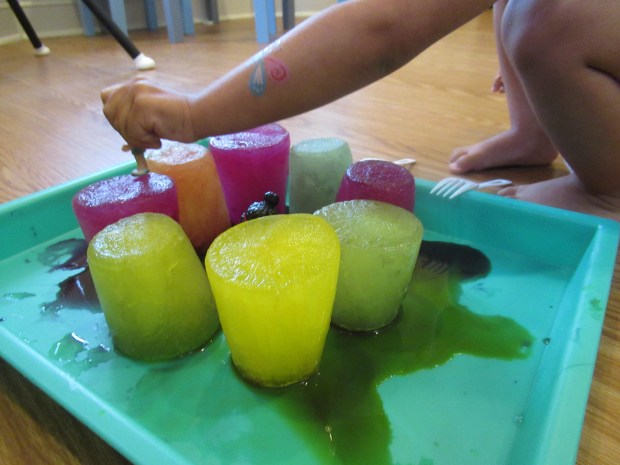
The first repeat was ice pop painting, which Veronika loved last year… but she also was tempted to eat the paint popsicles! This year we solved the problem with one key twist: using food coloring (phew, edible!) instead of paint. I filled popsicle molds with water and generous amounts of food coloring, then left them to freeze overnight.

In the morning, we headed out to the patio with the pops and thick white paper. Sure enough, the food coloring made beautiful swirls of color, and the hot sun meant our efforts were quickly rewarded with smudges of “paint” on the paper.

Equally sure enough, Veronika soon requested to eat one. This year, I could tell her to go ahead! Green was her particular favorite.

Our second repeat was freeing dinosaurs, but this time from ice instead of jell-o or sand. This time, I set up an excavation site in layers, first placing a few plastic dinos in a loaf pan and then filling it halfway with water. Let freeze.

I then added a few plastic Egyptian mummies and filled the loaf pan the rest of the way with water. My little archaeologists would be able to dig down through history!

When I set this out the next morning, both kids were ecstatic. Spoons, salt, and warm water to pour helped them unearth the buried treasures. Paintbrushes, chisels, or spritz bottles would be fun, too!

Travis and Veronika ended up flipping the block of ice over, which meant we freed the dinosaurs first.

They were so proud to “discover” their first species!

The Egyptian mummies were uncovered at the end. I was impressed with the kids’ diligence and patience, sticking with the task until the last sarcophagus came free.

What are your favorite icy summer games? Please share in the comments!

Banana Nice-Cream Sundae

A base of frozen bananas makes this decadent “ice cream” sundae almost healthy. The same can’t necessarily be said of the toppings, though!

To start, peel and chop 4 bananas and freeze. Transfer the banana pieces to a blender and puree until smooth, along with 2 to 3 tablespoons water.

We spooned the banana “ice cream” into bowls, then set up a buffet bar of toppings! Travis and Veronika chose from a mix of: chocolate rice cereal, non-dairy whipped cream, chocolate sauce, sprinkles, and maraschino cherries. Kids can pile on the works, or just pick their favorites.

If you want to stick with healthier toppings and the fresh fruit theme, try adding raspberries or other berries instead. Thanks to High Five magazine for this delicious idea!

Wading Pool Boat Race

Race Boats (6)

We’ve had so much fun finding ways to use our wading pool this summer, but one thing we had yet to do was put any boats in it! These little cork boats come together in moments, and are just the right size for a mini pool.

Save up a few wine corks (or purchase corks at a craft store), and hot glue two or three together into little rafts. If you don’t have hot glue, you can wrap them together with a rubber band in a pinch. Insert a toothpick into each raft, and tape on a triangle cut from a post-it or construction paper as the sail.

Race Boats (1)

Let the regatta begin!

Race Boats (2)

Veronika loved setting these little boats afloat in the pool, whether she was standing ashore or standing right in the water. In fact her legs made a little drawbridge!

Race Boats (3)

You can use the boats for a real race (try blowing at them like you’re the wind!), but Veronika just loved chugging them through the water by hand.

Race Boats (4)

Make one, two, or a whole fleet, and your toddler is sure to have fun!

Race Boats (7)

Bath Time Alfresco

No doubt you’ve taken advantage of summer to dine alfresco, but have you ever used it to bathe alfresco? This is the perfect treat to end a scorching hot summer day!

Early in the day, I filled the kids’ wading pool with a layer of cold water, knowing that by bath time the sun would have made that water just the right temp for an outdoor soak.

The kids could hardly believe it when I announced that bathtime was going to be outside! Hop into swimsuits if you’re worried about neighbors’ eyes and then jump right in. We brought out all the bells and whistles including favorite tub toys like ninja rubber duckies

…and bubbles!

The biggest hit, though, was adding bath bombs.

The kids absolutely adored the way these foamed and dissolved in the water.

All this fun meant bathtime was much longer than usual, but that’s no problem at all when you’re sitting on the patio and watching the setting sun and the glee on their faces. Just remember to have fluffy towels at the ready for when they climb out!

Balloon Kites

We always have just a little helium left in a tank after blowing up balloons for parties. Take advantage of the chance to inflate a few extra balloons and make your kids these quick “kites”!

To decorate, simply tie a few streamers to the tail of each balloon. Veronika chose green!

There’s a balancing act here, because if the streamers add too much weight, the balloon won’t fly any more.

Trim the streamers until the weight is right so that the balloon floats up, but not all the way to the ceiling. Pretty soon Veronika’s perfect kite caught the wind.

Note: In case kids do let go of the string, I recommend playing this game indoors to avoid helium balloons that pose a hazard to wildlife.

Box Bowling

If heavy bowling balls at the alley or giant pins at home are too big for your toddler, try out this cute suggestion from High Five magazine. Upcycled tissue boxes are just the right size for tot-sized bowling fun.

To start, I saved up old tissue boxes until we had three. You’ll need at least three, but continue saving boxes until you have five, seven, or even more for extra fun!

I initially thought we might stick with a red-white-and-blue patriotic palate for our box bowling, first wrapping the boxes in blue paper and intending to add red dot stickers. Veronika had other plans, though! I loved the multi-colored crazy dot stickers that she ended up plastering all over the boxes.

We then set the boxes up in a pyramid, and I handed her a large ball. Take aim and bowl!

Veronika squealed with delight every time she knocked the boxes over.

And of course immediately wanted to stack them up again.

In sum, this is the perfect toddler-sized bowling game, no heavy balls required.

Animal Piles

We were doing a stuffed animal reorg today, which was the perfect chance not only to toss everything into a giant pile and remember every one hiding in there, but also a chance to throw in some learning! This was a riff on a previous animal sort activity Veronika and I did, but today she was a full year older and wiser about it.

First, I sorted the animals into piles, roughly categorized as: Giant, Big, Medium, and Small. Veronika’s challenge was to find an animal from the pile I asked for.

“Where’s a big animal? I asked, and she waded right through the piles to bring me one that qualified.

“Can you find me one that’s teeny tiny and small?” I challenged next. “Ladybug is small!” she chirped up, and proudly presented it.

Then we tested out the concept of length. I lined up all of our snakes (since it turns out we have way more snakes than I remembered!), and asked her to show me the longest.

And then the shortest!

You can also have fun sorting the animals by home or habitat. It turns out we have very few animals that live in the water, but many denizens of farms and forests.

What other ways can your toddler learn with stuffed animals? Please share in the comments!

Go Fishing

Veronika has been loving her water table this summer, and today we found yet another way to play with it: we went “fishing”!

My kids are often frustrated by attempts at magnetic fishing, so today we used a much easier hack: mini fish nets from the pet store. I filled the water table with water and added easy little “fish” to catch: ping pong balls and old wine corks!

Veronika immediately loved scooping these up with the nets. She was so proud each time she made a catch!

It was nearly as much fun when a ball would go bouncing away and she had to retrieve it in her net.

For some early number recognition, I labeled the balls with a sharpie, too, so she could should out the number of each “fish” she caught. Older kids can riff on this idea by catching two balls and adding up the sum!

She was less interested in the corks, but still managed to snag a few in her net. Overall, a simple and watery way to keep pool on the patio.

Rainbow-Style Water Table

Rainbow Style (7)

Acting on a suggestion from Parents magazine, today we made Veronika’s water table full of all the colors of the rainbow!

The key to this fun activity was colored foam soap, a product I’d never used before, but which was worth the cost of a few bottles for the fun. To set up, fill your water table with a little water, have buckets of extra water or a filled watering can at the ready, and let the foamy fun begin!

Rainbow Style (3)

Needless to say, Veronika was delighted as soon as we squirted out the first batch of foamy soap. “More blue! More red!” she insisted.

Rainbow Style (2)

She loved filling up a mini bucket, then scraping off a layer of foam with the shovel and filling the funnels and water slide on her table.

Rainbow Style (4)

She could pour water onto the soap to make it dissolve, or swish it around in the compartments of the water table for a sudsy layer.

Rainbow Style (6)

And of course then we’d squirt in more to start all over again!

Rainbow Style (5)

If you want to take the rainbow factor to the next level, add colored water beads into the mix. I was worried, however, that these would bounce off our patio and pose a threat to wildlife, so we quickly scooped them back out again.

Rainbow Style (1)

The other drawback is that the soapy water seeped off the patio and into the grass. So while it was fun for one summer afternoon, you probably don’t want to make this activity an everyday occurrence!

Rainbow Style (8)

Construct an Igloo

Construct an Igloo (8)

What could be more perfect for cooling off in the summer than building blocks made of… ice? Freeze the “blocks” up the night before and your toddler can build their very own igloo the next morning.

To start, I filled plastic cups with water and added a bit of food coloring to each. I squirted the color in randomly (some red, some yellow, and some green) but you could have an even number of each color, a full rainbow, or even just leave the water clear! Freeze overnight.

Construct an Igloo (1)

Veronika was immediately intrigued when I pulled the frozen cups out in the morning. Run a little bit of warm water around the outside of each cup and the ice blocks will easily slip free. I set them on a tray and it was time to build an igloo!

Construct an Igloo (3)

We tried stacking them…

Construct an Igloo (4)

…or just arranging them in a single layer to form a wall of ice.

Construct an Igloo (6)

Either way, Veronika’s little toys loved to live inside their icy house. She soon had them leaping from icy rooftop to icy rooftop.

Construct an Igloo (7)

She also loved using two forks as a tool to move the blocks around, which helped keep her fingers from getting too cold.

Construct an Igloo (9)

If you have enough room in your freezer, consider freezing larger blocks in loaf pans instead. Or mix and match a few loaf pan rectangles with the cylinders from the cups. The only drawback to the game? One way or another the house won’t last forever, since the igloo is going to melt.

Construct an Igloo (10)