Sandwich Roll-Ups

Sandwich Roll Up (4)

One of the biggest changes for Veronika this fall is that she now eats lunch at school. We love these rolled sandwiches for two reasons. A) kids can help put them together, which lets them take ownership of packed lunches and B) they’re just the right size for small hands!

To start, trim the crusts from whole wheat bread, then use a rolling pin to flatten out and stretch each piece slightly. Veronika loves this part!

Sandwich Roll Up (1)

Next, spread the bread with a sticky spread of choice. We tried both lemon hummus and vegan cream cheese, both of which were declared yummy.

Sandwich Roll Up (2)

Top with your filling of choice. We made a veggie version with shredded carrots and chopped baby spinach on the first day…

Sandwich Roll Up (3)

…and filled them with tofurkey, vegan cheese, and olives on the second.

IMG_5536

Thanks to Veronika’s latest issue of High Five magazine for suggestion this perfect lunch treat.

Dessert Map

Cookie Map (5)

Maps were a big topic in Travis’s First Grade classroom last year, so as he transitions off to Second Grade, we decided to put a delicious endnote on the curriculum. This cookie dough map not only offered a little late summer learning, but made for a delicious dessert, too!

To start, prepare the dough from two boxes of chocolate chip cookie mix. You can also use refrigerated dough from the store or your favorite homemade recipe. Either way, it’s a great excuse to bake together!

Travis helped press the first batch of dough down onto the a baking sheet as a giant island.

Cookie Map (1)

He then used the second batch of dough to make topographical features, constructing mounds that could be mountains or hills and adding smaller cookie “islands” along the rim of the sheet. Bake according to package directions.

Cookie Map (2)

Once the cookie cooled, it was time to add a few more geographical features. Chocolate sauce was perfect for oceans, rivers, and mountain lakes. Travis got a bit impish with this step, drowning his land in goopy syrup.

Cookie Map (3)

He wanted to add chocolate sprinkles, too, which were more for fun than a specific geographical element. Perhaps they were plants or people on his island! Either way, it was time to dig in for the delicious result.

Cookie Map (4)

Note: Because this cookie is likely to be much thicker than a standard cookie (thanks to all those mountains!), you may find that it doesn’t bake all the way through. You can also expect the mountains to spread down and out as the cookie bakes. As a result, we found that the most delicious part was our edges and low-lying islands, while the rest was really more for fun than for eating.

Cookie Map (6)

Silly Face Rice Cakes

Silly Faces (3)

Kids love to eat food when it’s presented in the form of something else (think rainbows or boats), and it’s particularly fun to eat food that looks like… faces! Rice cakes are the perfect backdrop for this adorable snack idea from Veronika’s latest High Five magazine.

To start, spread rice cakes with your kids’ favorite sticky spread of choice, whether peanut butter or another nut or seed butter.

Silly Faces (1)

Then raid the snack cabinet for tidbits that can turn into facial features! We had an assortment of o-shaped cereal (great for eyes, noses, or mouths), raisins, dried apricots, and pretzels. The pretzels in particular were great for spiky hair.

Silly Faces (2)

The other big winner for hair was rainbow sprinkles!

Silly Faces (5)

Don’t stop there: strawberry halves make adorable ears, blueberries are perfect for eyes, and chocolate chip noses would also be super cute. Veronika thought that eating up this yummy face was an absolute delight.

Silly Faces (4)

Banana Nice-Cream Sundae

A base of frozen bananas makes this decadent “ice cream” sundae almost healthy. The same can’t necessarily be said of the toppings, though!

To start, peel and chop 4 bananas and freeze. Transfer the banana pieces to a blender and puree until smooth, along with 2 to 3 tablespoons water.

We spooned the banana “ice cream” into bowls, then set up a buffet bar of toppings! Travis and Veronika chose from a mix of: chocolate rice cereal, non-dairy whipped cream, chocolate sauce, sprinkles, and maraschino cherries. Kids can pile on the works, or just pick their favorites.

If you want to stick with healthier toppings and the fresh fruit theme, try adding raspberries or other berries instead. Thanks to High Five magazine for this delicious idea!

Fourth of July Salad

Fourth Salad

Help your toddler learn the colors of the American flag this Fourth of July with this super-simple salad. It’s perfect for an Independence Day picnic or barbecue.

To start, add 1 pint raspberries, 1 pint blueberries, and 1 (5-ounce) container vanilla non-dairy yogurt to a bowl. I loved showing Veronika the three colors in separate piles first.

Fourth Salad (1)

Stir together for a red-white-and-blue combo that’s sure to be patriotic and delicious!

Fourth Salad (2)

Rainbow Pizza

This vibrant rainbow pizza, care of Veronika’s latest edition of High 5 magazine, is the perfect recipe to celebrate Pride Month. All of the ingredients below have no quantity, since the amount will depend on individual preference or the size of your pizza crust! Feel free to swap out the veggies below for your kids’ favorite in each color.

Ingredients:

  • 2 individual prepared pizza crusts
  • Pizza sauce
  • Shredded non-dairy mozzarella cheese
  • Red bell pepper, chopped
  • Orange tomatoes, halved
  • Frozen corn, thawed
  • Broccoli florets, steamed and chopped
  • Snap peas, steamed and chopped
  • Red onion, diced
  • Kalamata olives, sliced
  1. To prepare the pizzas, spread the desired amount of pizza sauce to evenly cover each crust. Sprinkle with the desired amount of mozzarella.
  2. Arrange the veggies in rows, starting with the red pepper on the top of the pizza, followed by the tomatoes, corn, broccoli, snap peas, onion, and olives.
  3. Bake at 425 degrees F for 8 minutes. Cut into wedges to serve.

Stop and Eat the Flowers

This adorable idea from Highlights is one of those times when it’s perfectly okay to let the kids play with their food.

Just before Travis got home from school, I prepped a big platter of veggies and fruits that could be used to make a veggie “garden”. This can include almost anything, but we used an assortment of:

Celery

Snap peas

Cherry tomatoes

Baby carrots

Green beans

Broccoli

Green apple

Blueberries

I set out the plate, along with a cutting board for a “canvas”, and invited Travis to form the items into flowers.

There was so much room for variety here! The long green shapes like celery and green beans were perfect for flower stems. The slightly shorter snap peas could be grass.

Rounder shapes (cherry tomatoes, blueberries) worked nicely as the center of flowers, and we played around with ideas for petals, such as baby carrots or fuzzy broccoli trees.

This “flower” with a cluster of blueberries made me think of delphiniums!

Be careful though, because you’ll probably have garden “pests” who gobble up the flowers only moments after they’ve bloomed.

Make Pasta Noodles

Make Pasta (5)

I’ve tackled many homemade recipes with kids, but we’ve never properly made fresh pasta noodles. Today was the day to take the leap! Technically, I knew this recipe wasn’t going to turn out “right” with a toddler, but mostly the intention was for Veronika to have hands-on flour-y fun.

To start, I placed down several sheets of wax paper to protect the floor, then scooped out 2 cups flour. Instant fun! Veronika helped mound this into a volcano shape in the center of the wax paper.

Make Pasta (1)

I then whisked 4 tablespoons flaxseed into 12 tablespoons cold water for flax “eggs”, although honestly you could just use water. Veronika loves when we make vegan eggs like this, though, and is proudly in charge of the whisking.

Make Pasta (4)

Make a well in the center of the flour mound and begin adding the flax mixture, a little at a time.

Make Pasta (2)

Veronika loved helping stir with a fork after each addition; the flour begins to pull into the liquid in a way that’s quite neat to watch! Eventually you’ll need to start to using your hands, kneading until it forms a ball. I was so proud of Veronika for getting her hands right in there after a moment of hesitation.

Make Pasta (3)

Wrap the dough in plastic wrap and let stand at room temperature for 30 minutes. While a pot of water comes to a boil, roll the dough into a rectangle with a rolling pin. Veronika “helped” with this part, although mainly by jabbing at it with the rolling pin.

Make Pasta (6)

At this stage, things turned more into sensory play, so I wasn’t able to cut the noodles as suggested by online sources like Parents magazine. But I did slice off little bits of dough that we cooked up in boiling water anyway, just to see! Cook for about 3 minutes (until they float to the surface), then serve warm with marinara sauce. The kids declared the noodles yummy, although a bit odd in texture!

Make Pasta (7)

Watermelon Pizza

This is a great recipe for kids to tackle solo, since it involves steps for early slicing and knife skills in the kitchen. Travis proudly made the whole “pizza” himself.

To start, I cut a section from a mini watermelon that was about 1 inch thick. First Travis needed to put on the pizza “sauce”. He slathered on raspberry jam, very carefully making sure to smooth out any lumps.

Next he cut a banana into slices and green grapes in half. These fruits are great for early cutting, since both are soft enough to cut through with a butter knife.

We pretended the bananas were mushrooms and the green grapes were broccoli! Place on top of the “pizza”, then cut into 4 wedges to serve.

Fruit Salad Trio

Here are three very different ways to whip up fruit salad, all delicious, and all quite different! I’ve arranged them in order from most parental prep to most kid-involvement!

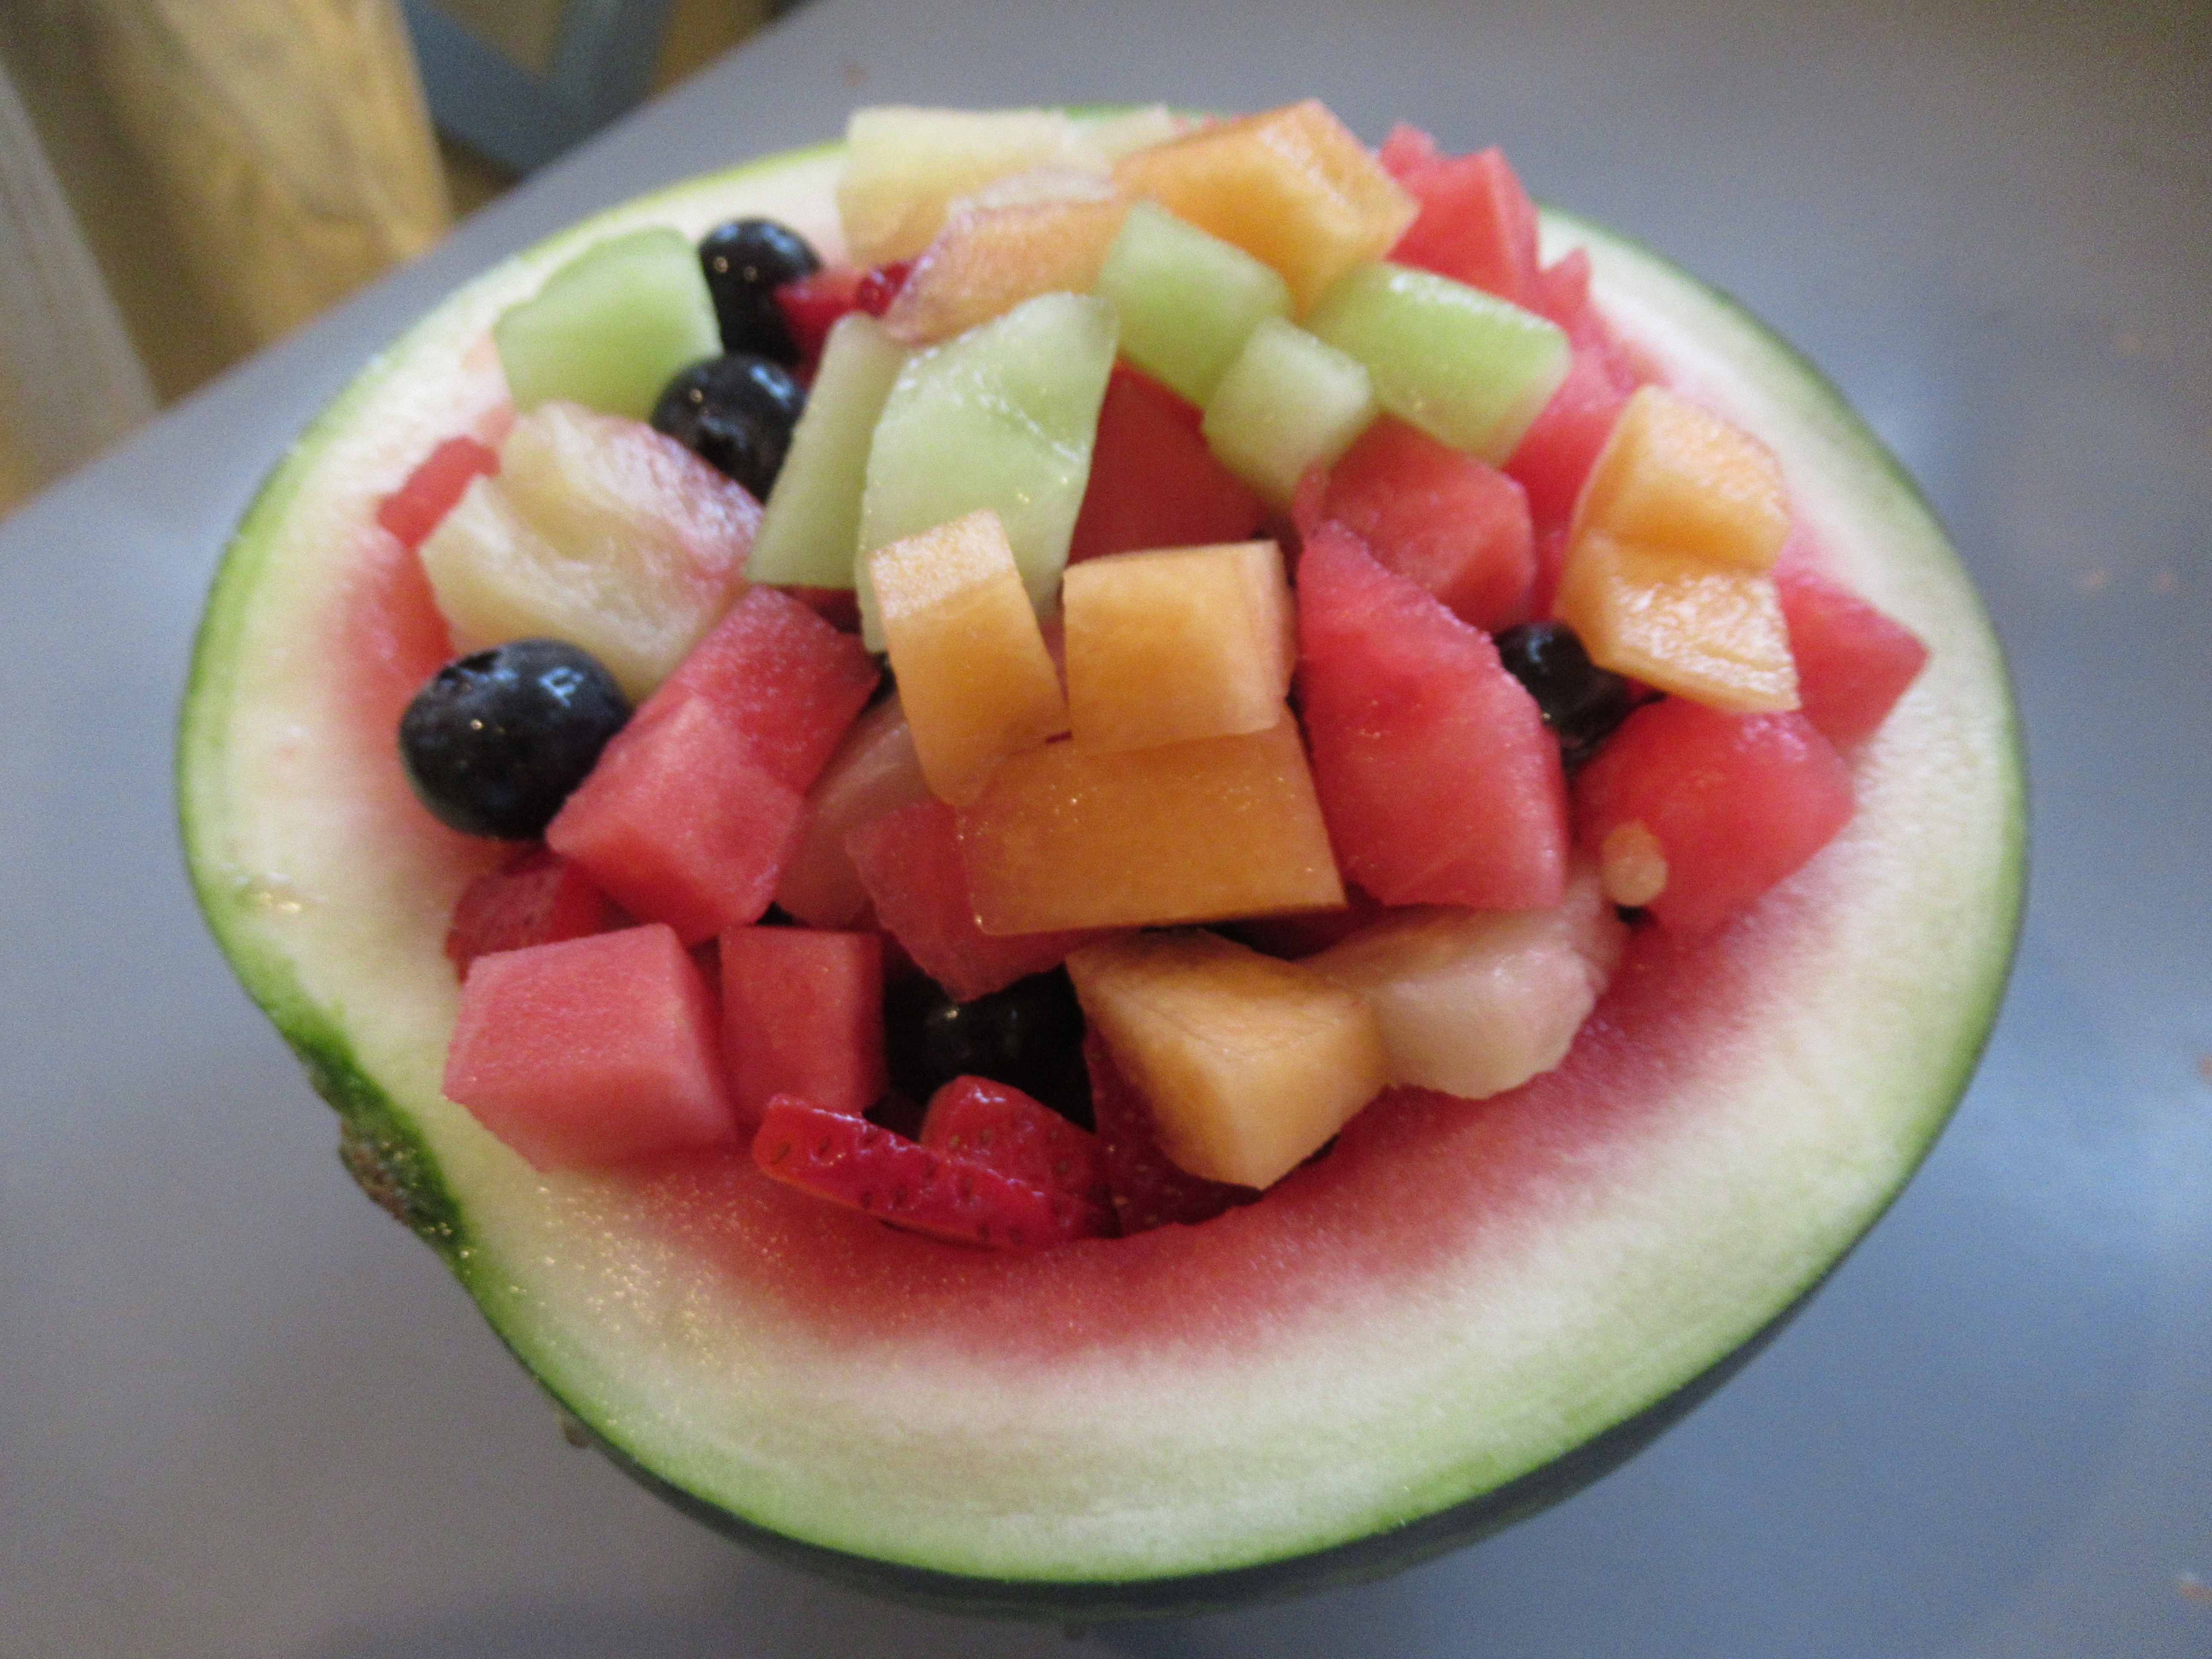
Fruit Salad in a Shell

This one is all grown-up work, thanks to lots of chopping and a classic presentation in a scooped-out watermelon!

Ingredients:

  • 1 mini watermelon
  • 1/2 cup finely chopped cantaloupe
  • 1/2 cup finely chopped honeydew
  • 1/2 cup finely chopped pineapple
  • 1/2 cup thinly sliced strawberries
  • 1/2 cup blueberries
  1. To start, scoop the flesh from half of a mini watermelon. Chop the flesh to equal 1/2 cup and reserve the remaining watermelon for another use.
  2. Combine the watermelon pieces in the shell with the remaining ingredients, stirring gently.

Needless to say, the kids loved looking at this one almost as much as eating it!

1-2-3 Fruit Salad

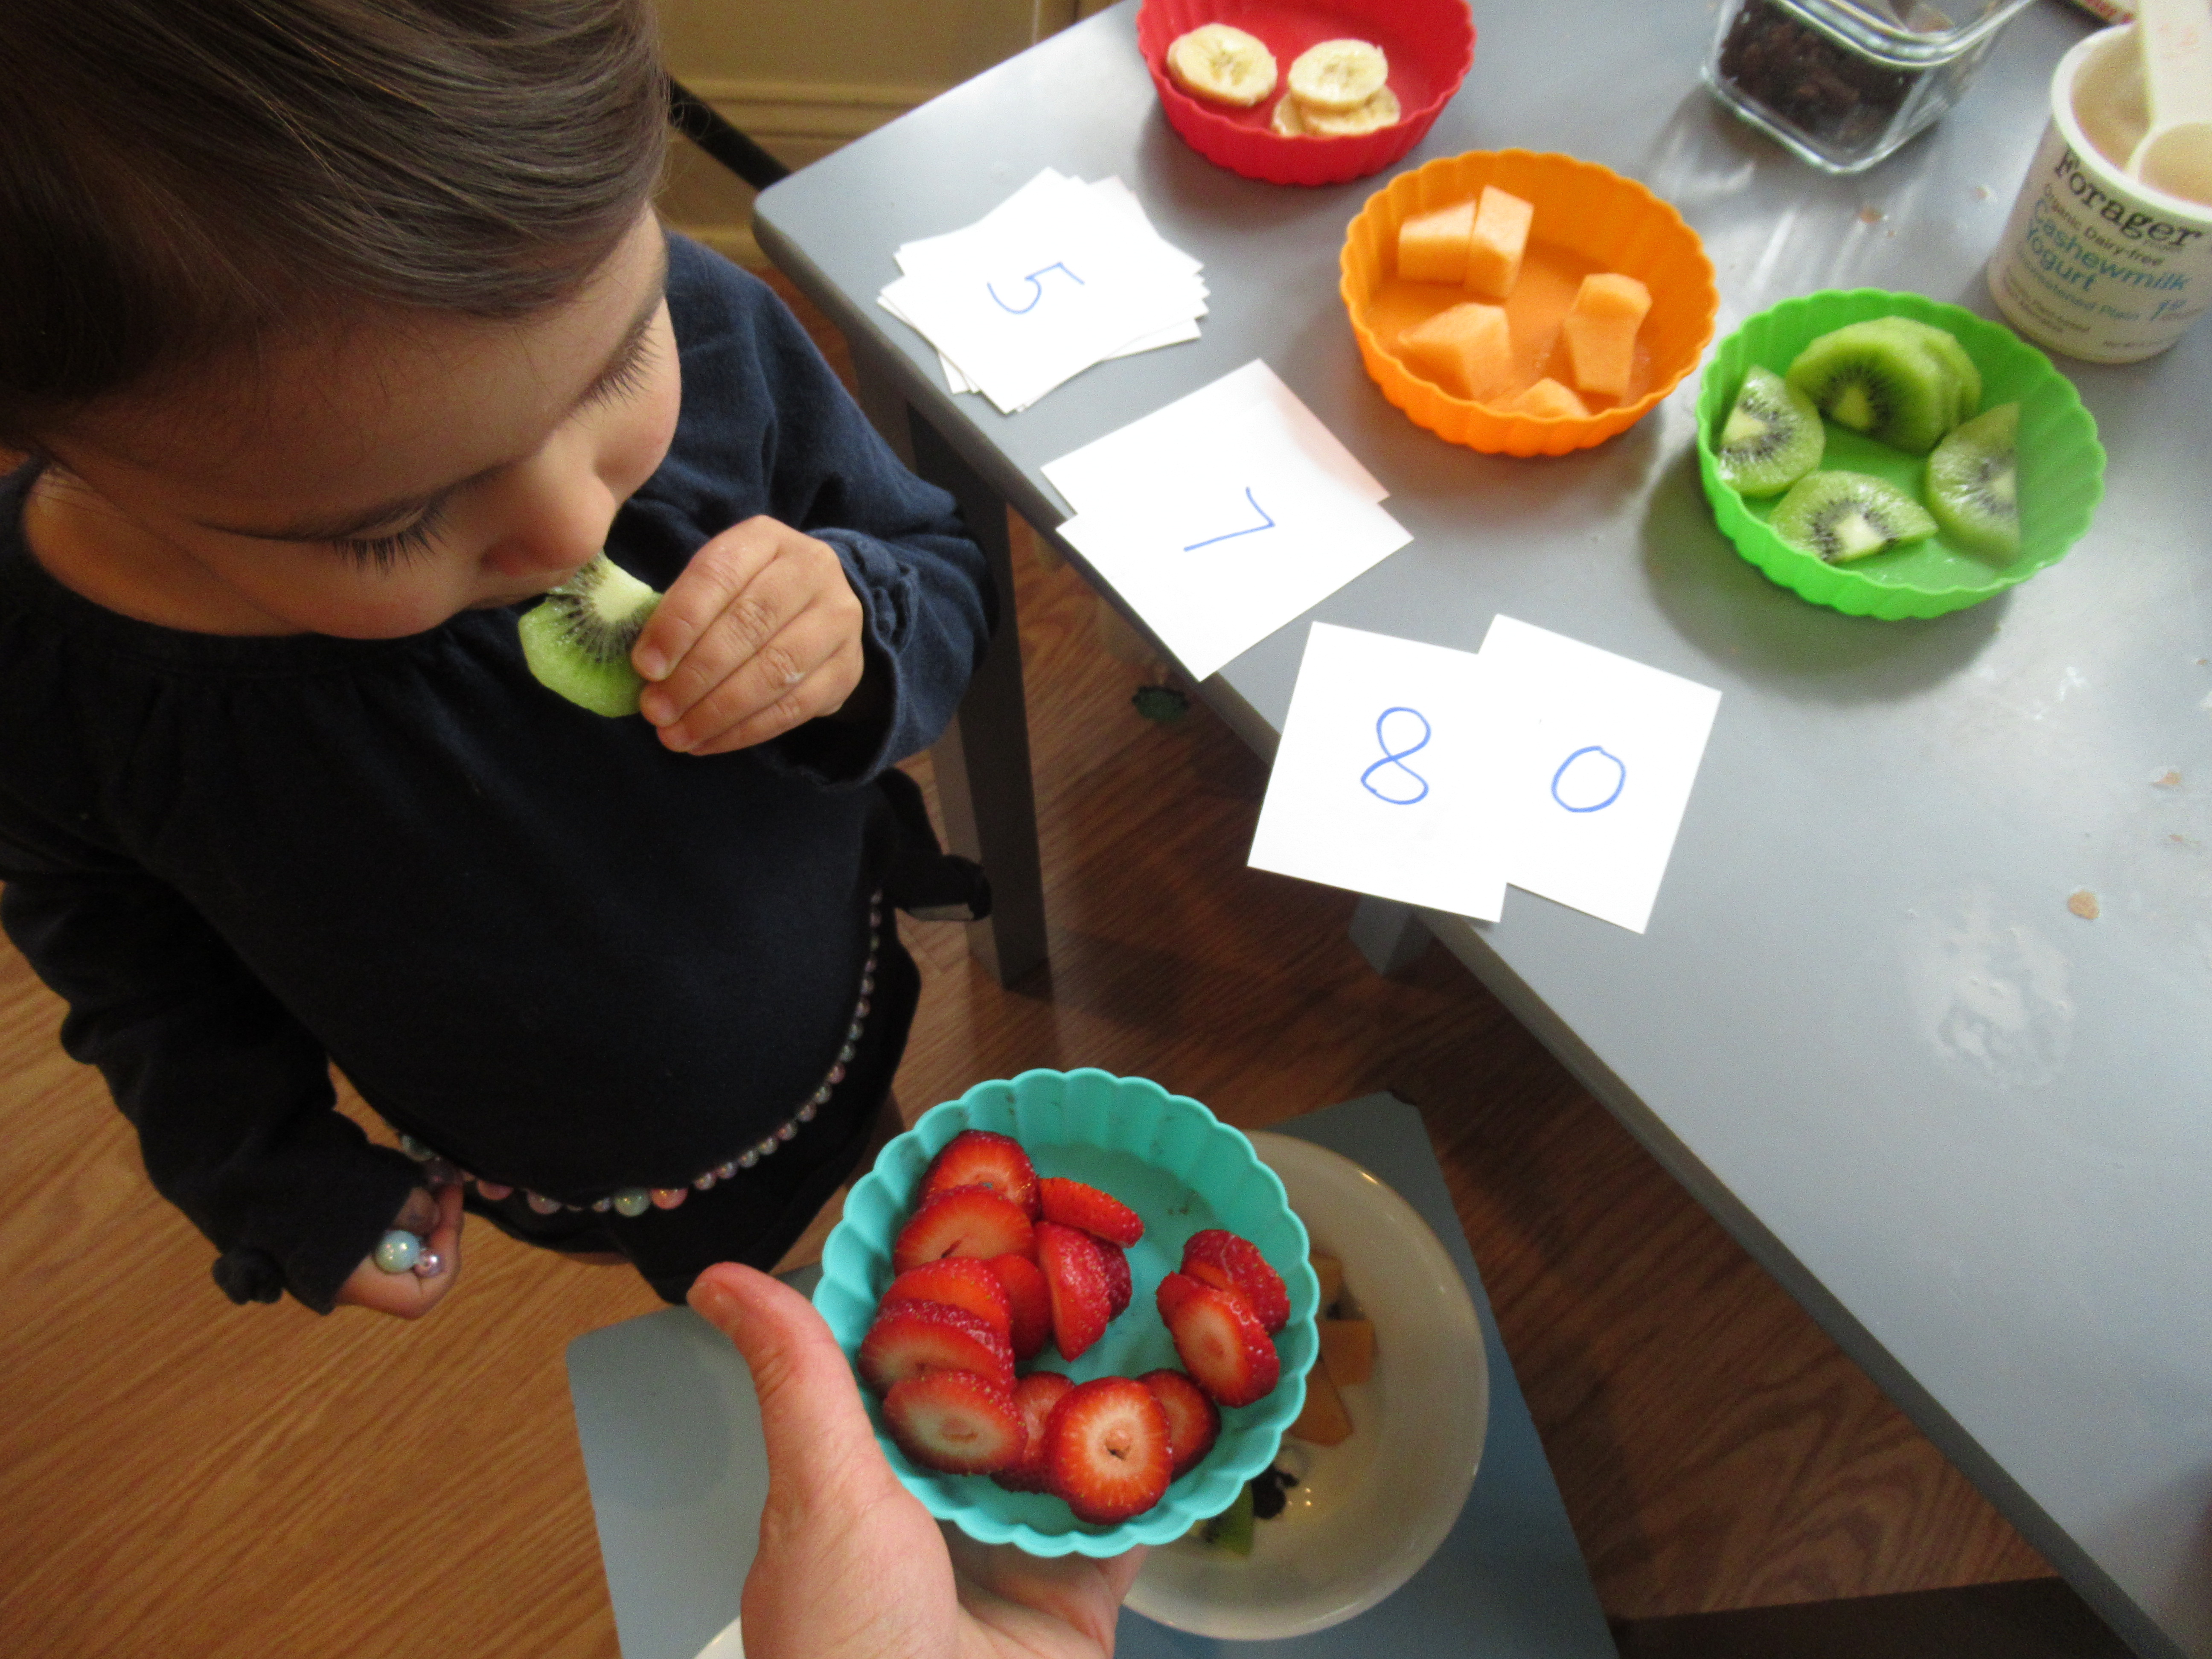
For the next version we made, care of High 5 magazine, not only was Veronika involved, but she got to practice counting!


Ingredients:

  • 1 teaspoon agave nectar
  • 2 teaspoons raisins
  • 3 tablespoons plain non-dairy yogurt
  • 4 grapes
  • 5 banana slices
  • 6 cantaloupe chunks
  • 7 kiwi slices
  • 8 strawberry slices
  • 9 blueberries

After combing all that in single-serving bowls, we gave the fruit salad 10 stirs! I loved setting out index cards for each ingredient, making this culinary math at its finest.

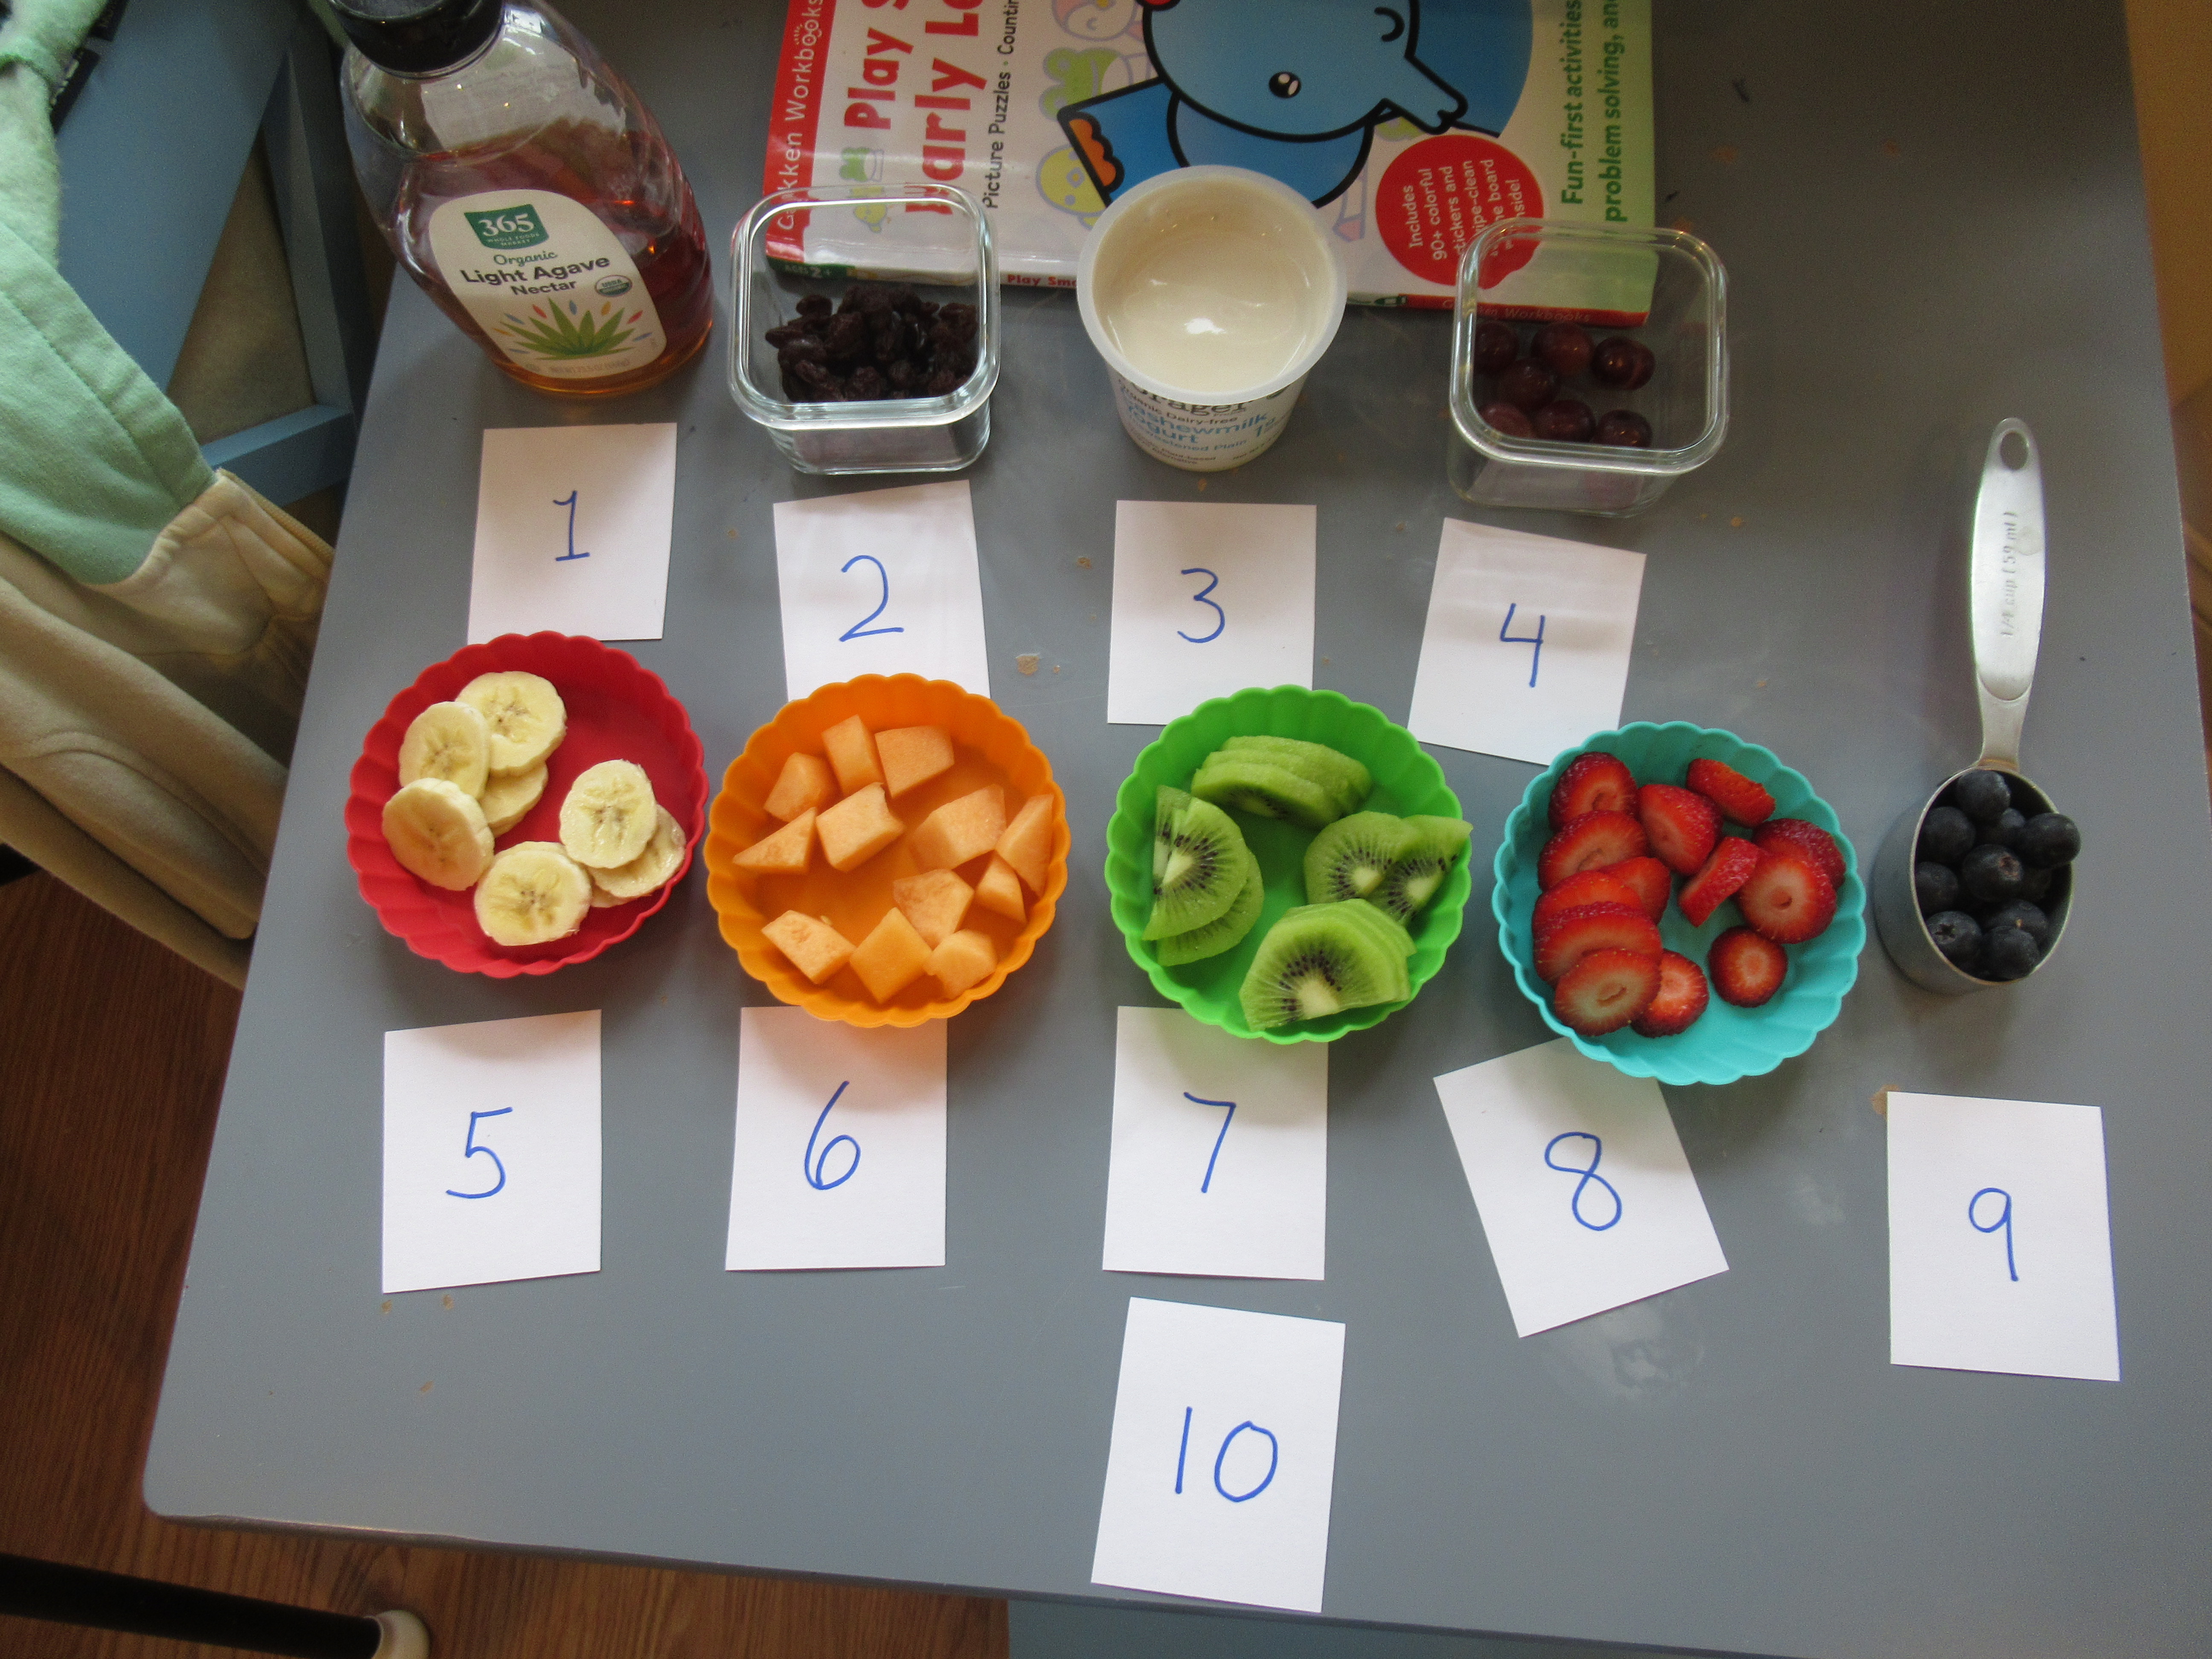
Veronika read me each number before we added that item, and I helped her select out the right number to plink into her bowl.

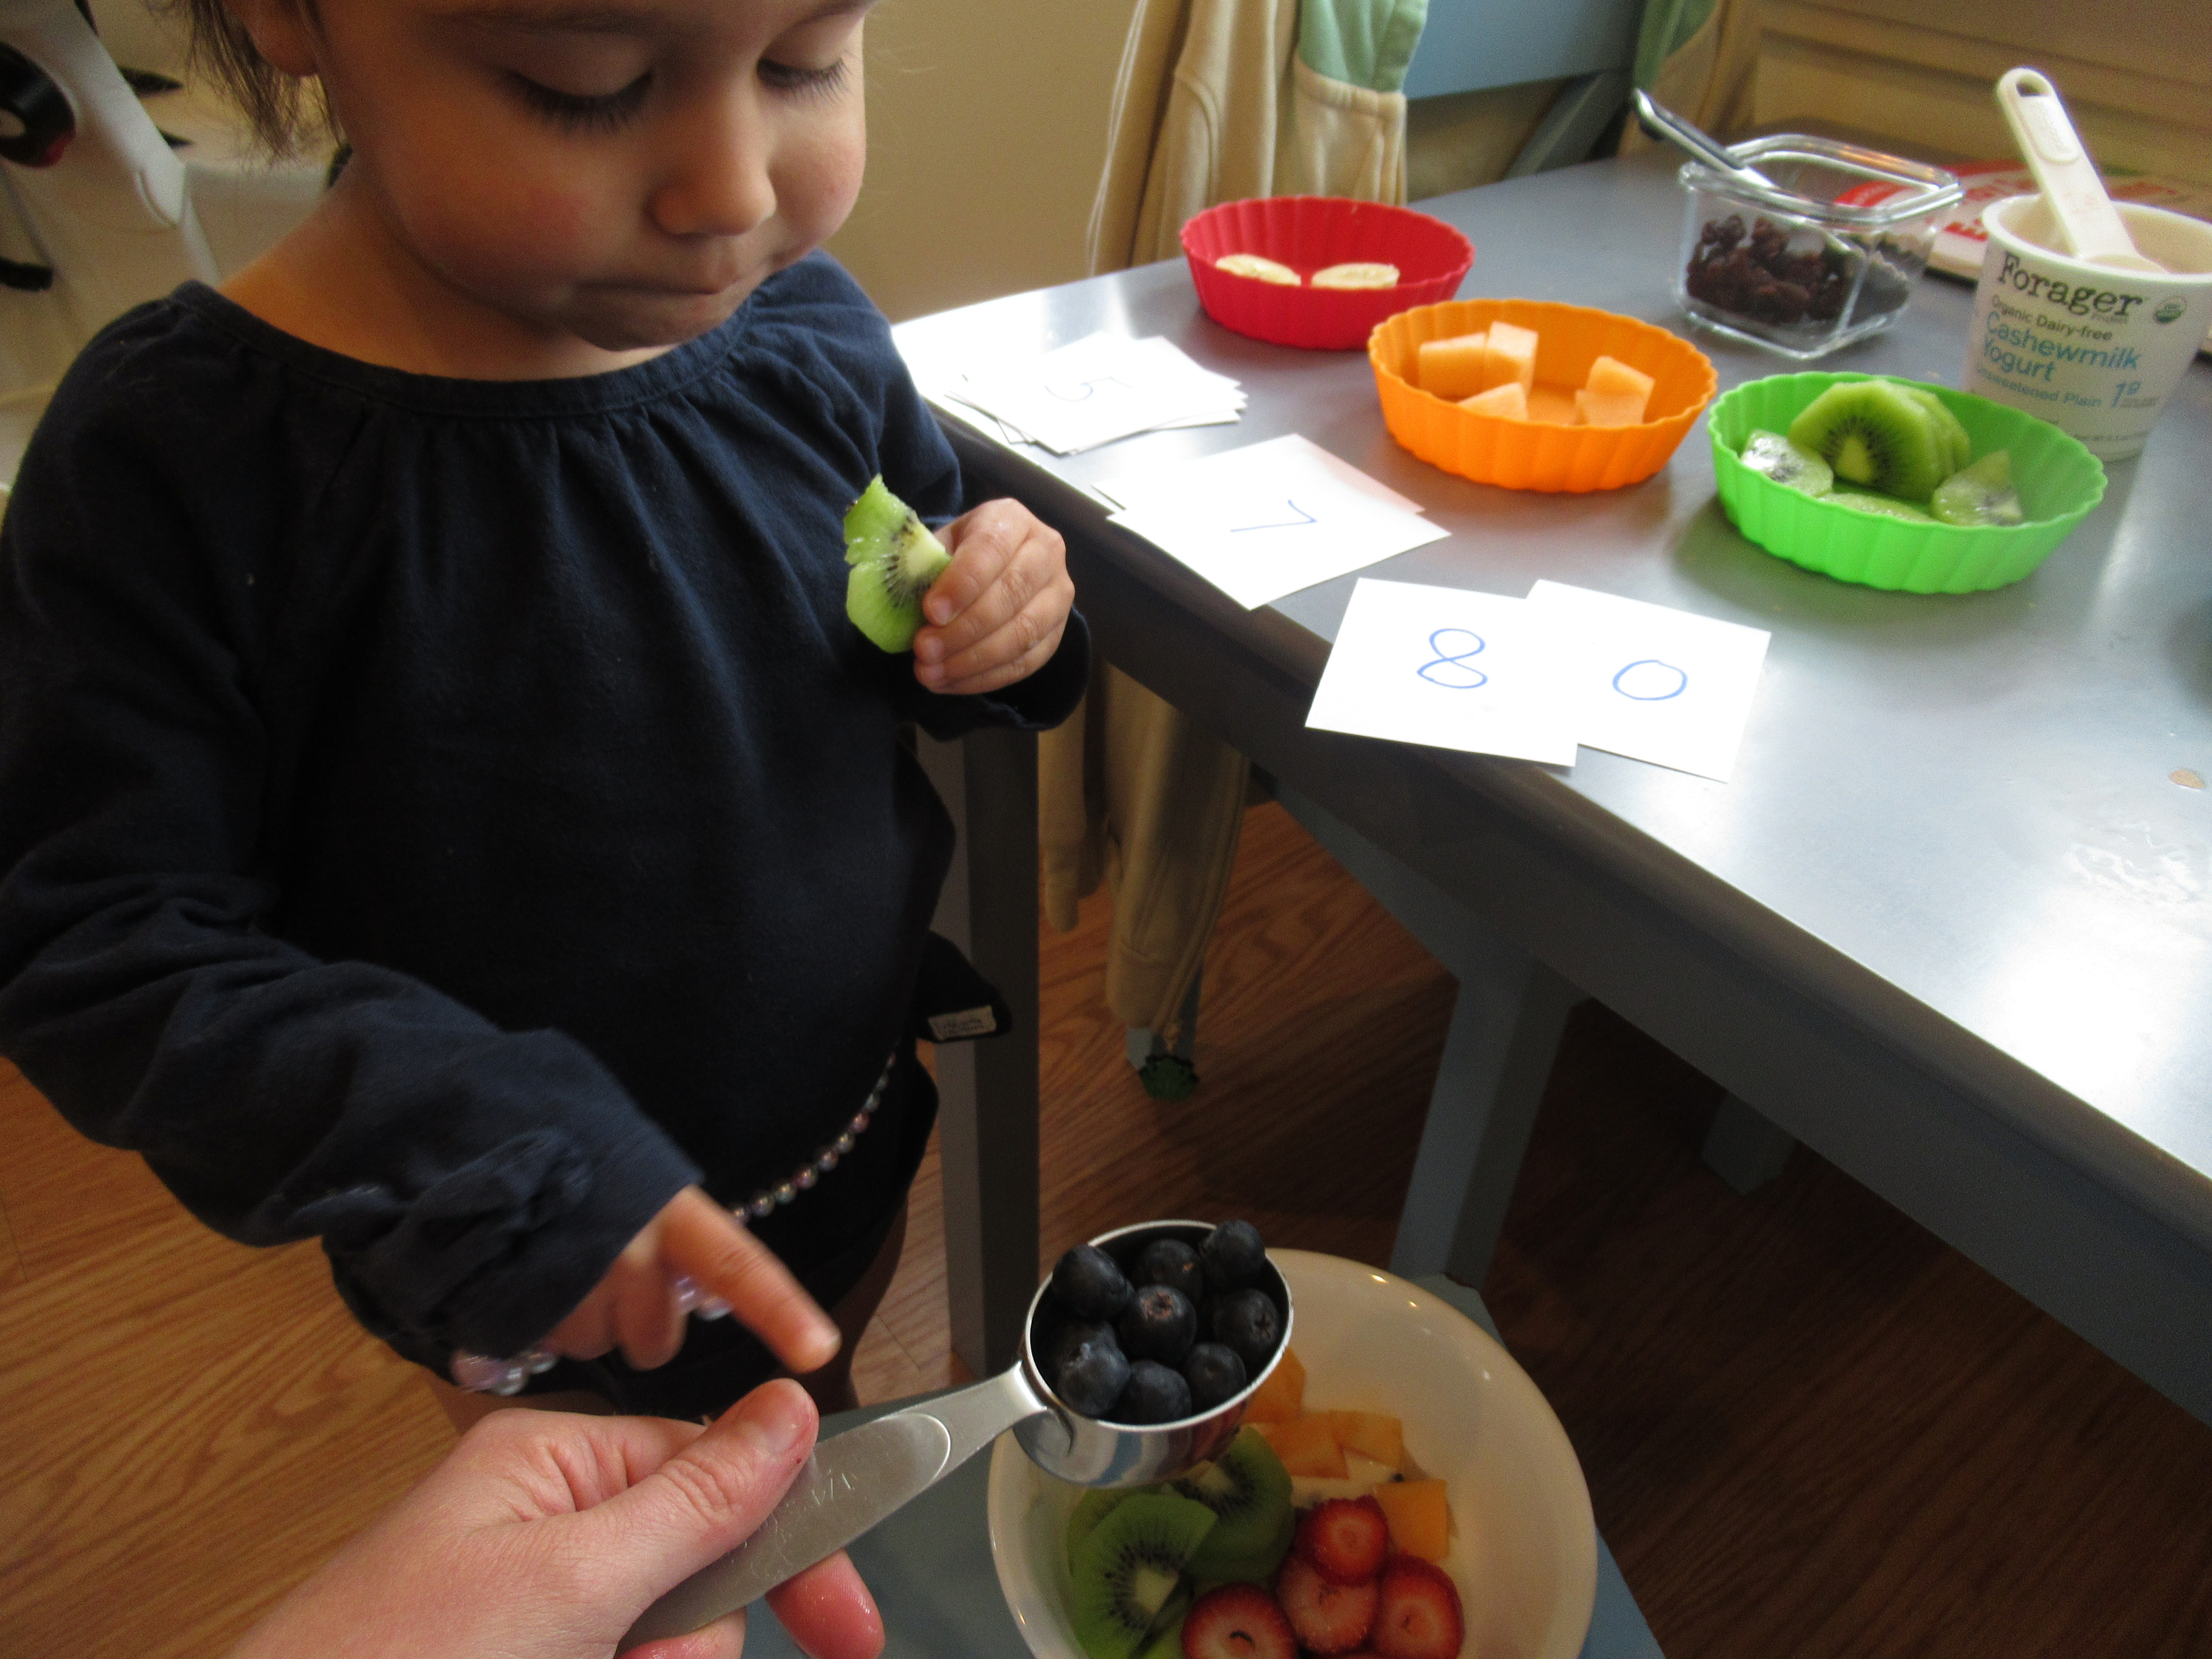
You can see that the tasting began before the counting was complete though!
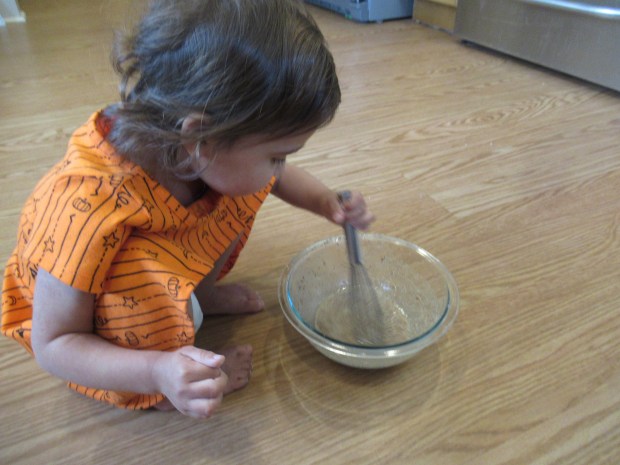
Canned Fruit Salad

For this final version, Veronika got to be in charge! Purchase snack fruit cups of pineapple, peach, and pear pieces, and all your toddler has to do is dump and stir.

In a bowl, combine the canned pineapple, peaches, and pears to taste. Let your toddler use a butter knife to slice a banana, and add to the bowl, along with a (grown-up) chopped apple. Now spoon a carton of vanilla non-dairy yogurt on top as the dressing! Stir to combine.

Note: If you can’t find individual snack cups, simply purchase one can of each fruit. In this case, you will need to do some grown-up slicing!