Beehive Card

Beehive (5)

We’re not the only ones happy to be back outside – the bugs are out in force now that spring is here, too! Travis has been very fascinated by the bees this season, so we decided to welcome spring with this cute project. You can hang it at home, or send it as a lovely card to a friend!

I cut a hive shape from brown construction paper to start, and then Travis went to town with a glue stick.

Beehive (1)

Once the paper was very gluey, we added thick yellow yarn.

Beehive (2)

Then of course we needed bee stickers, which I happened to have from the craft store. Travis didn’t stop until his hive was full of a big bee family.

Beehive (3)

We needed a few flower stickers as the final touch of course!

Beehive (4)

Four Seasons Tree Pictures

Tissue Paper Tree (6)

The buds are on the trees, and we’re discussing the annual cycle of a tree and the seasons a lot this week! It was the perfect time to make a beautiful picture showing all the stages of a tree throughout the year.

To set things up, I cut 4 trunks from brown construction paper (preschoolers can help with this step!) and glued them down to poster board.

Tissue Paper Tree (3)

Then it was time to rip up tissue paper for our 4 different trees – Travis was an eager participant for this part! We used pink for spring flowers, green for summer leaves, and orange and yellow for the fall. I had intended to use white tissue paper for winter snow, but we decided cotton balls would be more fun!

Tissue Paper Tree (1)

I set out a dish of glue, and showed Travis how to wad up each piece of tissue paper, dip in the glue, and then apply. So he wouldn’t get confused, we worked on one season at a time, starting with bright pink flowers for spring.

Tissue Paper Tree (5)

He was definitely proud to determine where each leaf or flower should go, and very seriously told me, “I’m all done!” when finished with one season and moving on to the next. A very cute way to talk about the seasons.

Tissue Paper Tree (7)

Cupcake Wrapper Flowers

Cupcake Flower (6)

This is one of those crafts that was really a mommy project, while Travis played with all of the materials alongside me. Children in pre-school on up will love to help you put the flowers together though! When our flowers were finished, Travis loved “planting” them – more on that below!

Cupcake Flower (3)

To start, I shaped bright cupcake liners into various flower shapes – some with rounded edges and some with points. The cupcake liners were by far Travis’s favorite part of this craft, and he stacked them and filled them with pom poms while I worked.

Cupcake Flower (8)

For older children, you can trace the shape of the flower to cut, and have them practice with safety scissors.

Cupcake Flower (2)

Once you have enough flowers, trace a leaf shape on green construction paper and cut out. Kids will love helping to use a hole punch on each leaf.

Cupcake Flower (1)

Fold a green pipe cleaner in half, and thread one or two leaves onto each. Carefully poke the pipe cleaner “stem” through two or three cupcake wrappers, folding over the end to secure in place.

Cupcake Flower (4)

We tried gluing pom poms to the center of a few of our flowers, but they didn’t stay on very well. Oh well, they looked pretty even without the embellishment!

Cupcake Flower (7)

You can display your spring flowers in pretty vases…

Cupcake Flower (9)

Or plant them in dirt, as we did with an old prop from a Koala Crate.

Cupcake Flower (10)

Newspaper Flowers

Newspaper Flowers (9)

Here’s another pretty addition to our spring flower play! This time we used a rather interesting concoction of homemade paint to make flowers from newspaper.

Travis loved the painting process. In cups, combine equal parts white glue and water, then add a few drops of liquid watercolor to each. The mixture is best applied with a foam brush.

Newspaper Flowers (1)

Travis was very deliberate deciding which color should go where!

Newspaper Flowers (2)

Our goopy newspaper then needed to dry overnight in the bathroom.

Newspaper Flowers (4)

The next morning the paper is very stiff – a bit like papier-mache. I cut it into flower petals, while Travis got in great cutting practice alongside me, using his safety scissors.

Newspaper Flowers (5)

Glue 5 or 6 petals together in a spiral. Travis had sort of lost interest, so I did this step solo.

Newspaper Flowers (6)

Once the glue dried, we attached a green pipe cleaner stem to the back of each flower with tape.

Newspaper Flowers (7)

Play with the flowers any way your like…

Newspaper Flowers (8)

Or they even make a fantastic addition to a real flower display!

Newspaper Flowers alt

Paper Towel Flowers

Paper Towel Flowers (9)

Be prepared for several crafty flower posts in the next week or so. I have a case of spring fever, plus another flower-based theme I’m working on (stay tuned for more on that!…). So for starters, here is a lovely and easy flower craft that toddlers will adore.

Watercolor and paper towels makes for an innovative painting experience, because with just a light touch of the paint brush, the color will bleed across the paper towel. Travis had fun testing the limits of this for a little while.

Paper Towel Flowers (1)

We were using liquid watercolors for the first time, but you might consider sticking with regular watercolors. I confess, it was this mama who knocked over our yellow for the first spill, and Travis later decided to pour the watercolors back and forth to mix them, which resulted in a spilled cup of blue. So… User discretion advised!

Paper Towel Flowers (2)

Despite the silly mess, we ended up with three covered pieces of paper towel to turn into flowers.

Paper Towel Flowers (3)

Let dry completely, then invite your toddler to rip the paper towel into pieces – this part is sure to be a big hit!

Paper Towel Flowers (6)

I arranged the pieces into three piles, each stacked in order from largest to smallest. Fold up into a flower shape, and secure with a clothespin stem.

Paper Towel Flowers (7)

To add a dose of reality to our flowers, we then scented them with perfume! Travis was astounded that our flowers had a real smell, and soon was running all about the house waving them. A great spring craft.

Paper Towel Flowers (8)

Make a Rain Meter

rain-meter-2

Rainy March sure came in like a lion, and seems to be ending the same way! Meaning it was the perfect time to make a rain meter! Travis wasn’t especially interested in making this craft (another clever suggestion from High Five magazine), but he sure loved the results!

To make the rain meter, we laid a fork along a piece of masking tape and made 5 notches. Label them 1 through 5, having your child count along with you.

rain-meter-1

Place the tape on a plastic cup, then secure the cup some place outside where rain will fall. We taped ours quite securely to the balcony because our rain storm involved a lot of wind!

The next morning, we could check on our results. When I told Travis the liquid in the cup was rain, he was amazed. “Can I hold it?” he asked. “Can I touch it?” I have to admit, I’ve never put my fingers in a cup of collected rain water either, and it was neat to think that they started out as individual rain drops!

Rain Meter (4)

After the first storm, the rain was just above our 1 mark. We intend to keep collecting through upcoming April showers to see how much spring rain we get!

Rain Meter (3)

Paint Up a Storm

Paint a Storm (7)

This idea from our April copy of High Five magazine was the perfect project on a gray day as we head into rainy April – what better way to help children enjoy all those April showers that will bring May flowers??

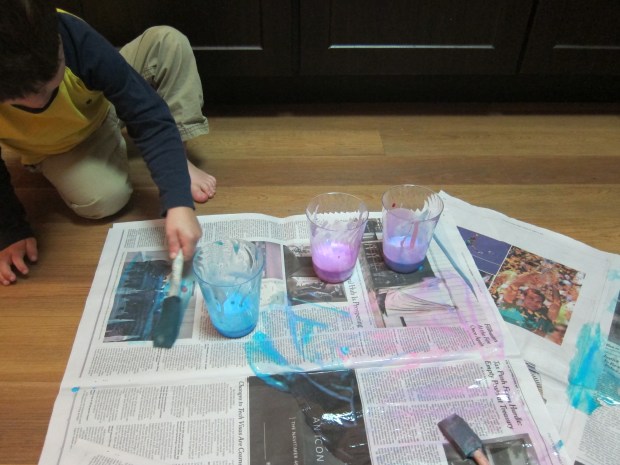
To start, we looked out the window at the stormy day, and I asked Travis what colors he saw, pointing out various tones of gray and deep blue. I asked him if he wanted to paint the day, and his enthusiastic answer was yes!

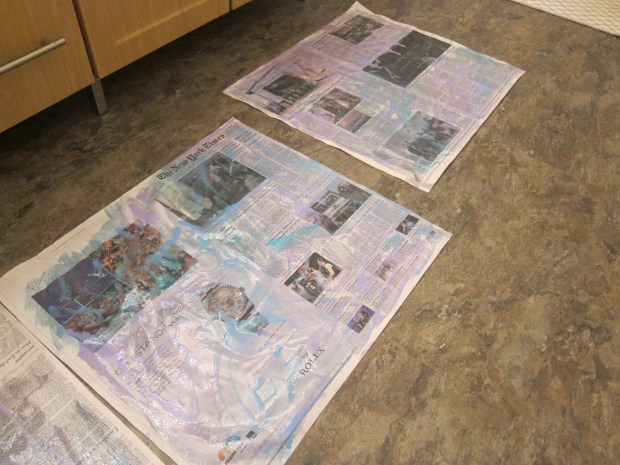
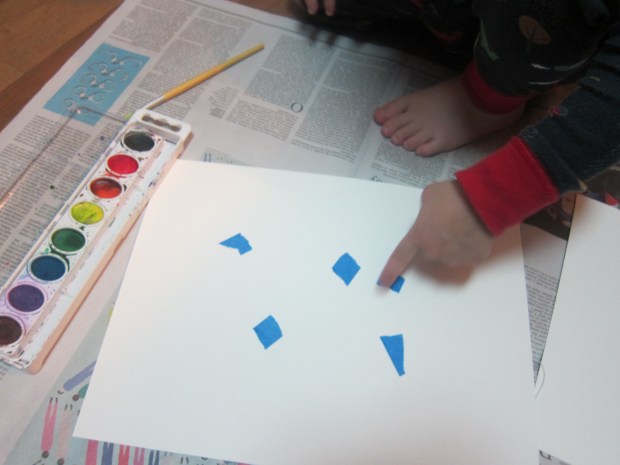
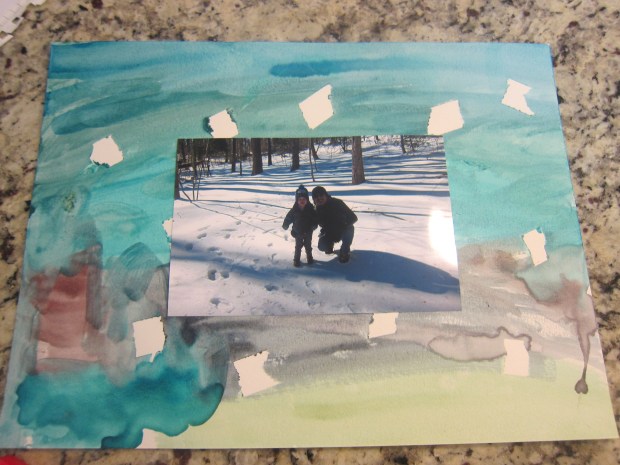
I set out watercolor and watercolor paper, but first we needed to add our “raindrops”: tear bits of masking tape into pieces, and adhere to the paper; when you remove the pieces later, you’ll have white raindrops left behind.

Paint a Storm (2)

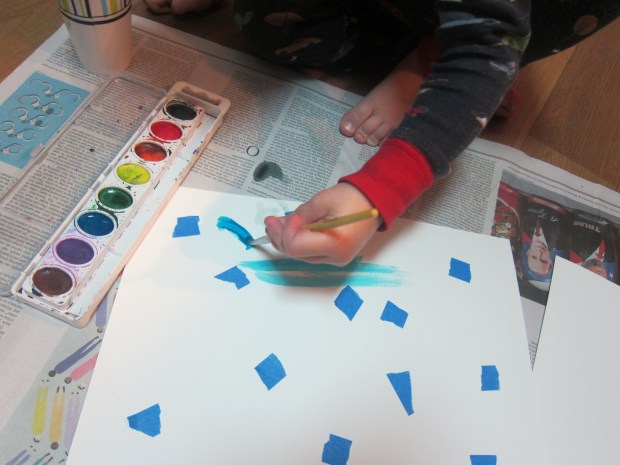
Travis barely paused for this step before diving for the paints. He talked as he worked about the various shades of blue he made…

Paint a Storm (3)

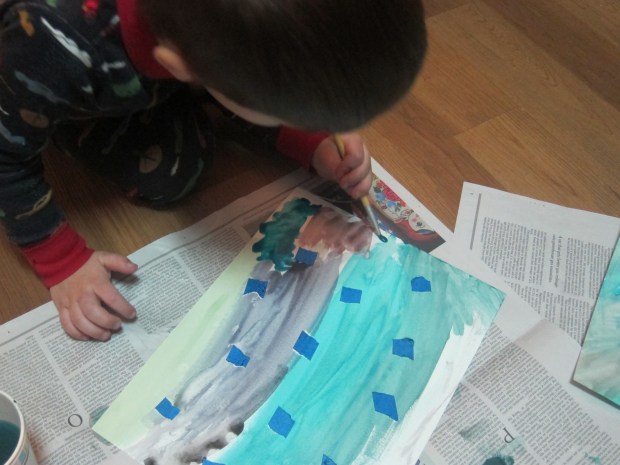
…and then impressed me by painting “puddles”!

Paint a Storm (5)

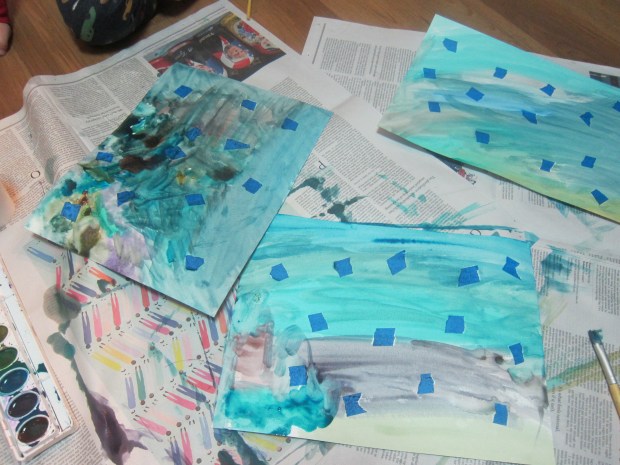
Mama made her own watercolor while he worked, and we collaborated on a third, ending up with three stormy paintings.

Paint a Storm 6)

Let the watercolor dry completely before removing the tape and revealing your “rain drops”.

Paint a Storm (8)

The paintings are perfect to transform into gifts. We folded one in half to make a “Cloudy Card” as a gift for his grandpa. A second one we cut into strips to be “Rainy Day Bookmarks.”

Finally, we glued a photo in the center of the third, making a Stormy Weather Picture Frame – the perfect gift for daddy’s desk!

Paint a Storm (1)

What other gift ideas can you think of with these stormy paintings? Please share in the comments!

Scented Salt Dough


Scented Dough (5).JPG

Salt dough projects aren’t just for Christmas ornaments – we brought the scent of spring into our house with this neat take on the project!

The first step was to whip up salt dough of course, and Travis always loves projects that involve mixing. In a bowl, combine:

1 cup flour

1/2 cup salt

1/2 cup water

If your dough is too sticky, simply add a little more flour. Next we mixed in just a drop of food coloring and kneaded it in, resulting in a pretty marbled effect. Lavender and green felt like the perfect spring shades!

Scented Dough (1)

Instead of Christmas shapes, we rolled and cut our dough into animals like sheep, pigs, and cows. And of course Travis had fun just playing with the dough for a while, and requesting extra flour to make his hands a springtime mess!

Scented Dough (2)

Bake the dough at 350 degrees F for 30 minutes.

Scented Dough (4)

Once it cooled, we added the finishing touch – a drop of lavender oil to the back of each piece. After that, the whole apartment smelled like springtime!

Scented Dough (3)

Alphabet Flower Garden

Alphabet Garden (9)

We are so ready for spring flowers around here, so decided to make them bloom in our home before the ones outside catch up. This beautiful foam sticker garden was a great way to sneak in some learning.

I drew flower stems and leaves on a piece of foam with a permanent marker (poster board would probably work even better), with a letter of the alphabet at the head of each stem. I then wrote the alphabet letters on foam flowers.

Alphabet Garden (2)

It was now up to Travis to add the flower to each stem, matching up letters as he went.

For a few minutes, he was more interested in just fooling around with the foam stickers. But once he made the connection of what I was really asking of him, he was SO excited each time he found the matching stem for his flower.

Alphabet Garden (6)

He made it about three-quarters of the way through the alphabet before losing interest, so I finished off our garden, but not before proudly surveying his work!

Alphabet Garden (5)

The next morning, we added additional stickers of leaves and bugs to round out the picture – a beautiful spring garden.

Alphabet Garden (8)

Spring Sensory Bin

Spring Sensory Bin (7).JPG

Happy Spring! We’re kicking off the new season with this pastel-hued sensory bin. I made dyed rice once before on this blog, but this time I used Kool-Aid for more vibrant color; you can prepare batches exactly the same as for Kool-Aid Dyed Pasta.

Spring Sensory Bin (1)

After the rice dried, I set up with a bin with a few spring animals, a rake, and fake flowers, for a pretty pastel garden.

Spring Sensory Bin (2)

Travis immediately set to raking – he loves scooping through rice, no matter the theme! For this activity, we talked about how flowers grow in the spring, and he loved “planting” some in the rice. Then we decided we needed to fill up a watering can with the rice, which could then rain “April showers” down on the flowers. This went on for quite a while!

Spring Sensory Bin (6)

I also added plastic Easter eggs at one point, which were fun to scoop with, fill with rice to shake like maracas, and more.

Spring Sensory Bin (4)

Travis loved the way that the rice started out in 4 separate color piles, and then all mixed together.

Spring Sensory Bin (5)

Hopefully this helps make your first day of spring as joyful as ours was!

Spring Sensory Bin (3)