Edible Geode

Geode final

There are kids’ projects that are ho-hum for the adults, and there are kids’ projects where even the grown ups in the room say “Wow!” This project definitely falls into the latter category, a homemade geode rock – that just so happens to be edible too. You’ll need to be patient for this one; t takes about 4 days, start to finish… But nowhere near the hundreds of thousands of years required for a real geode!

To make our own geode, we first needed to form crystals: Make a supersaturated sugar solution by dissolving 3 cups sugar in 1 cup boiling water. Wait until you can’t see any sugar crystals on your spoon, to ensure that the solution is ready.

LP Natural (15)

Fill a bowl half way with flour, then press aluminum foil in to the flour and pour in your sugar solution. Cover with additional foil and let sit for 2 to 3 days – yes 2 to 3 days!

LP Natural (16)

On the third day, I thought we hadn’t been successful, seeing just a few sugar crystals floating on top of the sugar solution. But when we lifted out our foil and poured off the excess sugar solution, we were left with a beautiful geode! We turned this upside down on a paper towel and left it to dry out for another full day.

LP Natural (22)

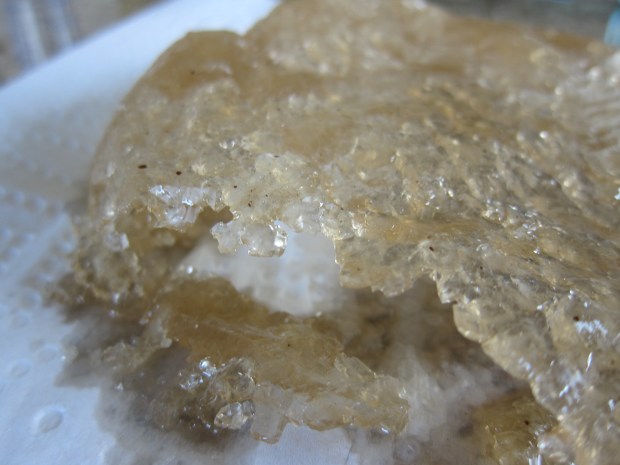
The “geode” broke into a few smaller pieces as it dried, but even the adults in the room were dazzled by the resulting rock candy. I haven’t eaten this stuff since I was a child at the science museum, and it was very neat to have made it right at home.

LP Natural (24)

Travis happily crunched on the smallest piece, before I stopped him because we weren’t quite done making our rocks look like rocks.

In order to do that, we melted vegan chocolate chips in the microwave at 20 second intervals until melted, about 1 minute total. Brush the melted chocolate over the outside of the rock (leave the jagged “geode” side uncovered.

LP Natural (26)As the finishing touch, we crushed two Newman O cookies and sprinkled on the resulting “dirt.”

LP Natural (27)

That is one beautiful geode!

LP Natural (25)


Chunky Monkey Cookies

Chunky Monkey cookies

We pretty much never tire of banana + chocolate + nuts around here. If you prefer your chunky monkey in liquid form, head on over to my smoothie recipe. These cookies will satisfy anyone looking for something a bit more toothsome.

Ingredients:

  • 6 pitted dates
  • 1/4 cup water
  • 1 cup rolled oats
  • 1/2 teaspoon salt
  • 1/2 teaspoon baking soda
  • 1/2 cup peanut butter
  • 1/2 cup mashed ripe banana
  • 1 Ener-G egg
  • 1/2 teaspoon vanilla extract
  • 2/3 cup vegan chocolate chips
  • 1/2 cup chopped pecans
  1. In a blender or food processor, combine the dates and water and process until very smooth, to make a date paste. You should have about 1/2 cup. Set aside.
  2. Combine the oats, salt, and baking soda in a bowl; set aside.
  3. In a large bowl, whisk together the peanut butter, mashed banana, and date mixture until smooth. Stir in the Ener-G egg and vanilla.
  4. Add the oat mixture to the peanut butter mixture and stir until combined. Stir in the chocolate chips and pecans. Let the mixture chill for about 10 minutes while you preheat the oven.
  5. Using an ice cream scoop, drop the dough by generous portions onto a parchment paper-lined baking sheet. Bake at 350 degrees F for 14 to 16 minutes, until set.

If, like me, you’re a little tired when you make these cookies and end up doubling the amount of chocolate chips by accident, so much the better!

Chocolate Leaves

chocolate-leaves-10

What else do you find on a safari besides beautiful animals? Plants and leaves of course! Ok, so we didn’t really forage for leaves, but I loved the idea and replicated it at home as best I could. The project might feel more like a “safari” if you have your own garden from which to select beautiful leaves! Whether store-bought or from your home, be sure to choose leaves that are edible or non-toxic and not sprayed with any pesticides.

We made do with bay leaves from the store, so no real “foraging”, but Travis loved helping rinse the leaves off in the sink before we began, and patting them dry.

chocolate-leaves-1

Arrange your leaves on a baking sheet lined with wax paper.

chocolate-leaves-2

Meanwhile, melt your favorite chocolate in a double-boiler just until melted and smooth. We love the dark chocolate from Endangered Species Chocolate Company! Before you let your child work with the melted chocolate, make sure it isn’t too hot to the touch.

chocolate-leaves-3

We used plastic knives to spoon our chocolate over the leaves. You are going to get messy, but that’s half the fun!

chocolate-leaves-4

Once he discovered how good his chocolatey fingers tasted, it was time to use a spoon.

chocolate-leaves-6

We put the baking sheet in the fridge for the chocolate to set – it took a few hours, which turned out to be perfect timing for dessert.

Carefully peel the leaf off of each portion of chocolate – Travis was a super helper with this part, too!

Chocolate Leaves (9).JPG

And then it’s time to eat the bountiful crop from your “safari” journey.

chocolate-leaves-8