Tabletop Christmas Tree

Tabletop Christmas Tree (9)

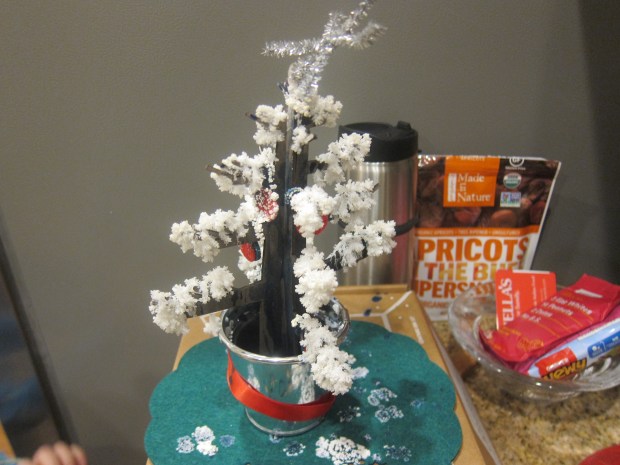
This easy toddler project makes the perfect centerpiece for a holiday table! The little tree is just the right size if you find your family gathering is smaller this year due to COVID-19.

To start, I printed out a Christmas tree template from Hands on As We Grow. Trace the tree shape onto two pieces of cardboard, then cut out from the cardboard. I wasn’t in the mood to wrestle with thick cardboard so used an old cereal box instead. In retrospect, it might have been worth using the thicker kind, since thin cardboard wasn’t entirely sturdy standing up. It also meant we had to paint over the printing on the cereal box.

Tabletop Christmas Tree (2)

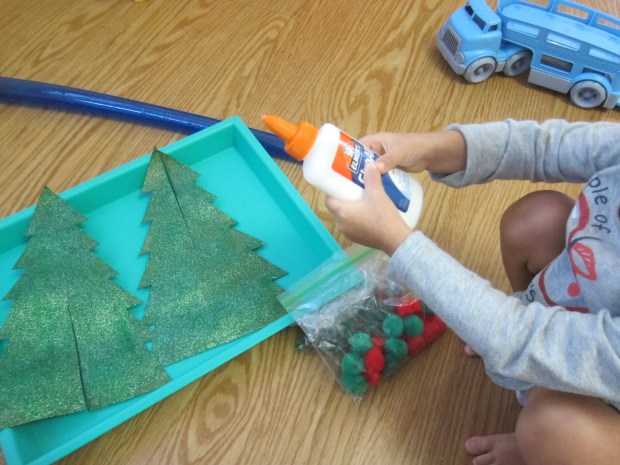
Luckily, green paint hid most of the cereal box writing! Veronika helped apply two thick coats of sparkly green paint to both sides of the tree shapes and we set them aside to dry.

Tabletop Christmas Tree (4)

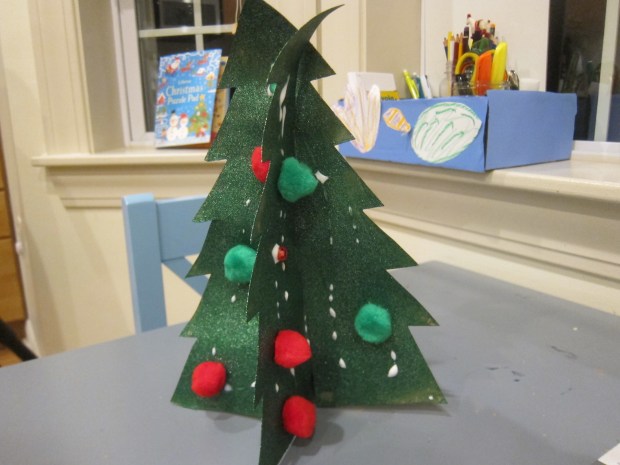
Next, cut slits in the two trees so they can slot together. That means you’ll need to make a slit in the center top of one tree and in the center bottom of the other. Slot together until they sit flush against a tabletop.

Tabletop Christmas Tree (3)

Time to decorate! Veronika helped add lots of white glue, and then we stuck on red and green pom poms and beads.

Tabletop Christmas Tree (7)

Any other holiday items from your craft bin would work great here, too, like holiday stickers or ribbon.

Tabletop Christmas Tree (8)

We think this makes the perfect little Christmas tree.

Tabletop Christmas Tree (10)

Christmas Doorknob Decoration

Christmas Doorknob (6)

Here’s a sweet Christmas decoration that toddlers will feel so proud to have made when they see it hanging around the house!

To start, I cut two shapes from felt. On pink felt (or red would work, too), I traced a 4-inch circle, then cut a smaller circle in the center, as well as four slits that would allow it to slip over a traditional round doorknob.

I then cut a Christmas tree shape (about 7 inches tall) on green felt. Use hot glue to attach the two together.

Christmas Doorknob (1)

Now it was up to Veronika to decide how to decorate! I helped her squeeze tacky glue all over the tree, and then she liberally dumped on red sequins and red and green beads.

Christmas Doorknob (2)

“Look at all the sparkles!” she said, as she let them trickle down.

Christmas Doorknob (3)

I only helped now and then by adding extra glue or pressing on a bead in a few places, otherwise it was all up to her.

Christmas Doorknob (4)

Once the glue dried, it looked beautiful hanging on a hallway door.

Christmas Doorknob (5)

Felt Recreatable Christmas Tree

Felt Tree (12)

I’ve always loved the idea of a felt Christmas tree for the kids, but was never ambitious enough to make my own. Thanks to an early Christmas gift, we now have a version the kids can use. Although we didn’t craft ours, the idea is so wonderful that it merits a blog post.

If you are going to tackle a homemade version, you’ll need to start with a very large piece of green felt. Cut out a Christmas tree shape and then cut a stump from brown felt; use tacky glue or hot glue to attach them together.

Felt Tree (5)

Add Velcro dots at various intervals on the tree and hang on a wall.

For ornaments, you can then use additional colors of felt to cut out simple Christmas shapes: think yellow stars, red candy canes, or little squares for gift boxes. Use hot glue any time you want to attach two colors of felt together where details are needed, like ribbon on the gift boxes.

Felt Tree (6)

Needless to say, I wasn’t that crafty and was so thankful to receive this early gift for the kids. What’s wonderful about these felt trees is that kids can decorate them again and again without getting near the real (breakable!) ornaments.

Felt Tree (3)

Veronika in particular loved the tree. We talked about each item as she attached them to the Velcro squares, or the colors or shapes. She loved pointing out that the presents were squares, or the hooks of the candy canes.

Felt Tree (10)

She even pulled off one particular ornament in the shape of a lollipop and enjoyed “feeding” it to her stuffed animals. What a thoughtful Christmas gift!

Felt Tree (4)

I also appreciated how easy it was for her to attach or pull off the decorations, thanks to the Velcro dots.

Felt Tree (8)

Big brother Travis swooped in now and then to add an ornament.

Felt Tree (9)

And whenever the kids want to, they can take everything off and start all over again!

Felt Tree (7)

This is definitely a decoration that we’ll trot out to play with for years to come.

Felt Tree (13)

Gift Your Child an Ornament Every Year

Ornament Year (2)

There are some households where the Christmas tree is color-coordinated or bears a different theme each year. Not so in our house! Our tree is a hodgepodge of homemade and heirlooms and ones we’ve randomly picked up over the years. But here is one nice thing that lends tradition to the tree: making sure to gift each child a special ornament every year.

This goes back to both my kids’ first Christmas, when they received one as a commemorative gift.

Ornament Year (3)

Moving forward, we’ve picked one up each year in relation to a holiday excursion. There’s the train from a trip to a holiday train show, for example…

Ornament Year (4)

…and this year Travis loved selecting owls from a trip to see holiday lights at a botanical garden.

Ornament Year (1)

This is definitely one of those traditions I intend to keep up, moving forward. How do your kids like to decorate the tree? Please share in the comments!


Crystal Chemistry Tree Crate

Crystal Tree (5)

Of all the holiday projects from Kiwi Co this year, this was by far Travis’s favorite. You can follow along on this project with materials from the craft store and drugstore; do supervise very closely, as chemicals (ammonia in particular) are involved. But the result is stunning!

To start, we needed to prepare the planting pot. Insert a plastic cup into a silver cup, and decorate with the provided red ribbon for a festive touch. The tree is two pieces of cardboard that slot together. Travis “planted” this firmly.

Crystal Tree (1)

He loved the felt ornaments to hang on the tree!

Crystal Tree (2)

As a final decoration, twist together three silver pipe cleaners, and arrange as a star on top.

Crystal Tree (3)

Now it was time for some science. I poured the bluing solution into the plastic cup first. A bluing solution is potassium nitrite and sodium hydroxide dissolved in water. Travis was a good sport listening to all the safety cautions about handling these chemicals

Next I poured in the provided ammonia. He was not a fan of the smell! Finally, we poured the provided salt packet evenly around the tree.

Crystal Tree (4)

Use the provided pipette to drip the solution over the tree branches until saturated.

Only an hour later, I noticed that already a few little sparkles had appeared. Travis went to bed full of wonder at how it might look in the morning.

To be perfectly honest, I’d forgotten about it when we came down for breakfast. “Mom, look!” he called out. I, too, was stunned with the white frosty crystals blooming all over the branches.

Crystal Tree (6)

One note of caution: the crystals are very delicate and will fall off at even the tiniest budge, so have your tree some place up high where it won’t get jostled.

Over breakfast, read about what happened. The cardboard soaks up the solution (so a plastic tree, for example, wouldn’t work here), but the liquids evaporate overnight as gases. The salt can’t do this, so it is left behind. Ammonia is present because it helps the evaporation happen faster. And voila – a chemis-tree!

Crystal Tree (7)

I Spy an Ornament

I Spy Ornament (2)

Here’s a fun variation on “I Spy” to play around the Christmas tree after the sun goes down!

Turn off all the lights in the room so that the only illumination left comes from the tree lights. Take turns playing classic “I Spy” (“I spy something green”, “I spy something gold”,) and have the other family members guess which ornament it is.

I Spy Ornament (3)

Travis loved being in charge of shining a flashlight on the guessed ornament if it was correct. Because he’s young, his clues are sometimes hilarious. “I spy something at the top of the tree with wings.” Our angel!

I Spy Ornament (4)

This can also be a fun way to talk about family ornaments, for example explaining the significance behind homemade ones, family heirlooms, or those purchased on vacation.

I Spy Ornament (5)

Travis loved the game so much we might just play every night until the tree comes down!

I Spy Ornament (1)

Yarn Christmas Trees

Yarn Tree (10).JPG

Be forewarned: This holiday decoration project is a messy one! In other words, perfect if your kids love getting their hands dirty and helping deck the halls around the house.

For materials, you’ll need Styrofoam cones (available at craft stores) with the plastic wrap still on. You’ll also need red and green yarn. I had pastel shades of each in my craft bin, which would look lovely if you’re taking a pastel approach to decorating this year! Ideally, I would have had darker red and green, but we were eager to do the project so made do.

Yarn Tree (1)

Cut the yarn into pieces about 20 feet long. Yes you read that right, 20 feet! Travis loved helping measure out the long lengths by standing at the opposite end of the apartment from me.

Yarn Tree (2)

Next we needed glue. You can use watered down store-bought glue, but we made a neat homemade version simply by mixing 1/2 cup flour with water until the consistency of a thick paste.

Yarn Tree (3)

I worried Travis might not get his hands in there, but to my surprise, he was eager to see how it felt. Goopy!

Yarn Tree (4)

Soak your stands of yarn in the “glue,” one strand at a time. Once it’s coated, wrap around one of the Styrofoam cones, wrapping and wrapping until completely covered – the more the better!

Yarn Tree (5)

The key is not to let the yarn get tangled, or you’ll wind up with a clump you can’t continue to wrap. After a few successful trees, we encountered a tangle. Whoops!

Yarn Tree (6)

Luckily the cone was just covered enough.

Let dry overnight. Travis had to come over and touch our flour glue occasionally, to see how the drying process was coming along.

Yarn Tree (7)

In the morning, snip the plastic wrap from the cone, and slide the yarn tree off – you’ll have to tug the cone out a bit forcefully. Remove the inner plastic, and the yarn tree now stands alone.

Yarn Tree (8)

We thought it might be fun to decorate one with little gems and beads, although it was hard to get them to stick on, as the beads were heavy.

Yarn Tree (9)

Pinecones made lovely tree toppers though!

Yarn Tree (11)

Little Tree Crate

Little Tree final.JPG

We loved our Swirly Ornaments holiday crate from Kiwi Co., and the kit for Little Tree turned out to be just as wonderful. The project set the stage for a festive mood inside our apartment on a drizzly December morning. Read on!

To start making the tree, we first needed to do some math, dividing the kit’s green pipe cleaners into two equal piles. This was a neat way to introduce Travis to counting out two sets of something, just as you would for dealing out cards in a game, for example.

Little Tree (15)

Cut the pipe cleaners from one pile in half, and leave the others long.

Insert the provided wooden stick into the round wooden stand.

Little Tree (16)

Starting with the long pipe cleaners, wrap around the stand.

Little Tree (17)

Repeat with the short pipe cleaners. Travis loved the wrapping, and insisted on doing so himself for each one.

Little Tree (4)

Adult step: snip the pipe cleaners at an angle, so your tree is a triangle shape. Travis was really psyched to see our fake tree in the same tapered shape as our real tree.

Little Tree (5)

Peel the backing off a provided star sticker, and attach at the top of the tree.

Little Tree (6)

Next up, thread on the provided beads and bells as ornaments. “Which are ornaments and which are lights?” Travis wanted to know.

Little Tree (9)

Good question, but either way, all beautiful!

Little Tree (10)

To make the base, use any round bowl to trace a circle onto the provided red felt.

Little Tree (11)

Cut out and decorate with the provided gold glitter glue.

Little Tree (14)

Travis was equally delighted by the “presents” that can go under the tree – two wooden cubes, onto which we glittered-glued pom poms.

Little Tree (13)

You can set your tree out as a pretty decoration, and we also plan to leave it alongside cookies and non-dairy milk for Santa on Christmas Eve! It’s also the perfect size to be a play tree for your child’s stuffed animals.

Little Tree alt.JPG

To round out our festive morning, we made hot cocoa and added in a cute Snowman-themed spelling lesson from Education.com.

Little Tree (1)

This fun picture word match was a great way to cuddle up inside during the cold winter months and practice Travis’s spelling skills. For more spelling activities and printables like this check out Education.com!

Little Tree (2)

In sum, we had all the makings of a cozy winter morning.

Little Tree (3)

Cardboard Learning Tree

Learning Tree (11)

This is a great activity that combines seasonal holiday crafting with a little learning. If you play your cards right, the kids won’t even know you’ve slipped in some education with their fun!

For the shape of your tree, you can either paint a large piece of cardboard (holiday gift delivery boxes, perhaps?) or poster board. We chose poster board because I knew it would be easier to cut out the tree. Either way, Travis was thrilled when I said I needed the entire thing painted green.

Learning Tree (2)

We left the paint to dry overnight, and the next day I cut out the tree shape.

Learning Tree (3)

Next we gathered supplies for the “ornaments.” Use holiday-themed cookie cutters or other shapes, and trace the outlines on colored construction paper.

Learning Tree (4)

Don’t worry if your kids don’t trace perfectly, you can always neaten up the lines when cutting the shapes out later.

Learning Tree (5)

The next step was even more fun: laminating the cards. Although this step is optional, it will definitely make your paper pieces last longer. Travis adores whenever he’s allowed to help laminate, so this was a big hit.

Learning Tree (7)

I cut out the shapes, and set them aside.

We hung our tree on the wall and added a brown piece of construction paper as the trunk.

The final step was to add Velcro strips to our tree and ornaments. Place the soft side of the Velcro on the tree at random intervals, then attach one rough Velcro piece to each ornament. Travis loved this even before we added the learning element, hanging his ornaments and then changing their positions.

Learning Tree (10)

There are so many games you can play from this point on! First, I numbered the ornaments one through twenty with a wipe-clean marker, for a number search game.

Learning Tree (12)

A simple wipe with a paper towel and we could play alphabet games. One suggestion is to hide the letters in your child’s name, and have them pinpoint those on the tree.

Learning Tree (13)

As an alternative, write the upper and lower case of a batch of letters, and have your child find the pairs.

In full honesty, Travis was way more into the mechanics of this game (taking on and off the ornaments, wiping them clean with paper towels), than he was with the learning games, but we’ll play again over the course of the next few weeks!

Popsicle Stick Christmas Tree

popsicle-tree-4

Why stop at one Christmas tree when you and your child can craft together this adorable second? Travis was so excited when he realized what shape we were making with our popsicle sticks.

First, you’ll need to get good and messy with green paint. Paint as many popsicle sticks as you need to make a tree shape – be prepared for green fingers so you can paint all the way to the edges! Once the popsicle sticks dry, cut a few into smaller pieces so your tree can taper at the top. Leave two sticks unpainted to serve as the trunk.

popsicle-tree-1

Have your child help you arrange your “tree” on poster board, then glue each “branch” down, starting from the bottom up. Travis loved seeing the tree take shape as he worked!

popsicle-tree-2

Then it was time to decorate! Party confetti from the grocery store worked perfectly as ornaments and tinsel, but use any sparkly crafty items you have at home that can be glued on.

popsicle-tree-3

For the star on the top, we traced a star-shaped cookie cutter on construction paper, then cut out and glued on. A very cute and festive project.