Yogurt Hearts

Yogurt Hearts (4)

This sweet idea from our February issue of Ranger Rick Jr. was just one way to eat hearts this Valentine’s Day. And of course you can make them any day you want to share some love!

I set up a plate with two heart-shaped cookie cutters, one large and one small, and a container of non-dairy yogurt – for the prettiest result, choose a red berry flavor like strawberry or raspberry.

Yogurt Hearts (1)

Travis was a great helper scooping the yogurt into the big heart, and I filled up the trickier small one.

Yogurt Hearts (2)

Put in the freezer for 2 hours, until firm. If you need to, run a little hot water around the cookie cutters to release your hearts.

Yogurt Hearts (3)

The middle of the heart stayed a little mushier, more like soft-serve ice cream, and we worked our way out to the more frozen edges.

Yogurt Hearts (5)

Yum!


Pizza Hearts and Sweet Stuffed Celery

Pizza Hearts (4).JPG

Here’s the perfect little lunch to put together for your kids this Valentine’s Day! Serve it at home, or pack it up for school; it travels easily in the compartments of a lunchbox.

For the deli slices, you can use a good vegan pepperoni (such as Yves Veggie) if your children like the taste. My son finds pepperoni too spicy, so I use milder deli slices from Field Roast, torn into small pieces.

Ingredients:

  • 1 pound refrigerated pizza dough
  • 1/3 cup pizza sauce
  • 1/2 cup shredded Daiya mozzarella
  • 1 package vegan deli slices or pepperoni
  • Celery sticks
  • Non-dairy cream cheese
  • 1 red bell pepper
  1. To prepare the pizza hearts, divide the dough in half. Working with one half at a time, roll into a 14×7-inch rectangle. Spread the dough with half of the sauce, leaving a 1/2-inch border free of sauce along one long edge.
  2. Sprinkle with 1/4 cup cheese, and cut the rectangle into 10 strips. Top the strips evenly with half of the pepperoni or deli meat.
  3. Roll up two strips towards the unsauced end, leaving the end unrolled, and place next to each other on a baking sheet lined with parchment paper. Pinch the tips of the “heart” together to seal. Pizza Hearts (1)
  4. Repeat with the remaining strips, and then repeat steps 1 through 3 with the remaining half of the dough for 10 hearts total.
  5. Bake at 425 degrees F for 18 minutes, until cooked through.
  6. To prepare the stuffed celery, fill celery pieces with your favorite vegan cream cheese.
  7. Wash and core the bell pepper. Using a small heart-shaped cookie cutter, punch out heart shapes and top each celery piece with a heart.

Pizza Hearts (2)

Hope your kids eat their heart out!

Pizza Hearts (3)

Friendship Heart Necklace

Friendship Heart (13)

Here’s the final craft we’re putting together this Valentine’s Day, this time thinking of a few special friends. Even if it’s not Valentine’s, this is a great craft to ask your kids who their best friends are, and to talk about budding concepts of friendship and the emotions that go with it. Also, the idea of keeping half of something for yourself and giving the other half away was a bit novel for my preschooler, so I’m glad we did the activity!

First, we needed simply to have fun with clay! Travis has become quite adept at rolling clay between his hands to form a ball.

Friendship Heart (1).JPG

From here, I showed him how to flatten the balls into discs, and I asked him how we might cut out a heart shape. You can just use cookie cutters, but Travis is very into his chisel tool, so we chiseled. It helped if I made the outline of a heart for him to follow, first.

Friendship Heart (3)

Next, chisel each heart in a zig-zag down the middle, so you have two halves for each one.

Friendship Heart (7)

Punch a hole into each heart piece near the top with a chisel or straw, then let the clay air-dry overnight.

Friendship Heart (8)

The next day, we decorated. First, Travis applied a coat of watercolor. He decided the jagged halves looked a bit like teeth, ha!

Friendship Heart (10)

Then we painted on a layer of tacky glue so he could adhere beads and confetti pieces. Glitter would be pretty, too.

Friendship Heart (11)

We had the perfect beads with letters on them that could be used for friends’ initials, a great find in the craft bin!

Friendship Heart (12)

I cut strands of colored twine for necklace strings, and then our friendship hearts were ready to be shared with good buddies.

Friendship Heart (14)


Early Explorers World Celebrations


LP Celebrations (24).JPG

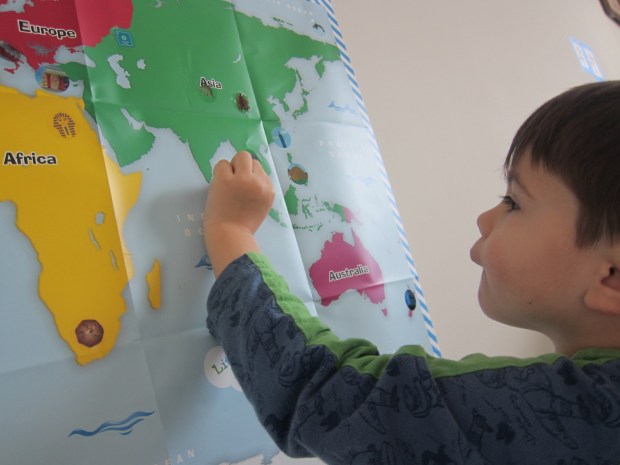
February was a great month to receive our World Celebrations kit from “Max and Mia” at Little Passports, since we could focus on a few big current events like Valentine’s Day and Lunar New Year. Meanwhile we learned lots about celebrations that occur throughout the year. Travis knows by now to expect stickers in his kit, and eagerly finds the spot for them on his map…

LP Celebrations (2)

….and loves each month’s flashlight adventures.

LP Celebrations (4)

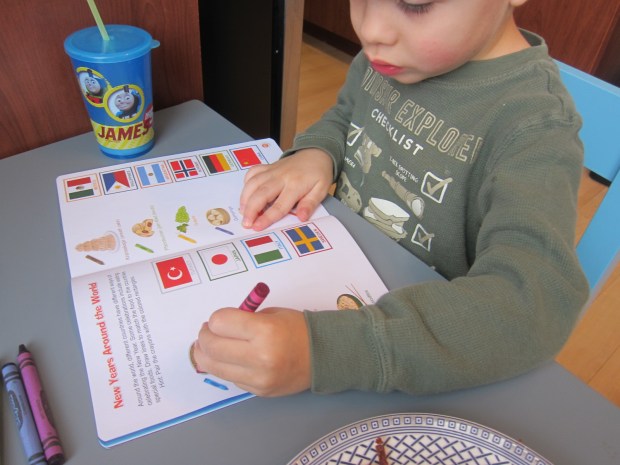
As always, there were great preschool-appropriate activities and information in our booklet. We especially liked matching up New Years’ foods around the world with the right flag!

LP Celebrations (26)

Celebrations Craft:

Straight away, we put together the sweet little craft suggestion to teach about Dia de los Muertos: paper marigolds. Although not the right time of year, there’s never a wrong time to think about past loved ones. As we worked, we talked about how each flower was for a relative who wouldn’t be coming back. It turned into an unexpectedly beautiful way to teach Travis about a few of his ancestors.

To make the flowers, cut tissue paper into rectangles that are 8 inches long (they should be about 6 inches across). Travis loved helping with the ruler for this bit. Ideally you’ll have orange tissue paper, but yellow worked as variety so we could make more blooms.

LP Celebrations (8)

Layer 4 sheets of tissue paper together, and fold up accordion-style.

LP Celebrations (9)

Next, twist a green pipe cleaner securely around the center, pointing the “stem” downwards.

LP Celebrations (10)

To make the blossoms, round the edges of the tissue paper slightly with scissors, then fan out and carefully lift up each of the four layers.

LP Celebrations (15)

What a beautiful marigold!

LP Celebrations (11)

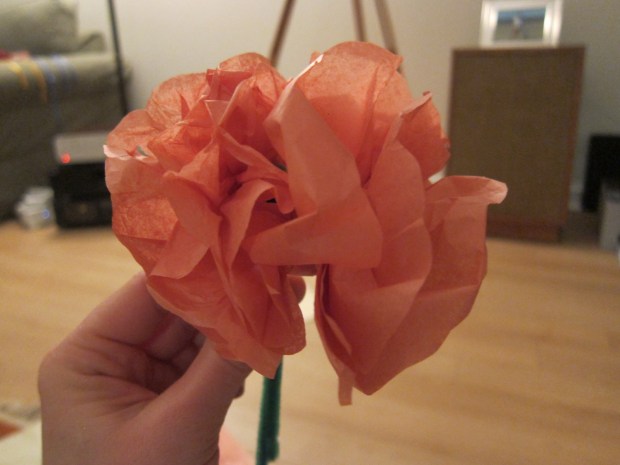
We kept going until we had a whole bouquet.

LP Celebrations (16)

Celebrations Science:

It’s a bit of a stretch to call the other booklet activity science, but cooking is a bit of chemistry after all. We made potato latkes, and as we cooked we talked a little bit about Hanukkah. Travis loved this recipe because he got to help with two very grown-up kitchen tools: the peeler and the grater.

First, peel a potato.

Latke (1)

Adults, cut an onion into quarters and remove the peel.

Latke (2)

Grate the potato and 1/4 of the onion, and place the grated veggies in a bowl; reserve the remaining onion for another use.

Latke (4)

Add 2 Ener-G eggs, a dash of salt, and a dash of black pepper to the bowl, stirring to combine.

Latke (3)

Heat a layer of canola oil in a large skillet over medium-high heat. Reduce the heat to medium and add the potato mixture in spoonfuls. Fry for 5 minutes, then turn over and cook an additional 3 to 4 minutes on the other side, until browned. Transfer to a plate to cool.

Latke (7)

Serve with applesauce. Travis was thrilled with our concoction. “I’ve been waiting for latkes!” he declared; it was priceless to see his excitement over something he hadn’t known existed prior to twenty minutes earlier.

Latke (9)

Celebrations Keepsake:

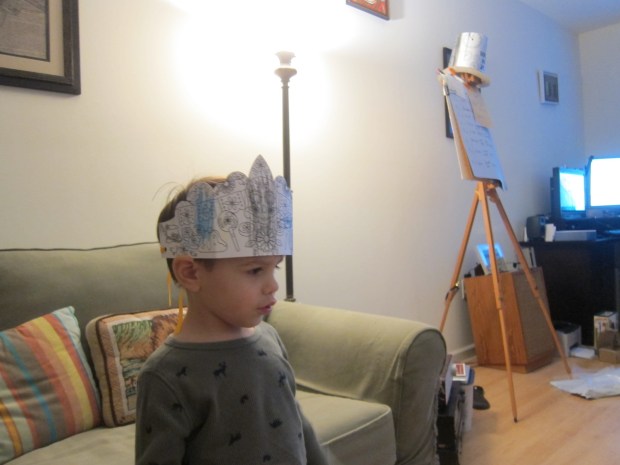
I appreciated how interactive this month’s keepsake was: crowns to color in with descriptions of the five different holidays depicted: Bastille Day, Lunar New Year, Diwali, Dia de los Muertos, and birthdays.

LP Celebrations (5)

One small gripe: we found that the provided colored pencils didn’t give very saturated color, and eventually just used crayons from home.

LP Celebrations (6)

Celebrations Field Trip:

I was so pleased we had this kit in February because it made the obvious field trip an outing to a Chinese New Year festival.

Chinese (4)

Travis couldn’t get enough of the lion dance (we fed one a red envelope with green money inside for luck in the coming year) and the taiko drumming.

Chinese (6)

Celebrations Further Activities:

As always, we couldn’t stop there, and took the kit up on the suggestions in the back of the booklet.

First, we finished coloring in our keepsake crowns and dubbed it a family celebration. Hmm, what holiday could we mark on a random Tuesday? Thanks to the arrival of Girl Scout cookies in the mail, we dubbed it Girl Scout Cookie Day!

LP Celebrations (18)

Everyone in the family colored a crown, grown-ups included.

LP Celebrations (20)

And then we dined on cookies. Yup, Thin Mints are vegan.

LP Celebrations (19)

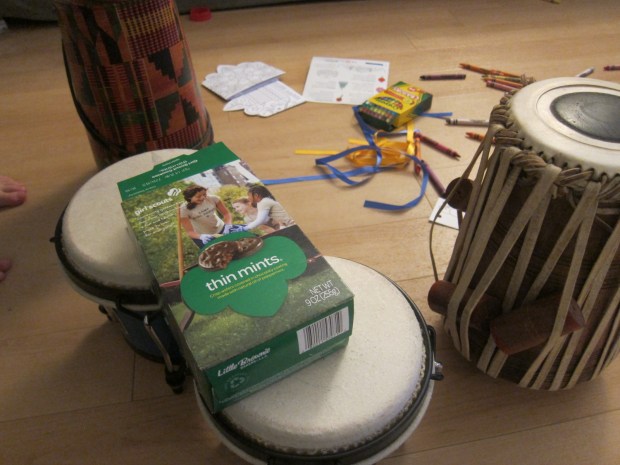
And because we love music, we incorporated aspects of Panafest and turned it into a drumming and cookie-eating festival. Now we can celebrate Girl Scout Cookie Day as our special family day every year. What family holiday will you come up with?

LP Celebrations (22)

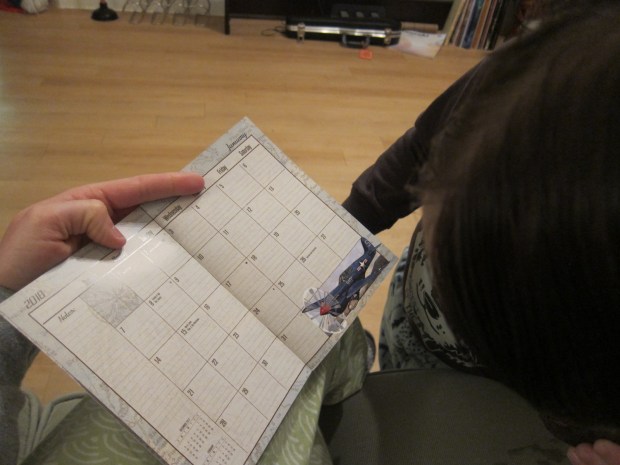
The booklet also suggested flipping through a calendar to learn more about world holidays. This proved a bit underwhelming for Travis, since he can’t read the words yet, and the names of the celebrations don’t mean much to him.

LP Celebrations (25)

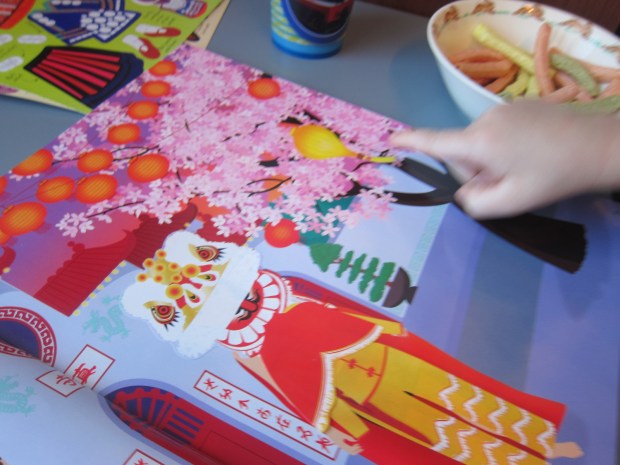
So we supplemented with the Sticker Dolly Dressing Costumes Around the World from Usborne. Now he could learn a bit about some of the holidays in our calendar, and had a beautiful visual of the traditional clothes to match!

LP Celebrations (23)

We were having so much fun that we kept up the exploration by heading to the library, selecting books on Diwali, Carnival, Irish festivals, and more.

LP Celebrations (27)

A few weren’t in books so we continued the exploration online, including Waitangi Day, which we happened to look up on the exact day it’s celebrated!

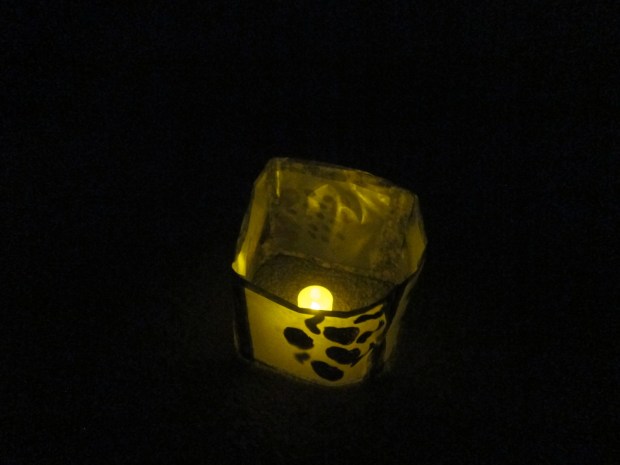
Finally, we checked out Little Passport’s blog for a few fun holiday crafts. We considered making these lanterns for the annual Pingxi Lantern Festival in Taiwan, which will happen on March 2 this year.

Pingxi (2)

It was a bit too complicated a craft for Travis, other than dabbing some paint on wax paper, so I ended up making the lantern (see full instructions here).

Pingxi (5)

We loved the glowing final product once a battery-operated tealight was inside!

Pingxi (6)

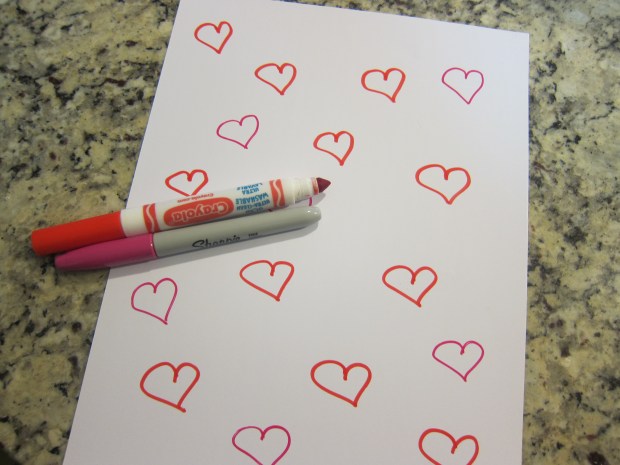
Finally, just in time for Valentine’s, we tried out this traditional game from Denmark: write a Valentine’s poem or limerick, then send it to someone as a gaekkebrev, a “joking letter.”

LP Celebrations (29)

Instead of signing your name, make one dot for each letter of your name (I guided Travis’s hand for this to make sure we didn’t have too few or too many dots).

LP Celebrations (30)

Mail it off and see if your Valentine guesses who you are! If they do, you owe them an egg at Easter, so we’re stocking up on vegan chocolate eggs now.

Paper Bag Valentine Satchel

Paper Bag Valentine (6)

This project is a neat way to upcycle any paper bags you have from the grocery store, just in time for Valentine’s Day! The finished satchel makes a great gift for teachers, grandparents, or friends.

To start, I traced a heart (using red marker of course) on a brown paper bag, and guided Travis’s hand with safety scissors to cut out.

Paper Bag Valentine (1)

Once you have the first heart, trace onto a second piece of brown paper and cut out so the two sides match.

I added red dots around the heart as guidelines for Travis to hole punch – Valentine’s Day 2018 is quickly becoming the year of the hole punch for us!

Paper Bag Valentine (2)

Next up help your child develop their lacing skills by threading a shoelace through the holes. I picked up a cheap heart-print shoelace on Amazon in keeping with our Valentine theme. If you want your gift recipient to use the heart as a real satchel, don’t lace along the top, and knot the ends of the shoelace to form a handle.

Paper Bag Valentine (3)

We decorated our satchels with stamps. I set out a few that felt Valentine’s-ish (hearts, lips, and flowers), and suggested Travis use red ink, although he preferred blue. No problem, it’s his creativity!

Paper Bag Valentine (5)

You can add a note to your recipient on the back as a final touch, or leave it blank.

Paper Bag Valentine (7)

Bookmarks with Heart

Hole Punch (9)

You know you’ve got kids in school when you’re on the hook to produce Valentine’s for the class for the first time! This adorable and easy idea from Parents magazine was the perfect craft to put together with Travis. Although I had to do some components, I loved that he got to collaborate as well, making this truly his project for the class.

To start, print the bookmark template from parents.com/bookmarkheart onto colored paper. We used pink and red construction paper.

Hole Punch (1)

The template reads: I like you a hole punch, but the o’s are missing – you’ll fill them in later with a hole punch, of course.

Next, I purchased patterned scrapbook paper and cut into rectangles that were 2 inches wide by 6 and 1/2 inches long – slightly larger than the printed bookmarks. This is a fun chance to do some measuring and ruler practice with your child.

Hole Punch (3)

Here came Travis’s big role! He loved smearing a glue stick onto the patterned paper, after which I adhered the bookmark templates to the center – we had a great assembly line going!

Hole Punch (5)

As mentioned in previous blogs, Travis loves when he gets to use the hole punch, so this was a big hit. Go through and punch the o’s in the word ‘you’ and ‘hole’ on each bookmark.

Hole Punch (7)

We finished our Valentine’s with a heart sticker and his name on each.

Hole Punch (8)

Can’t wait to deliver these to the class for the Valentine’s party!

Hole Punch (10)

Valentine’s Day Tree

Vday Tree (8)

Why should Christmas have all the countdown/advent calendar fun? Consider this little tree a neat way to share the love as you mark off the days from February 1st to the 14th!

First, you’ll need to select several branches from outside, and place them in any pretty vase you have in your home.

Vday Tree (7)

Ahead of time, I traced and cut out 14 hearts from patterned paper. Pinks and reds were a natural choice for background color.

Vday Tree (1)

Next, I numbered the hearts 1 through 14. This helps add a little math element to the project, with Travis selecting the right numbered heart each day we add it to the tree.

Vday Tree (2)

Travis was so excited because to finish the set up, we needed two grown-up tools that he adores (under careful supervision of course): the stapler and the hole punch.

Vday Tree (4)

First, we stapled a strip of pink construction paper to each heart.

Vday Tree (3)

Next, we punched a hole in the top corner of each heart.

Vday Tree (5)

We added little heart stickers to each one as a finishing touch. Feel free to decorate your hearts however you like! Cute pink or red buttons glued on would also be pretty.

Vday Tree (6)

Each morning starting February 1, have your child name someone they love or care about. Write the name on the strip of paper, slip a piece of thread through the hole in the heart, and hang from the tree.

Here’s the tree about halfway completed:

Vday tree alt

And here is our finished tree on the 14th!

vday tree final.JPG


Valentine’s Day Breakfast

valentine-breakfast-5

Kids can help with most of the steps for this heart-themed breakfast, either to enjoy themselves, or to serve as a treat to Mom or Dad!

For the Red Berry Smoothie, have your child help measure out 1/2 cup vanilla non-dairy yogurt (we used coconut), 1 cup frozen raspberries, 1 cup frozen strawberries, and 1 cup almond milk, and add to a blender.

Help your child slice a banana with a toddler-safe knife – great practice for little hands! Add the banana to the blender, and gave it a whirl.

valentine-breakfast-2

To make the Heart Toast, press a heart-shaped cookie cutter into a piece of bread, and then toast it lightly (adults only for the latter step!).

valentine-breakfast-3

Have your child help spread on a thin layer of vegan cream cheese, followed by a dollop of red jam.

valentine-breakfast-4

Note: For a savory version, top the cream cheese with a slice of your favorite vegan deli meat instead.

valentines-breakfast

Happy Valentine’s Day!

Valentine Garland

Valentine's Garland (6).JPG

Much as with the Paper Snowflakes I made to decorate our home for Christmas, this project is really more a grown-up craft to make the house feel festive for Valentine’s Day, and Travis was a bit too young to help. Preschoolers on up, however, might love to help cut out the hearts with you!

To set up, I cut hearts from pink and red construction paper, and then smaller hearts from white paper to fit in the centers.

valentines-garland-1

Arrange your larger hearts on a work surface and squirt glue in the middle of each – I did briefly enlist Travis to help with this task!

valentines-garland-3

Lay a length of red-and-white twine across the gluey hearts, making sure to leave enough twine at each end for hanging your garland, and then press the white hearts down on top.

valentines-garland-4

Once the glue dries, adorn your home with hearts! Travis did enjoy helping me select the location for our garlands, including our front door and hallway bench. You can repeat this simple craft as many times as you like to decorate all the areas of your home.

valentines-garland-7

I Heart You Stickers

i-heart-stickers-8We always love the craft ideas that come in our High Five magazine, and this month’s was perfect for Valentine’s Day! Before you begin, you’ll need to buy sticker paper, which can be found at any craft store.

On the sticker paper, I drew the outlines of several hearts.

i-heart-stickers-1

Now it was up to Travis to color them in with pink and red crayons or colored pencils. This was great practice for coloring inside the lines!

i-heart-stickers-3

(Note: Big kids can not only color in their hearts, but draw the outline of the shape as well).

i-heart-stickers-2

I cut out the heart stickers, and Travis helped peel off the backing to attach to index cards, which I had folded in half. We added extra heart stickers from the store as well – the more the merrier.

i-heart-stickers-5

On the inside of the index card, we wrote Valentine’s notes to all of his cousins. Travis grabbed a colored pencil and told me he was writing “Love Travis.”

i-heart-stickers-6

Although I filled in most of the actual detail on these cards – the words, adding enough stickers to each – I could tell Travis was so proud to be making something special for his loved ones, and that’s part of what I wanted to teach him as to what Valentine’s Day is all about.

i-heart-stickers-7

Don’t forget a special trip to the post office to send your Valentine’s cards on their way!