Floating Toothpick Trick

Floating Toothpick (4)

After learning about how water molecules help each other up the roots of a tree (just imagine cute water droplets holding hands!) Travis and I tried this fun way to break those same water molecules apart. All you need is a bowl and toothpicks! My kindergartner found it slightly naughty to break the bonds, meaning he thought this experiment was hilarious!

Floating Toothpick (1)

First, fill a shallow bowl with water. Wait for the water to be still, then very carefully arrange four toothpicks in a square. It helps to overlap them slightly, but not so much that they will stick together.

Floating Toothpick (2)

Dip a toothpick into the center of the square. Nothing happens! There is nothing to break up the water bonds.

Floating Toothpick (3)

Now dip a second toothpick into dish soap. Dip into the center of the square and… the toothpicks run away from each other!

Floating Toothpick (7)

As stated above, Travis thought this was pretty hilarious, and he wanted to repeat with our toothpicks in different configurations. We tried a zig zag, although the results weren’t as pronounced.

Floating Toothpick (5)

So then we needed to repeat the square a few times (if you repeat, start with fresh water; once the water is soapy, the effect isn’t as pronounced).

Floating Toothpick (6)In sum, a very kid-friendly way to illustrate some big (or should I say, microscopic) scientific concepts!

Make a Night Sky Mobile

Night Mobile (7)

Talking about the moon and stars with Veronika prompted me to follow up with this cute mobile craft. There are two ways to make it, mine decidedly more of a hack, but it worked in a pinch!

For the easy version, I wanted to purchase a mobile frame with predrilled holes from the craft store. You’ll notice that the closest thing I could find was actually twisted in the shape of a soft pretzel, but Veronika didn’t know the difference!

With that on hand, I made a few simple night sky decorations to dangle from it. I traced a moon, star, and cloud onto cardboard.

Night Mobile (1)

Cut out the shapes and gave them a few coats of gold and silver paint. Let dry completely.

Night Mobile (2)

Once dry, hole punch the cardboard and thread from your frame with yarn or twine.

Night Mobile (3)

If you’re far craftier than me, you can instead trace your shapes onto tracing paper as templates, pin to colored felt, and cut two for each shape. Sew the felt together with a blanket stitch, leaving a hole to stuff in roving. Sew up and then attach to the mobile frame with thread.

But like I said, my baby girl didn’t mind my quick version; if anything she was entranced!

Night Mobile (5)

She loved grabbing onto the dangling pieces in the playroom.

Night Mobile (4)

For a true mobile, you’ll need to suspend it where your baby can’t reach it, not prop it up like I did.

Night Mobile (8)

Since we were just playing, I let Veronika grab at the tips of the moon and star.

Night Mobile (11)

Her expression was full of wonder at these glowing night objects.

Night Mobile (9)


Capillary Snack-tion Straw

Snack Straw (5).JPG

This straw has some serious action! After learning about how trees and plants drink their nutrients up from the soil in his latest Kiwi Crate, Travis discovered he too can sip in defiance of gravity: by slurping through a straw.

Cut a watermelon into thick slices. Use a flower-shaped cookie cutter to make a flower shape from the watermelon. Insert the “flower” onto a thick straw “stem”.

Snack Straw (1)

Give a quick blow into the straw to expel the watermelon piece inside. This earned a “whoa!” from Travis.

Snack Straw (2)

We filled a glass with lemonade – any drink will do, but lemonade is a favorite around here – and then tested it out.

Snack Straw (4)

Travis provided the power for his flower’s “roots”. What a delicious way to soak up nutrients! When the drink is finished, you can eat your “flower” of course.

Snack Straw (3)

Exploring the Night Sky

Explore Night (1)

It can feel funny sometimes to teach a baby about celestial objects – the stars, the moon, planets – because they are rarely awake to see nighttime! Especially here in the summer, Veronika is asleep long before stars come out or the moon shines.

If your child also sleeps before dark, have fun pointing out these night objects in books instead! Today, instead of reading the words, I sang star and moon poems as we turned each page of a favorite book.

Explore Night (3)

When we came to a star, I pointed and sang:

Twinkle twinkle little star

How I wonder what you are.

Up above the world so high,

Like a diamond in the sky.

Twinkle twinkle little star

How I wonder what you are.

And here’s a rhyme to go with the moon page:

I see the moon

And the moon sees me

As is floats so high

Over mommy and me

I see the stars

And the stars see me

As they shine in the sky

Over Daddy and me

Explore Night (4)

You can also point out stars wherever you may have them around the house. Veronika is transfixed by our nightlight.

Explore Night (5)

We tried going outside just before bedtime, but the sky was indeed still light.

Explore Night (6)

But then wouldn’t you know it; an unusually fussy bedtime had Veronika up later than usual, and look what was peeking at us just before she slept.

Explore Night (8)

Meanwhile, we’ll wait for the impending shorter days of autumn and winter, when I can truly take her out to marvel at these wonders of the night sky.

Explore Night (7)

Science of Trees Kiwi Crate

Kiwi Trees (1)

Travis’s crate from Kiwi Co. this month was about the way trees and plants take nutrients from the roots upwards, in seeming defiance of gravity. Travis loved every element of this “capillary action” crate… and for good reason!

First, we needed to see capillary action in, well, action, with Capillary Action Art. Using the provided double-sided tape dots and clear slides, Travis attached on three string stems and 3 coffee filter paper flowers.

Kiwi Trees (8)

He added the provided binder clips on either side of the slide’s bottom, and two additional clips to hold everything in place. Clever: now the blender clips meant the slide could stand upright over the provided paint tin.

Kiwi Trees (9)

He dripped liquid watercolors into three of the compartments. There was red and yellow watercolor, and his booklet suggested combining them in the third compartment to make orange.

Kiwi Trees (10)

Almost instantly, the color was bleeding up the stems.

Kiwi Trees (11)

Travis was practically shaking with amazement as he watched this, especially because of how fast it happened.

Kiwi Trees (4)

When it reached the tissue “flowers,” he was ecstatic.

Kiwi Trees (3)

Kiwi must have known this would be a big hit; there are enough materials to do the project twice. Needless to say, we repeated it instantly.

As a nice finishing touch, you can use additional double-sided tape dots to place the slides into a cardboard frame, and save your artwork. Talk about STEAM!

Kiwi Trees (15)

The second activity was to Build a Balancing Tree. This required slotting together two wooden pieces as the trunk, and inserting that into a wooden base.

Kiwi Trees (23)

Wood leaves and roots allow your little engineer to tip the tree one way or another.

Kiwi Trees (18)

At first, Travis seemed disappointed. But then we put the tree to the test in a Tilting Tree Game. Roll the dice to add leaves or roots to one of the four quadrants… but if you roll the (!) symbol, there’s a natural disaster! This can be a tornado (blowing on the tree), earthquake (shaking the box it sits on), or forest fire (removing the leaves from certain colored sections).

Kiwi Trees (19)

Travis cackled every time we thought our tree was nearly complete but then disaster struck.

Kiwi Trees (20)

Okay, so this isn’t perhaps the nicest way to teach kids about natural disasters, but it sure had him thinking about the stability that a tree’s roots provide, and was a ton of fun.

Kiwi Trees (22)

We concluded with two additional activities from the booklet. First, you can demonstrate the most mundane capillary action of all with a paper towel. Pretend to spill a little water or juice on the table (Travis thought it was quite funny that mom made a mess on purpose) and then quickly place a paper towel over it. The fibers act just like the root system of a plant!

Kiwi Trees (6)

Next, we repeated a classic flower-dyeing experiment, but with a slight twist. Use any white flowers for the game, such as carnations or roses. Trim the stems at an angle, then carefully slit the stems down the middle.

Kiwi Trees (12)

Fill two cups with lukewarm water and add 20 drops food coloring (in different colors) to each cup.

Kiwi Trees (13)

Arrange two flowers so that the halved stems dangle one into each cup. I found it useful to use a paper clip to hold them in place, so the flowers didn’t tip.

Within just an hour or two, we could already see a pretty tint… on each half of the flower!

Kiwi Trees (16)

By morning, the colors were vibrant and split evenly down the middle, a fantastic visual of capillary action.

Kiwi Trees (17)

We finished with two fun suggested reads: The Tree Lady by H. Joseph Hopkins and Tell Me Tree by Gail Gibbons. In sum, we loved this crate!

Laundry in the Fast Lane

Laundry Games (1)

It’s getting harder to keep Veronika entertained while I do laundry, so today I upped the ante; instead of seating her next to me with her own laundry center, I put her right in the laundry basket!

Laundry Games (8)

She instantly was intrigued with her new surroundings. To keep her occupied, I dropped in easy, small items – baby socks, washcloths – and soon she was playing happily with them.

Laundry Games (2)

Next I played a game of peekaboo, draping a small hand towel over her head and asking, “where’s Veronika?”

Laundry Games (3)

I lifted the towel for a big reveal: there she is! She loved this one.

Laundry Games (4)

Now it was time to turn the laundry basket into a car.

Laundry Games (7)

I zoomed her around, including back and forth to the dryer to check on a load, and announced “Pit stop!” when we came to a stop. These words got a giggle every time.

Laundry Games (6)

One note of caution: big siblings are going to think this looks so fun that they’ll want a turn! Needless to say, this is one way to take the drudgery out of laundry.

Laundry Games (9)

Baby’s Beef and Barley

Beef and Barley

This quick recipe is a well-balanced combo of protein, grain, and veggie for your little eater.

Ingredients:

  • 6 Gardein beefless tips
  • 1/2 cup cooked barley
  • 4 ounces carrot puree
  1. Saute the beefless tips for about 8 minutes, until lightly browned.
  2. Mince the beef, and combine in a bowl with the barley and carrot. If you prefer, you can run the whole mixture through a food processor for younger babies.

Solar System Models

Planets alt

When you’re the only mom who gets her kid up and dressed and backpack packed and lunch made and head to the bus stop and then learn that the Friday before Labor Day is apparently also a day off from school… Well then whoops, you suddenly have a day to fill!

Luckily I had this little project from Raddish Kids up my sleeve, a chance to make two models of the universe: one tiny and one huge!

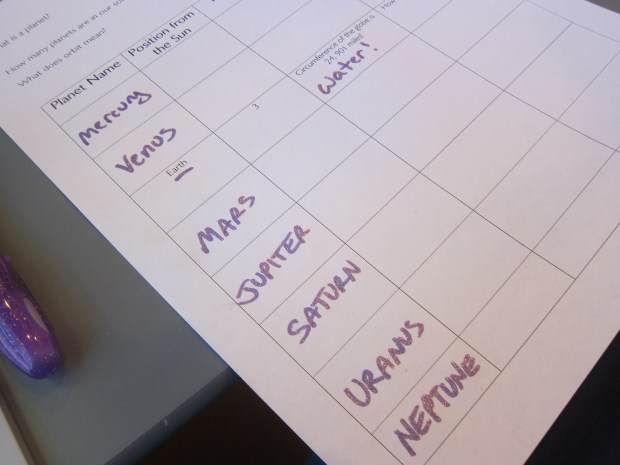
First I asked Travis what planet we live on. He correctly knew Earth, and was able to name a few facts about it, like how its watery.

Raddish provided a chart to name the other planets, all of which my budding astrologer could fill in. He proudly gave me a fact about each, which I wrote down (in glittery galactic pens, of course). Filling in the column with further questions about each planet was a bit harder for him to grasp, but big kids can write in any pending querries here, as well.

Planets (1)

After watching a suggested video that helped him fill in a few new facts about each planet, it was time to model!

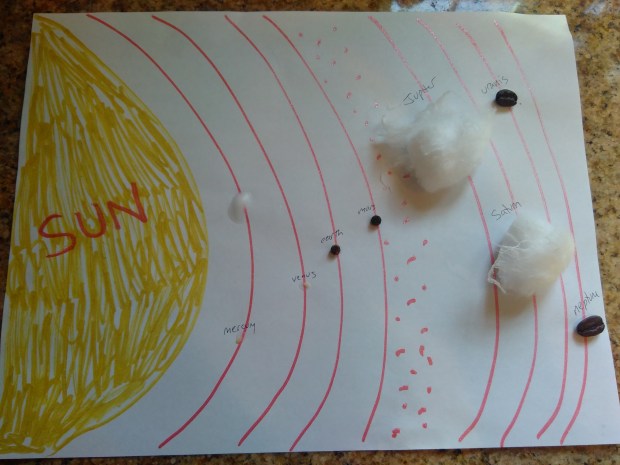
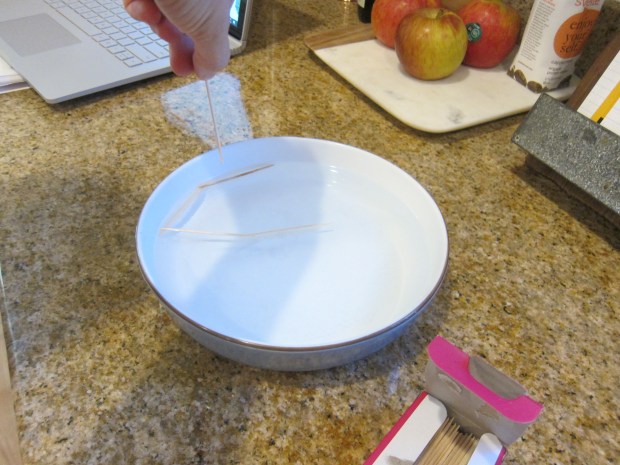
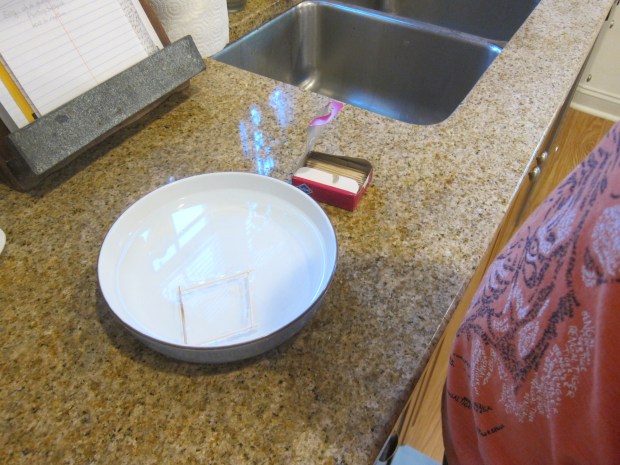
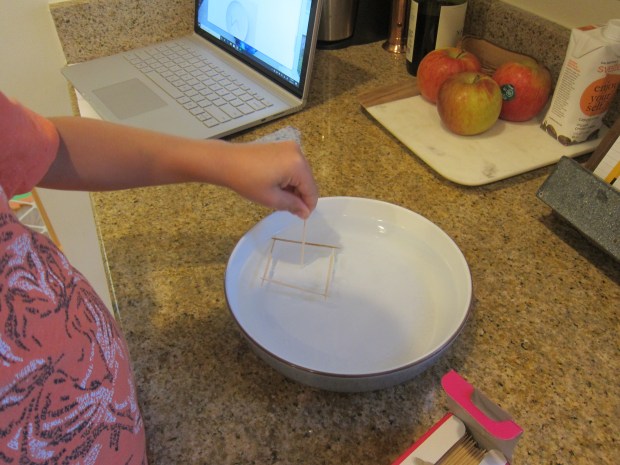
First up was the Tiny Solar System. I drew a half circle on the edge of a piece of white paper and labeled it as the sun. I drew 8 orbits, with an asteroid belt making a wide patch between the fourth and fifth lines.

Planets (2)

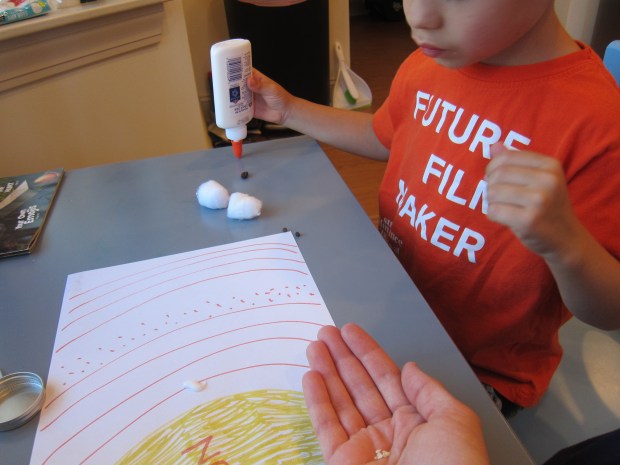
For scale models of the planets, we glued on the following:

2 sesame seeds (Mercury and Venus)

2 peppercorns (Earth and Mars)

2 cotton balls (Jupiter and Saturn)

2 coffee beans (Uranus and Neptune)

Planets (3)

Note: the scale obviously isn’t exact, but the idea here is that the relative sizes of the planets (the enormity of Jupiter, the tininess of Mercury) become apparent. This model also didn’t show the distance between orbits to scale.

Planets (4)

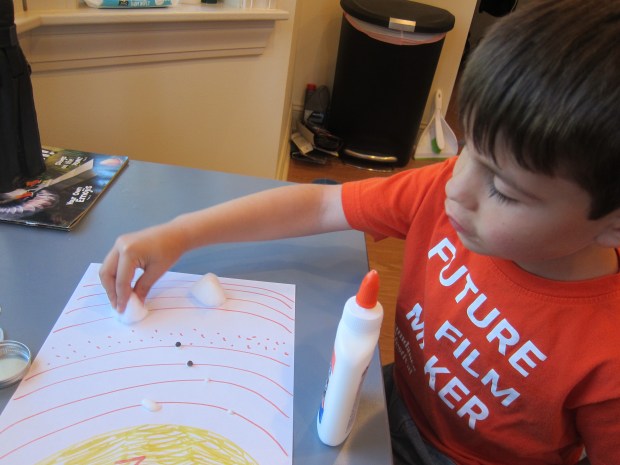
Travis marveled at the tiny sesame seeds. In fact they were so small we could barely see them until the glue dried!

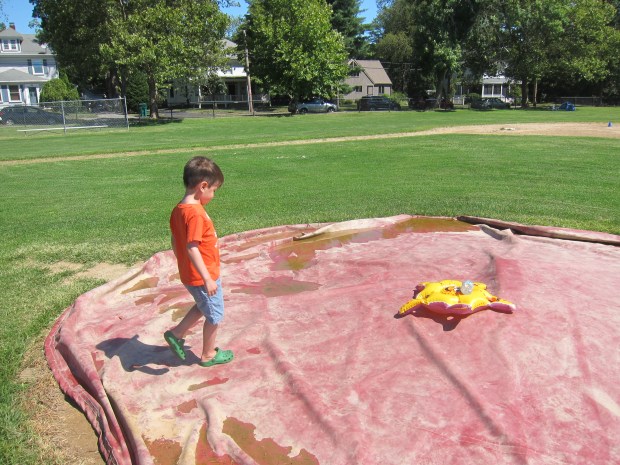
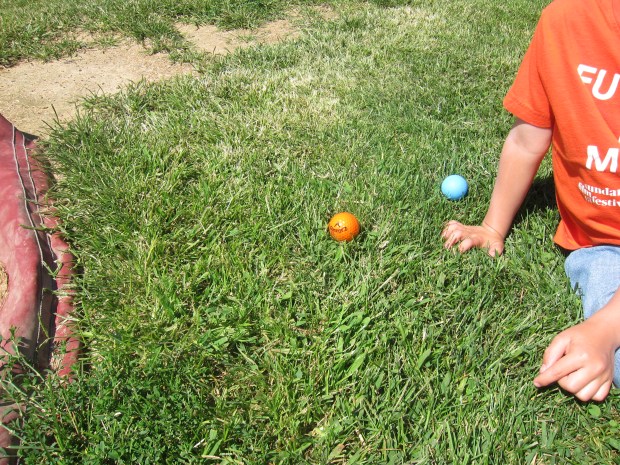
Now for the Large Solar System! We headed out to the playground with a bag full of balls in various sizes. Travis was very curious as I collected these from around the house, but was soon to see why.

I inflated a silly starfish to be the sun and put this right in the center of a baseball diamond. (Note: A beach ball would work, too, but I liked that the starfish was a sun/star shape).

Planets (5)

Next we walked out a full 78 steps from the sun holding a wiffle ball as “Neptune.” This took us right to the edge of the baseball field.

Planets (6)

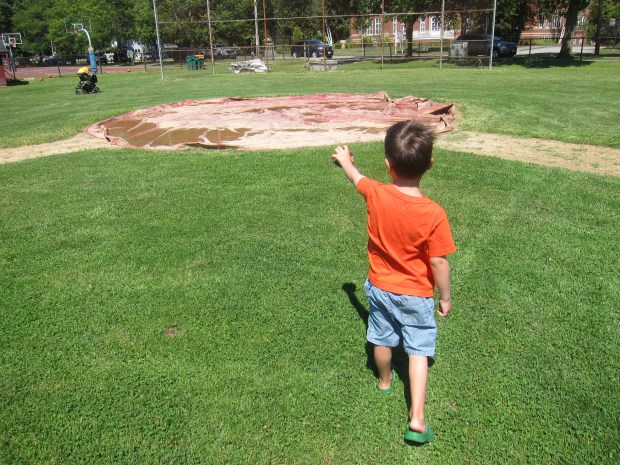
Repeat with the following:

50 steps: wiffle ball (or tennis ball): Uranus

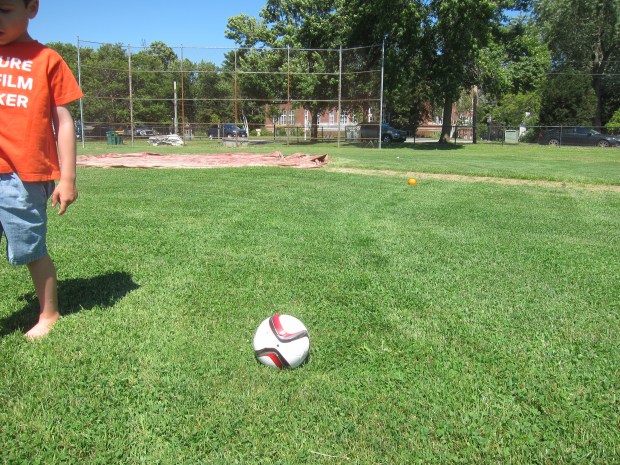
25 steps: soccer ball: Saturn

13 steps: basketball: Jupiter

4 steps: ping pong ball (or golf ball): Mars

3 steps: ping pong ball: Earth

2 steps: marble: Venus

1 step: marble: Mercury

Planets (8)

This exercise is eye-opening even for a grown-up, revealing how truly close our rocky neighbor planets are, and how truly vast the distances are between the outer planets.

Planets (9)

I shared these fun facts with Travis to highlight the great distance across the baseball field. Each step we’d taken was equal to 36 million miles. A rover took 6 months to reach Mars, that “one step” away, but 12 years to reach Neptune! He seemed impressed, but then wanted to play soccer… There goes Saturn!

On the way home, we made up some corny space jokes.

How did Mars know what Venus was thinking? It red its mind.

Why was Jupiter so stinky? Because it passed gas.

Ha, what space joke will your kid create? Please share in the comments!

Planets (7)

Arrange a Musical Playdate

Musical Playdate (3).jpg

Classic children’s songs are so much fun for babies. Parents will likely know the words and motions from their own childhood, making them favorites to pass down (think Itsy Bitsy Spider, Wheels on the Bus, or Open Shut Them). When you make it a group event, it’s just that much more fun!

Today, Veronika and I joined a group singing at our local library. She was thrilled to receive props like scarves and puppets as we sang to favorites like Old MacDonald Had a Farm.

Musical Playdate (4)

This is a great way to see other babies in action, too, playing with instruments and moving around. Our group singalong featured an assortment of rattles and shakers.

Musical Playdate (5)

Another fun song for movement is Row Row Row Your Boat. After we rowed our babies’ arms on the classic first verse, the library added some cute new lyrics.

Drive Drive Drive your car (move your baby’s hands like a wheel)…

Chug Chug Chug your train (elbows swinging)…

and

Fly Fly Fly your airplane (arms out)

At home, I made up a few more silly verses. We rowed up a river to see a polar bear shiver, up the stream to see a crocodile and scream, and to the shore to see a lion roar.

You can continue the musical fun long after group time has ended. I’m a Little Teapot is another one that’s great for gross motor movement (and props!).

I’m a little teapot

short and stout

Here is my handle (one hand on hip)

Here is my spout (other arm out straight)

When I get all steamed up

then I shout

Tip me over

and pour me out! (lean over to the side)

The tip gets a giggle very time – mommy is sideways!

Musical Playdate (1)

If your library doesn’t have a musical sing-along for you to attend, consider being the host for a musical playdate. Have a few friends over whose babies are about the same age, and scatter all the instruments in the middle. Parents sing while babies bop and shake along!

Musical Playdate (2)

3 Baby Obstacle Courses

Obstacle Baby (19).JPG

Veronika can’t wait to break free from “pillowville” (the name I have for the way I currently block her in the playroom with pillows; it’s time to buy baby gates!), and she’s trying to scale the pillows constantly. Today I set up a few obstacle courses to develop her gross motor skills, and boy did she have a blast.

First, I placed a very low obstacle in the center of the playroom with a few toys on top.

Obstacle Baby (1)

This is lower than couch cushions, so it was great practice for getting her knees up and onto the top, the last piece of the puzzle for her to work out.

Obstacle Baby (2)

She was so proud when she reached the toys!

Obstacle Baby (3)

You can make a similar “obstacle course” for any early crawler with low pillows or bean bags to crawl across. Toys at the end as incentive always help!

Obstacle Baby (4)

Next up was more of a cerebral obstacle course. I had her practice zigging and zagging across the room by placing a series of enticing toys.

Obstacle Baby (5)

First she crawled to bean bags hidden under cups.

Obstacle Baby (6)

Then she had to zig to a tower of blocks.

Obstacle Baby (7)

A current favorite music box toy was up next. She made a beeline for it.

Obstacle Baby (8)

She probably would happily have stopped there…

Obstacle Baby (9)

…so I moved it to the final point of her “maze” too. As she moved towards each group of objects, we also worked on language development. “Come get the blue bean bag!” “Can you get the square block?” The activity also builds math skills, believe it or not (the geometry of zigging and zagging) and fine motor skills as baby plays with each toy along the way.

Obstacle Baby (10)

Finally, it was time for the big girl obstacle course! For this one, I set up the couch cushions so they formed “steps” and “ramps.” I did all of this over a soft floor mat, and added blankets along the sides as added protection against any rolls.

Obstacle Baby (11)

She needed no encouragement at all; she wanted up! She headed for the toys at the top of the first ramp, still needing a bit of a boost on her bottom.

Obstacle Baby (12)

About half way to the toys, she got tired. This is hard work mommy!

Obstacle Baby (14)

I encouraged her with another boost, and she made it!

Obstacle Baby (15)

Heading down was interesting, and I spotted her along the side in case of a fall. She decided to take a side route instead.

Obstacle Baby (16)

Once again with a little boost she reached the top.

Obstacle Baby (18)

What great exercise!

Obstacle Baby (21)