Moon Crater Experiment

Moon Craters (9).JPG

Travis loves learning about the moon, and specifically how its craters were made. Okay, so this “experiment” isn’t exactly accurate, but your kids will have a blast launching “asteroids” at the moon surface to make holes!

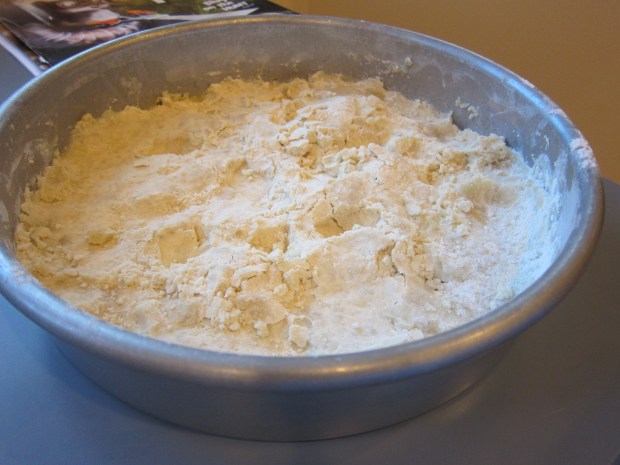
To make our moon, Travis first poured 4 cups flour into a cake pan.

Moon Craters (1)

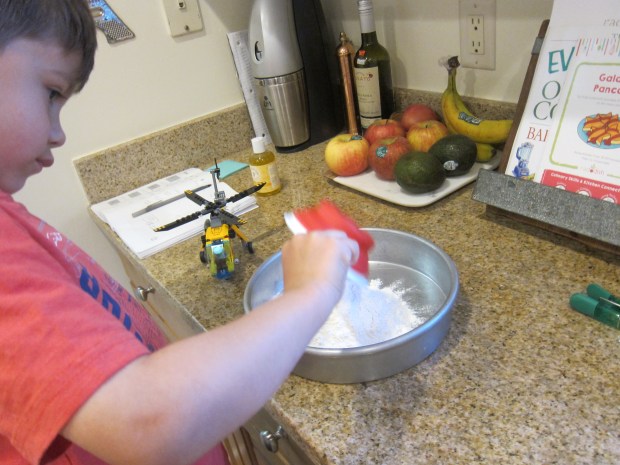
Add 1/2 cup baby oil and mix until the mixture holds together; we found that hands worked better than a spoon for this purpose. Now we had moon dust!

Moon Craters (2)

Next we headed outside to the “asteroid belt!” My proud astronaut discovered a trove of pebbles and very carefully selected some to bring inside.

Moon Craters (4)

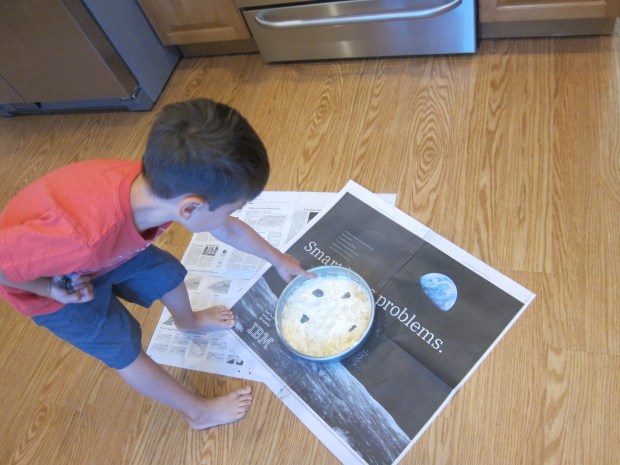
Place your moon cake pan on a layer of newspaper to avoid any mess. Wouldn’t you know, there was an ad featuring a view of Earth from the moon!

Moon Craters (7)

Travis began launching our “asteroids” one at a time.

Moon Craters (5)

He discovered that pressing the pebbles in a bit made a better crater than simply dropping them, and experimented with the difference between dropping them from up close versus up high.

Moon Craters (6)

That’s one small drop for a boy, one giant leap for imagination.

Moon Craters (8)

Baby’s Beef Stew

Baby Beef Stew (2).JPG

This three-ingredient recipe was a great way to introduce Veronika to the warm flavors of a grown-up beef stew! It was also her first taste of Gardein beefless tips. The results? A big hit!

Ingredients:

  • 1 russet potato
  • 2 carrots
  • 9 Gardein beefless tips
  1. Peel and chop the potato and carrots; cover with water and bring to a boil. Continue to cook for 15 minutes, until very tender.
  2. Meanwhile, saute the beefless tips for about 8 minutes, until browned. Add to the pot with the potatoes and carrots for the last 10 minutes or so. Remove with a slotted spoon.
  3. Finely mince the beef. Mash the potatoes and carrots with a potato masher.

I served these in two little piles on Veronika’s tray, an adorable deconstructed “stew”.

Baby Beef Stew (1)

Create a Sensory Tunnel

Sensory Tunnel (8).JPG

Today, with big brother off to kindergarten (!), I had time for a bigger project than usual with Veronika. Using two old moving boxes from the garage, I opened up all the flaps and then nested them slightly one inside the other to form one long tunnel.

Sensory Tunnel (1)

Hmm, the box was intriguing, but Veronika didn’t head inside just yet.

Sensory Tunnel (2)

Next I poked three holes along the top. I stuffed in three socks, all with different patterns. One sock I left empty, one I stuffed with newspaper for a crinkly effect, and one had a musical rattle inside.

Sensory Tunnel (3)

Interestingly, the empty sock was her favorite. She loved trying to catch it and tug on it.

Sensory Tunnel (4)

She seemed quite determined to pull it all the way from the box, and was amazed every time it sprang back into place (Note: you can knot the socks at the top if needed, to keep them secure).

Sensory Tunnel (5)

I placed a few tantalizing toys inside (balls, cars), and finally that did the trick. In she goes!

Sensory Tunnel (7)

She looked absolute thrilled with her surroundings once inside, her own little fort! If you want, you could even make windows, but my boxes were a bit floppy and I skipped that step so that the tunnel didn’t cave in.

Sensory Tunnel (9)

She did also try lying on her back to kick at the socks, but preferred sitting up to play.

Sensory Tunnel (6)

What a fantastic morning of fun!

Pudding Painting

Pudding Paint (6)

Veronika is almost old enough to start making her first works of art, but there’s one problem with this girl: everything goes in her mouth! The solution, if your baby is the same, is edible paint.

Pudding Paint (1)

Today, I whipped up a batch of vanilla pudding (Whole Foods 365 is vegan). Let the pudding chill in the fridge, then add food coloring for “paint” colors.

Pudding Paint (2)

I gave Veronika a paint brush, which instantly made her look so proud; she’s seen big brother paint, and now it was her turn.

Pudding Paint (4)

Turn a little of the pudding paint out onto a highchair tray (or tape down paper, if you prefer) and let your little artist go to town.

Pudding Paint (5)

First she just made a few smears. Then she wanted to focus more on the paintbrush. Once the tip of it got in her mouth and she discovered the pudding was yummy…

Pudding Paint (7)

…her smile was priceless. Then she really got her hands into the mix.

Pudding Paint (11)

I showed her how to make circles and squares, plus a few letters.

Pudding Paint (8)

Soon we had green, where or blue and yellow “paints” had mixed.

Pudding Paint (10)

This was a fantastic foray into the world of art, as she nears 10 months old!


Pudding Paint (9)

Solar Energy and Water

Solar Power (1)

This quick experiment seemed like a good way to illustrate the power of the sun for Travis, especially as he learns about how solar energy can power homes and more. Unfortunately our results weren’t spectacular, but perhaps you’ll have a more clear-cut outcome!

Set two cups of water on 2 pieces of paper, one white, and one black, somewhere that receives direct sunlight. Theoretically, the water on the black paper should warm up more quickly, as the black absorbs the sun’s heat, while the white reflects it.

Travis helped test this in two ways.

First, we tried ice cubes, expecting the one on the black paper’s water to melt faster.

Solar Power (2)

But oh no, our ice cubes might not have been the same size, because the white side melted more quickly!

Solar Power (3)

Next we tried a thermometer. We left the two cups of water to heat up in the sun for a few hours, then headed out with a thermometer to check.

Again, sadly, the results weren’t very pronounced. The black water might have been a degree or two warmer, but on our small dial, that was hard for Travis to appreciate.

Solar Power (4)

Either way, at least the experiment got him thinking, and he got a dose of science and a little sunshine in the morning!

Sticky Toys

Sticky Toys (4)

This cute game is a great way to test your baby’s “strength”. Veronika seemed to go wild for the slight effort involved, or perhaps just for the novelty of the way the toys were presented.

Use sticky contact paper or double-sided tape to cover part of the surface of a piece of cardboard.

Sticky Toys (2)

Arrange a few soft toys along the sticky surface and present to your little one. She immediately trotted over with interest.

Sticky Toys (3)

First Veronika seemed the most curious about the cardboard itself. She wanted to pick up the whole thing and wave it around.

Sticky Toys (5)

Then she seemed to become aware of the toys. I showed her how to lift one up – with a bit of effort – and stick it back on again. Note: You’ll notice that it helped to hold the cardboard in place for her with my feet!

Sticky Toys (6)

She was delighted when she gave a pull to ducky…

Sticky Toys (8)

…and was all grins for her big success one it was in her hands.

Sticky Toys (9)

In sum, an easy game that can entertain your baby for quite a while.

Sticky Toys (7)

Environmental Print

Summer Print (8)

In the final week of summer, Travis undertook a multi-part assignment to search for the print all around us: on food labels, on street signs, on toys, etc. Such words, known as “environmental print” can be great first sight words for pre-readers, and can encourage kids to learn!

So after concentrating on a letter a day for a little while, the idea now was for Travis to spot and notice full words.

Travis made a collection over a few days, pulling labels from food boxes at home and noticing signs around town.

Summer Print (1)

Great early sight words include STOP on a red hexagon, the “One Way” of a black and white arrows, or stores your child knows by name.

Summer Print (3)

Next up, I asked Travis to sort the print we had found. We had two main categories: street signs and food labels. Feel free to add multiple categories though, depending what your child has seen!

Summer Print (5)

A further great exercise was adding them to the pages of his Alphabet Dictionary.

Summer Print (6)

This was great both for recognizing the opening letter of each word and for sounding it out. He rightly noted that Fig Newmans could have gone on the “F” page or the “N” page!

Summer Print (7)

Finally,you can make a few “puzzles” by cutting some of the larger labels into pieces.

Summer Print (9)

If you are able to make copies of photos or have double of certain food labels, you could even turn it into a game of Memory.

Summer Print (10)

How else could your child play with “environmental print? Please share in the comments!

Summer Print (11)

Sight Word Tower

Sight Word Tower (4)

It doesn’t seem possible, but summer is over and school starts tomorrow! That meant it was time to culminate Travis’s summer sight word practice with one final fun activity.

I wrote each word from our index cards onto the top of a paper cup.

Sight Word Tower (1)

I challenged Travis to build the cups into towers – any way he chose! – but as he worked, he had to say the word on that cup.

Sight Word Tower (3)

Not only was this a neat building challenge, but I was able to pinpoint which words still gave him pause.

Sight Word Tower (6)

The activity is so simple but so beneficial, we’ll keep these cups on hand for the school year!

Sight Word Tower (5)

Plus it became a race to see if he could blurt the correct word before the resident menace (baby sister) came over to knock down his towers.

Sight Word Tower (7)

Tube Talk

Tube Talk (4).JPG

Sometimes the best games with babies require only the simplest tools; to wit, this adorable little activity for which you only need an empty toilet paper roll or two!

I spoke through one and called out Veronika’s name, and she eagerly trotted over. This was something she had to come see.

Tube Talk (1)

I held the tube up to her ear and whispered a few words. She turned her head eager to see where the sound was coming from!

Tube Talk (2)

Of course she wanted to hold one immediately. She babbled down into it, which changed the sound of her vocalizations somewhat.

Tube Talk (3)

And of course nibbled on it.

Tube Talk (6)

Finally, I held the tube against the bare skin of her arm and spoke into it, which meant my warm breath reached her skin. There were lots of giggles for that one!

Tube Talk (5)

Develop Your Baby’s Taste Buds

Develop Taste Buds (1)

Veronika seems bored of the foods I’ve given her in varying combinations for the past few months. Today, it was time to test her taste buds! Some of these suggestions were items I wouldn’t have thought for a nine-month-old, but it turns out she could chew them just fine and loved quite a few!

The idea was to pair contrasts; think: something sweet with something savory, or something soft with something crunchy. This will help your baby discern differences in tastes and texture.

First we paired kiwi with Tofurky slices.

Develop Taste Buds (5)

The Tofurky was an instant hit! She ate nearly an entire slice. Kiwi she seemed confused by, perhaps too strongly citric.

Develop Taste Buds (6)

Next up was mango and Daiya cheddar cheese. Cheese, another food I wouldn’t have thought of this young, was also a huge hit.

Develop Taste Buds (3)

Then she nibbled happily on the mango for a while after.

Develop Taste Buds (4)

Finally, I paired a soft banana date square from a vegan bakery with a crunchy apple slice.

Develop Taste Buds (7)

She loved both, and had one in each fist for a while, alternating bites.

Develop Taste Buds (8)

In sum, this was a delightful taste test that expanded baby and mama’s sense of edible possibilities.