Bookmarks with Heart

Hole Punch (9)

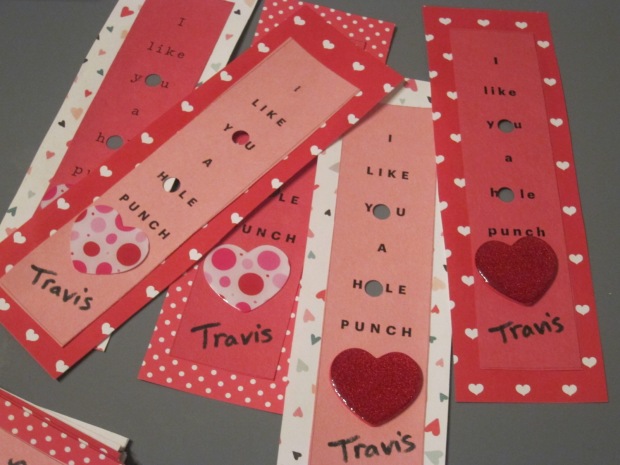
You know you’ve got kids in school when you’re on the hook to produce Valentine’s for the class for the first time! This adorable and easy idea from Parents magazine was the perfect craft to put together with Travis. Although I had to do some components, I loved that he got to collaborate as well, making this truly his project for the class.

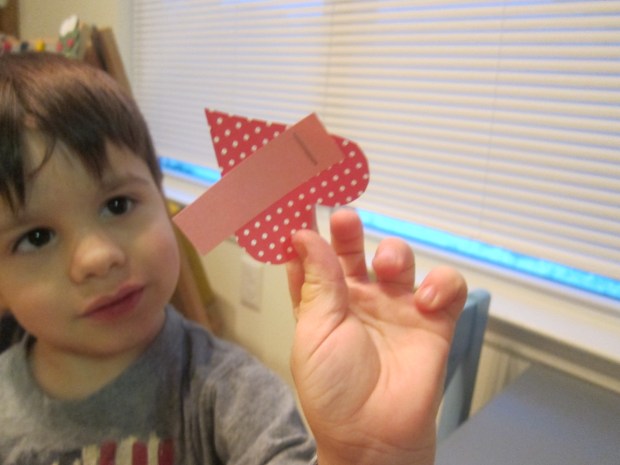
To start, print the bookmark template from parents.com/bookmarkheart onto colored paper. We used pink and red construction paper.

Hole Punch (1)

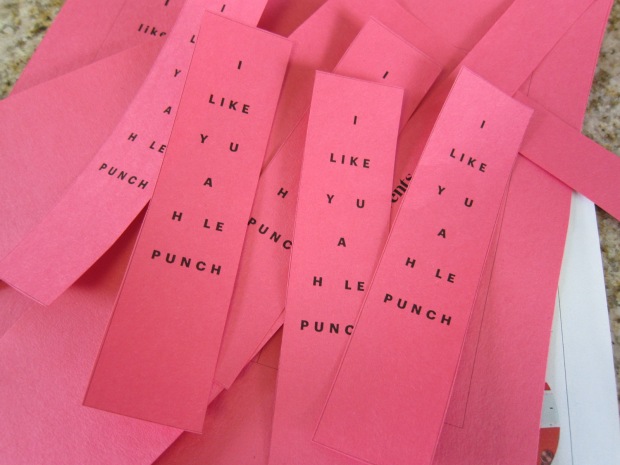
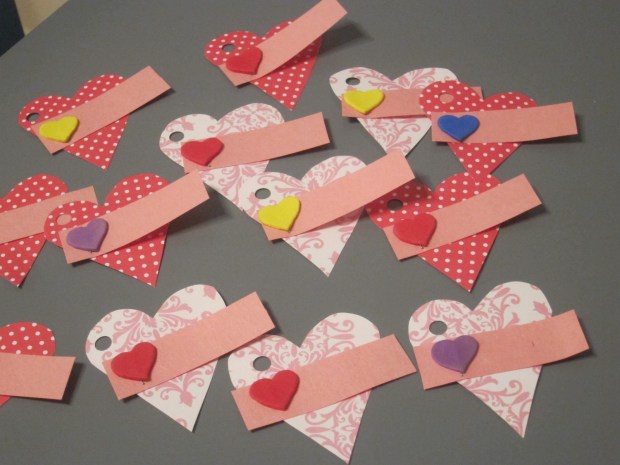
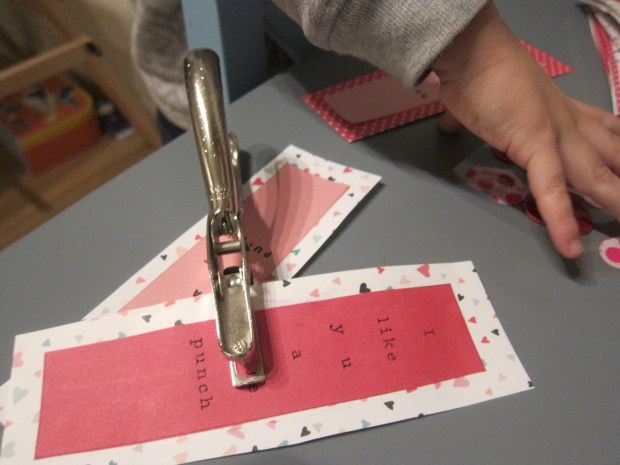
The template reads: I like you a hole punch, but the o’s are missing – you’ll fill them in later with a hole punch, of course.

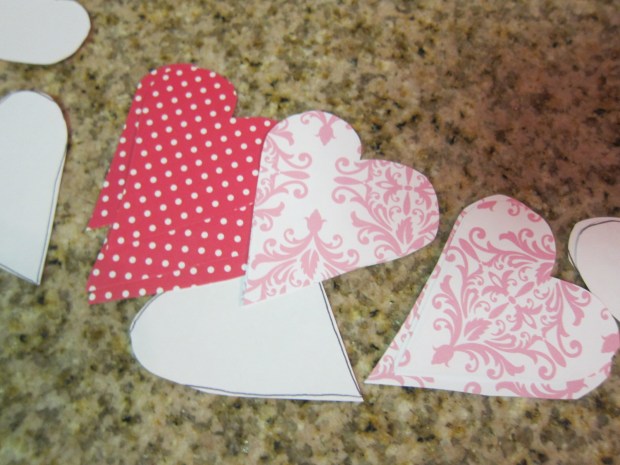
Next, I purchased patterned scrapbook paper and cut into rectangles that were 2 inches wide by 6 and 1/2 inches long – slightly larger than the printed bookmarks. This is a fun chance to do some measuring and ruler practice with your child.

Hole Punch (3)

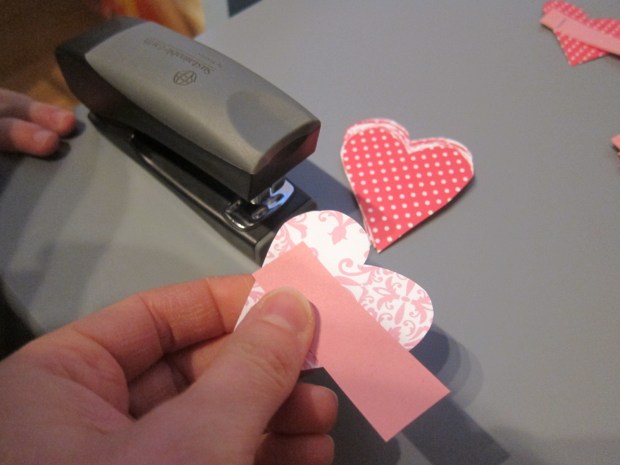
Here came Travis’s big role! He loved smearing a glue stick onto the patterned paper, after which I adhered the bookmark templates to the center – we had a great assembly line going!

Hole Punch (5)

As mentioned in previous blogs, Travis loves when he gets to use the hole punch, so this was a big hit. Go through and punch the o’s in the word ‘you’ and ‘hole’ on each bookmark.

Hole Punch (7)

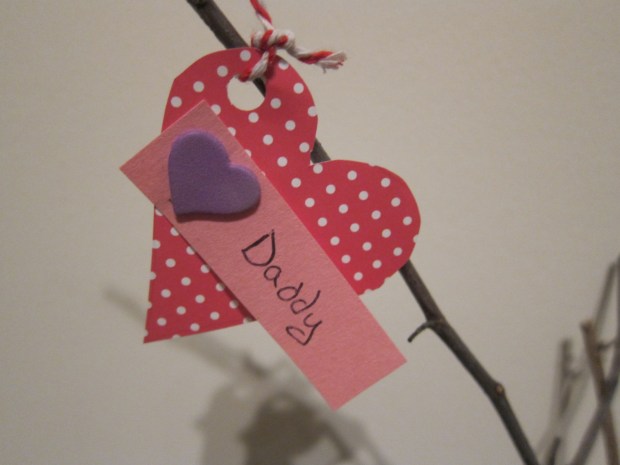
We finished our Valentine’s with a heart sticker and his name on each.

Hole Punch (8)

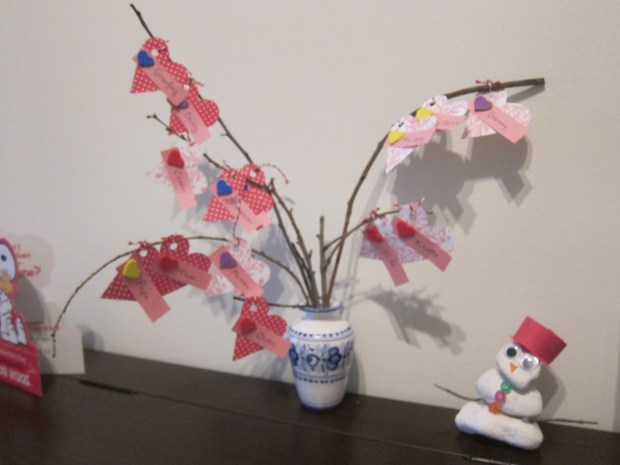
Can’t wait to deliver these to the class for the Valentine’s party!

Hole Punch (10)

Make a Speedy Bobsled

Bobsled (6)I love how timely the craft in our monthly issue of High Five always is. This month, Travis learned how to make a bobsled just in time for the start of the Olympics!

Of course it made no sense to put together a bobsled when Travis had no reference point, so first we watched a few videos of past teams. He was then super revved up to create one at home.

All you need is an empty toilet paper tube to be the bobsled, and a long piece of cardboard for the track. Ideally use a three foot long piece of cardboard as your track; I only had two feet in length, which worked just fine, but it meant our bobsled couldn’t race as far downhill.

Cut the tube open along one side, and then paint.

Bobsled (1)

I asked Travis if he wanted to paint his sled in the colors of a particular country. Actually, the red white and blue here isn’t America but Australia – he’s big into an Australia phase.

Bobsled (2)

I suggested making the track white for ice, but Travis wanted an Australian-flag colored track as well.

Bobsled (3)

We left the track and bobsled to dry while he was at school, and returned to an afternoon of Olympic fun!

To finish the sled, simply tape two plastic straws on the bottom (decorative washi tape was pretty, though not a must), with the bent parts of the straw pointing upwards like sled runners.

Bobsled (5)

Woosh! Action shot!

Bobsled (7)

We took turns launching the bobsled and rating its runs on a scale of 1 to 10. We give a gold medal to this craft, thanks High Five!

Bobsled (8).JPG


Stained Glass Window Art

Stained Glass (14).JPG

Just about this time last year, when Travis was two-and-a-half, we made toddler stained glass. Now that he’s three-and-a-half, we’ve grown a bit more sophisticated with our designs! This project introduced a new art medium – puffy paint! – which absolutely delighted Travis.

First, place a piece of contact paper, sticky side down, on a work surface. You’re going to use your puffy paint directly on here, so make sure the contact paper is some place it can dry undisturbed for a while.

Stained Glass (1)

I knew Travis wouldn’t be able to draw the exact outline of a house for our stained glass, so I set up two work stations side by side. While I outlined the house, he went wild with other puffy paints on his work surface.

Stained Glass (4)

He told me he’d painted a castle, a prince, a king, and the girls visiting (whoops, too much Cinderella!). Meanwhile, he was ecstatic when he realized I had copied the house shape off of a template online. Next time I would make sure to have a large bottle of black puffy paint on hand – I had to switch to green mid-way.

Stained Glass (3)

Let your puffy paint dry overnight.

To fill in the panes of our “glass”, we used glitter glue in lots of fun shades.

Stained Glass (7)

After a bit of trial and error, Travis grew quite adept at keeping the glitter glue between the lines of the puffy paint.

Stained Glass (9)

We did run out of puffy paint with a few spaces left to fill, so I mixed up some quick colored glue (glue and any shade of tempera paint). Let dry completely again.

Stained Glass (10)

Trim any excess contact paper, and then your stained glass will adhere right to any window.

Stained Glass (11)

It was so beautiful with the sun shining through!

Stained Glass (12)

What other shapes or designs would you make to hang as “stained glass”? We’d love to hear in the comments!

Stained Glass (13)

Felt Crown

Felt Crown (10)

We tried out a pipe cleaner crown the other day, but unfortunately it was short-lived. The pipe cleaner segments unwound from one another quickly after King Travis tossed it around a few times. We thought a felt crown might stand up to more rough and tough kingly play!

First, trace an outline for your crown on white felt and cut out.

Felt Crown (1)

Even this large piece of felt wasn’t long enough to stretch around Travis’s head, so we cut an additional strip of felt to sew on the back. This ended up being the neatest part of the craft for Travis. With careful adult help, we threaded yarn through the felt to secure the extra strip in place.

Felt Crown (2)

Before sewing though, I asked Travis how he would like to decorate the crown. He wasn’t very into the permanent markers I offered, making only a few scribbles. (I ended up ending a few lines of decoration across the front).

Felt Crown (6)

He did, though, love the “gems” from the craft store that I had.

Felt Crown (3)

Very careful consideration was given to which gem should go where, and then I adhered them with hot glue.

Felt Crown (4)

If you have decorative buttons on hand, you can also add those to your crown – another chance for sewing through the felt!

Felt Crown (5)

Once he had the crown on, I realized he actually looked more like a medieval bishop than king! But either way, this is a great dress-up prop.

Felt Crown (9)


Mini Archery

Mini Archery (12)

After way too much fun with our medieval Koala Crate, we needed to continue our exploration of the Middle Ages. This project was too cute for words. Putting it together was mostly a grown-up task, but you’ll love watching your kids imagination go wild as they play with the final product!

To prepare the bow, notch a craft stick on both ends, on each side, for 4 notches total. I was entirely unsure how to go about making the notches, and just slivered into the stick with scissors. This may not have been the safest or best method, but it worked!

Mini Archery (3)

Soak the stick in water for at least one hour to soften the wood.

Mini Archery (4)

Once soft, carefully bend the stick into an arc. Wrap a piece of dental floss a few times through the notches on one end. Stretch the floss taut while curving the bow, and secure through the notches on the other end.

Mini Archery (2)

For completely safe mini arrows, simply snip one tip off of a q-tip.

Mini Archery (10)

Now we needed something to aim at! We cut two circles from poster board (paper plates would work, too), and decorated with a bull’s eye marking. Little poster board strips taped to the back helped them stand upright.

Mini Archery (5)

The mechanics of nocking and launching the q-tips turned out to be quite tough for Travis.

Mini Archery (6)

He loved watching though while we had some family time trying to hit the target. The arrows go quite far!

Mini Archery (9)

As the finishing touch, we needed a quiver for the arrows. I cut a toilet paper tube until it was only a little taller than the q-tips, then wrapped in brown construction paper to cover the bottom and sides. We added a few Sherwood Forest-y decorations, as well as a ribbon handle.

Mini Archery (11)

It turned out the quiver was Travis’s favorite element of the whole game. He loved loading it up with his “arrows” and running around with it…

Mini Archery (13)

… but in full disclosure, he also decided it would be fun to run around naked while doing so. So you’ll have to take my word for it that there was lots of enjoyment going on, but I couldn’t capture photos for the blog!

Mini Archery (7)

Valentine’s Day Tree

Vday Tree (8)

Why should Christmas have all the countdown/advent calendar fun? Consider this little tree a neat way to share the love as you mark off the days from February 1st to the 14th!

First, you’ll need to select several branches from outside, and place them in any pretty vase you have in your home.

Vday Tree (7)

Ahead of time, I traced and cut out 14 hearts from patterned paper. Pinks and reds were a natural choice for background color.

Vday Tree (1)

Next, I numbered the hearts 1 through 14. This helps add a little math element to the project, with Travis selecting the right numbered heart each day we add it to the tree.

Vday Tree (2)

Travis was so excited because to finish the set up, we needed two grown-up tools that he adores (under careful supervision of course): the stapler and the hole punch.

Vday Tree (4)

First, we stapled a strip of pink construction paper to each heart.

Vday Tree (3)

Next, we punched a hole in the top corner of each heart.

Vday Tree (5)

We added little heart stickers to each one as a finishing touch. Feel free to decorate your hearts however you like! Cute pink or red buttons glued on would also be pretty.

Vday Tree (6)

Each morning starting February 1, have your child name someone they love or care about. Write the name on the strip of paper, slip a piece of thread through the hole in the heart, and hang from the tree.

Here’s the tree about halfway completed:

Vday tree alt

And here is our finished tree on the 14th!

vday tree final.JPG


Dinner Table Conversation Jar

Dinner Jar (4)

I’ll be honest; we’re not always the model family when it comes to sitting down together for dinner, despite research about this healthy practice. Typically Travis eats early, and my husband and I eat later. So I loved the idea of this game when I came across it, as a reminder to all sit and be present together. But honestly, the game works whether you’re gathered around a dinner table or if you make it a part of your bedtime routine. One way or another, it’s a great way to get kids talking!

First, I invited Travis to help me decorate the glass jar that would hold our topics.

DInner Jar (1)

The thrill of scribbling all over a glass surface with permanent marker was pretty grand in and of itself! Travis made a vibrant purple…

Dinner Jar (2)

…and I also colored in a jar we could use, in case the first was ever too full.

Dinner Jar (3)

To make your conversation starters, write out simple questions on popsicle sticks.

Dinner Jar (5)

Our initial list of questions included:

Favorite teacher? Why?

Exciting news to share…?

What are you proud of?

Best friend?

3 Words to describe your day?

Favorite part of recess?

Favorite movie? Why?

Favorite song? Why?

The intention is to add sticks as time goes on, so the game keeps evolving with our family!

I loved how much Travis loved this game.

Dinner Jar (7)

My initial thought was to have each family member draw one question, but he was having so much fun that he made us go through every stick! His answers were charming and enlightening; some that I was sure I knew the answer to, he surprised me, and he thought really hard about some of the more open-ended ones.

Dinner Jar (8)

We can’t wait to play this for many nights to come.

Dinner Jar (6)

Cotton Swab Snowflake Craft

Cotton Snowflake (9)

I’ve never been a fan of cut-paper snowflakes as a craft. Quite frankly, I’m no good at it, and mine end up looking like circles with a few holes in them, instead of lacy flakes! But with pretty sparkling snowflakes outside our window, we wanted some indoor craft to bring the snow inside, and this cotton swab version was much easier to pull off.

To be honest, Travis was a little young for it. Older kids may be much more into shaping and designing their six-pointed flakes, and can really get creative with the process. As to Travis, he still had lots of fun, just in his own preschool way…

…starting with ferrying the cotton swabs over to me by “forklift.” Shipment received.

Cotton Snowflake (1)

He thought it was fascinating to watch me clip the cotton swabs in half (which, fyi, is not easy to do, the stems are tough; adults may want to help even older children with this step).

Cotton Snowflake (2)

Next I showed him how to arrange the cotton swabs into six-pointed shapes like snowflakes.

Cotton Snowflake (3)

We adhered ours to circles cut from blue constructions paper, but if you prefer, glue them together over wax paper and lift them off the wax paper once the glue has dried.

Cotton Snowflake (5)

Travis set about adding lots of glue and cotton swabs to his “snowflakes.” I loved watching his creative process, including smearing on the glue with a cotton swab at one point.

Cotton Snowflake (8)

As mentioned, older kids may want to create increasingly complex designs, and can cut the swabs into even tinier components.

Cotton Snowflake (7)

After the glue dried, we hung the snowflakes in the window.

Cotton Snowflake (10)

What beautiful flakes falling down!

Cotton Snowflake (11)


How Much Water Is in Snow?

Water in Snow (4)

Here’s a super-simple experiment for the next time it snows. It combines a whole host of scientific ideas, from talking about liquid vs. frozen states of matter to making a hypothesis.

First, we needed to fill a clear glass jar with snow. For the best results, make sure to tamp the snow down so your jar is truly filled all the way.

Water in Snow (1)

We took the jar inside and measured the snow (15 cm) and made guesses as to how much water would be left once it melted, keeping in mind past lessons on how ice takes up more space than water.

Water in Snow (2)

Travis guessed really low, at 2 cm! I chose 5 cm to keep things interesting. I tried marking our guesses directly on the jar, but since it was still a little wet, we found that masking tape worked better.

Water in Snow (3)

Next we needed to be scientific and record our results. We took measurements at one hour intervals over the next three hours with the following results:

3.27 pm – 15 cm

4.27 pm – 12 cm

5.27 pm – 7 cm

6.27 pm – 4 cm – all water!

Water in Snow (5)

It was neat to see that it took a full 3 hours, as well. Next time, we’d make hypotheses about the timing as well, and record that at the start.

Snowy Road

Snow Road (3)

You’ll be the coolest mom or dad on the block if you give this simple twist to outdoor snow play: give your kids permission to bring their toy cars outside to join the fun! Travis was hesitant to venture into the cold, so I headed out first with a shovel and made a road in the snow. Once he saw what I was up to, he couldn’t resist.

He was very into the process of making the road itself, and started to shovel his own route next to the one I had created before he even turned his attention to the cars. Let your civil engineers take over the road building, too, if they prefer!

Snow Road (2)

We found that this game works best with bigger toy cars; little ones get bogged down in the snow.

Snow Road (6)

The best vehicle was our big dump truck, which of course had the added benefit that we could load it with snow…

Snow Road (4)

…zoom it to the dump, and then unload.

Snow Road (5)

What’s your favorite novel way to play in the snow? Let us know in the comments!

Snow Road (7)