Button Toss

Button Toss (6).JPG

This fun game (another winner from Highlights magazine) involves crafting on the front end and then becomes a sport with some math involved by the end!

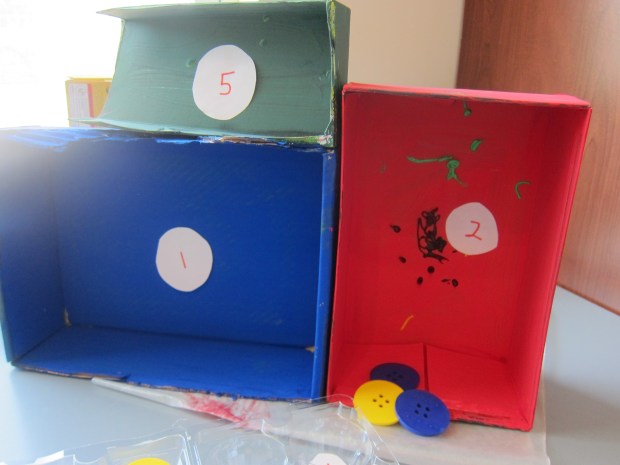
To put it together, you’ll need 3 boxes, ideally of different sizes and heights. Paint each box a different color, for the best contrast.

Button Toss (1)

We also squirted on some puffy paint because, puffy paint.

Button Toss (2)

Note: If you don’t have paint, you can wrap them with wrapping paper instead. Glue the boxes together in any configuration and let dry.

Button Toss (3)

To play, I cut out paper circles and marked each with a different score for each box. The easiest was worth a 1, the second was a 2, and the hard one was a 5. (Note: Big kids can skip count by 5s, labeling the boxes 5, 10, and 15).

Button Toss (5)

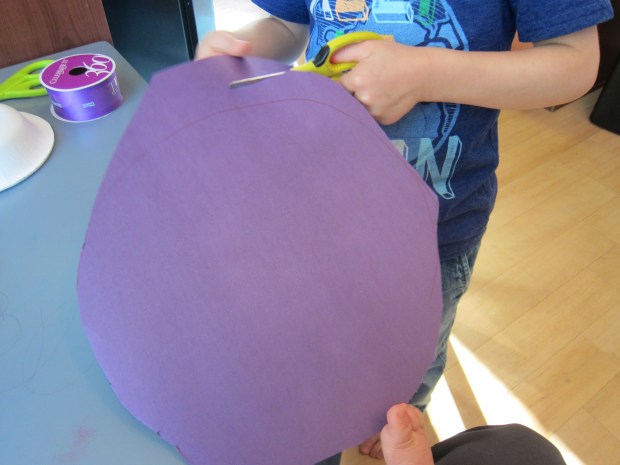
In an empty egg carton, add paper circles numbered 1 through 12 (or 5 through 60, if skip-counting).

Button Toss (4)

Each player now needs 2 buttons – one to toss and one as a score piece.

Travis took his first toss – a lucky 5!

Button Toss (8)

I helped him count his button five spaces forward through our scoreboard.

Button Toss (7)

He loved the challenge of the game, and the challenge of counting his score each time.

Button Toss (12)

The first person to 12 (or 60) wins!

Button Toss (11)


Mother’s Day Hat Card

Mother's Day Card (8).JPG

This adorable card in the shape of a hat, which evokes Kentucky Derby season and all things springtime, makes a wonderfully whimsical card for a special someone on Mother’s Day! When Travis and I spotted the craft in Highlights, we knew we needed to put one together for his grandmother.

Cut a large circle from colored cardstock; we chose a royal purple. I was impressed with the way Travis followed the lines along the circle I drew – I hadn’t realized his cutting skills had grown so precise!

Mother's Day Card (1)

Then we cut the rim from a paper bowl for a smaller circle.

Mother's Day Card (5)

Cut a tab into your cardstock near the middle, and glue onto the bowl. It should be able to lift open and closed.

Mother's Day Card (3)

Next we glued purple ribbon around the bowl, and also affixed a purple bow.

Mother's Day Card (4)

Once the glue dried, we added our Mother’s Day message to grandma under the hat!

Mother's Day Card (6)

Hats off to this cute idea!

Mother's Day Card (7)

Straw Rockets

Straw Rocket (8)Travis and I have been launching all kinds of things lately, from marshmallows to disks. Today, we made little rockets that could have races!

Cut squares of construction paper that are 3 inches x 3 inches. Make as many of these as you’ll want rockets.

Straw Rocket (1)

Wrap each piece of paper around a straw, making sure it is loose enough to fly off the straw when needed. We secured these with tape.

Straw Rocket (2)

Although there’s no need to, it was fun to add decorations. Travis soon was swirling pipe cleaners into all kinds of creations!

Straw Rocket (3)

I helped with one that was recognizably a “rocket,” as well as a few silly ones. Definitely have fun with these; we even had a little alien with googly eyes.

Straw Rocket (5)

We used hot glue to affix our pipe cleaner creations to our paper pieces. Now our rockets were ready to launch!

Lift the straw to your lips and blow, and see how far it flies.

Straw Rocket (7)

You can even turn it into a race, and see whose rocket flies furthest.

Straw Rocket (6)

Weave a Bajau Mat

Bajau Mat (7).JPG

This interesting craft idea from Travis’s Welcome issue of Highlights magazine not only teaches a little about an interesting culture, but was also Travis’s first introduction to weaving. Although a bit advanced for him, it was a neat activity to work through together.

For a little background on the mat, it’s technically called a banig, a mat woven from plant leaves by the Bajau people, who live in Southeast Asia. Traditionally, they have lived in wooden houses on stilts above the sea, and so the zigzag pattern on the mats resembles ocean waves. Neat! We wanted a turn.

Instead of leaves, you’ll be using poster board and cardstock. Highlights recommended using a full 11×22-inch piece of poster board, but I knew that would be too big a canvas for Travis’s attention span.

Bajau Mat (1)

Instead we cut a piece of poster board to about half that, at 10×11-inches. He liked doing the measuring!

Bajau Mat (2)

Cut the poster board into strips about 1/2-inch wide, leaving a border about 1 inch long at the top. Great scissor practice.

Bajau Mat (5)

Now fold two sheets of colored cardstock in half, and then in half again. Travis was my expert creaser.

Bajau Mat (3)

Cut these cardstock pages on the diagonal into strips, then unfold; you’ll now have a zigzag.

Bajau Mat (4)

Working with one strip at a time, weave into the poster board, alternating under and over. Push the first zigzag up to the top, then repeat with the remaining strips. Travis did tire out, but watched as I finished up the weaving.

Bajau Mat (6)

Cover the edges of the mat with duct tape to secure and voila! A beautiful homemade mat. Ours was too small to really be a floor covering, of course, but it quickly became a prop for Travis’s action figures in his games.

Make Volcano Eggs

Volcano Eggs (7).JPG

Yesterday Travis and I tested out a few ways to dye plastic Easter eggs. We had another batch of eggs (this time more properly ceramic rocks, which are meant to be painted), so although we know the results wouldn’t show up that well, we still wanted to have fun with the process!

In a small bowl, stir together 3 tablespoons baking soda, 10 drops food coloring, and just a bit of water until you have a thick paste.

Volcano Eggs (1)

Dribble the paste over the eggs – I recommend using a baking sheet or other craft bin as a base, because you’re about to have a mess!

Volcano Eggs (2)

Drizzle 1 tablespoon vinegar over each egg, and watch the colors run!

Volcano Eggs (3)

Travis couldn’t get enough of the fizzing.

Volcano Eggs (4)

This was so fun we mixed up a second bowl of color and repeated the process.

Volcano Eggs (6)

Bubble bubble!

Volcano Eggs (5)

As with our previous egg crafts, the color didn’t really set on the fake ones, but a few streaks were left behind. I’d love to hear if you have great results with real egg shell!

Volcano Eggs (8)

Easter Egg Maracas

Egg Maracas (7)

Here’s a great use for any extra plastic Easter eggs you have lying around this time of year! You can make the maracas after the hunt on the holiday, or set aside a few and make them beforehand; they look beautiful among other Easter decorations.

First, scoop a little rice into plastic Easter eggs. Good scooping practice!

Egg Maracas (1)

Place two plastic spoons around the egg, and secure with decorative washi tape. Any color will do, but I looked specifically for colors and prints that evoked springtime! Whoops – Travis thought it was funny when he taped my thumb in for a moment.

Egg Maracas (2)

Now continue wrapping in washi tape until the egg and the spoon handles are completely covered. This step got a big frustrating for Travis, so finishing up became a mama job.

Egg Maracas (5)

Turns out little sister Veronika loved the maracas, too!

Egg Maracas (4)

In fact, perhaps more so than Travis.

Egg Maracas (6)

But they were still great for shaking and grooving to music.

Egg Maracas (8)

Add these to your table centertop for an Easter decoration, or just enjoy them during any music play.

Egg Maracas (3)


Vegan Easter Eggs, Three Ways

Vegan Egg Dye (11).JPG

Every Easter since Travis was little, I’ve wanted to dye eggs, but didn’t manage to find plastic or wooden ones in time for the holiday. This year, I was prepared! Today, Travis and I tested out three neat methods of dyeing plastic Easter eggs. Did other people know these plastic ones from Paas exist? What a find!

Vegan Egg Dye (1)

To be honest, none of the following three methods worked that great on the plastic – it was more about the process and the fun than the result. The colors and tricks may work better on real egg shells, if your family is not vegan.

First up was a Marble Finish version. Fill a baking sheet with a generous layer of shaving cream.

Vegan Egg Dye (2)

Add drops of food coloring at 4 separate intervals. Swirl the color slightly into the shaving cream.

Vegan Egg Dye (3)

Now add 1 egg to each color, rolling around slightly.

Vegan Egg Dye (4)

Let sit for 10 minutes. Wipe off the excess shaving cream, and you should see a neat marbled color effect.

Vegan Egg Dye (5)

Of all the methods we tested, this one worked best!

Vegan Egg Dye (10)

While the eggs sat in the shaving cream, we set up the second attempt: Soap Star eggs.

Fill a small bowl with 2 tablespoons dish soap, 1 teaspoon water, and 10 drops of food coloring. Use a straw to blow bubbles in the solution (they will be big bubbles), then stir quickly until you have smaller bubbles.

Vegan Egg Dye (6)

Dip an egg into the bubbly water, then let set until the bubbles dry.

Vegan Egg Dye (7)

Finally, we made Bubble Fun prints! Draw with sharpie marker (or use an ink pad) on bubble wrap.

Vegan Egg Dye (8)

Wrap around an egg while the ink is still wet, and press firmly. You’ll have dot marks left behind.

Vegan Egg Dye (9)

As mentioned, all of our results were faint, but I was so glad my little vegan got to join in the Easter egg fun!

Vegan Egg Dye (12)

Art of the Color Wheel

Color Wheel (9)

A gray day seemed like the perfect chance to bring color inside. To combat all the dark rain clouds, Travis and I explored different ways we could make a color wheel. This project was part lesson, part craft – and all fun!

First, we did a quick review: I showed him paintings that use yellow, red, and blue as the dominant colors, including Piet Mondrian’s Broadway Boogie Woogie and Mark Rothko’s Untitled (Yellow, Red, and Blue).

Color Wheel (1)

Take the time to ask your child what he or she thinks the pictures are about, or how they make him or her feel. He told me Rothko’s made him “happy happy sad.” When I asked him to explain, he said the red and yellow were happy, but the blue was sad. Then remind your child these are the three primary colors.

Color Wheel (2)

Now it was time to make color wheels! We started with the most basic version using crayons. I filled in yellow, red, and blue on a paper plate divided into 6 portions. His job was to figure out which secondary color went where.

Color Wheel (3)

The next version was a little messier. We made three blobs of paint in the primary colors, and he used a paintbrush to drag these together. Soon we had a color wheel!

Color Wheel (4)

I encouraged him to make a version with hand prints, but he didn’t want to get that messy. Using my hand and fingerpaint, I  showed him an example, pressing together yellow and blue prints. Your kids might want to have goopy fun with this and make a full handprint color wheel!

Color Wheel (6)

Finally, it was water mixing time! We filled three cups with water, and added our primary colors (now in the familiar red, yellow, and blue) with food coloring.

Color Wheel (7)

Use a pipette (which means you’re sneaking in fine motor skills, too!) to make a few drops of each color on a plate. Then mix and match to form the secondary colors.

Color Wheel (8)

Travis enjoyed this version the most, and soon was experimenting with making a big plate of brown.

Color Wheel (10)

All of this was prompted by a Raddish Kids lesson, so we also watched some of the recommended videos to further our exploration. There’s lots more you can do to go further in depth with older kids: check out fine art books at the library, or head to a gallery for a primary and secondary color scavenger hunt!

Hummingbird Puppets

Hummingbird (5).JPG

We’re welcoming the birds of spring with this little finger puppet craft from Travis’s Ranger Rick Jr.! The pom pom puppets probably come out close to a hummingbird’s true size, which is neat to think about.

First, Travis selected which color pom poms we should use for the bodies. His was dark blue and light blue, and mine was yellow and pink. Glue the two pom poms together.

Hummingbird (1)

Next we snapped toothpicks in half for the long pointy beaks. Glue a half onto whichever pom pom will be the head. Cut triangles from foil cupcake liners, and use two for the wings and one for a tail.

Hummingbird (2)

Googly eyes complete the little birds.

Hummingbird (3)

To make them into puppets, cut a strip of felt and glue into a circle that will fit your child’s finger. Glue onto the bottom of the pom poms and let dry.

Hummingbird (4)

Now flutter your hummingbirds! Ranger Rick even included a sweet little poem to recite as you fly them around.

Look in your garden

And you just might spy

A hummingbird flash

As it quickly flies by.


Watch the small bird

Putting on a great show – 

Moving this way and that,

Always on the go.


When it finds flowers

So bright and so fair, 

It sips sweet nectar

While still in the air.

Travis even had the birds drinking “nectar” from some other toys!

Hummingbird (6)

Jack-in-the-Box

Jack in Box (3)

Here’s a cute and easy jack-in-the box that you can make for your infant. It’s a little less startling than the kind you buy where a wind-up figure pops out, making it a good intro to the toy. And you only need a few pantry items to make it!

Poke a hole in the bottom of a Styrofoam cup with a pencil.

Jack in Box (1)

Push a straw through the hole, and attach a small   to the other end of the straw (I just taped one on).

Jack in Box (2)

Hold the straw so the puppet is hidden in the cup, then… Peek-a-boo!

Jack in Box (4)

Here’s a cute rhyme you can say before the big reveal:

Jack in the box, still as a mouse,

Deep down inside your little dark house.

Jack in the box, resting so still.

Will you come out? Yes, I will!

Lots of giggles and delight for this one.

Jack in Box (7)

Big siblings will probably want to take a turn doing the popping, too.

Jack in Box (6)