Twig Stars

Twig Stars (10).JPG

There is a beautiful, yuletide feel to these stars, although here we are crafting them in October! Make them now, or set the idea aside for the upcoming Christmas season.

For each star, you’ll need 5 sticks that are roughly the same thickness and length; break any to the proper size if they are too long.

Twig Stars (1)

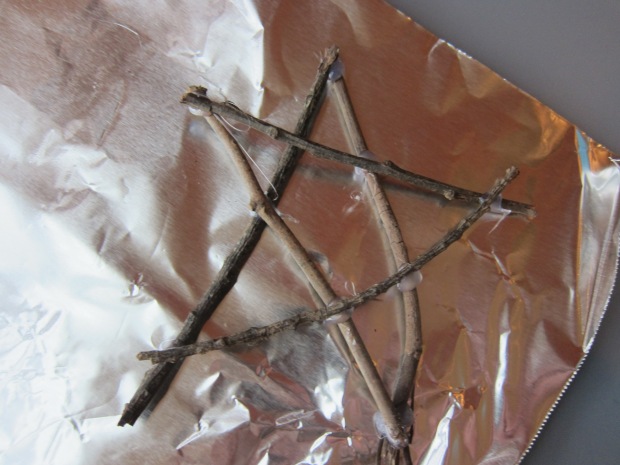
I hot glued the stars together, then set Travis up with tidbits to decorate them – berries, pine needles, a bowl of glue, and a bowl of glitter. Little pinecones would look sweet, too.

Twig Stars (2)

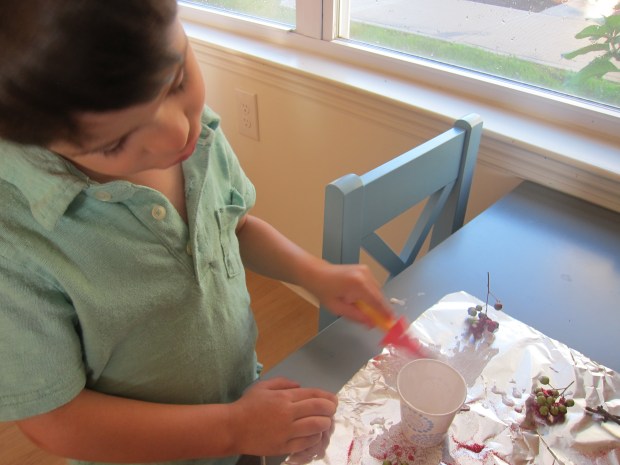
First dunk the berries in the glue, then immediately transfer to the glitter. He loved this part!

Twig Stars (3)

If you like, dunk in the tips of your pine needles, too, or any other nature finds you have to add to your stars. Let dry completely.

Twig Stars (5)

The next morning, we dabbed glue all over the stick stars, and added our berries and other treasures.

Twig Stars (6)

Travis got a bit impish and loved smearing glue over the leftover glitter on our work surface, too. Good thing I had things covered with a layer of foil!

Twig Stars (7)

Hang the resulting stars from twine, indoors or out.

Twig Stars (9)

As mentioned, these would be beautiful at Christmas, but will light up a windowsill or other area of your home any time!

Twig Stars (8)

Clothespin Grasshopper

Grasshopper (6)

We were invaded by an army of grasshopper this morning! Okay, perhaps not really, but you only need a few materials to make a whole batch of these buggy friends, and Travis loved having lots to play with.

First, color clothespins with green marker (or use green paint, in a pinch).

Grasshopper (1)

For the legs, cut green pipe cleaners in half. Insert one half towards the front, and one half in back, then bend down to shape the legs.

Grasshopper (2)

I had to wrap the back leg pipe cleaner around the clothespin to secure it in place, since it wasn’t pinched, which resulted in slightly crooked critters; cut the front pipe cleaner shorter if you want to offset this imbalance!

Travis was so eager to play with one that I drew on eyes with marker.

Grasshopper (4)

For the rest of our green horde, we glued on googly eyes and let dry.

Grasshopper (5)

Get hopping!

Grasshopper (3)

Rattlesnake and Other “Critters”

Rattlesnake (4)

You can bring the “wild wild west” to life for your kids with this easy snake craft. I purchased a tie on clearance at Target for our snake, but you can also raid daddy’s closet for old ties instead of buying something new.

First, we cut a bit of length off the end where it was too narrow, then stuffed bells into the seam to be the snake’s rattle. You can also use wooden beads for this step – anything that will make a noise!

Rattlesnake (1)

Secure the bells or beads between two elastic bands.

For the head, stuff in two old socks. I was worried the socks would fall out, so used a safety pin to help keep them in place.

Rattlesnake (5)

To finish our wiggly friend, Travis glued on two googly eyes and decorated with markers.

Rattlesnake (3)

Squiggles from Travis, diamonds care of mama. (And yes, he insisted on wearing another pair of old socks on his hands as he worked, ha!)

Rattlesnake (2)

Now it was time to take our snake out for play. He can squiggle…

Rattlesnake (7)

…or coil up in a ball!

Rattlesnake (6)

As we played with the snake, we talked about other Wild West critters, like vultures and armadillos. Your kids can pretend to be the animals, curling up in a ball like the armadillo, or trotting through the Western town horseback. For more Wild West fun, see our Koala Crate from ages ago!

Milk Jug Bird Feeder

Milk Jug Feeder (8).JPG

It’s that time of year when we start thinking about our feathered friends, providing them with seeds for the colder weather ahead (even though it’s been unseasonably warm!). In the past we’ve made everything from pinecone feeders to a little cafe. I wanted to try this version because it looked nice and roomy for the birds, but it posed a bit of a vegan challenge: the base of the feeder calls for a gallon milk jug. I briefly considered reusing a relative’s milk gallon, but had a hunch the non-dairy milk bottle from Califia Farms would work. It does, but grown-ups, do take care in the step below that calls for an Xacto knife and scissors!

Milk Jug Feeder (1)

First, cut a window in the front of the jug for birds to fly into. I started this with a knife, and finished the cut-out with scissors.

Milk Jug Feeder (2)

You’ll also need to make a hole near the top of the bottle to thread through yarn.

Travis took great pride in painting this project, everything from selecting the color blue…

Milk Jug Feeder (3)

…to mixing shades of blue…

Milk Jug Feeder (4)

…to making sure every last bit was covered.

Once the paint had dried, I tied yarn through the hole in the top and we headed outside.

Milk Jug Feeder (5)

Travis loved scooping in the bird seed.

Milk Jug Feeder (6)

Find the perfect spot to hang your feeder, then wait for your feathered friends to arrive!

Milk Jug Feeder (7)


Nature Hunt Treasure Stick

Nature Hunt Stick (6)

This neat idea from KiwiCo’s website is a great way to bring home treasures from the outside world. Bonus points if you craft it while you’re still out in the woods!

We went for a short walk after a morning of classes, bringing along two Y-shaped sticks that I’ve hoarded just for this purpose.

Nature Hunt Stick (1)

As we walked, we gathered anything we deemed a “treasure” – leaves we liked, little flowers, berries, and more.

Nature Hunt Stick (4)

Back at the park entrance, we seated ourselves at a picnic table and I showed Travis how to wind yarn (which I’d brought along) around the Y of his stick. Keep wrapping all the way up the Y, then tie the yarn off.

Nature Hunt Stick (3)

Now tuck in your treasures!

Nature Hunt Stick (5)

Travis and I each made one, reflecting the various things we’d found beautiful along the way.

Nature Hunt Stick (8)

A great way to get outside with your little one in these wonderful autumn days.

Nature Hunt Stick (7)


Leaf Drawings

Leaf Drawings (7)

A recent nature walk yielded up the first of fall’s changing leaves, and we knew we had to make art with them when we got home!

My original title for this post was going to be “leaf butterflies”, since when I saw all the pretty leaves, I immediately thought of little butterfly and bug wings. Travis had plans of his own, hence the more generic title of “leaf drawings.” Read on!

For the original butterfly idea, I drew a few bug bodies in crayon, and Travis helped select which leaves would be their wings.

Leaf Drawings (2)

Liberal application with a glue stick was all we needed to attach “wings” and googly eyes to each critter.

Leaf Drawings (4)

But Travis wanted to make his own picture with the remaining leaves, and began gluing and coloring.

Leaf Drawings (3)

“It’s you and me in a leaf pile!” he explained proudly, showing me his first one. A second “leaf pile” work of art soon followed.

Leaf Drawings (6)

What other drawings would you make featuring leaves from a nature walk? Please share in the comments!

Leaf Drawings (5)

Hide-and-Seek Map

IMG_0002.JPG

Travis has been into maps lately (a bit of a throwback to our Dora-the-Explorer-watching days), so I was thrilled to see our October project from High Five magazine lined up perfectly with his interest. Put together this neat treasure map, and your kids will love both creating it and hunting with it!

First, tear apart a brown sandwich bag along the glue seam in the back. If you’re worried your child will rip the paper, adults can do this step. Cut off the bottom of the bag, and now it should open up and lie flat.

Hide Seek Map (1)

Now for arguably the best part: crumple it up to make it look old! Travis couldn’t believe this was the direction I gave him, and loved it.

Hide Seek Map (2)

Smooth your map back out, and fill it in any way you please! Be sure to make an X for buried treasure, and a route to get there. Travis’s art was still very, well, abstract, so I put together a second map that could become a true hide-and-seek hunt.

Hide Seek Map (4)

To make the maps look even older, we then brushed over them with a paintbrush dipped in water. Another “whoa Mom I can really do this?” moment. Let dry completely.

Hide Seek Map (5)

On the reverse of the map, we drew the treasure that would await the finder.

Hide Seek Map (7)

I taught him how to roll up the map and he loved that it was just like an old pirate’s one!

Hide Seek Map (8)

Totally optional, but you can turn this into a real hunt. While Travis was at school, I actually buried a few little “jewels” at a nearby park, marking the spot with an X.

Hide Seek Map (9)

We headed off with our map in hand, and he was thrilled to find real treasure waiting for him.

Hide Seek Map (10)

Apple Prints

Apple Prints (1)

It’s officially fall, and that means it’s time for apple picking! Apple prints are an activity that never grows old, whether you’ve plucked your apples fresh from the tree or pick them up at the farmers’ market on a crisp autumn morning.

That’s exactly where Travis and I headed today. We set aside most of our bounty to eat, but saved an apple or two for artwork, thanks to the prompt in our latest Ranger Rick Jr.

Cut one apple in half, to make large prints. Cut a second apple into wedges. Dab the cut sides of the apples dry with a paper towel.

Apple Prints (2)

Squirt paints onto a paper plate (or a piece of foil works, in a pinch). Dip the apples in paint, and press down on construction paper or watercolor paper.

Apple Prints (4)

We didn’t make a flower like the magazine suggested, but it was fun to have two different shapes to work with. Travis said his picture was footprints – perhaps a dinosaur?

Apple Prints (5)

We decided mommy’s print looked like some sort of buzzing insect.

Apple Prints (6)

What will you make with your apple art? Happy fall!

Custom Kicks

Custom Kicks (6)

Kids take great pride in things they’ve made, and that goes for clothing as well as crafts. Give them a little extra kick in their step by customizing sneakers for school this fall!

You’ll need to start with blank canvas sneakers; the ones from Kikiz Kids are made of non-animal materials, and inexpensive enough that you won’t mind unleashing your mini Picasso on them.

Custom Kicks (1)

If you want to make the project into a bit of a lesson, try stenciling in lines with a pencil first, and encouraging your child to trace along the lines. We used glitter pens, but you can also use paint pens for the project.

Custom Kicks (2)

Travis had his own plans, and soon his shoes were a riot of colors.

Custom Kicks (4)

We also liked practicing our tracing around the eyelet holes!

Custom Kicks (3)

Now those are some kool kicks:

CUstom Kicks (5)


Ribbon Wands

Ribbon Wands (5)

My son loves gadgets. My son loves music. Was this project the perfect mix of the two? Hint: it involves a power tool.

In general, musical props like scarves or wands help kids enjoy movement and music that much more as they find the rhythm and beat of a song. So get drilling and put together these cute dancing wands!

The wands are simple, but you will need a drill, as well large craft dowels. Make sure you don’t buy thin dowels, or your drill bit will be much too large to bore through.

Adults: Make sure the dowel is on a tool bench or otherwise clamped down, and carefully drill a hole near one end, going all the way through.

Ribbon Wands (1)

Travis loved watching (with safety goggles on!) and sweeping up the sawdust after. Use sandpaper to smooth down any rough edges or splinters.

Ribbon Wands (2)

Next, I cut lengths of ribbon for Travis, until we had a nice pile and variety.

Ribbon Wands (4)

Help your child guide the ribbon through the holes of the dowels until you’ve filled each with 4 to 5 ribbon pieces. Gather into a knot and tie off.

Ribbon Wands (6).JPG

And now it’s time to dance!