Green Time: Counting Walk

Counting Walk (5).JPG

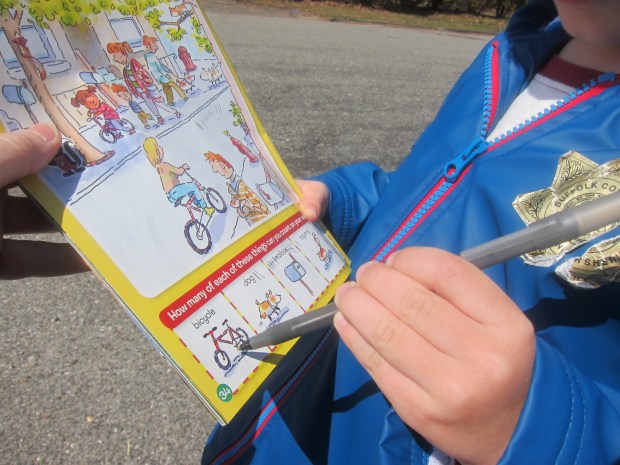
Well, here we are in April but we’re just now getting the chance – a sunny, warm day! – to go on our Green Time adventure from March’s issue of Ranger Rick Jr. – a counting walk!

The magazine included a list of suggested things to count as you take a walk outside, including mailboxes, fire hydrants, and squirrels. We wanted a nice warm day so we’d be more likely to see a couple items on the list like dogs (out for a walk) and bicycle riders.

As we kept a tally of each item, I helped Travis decide what number was one higher than the number we’d said before.

By far we found the most mailboxes – 10!

Counting Walk (1)

Meanwhile Travis loved spotting hydrants – 2!

Counting Walk (3)

We nearly thought we’d end the walk with zero bicycles until a man went cycling past us. Travis was very proud to make the tally.

Counting Walk (4)

And because he loves them, Travis decided we needed to count pickup trucks in driveways as well – for a grand total of 7.

Overall, this was a great exercise – not just for the legs but for the mind as well!

Counting Walk (2)


Printable Story Cards

Story Cards (7)

Following on the heels of great exploration with our Koala Storytime kit, we used templates from the company’s blog for even more fun making up stories.

Simply print the story card templates, and cut out along the dotted lines. If you want to get a little fancier, print on heavy paper and in color.

Story Cards (2)

At storytime, I told Travis we’d be doing something a little different; instead of reading a book, we’d write our own story!

Story Cards (5)

Have someone in the family select a few cards from the top of the pile, and begin the narrative. (Alternately, you can arrange all of the cards face up and take turns selecting what comes next).

“Once upon a time…” Travis began. He loved it so much that we made up three stories before turning to regular books.

Story Cards (4)

He’s still getting the hang of narrative (“There was a balloon and jeep who wouldn’t share their milk…”) but the basic ideas are setting in!

Story Cards (6)

These cards also make great flashcards for word recognition. For variation, they are also useful for sorting.

Story Cards (1)

Try sorting them into piles like ‘things with wheels,’ or things that are a certain color, or any other category that your preschooler comes up with. What else can you do with these story cards? Share ideas in the comments!

Story Cards (8)

Giant Alphabet Mat

GIant Mat (2)

This giant alphabet mat turns letter-learning into big fun. Much bigger than our alphabet parking lot, it’s a great visual and physical way to engage children with learning the alphabet. You can tailor the games on the mat to suit everyone from 2-year-olds to preschoolers!

First, lay an unused shower curtain liner on the floor and make circles for all the letters of the alphabet; I traced a plate to make the circles even. Write in the upper and lower case letters in each circle.

Giant Mat (1)

Your possibilities for play are almost endless, from here! First, try walking along the letters as you sing the alphabet song. You could also ask toddlers to toss bean bags into a designated circle, or ask them to hop to a specific space, if they are just learning their letters.

Travis still mixes up a few tricky lowercase letters, so our best use for the mat was to have him find the right spot for our set of lowercase magnets.

GIant Mat (4)

Because we’re into all things cars over here lately, he decided the best way to play was to load up his jeep and have it deliver each letter – whatever works!

Giant Mat (6)

Another great variation for pre-readers and kids learning to recognize the sound each letter makes is to find a toy in your home that starts with each letter.

Giant Mat (5)

I will confess: Travis wasn’t nearly as interested in this giant playing board as I thought he would be. But we’ll set it aside and try it again another day. Let me know what your kiddos think of the mat!

Giant Mat (7)

Life Size Board Game

Board Game (3)

We loved this giant take on a board game, using our own bodies as the playing pieces! It’s a great way to burn off some physical energy indoors, plus work on counting skills, turn taking, and playing a game by the rules.

To set up your “board” all you need is painter’s tape. I made squares around the carpet in a pattern for us to move forward. If you want to make the game a bit more complex, add another shape (such as diamonds) that mean “move back one space.”

Board Game (7)

I threw together a very quick giant dice by taping construction paper on the sides of a tissue box and adding pips with a sharpie. If you have the time, glue on your construction paper for a more elegant look!

Board Game (1)

Now it was time to toss the dice. Travis delighted in throwing the giant cube.

Board Game (2)

He was quicker than I would have guessed at counting the pips, yelling out the numbers and then taking proud giant steps from square to square.

Board Game (4)

We have a winner!

Board Game (5)

We also played a version using big toy cars in a car race, driving them the right number of spaces forward with each roll.

Board Game (6)

If you create a giant board game, please share any variations or ideas in the comments, we’d love to hear!

Moving Dollar Trick

Moving Dollar (2)

We always love to find new spins on our magnet play, so I thought Travis would enjoy the humor behind this little trick. It’s fun on any random afternoon… or file this one away for April Fools!

To set up, you’ll need two neodymium magnets, the small metal silver ones. I have no idea if our fridge magnets are actually neodymium, but they worked just fine! Tape one magnet onto a dollar bill.

Moving Dollar (1)

Tape the other to a piece of string; make sure to tape securely, as these magnets are strong.

Moving Dollar (5)

Now place your dollar on a table, and clip the magnets together underneath the tabletop. To fool any passer-by, ask them to pick up the dollar, then gently tug on the string to move it away from the other person’s hand. The key here is to tug gently or the magnets may pull apart from each other.

Moving Dollar (4)

Travis loved the trick! He had to move our dollar around the table in all directions and loved snapping the two magnets together again from underneath the table.

Moving Dollar (3)

We weren’t truly trying to trick anyone, so a piece of blue twine worked just fine. If you’re in it for the trick, make sure you use a clear-colored thread that will be nearly invisible, and act as casual as possible.

Either way, this is a neat method to show how strong magnetic attraction can be, even through a tabletop!

Arctic Animal Experiment

Arctic Animal (4)

Following up on fun and icy magnetic play, we wanted another way to play with ice indoors. Recent reading about arctic animals such as penguins and seals was the perfect launching off point. I posed the question to Travis: How do arctic animals stay warm in icy water? The answer of course lies in their blubber, the thick layer of fat under their skin. To illustrate this for your child, get messy with this silly experiment!

First, give your child a bowl of water with ice cubes, and encourage them to plunge their hand in – if they dare! Travis cautiously dipped a finger. Brr!

Arctic Animal (1)

I promised him we could keep his hand warm in the icy water with a few simple steps. First add a latex glove. This layer alone won’t do the trick, of course, but we tested just to be sure.

Arctic Animal (2)

Next, dip your child’s glove-covered hand in a big vat of vegetable shortening (if you’re looking for a vegan and organic option, try Spectrum Organics). It will make a huge mess as you get your child’s hand covered front and back in the shortening (let alone take pics in the process!) but we mostly managed. Next time I would wrap the shortening-covered hand in plastic wrap to seal in all the mess.

Arctic Animal (3)

Now it was time to dip in. To be honest, Travis was significantly less impressed than I was, but he did notice that the fat-sealed hand didn’t flinch away from the cold ice cubes. I took a turn after, just to feel the difference.

Yup, here’s mama, just hanging out with her hand in icy water.

Arctic Animal (5)

Truly, you could keep your hand immersed this way for quite some time and not be bothered by the cold. If I’m ever crazy enough to do a polar bear swim, I’ll be layering up in shortening first.

Magnetic Ice Science

Ice Magnet (2)

This easy game is such a neat winter-time twist on magnet play!

To prepare, simply place small magnetic items in the compartments of an ice tray, and cover with water. Think small pieces of pipe cleaner, paper clips, metal rings, and similar small items. Freeze overnight.

Ice Magnet (1)

The next morning, I popped the ice cubes out into a baking dish, and invited Travis to see if he could pick up the frozen ice cubes with strong magnets from our magnet set.

Ice Magnet (3)

The results turned out to be so interesting, and lasted us the better part of a half hour! A few items, where the metal poked through the ice already, worked right away. The paper clips were remarkably strong even through a layer of ice.

Ice Magnet (4)

Travis loved discovering what would stick to his magnet already and what needed a wait, for the ice to melt somewhat.

Ice Magnet (7)

For some additional fun – under close supervision! – prop the baking dish between two stools and run your magnet wands underneath; Travis loved watching the magnets slide as if by magic from his wand under the tray.

Ice Magnet (8)

As we played, it became clear that the pipe cleaners were the real puzzle. The slightest bit of water was enough to get in the way of the thin metal strip inside the fuzzy layer.

Travis was the one who suggested we chisel away at our ice cubes to get to them – the perfect idea!

Ice Magnet (9)

We really had to work for that pipe cleaner; the pieces wouldn’t stick to our wand until only the tiniest shards of ice remained.

Ice Magnet (10)

Success at last! Overall, great icy and scientific fun, and Travis enjoyed playing with the magnetic items and wands even once the ice had melted.

Ice Magnet (11)

Glow-in-the-Dark Constellation Cards

Constellation Cards (6).JPG

This project is such a neat update on simply sticking glow-in-the-dark stars on your child’s wall or ceiling as décor. Turn it into a mini astrology lesson – as well as an art project! – and you have homemade constellations.

First, we needed to find images of constellations as inspiration. I’m no artist, so relied heavily on the ones we found in our Usborne Book Big Book of Stars and Planets.

Constellation Cards (1)

Set out dark paper and glow-in-the-dark paint and recreate the star patterns. Older kids can draw the outlines and stars themselves. Younger kids may be happier filling in the dots if you draw circles where the stars go first.

Constellation Cards (3)

In fact, Travis was happy painting his own invented “constellation” while I did the more meticulous detail of recreating what was in the book – just fine for a three year old!

Constellation Cards (4)

A couple pointers: If you have dark cardstock instead of construction paper, use that. The paint will show up better. If you’re relegated to porous construction paper like we were, make sure your star dots are quite thick, or the paint won’t show up once it’s lights out.

Constellation Cards (2)

We let the paint dry, then I connected the stars with white crayon. I added the name of each constellation in crayon as well.

Constellation Cards (5)

Note: If you prefer, you can also paint the lines between stars with glow-in-the-dark paint, but I liked the idea that Travis would see just the stars in the dark, and the constellation lines by day.

Next up was mounting the cards on the ceiling – uh oh, could mama reach that high? Thanks to a stool, she could! I positioned them directly above the lamp in Travis’s bedroom so they could “charge.”

Constellation Cards (7)

At lights out, we saw the best starry night sky! My camera could barely capture it, but do you see the glow?

Constellation Cards (8)


Letter Match Parking Lot

Parking Lot (11)

This game is by far the best way yet I’ve found to get Travis excited about matching upper and lower case letters. He knows his upper case with no trouble, but still mixes up some of the lower case toughies, like d and b, n and u, or p and q. Start your (toy) engines and your little ones will be matching all their letters in no time!

To prepare the parking lot, we first needed to make sure we had 26 cars in the house. I thought we might be a few short, but it turns out we had more than enough – where do all these cars come from? Travis was thrilled when he saw them all lined up.

Parking Lot (1)

Write out the lower case letters on stickers, and apply one to each car; set aside.

Parking Lot (2)

Next I set up the parking lot, drawing 26 spaces on a big sheet of poster board.

Parking Lot (3)

You can use a ruler if you want your lines to be nice and neat. Label each parking space with capital letters, A through Z.

Parking Lot (4)

Now it was time to drive our cars in. Travis has dragged his heels with other letter matching games but to my delight, he thought this was just about the best game in the world. Each car received a driver’s name, and drove proudly to its assigned spot.

Parking Lot (6)

I was happy I only had to correct him a couple of times, on some of those tricky mirror image ones mentioned above. Little m finds a spot!

Parking Lot (8)

He found it a little difficult to locate the right capital letter a few times, especially when the lot was empty at the beginning. It was helpful to sing the ABC song together, so he knew whether the letter would be near the top row or bottom.

Parking Lot (5)

Because you can’t have a game without a hefty dose of preschooler imagination thrown in, he soon decided that it was a snowy parking lot, and all of the cars would need to shovel out.

Parking Lot (10)

No sooner did we park them all than he wanted to do it again!

Parking Lot (12)

What’s your favorite way to match capitals and lower cases with your preschooler? Please share in the comments!

Salt Painting Ice Sculptures

Salt Sculpture (12)

Not only is this project visually stunning, but it’s a neat way to teach kids why they see salt on the sidewalks and roads in the wake of a snowstorm… bcause the salt helps the ice to melt faster! Bring the concept to life with this fun activity.

First, fill an empty milk container with water and freeze overnight. In the morning, cut away the box (make a slit with sharp scissors, and the rest will peel away) to reveal a huge ice cube.

Salt Sculpture (1)

Travis was quite impressed – the biggest ice cube ever! Place in a baking tray to catch the mess you’re about to make.

Salt Sculpture (2)

Next, sprinkle a healthy dose of salt over the top of the ice cube.

Salt Sculpture (4)

Set out food coloring and invite your child to drip it all over the ice. You’ll soon see runnels of color and salt melting away at the ice block.

Salt Sculpture (5)

The effect is quite stunning! Travis had fun mixing colors, and watching it all run down the sides.

Salt Sculpture (7)

It was his idea to pull out a flashlight; lighting up the rivulets made them appear even cooler!

Salt Sculpture (10)

Of course then we needed to add extra salt and more color a few times. We then left the ice block out all morning, and checked on its progress. I had to pour off the melted water a few times, and then we could watch new pools of colored water form.

Salt Sculpture (13)

The craggy surface was fascinating for Travis!

Salt Sculpture (14)

And it turns out we had perfect timing since we got another snowstorm today – and another chance to see salt out on the sidewalks and pavement.