Tricked-Out Treats

Owl Treats (10)

There aren’t any neighborhood Halloween parties this year since big gatherings are a no-no, but that doesn’t mean you can’t surprise your little goblins with a party platter of tricked-out treats. To wit, we’re getting a little batty with our snacks as we get closer to Halloween. And ghosty, and spidery, and owlish, too!

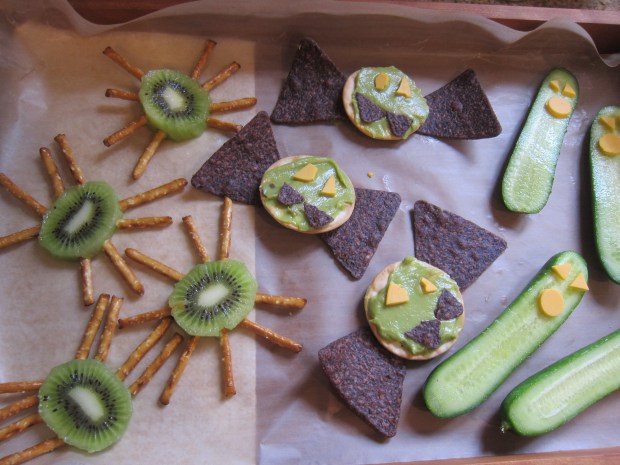
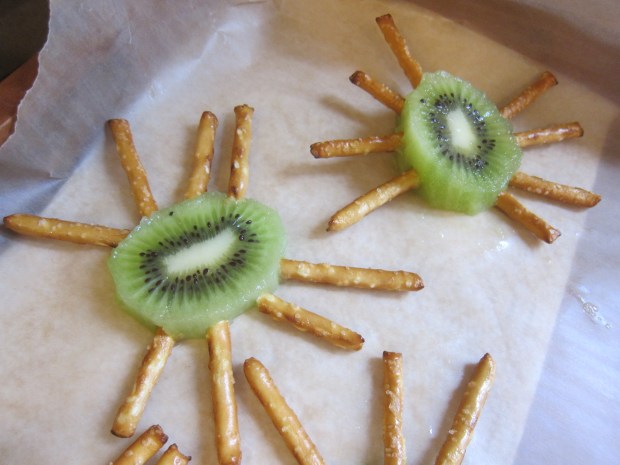
For spiders, cut kiwi into rounds and arrange 8 pretzel pieces around each circle as legs.

Owl Treats (1)

For ghosts, cut mini cucumbers in half lengthwise. Cut out small pieces of non-dairy cheddar slices for eyes and mouths.

Owl Treats (3)

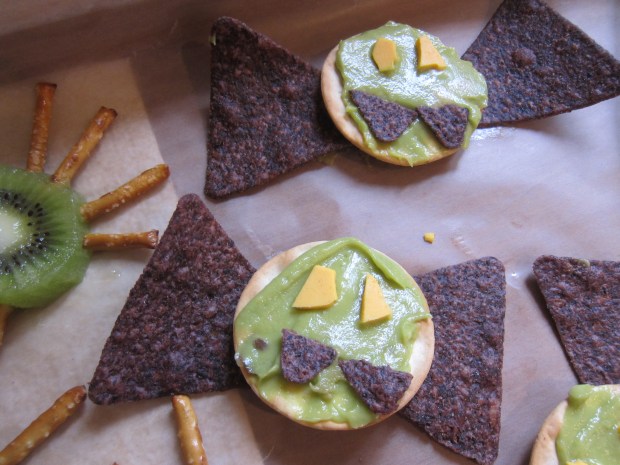
For vampire bats, spread water crackers with guacamole. Place each cracker over two blue corn tortilla chips for wings. Use additional corners of tortilla chip for fangs, and pieces of non-dairy cheddar for eyes.

Owl Treats (4)

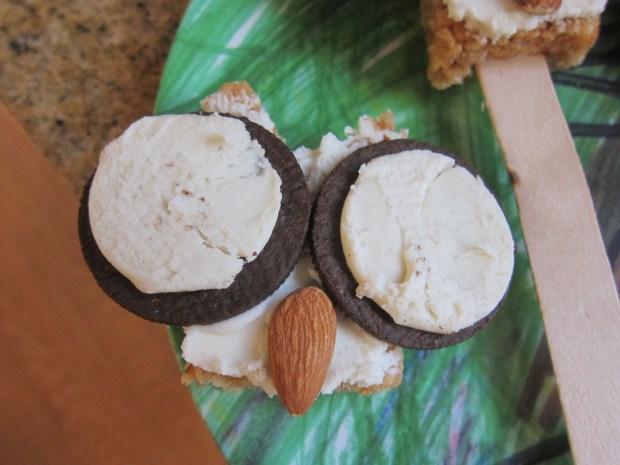
At dessert, it was time for some sweet-not-spooky owls!

Owl Treats (9)

Trim rice crispy treats (such as Made Good) along one edge to form two triangles. Spread with your favorite vegan vanilla frosting, then add two creme-filled cookies (such as Newman O’s) as eyes. We had some sleepy owls and some that were wide awake! Add an almond for a beak, and your little owls are ready!

Owl Treats (8)

No tricks here, just delicious treats that had the kids smiling.

Owl Treats (5)

Spaghetti Spider Web Craft

Spaghetti Spider Web (11)

Thanks to some recent sensory play with Veronika, I’ve learned a few tricks about how best to make sculpture from spaghetti. I realized the same method could be used to add to our Halloween decor, because it would result in perfect “spider webs”.

To start, mostly this activity was just spaghetti sensory play again. This time, I tinted a big batch of spaghetti a witchy green hue and instead of adding glue, I added corn syrup.

Spaghetti Spider Web (1)

Just pour it on until you have a nice coating over the noodles. This not only means the noodles won’t clump together as your child plays, but also means the final artwork can still dry like glue, but stay edible.

And good thing, because Veronika was in the mood to nibble on pasta today! I gave her a small dish of plain noodles, but she ate big handfuls of the green stuff right from the pot!

Spaghetti Spider Web (2)

Eventually I diverted her attention from eating noodles to making the spider web craft. Lay out squares of wax paper and help your toddler arrange noodles in a circle. The thinner the overlap of the noodles, the faster and better these webs will dry.

Spaghetti Spider Web (4)

Being a toddler, of course she also wanted to make big gloppy piles of noodles, which was half the fun.

Spaghetti Spider Web (5)

She loved calling them webs, though, as she worked.

Spaghetti Spider Web (7)

Once we had three neat web shapes, I placed them on a baking sheet and put in the oven at 175 degrees F for 2 hours. This was sort of a guess, but it worked perfectly. The webs came off from the wax paper without tearing or breaking at all.

Spaghetti Spider Web (9)

Thread yarn through the top of each “web” and hang in spooky corners or windows. Bonus points for plastic spiders to live in each web!

Spaghetti Spider Web (10)

Slimy Spaghetti Sensory Activity

Spaghetti Potion (6)

Veronika enjoyed a recent craft with spaghetti so much that I thought we’d do a repeat today, this time with more of a Halloween theme!

Spaghetti Potion (1)

I cooked a package of spaghetti and divided it in half. My intention was to tint one half orange and one half black with food coloring. Because I had to mix colors to achieve black, it was more of a deep bluish purple, but that was just as eerie and witchy in its own way!

Spaghetti Potion (2)

That was it! I set the two big bowls (er, cauldrons) of spaghetti “slime” in front of Veronika, along with a few other kitchen tools like colanders and sieves.

Spaghetti Potion (3)

She immediately was busy ladling, scooping, and transferring.

Spaghetti Potion (5)

Spaghetti bubbling up from the steamer basket looked like little worms!

Spaghetti Potion (7)

She kept the colors together for a while, but soon was mixing and matching.

Spaghetti Potion (8)

I knew Veronika would love this, but I hadn’t counted on big brother Travis wanting to get involved! He immediately wanted his own ladle and whisk and began making batches of witch’s brew.

Spaghetti Potion (4)

I had put newspaper on the floor, so believe it or not, clean-up was a breeze.

Spaghetti Potion (9)

Luckily our all-natural food coloring washes off hands easily, too, so a quick wash and the fun was done.

Halloween Countdown Day 10: Haunted Snacks

Jack O Orange (5)

Halloween lends itself so easily to food play, transforming simple fruits and veggies into haunted treats with just a few tricks. To wit, today the kids enjoyed banana ghosts and jack o’ lantern clementines as part of our countdown to the big shindig.

For the “Casper Ghosts”, peel a banana and carefully cut in half lengthwise. Curvier bananas are better for this, because you’ll get that perfect curled ghost tail.

Halloween 10 Casper Banana

Add three chocolate chips: two for eyes, and one for the round O of a mouth.

Halloween 10 Casper Banana (2)

Now it was the kids’ job to make the ghosts “disappear”, a task they were happily up to. Starting with the eyes of course!

For a Jack-o’-Orange, first draw jack o’ lantern features on the skin of a clementine. Show your kids how to poke whole cloves in along the lines.

Jack O Orange (1)

This was tricky for Veronika, but I helped her poke cloves straight in, or she simply enjoyed sprinkling them on top as I worked.

Jack O Orange (2)

She was delighted by her end result!

Jack O Orange (4)

Travis, meanwhile, took the task so seriously and concentrated hard as he worked his way around the lines I’d drawn.

Jack O Orange (6)

He loved it so much he wanted to make another as a present for his great-grandmother!

Jack O Orange (8)

These oranges really are more potpourri decor than a snack (they’ll make your kitchen smell amazing!), so make sure there are extra clementines on hand to satisfy your little beasties.

Jack O Orange (3)

Spaghetti Mobiles

Spaghetti Mobile (11)

We started the day with some messy food fun! This activity makes for great sensory play, plus nets you a cool piece of artwork at the end.

I cooked up a big batch of spaghetti (although in retrospect I didn’t need a full package), and set it out in front of Veronika. She was immediately thrilled to dip her hands in.

Spaghetti Mobile (1)

She was even more excited when I set out three paper plates and poured a little glue in each. We tinted them red, blue, and green with all-natural food coloring.

Spaghetti Mobile (2)

I showed her how to dip a few strands of the spaghetti in one of the colors, then transfer to a foam tray (like the kind some vegetables are sold in at the supermarket).

Spaghetti Mobile (3)

Continue to dip and layer, helping your artist “arrange” the strands of spaghetti. Veronika loved talking about the colors as she worked!

Spaghetti Mobile (4)

When she started tossing big piles of spaghetti that weren’t covered in colored glue on top, I knew it was time to set the mobile safely aside to dry. But she wasn’t done yet!

Spaghetti Mobile (5)

She loved picking up big handfuls of the spaghetti and making them go “splat!” At one point I saw her trotting off toward the playroom with a huge handful, and quickly redirected her to the kitchen.

Spaghetti Mobile (7)

We were out of glue, but we could still add more food coloring to the spaghetti on each paper plate. “It’s pink-y! It’s blue-y!” she said of each pile with delight.

Spaghetti Mobile (9)

Meanwhile, back to the glued spaghetti:

Spaghetti Mobile (10)

As long as your child hasn’t piled it on too thickly to dry properly, you’ll be able to stretch it up off the tray once the glue has dried, thread yarn through, and suspend it from a hook. A rather novel piece of modern art!

Designer Pancakes

Designer Pancakes (8)

Today was Veronika’s first time at the stove! She’s not quite yet 2, so needless to say I supervised this activity very closely. But dripping pancake better is an excellent first stove-top activity, and will make toddlers feel like big helpers in the kitchen.

First up was whipping up a super simple pancake recipe, by whisking the following together in a big bowl:

1 and 1/2 cups almond milk

2 Ener-G eggs

4 tablespoons canola oil

2 teaspoons baking powder

1 and 1/2 cups flour

Toddlers can help with this part, too!

Designer Pancakes (1)

I poured the batter into a liquid measuring cup and helped Veronika climb on a stool by the stove. Together, we held a big ladle and dripped the batter into a heated pan coated with cooking spray.

Designer Pancakes (2)

When it’s your toddler’s turn, chances are the “design” of the pancakes will be completely random. But Veronika loved that she made “baby pancakes”, and we thought one looked like a caterpillar.

Designer Pancakes (3)

Some of the small ones looked like little clouds in the sky.

Designer Pancakes (5)

While she enjoyed sampling the first batch, I prepared a slightly more deliberate design: a pancake gingerbread man! Chocolate chips made eyes, a nose, and buttons.

Designer Pancakes (7)

Veronika absolutely loved this activity, both the cooking and the eating of it.

Designer Pancakes (6)

Cookie Dough Log

Cookie Log (2)

Cookie dough is one of the easiest and earliest ways to get toddlers in the kitchen. I loved this variation on simply making cookies together, allotting Veronika her own portion of dough to play with in a log.

I kept this activity as simple as could be, whipping up a batch of chocolate chip cookies from a mix instead of from scratch. Because this only required three ingredients (the bag of mix, a stick of Earth Balance butter, and a flaxseed egg) it meant Veronika could stir it all together. She was so proud to help!

Cookie Log (1)

Once the dough came together, I divided it in half. Half was for real cookies (of course) and the other half I rolled into a log. I handed across a craft stick and she used this as a knife to “slice” the cookies.

Cookie Log (3)

And of course the stick was also useful for tasting. Then we divided the log into separate portions, and I showed her how to roll it into balls.

Cookie Log (4)

I thought she might want to play pretend bakery for a little while, but she was more interested in the real cookies that were now baking in the oven, asking when they would be done.

Cookie Log (5)

So then it was snack time!

Cookie Log (6)

Marshmallow Treats

Marshmallow Treat (1)

Okay, so this treat isn’t healthy and it’s only redeemable value is that your toddler will have an absolute blast with it. But sometimes that’s what snacktime calls for on a cloudy day!

I sprinkled the powder from raspberry-flavored vegan jel dessert (try Simply Delish) into a zip-top bag, and folded the edge down slightly so  Veronika could reach inside more easily.

Marshmallow Treat (3)

Then I handed her big marshmallows!

These were a novelty, since she’s only eaten the minis before. I showed her how to dip a marshmallow into the powder and then take a taste. On the first dip, your child won’t be terribly rewarded. But once the marshmallow is sticky, each dip means more dessert powder in the next bite.

Marshmallow Treat (2)

Yum!

Food Fair

Food Fair (3)

We turned snack time today into a chance for the siblings to bond! Travis gets a kick out of how messy Veronika can be when she eats, but sometimes older siblings resent the attention a messy baby or toddler receives at mealtime: help with a spoon; wiping off trays and bibs, etc. So today, Travis was in charge of Veronika’s snack! This got laughs all around.

We headed outside with a picnic blanket and a tray full of snacks. I included: applesauce, fruit pouches, chocolate pudding, juice boxes, and soft cookies.

Food Fair (1)

At first I asked Travis just to help Veronika explore the foods. Were they hot or cold? What did they taste like? Which did she like best?

Food Fair (2)

Then Travis began to make her concoctions. A simple cookie topped with a little applesauce…

Food Fair (4)

…soon became a big glob on a plate. Applesauce + pudding + juice, oh my! Travis then dipped a cookie in it and offered it to his sister for a taste with glee.

Food Fair (5)

Don’t be fooled by Veronika’s sleepy, sour expression. She kept asking for more bites!

Food Fair (6)

Travis delighted in this activity, and I loved watching them share this moment.

Sensory “Salads”

Sensory Salad (11)

We found an old play set with components to make a pretend salad: fake lettuce, croutons, olives, etc. Veronika loved it so much I thought it would be fun to help her make a few more “salads”. These two methods were quite different, but both so enjoyable.

Sensory Salad (3)

For the first version, I put together odds and ends from the craft bin that she could toss like the ingredients of a salad. We had tissue paper “lettuce”, cotton ball “croutons”, strips of ribbon (bell peppers perhaps?) and pieces of crepe paper.

Sensory Salad (4)

I gave her toy tongs as well as real tongs to toss the ingredients around. The tongs were arguably as interesting as the sensory materials!

Sensory Salad (7)

Then we moved on to an edible sensory version. The night before, I made a batch of Kool-Aid dyed pasta. To keep it edible, just in case Veronika wanted to take a nibble, I diluted each pack of Kool-Aid in 2 tablespoons hot water (as opposed to rubbing alcohol). Place 1 cup of cooked spaghetti in a gallon-sized zip-top bag for each color that you’ve prepared. Pour in, seal, and shake to distribute the color evenly. Open the bags and let the pasta dry out overnight.

Sensory Salad (2)

In the morning, I heaped together all the colors of noodles in a craft bin for a big “salad”, and once again handed over the tongs.

Sensory Salad (9)

This was an instant hit! She needed a little help at first since the noodles were sticky, but then loved scooping them into a smaller bowl.

Sensory Salad (14)

Big brother immediately needed in on the action, too. He soon had created a big spaghetti “cake”!

Sensory Salad (15)

Then he wanted to try snipping the spaghetti with scissors, which is how bits began ending up all over the floor.

Sensory Salad (11)

Veronika, meanwhile, was narrating her play, something about trucks and cars. She was pleased as punch with whatever she thought she was “making”.

Sensory Salad (16)

And then she discovered the joy of simply throwing the spaghetti on the floor to make it go splat.

Sensory Salad (17)

My two crazy sous-chefs did then decide to sample the salad. “It’s tasty!” Veronika announced. They told me blue was the yummiest. I was glad it was just a few nibbles.

Sensory Salad (18)

Clean-up was a bit more of a pain than usual. Next time I would probably do this activity outside and hose down the patio afterward, or lay an old shower curtain liner on the floor if doing it indoors. But worth it? Yes!

Sensory Salad (13)