Sensory Rainbows

Sensory Rainbows (7).JPG

I haven’t a drop of Irish blood in me, but I’ve always adored Ireland – the literature, the music, the wit, the music, the scenery… Did I mention the music? So I wanted to bring a little luck of the Irish to our St. Paddy’s Day just for Travis’s enjoyment. Aside from making a rainbow snack, we put together this sensory rainbow while talking about the lore of the pot of gold that waits at the end. Now I just need to find a green shirt for Travis to wear!

I drew a line for each color of the rainbow on poster board, and set it aside.

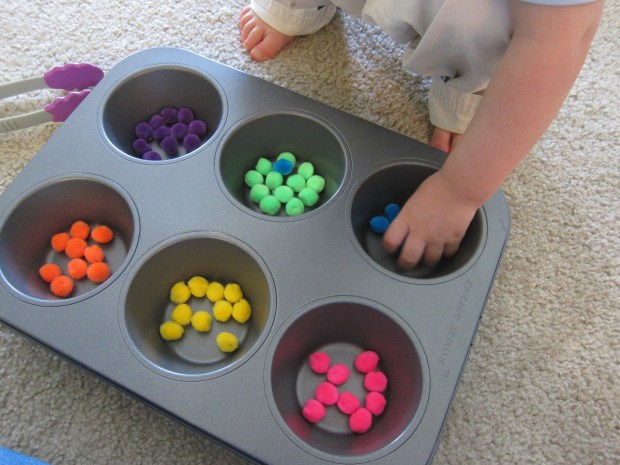
Then it was time to sort our supplies! For the best sensory experience, use a variety of items – we used buttons, pom poms, stickers, beads, pipe cleaners, and more. Travis helped sort, and I put everything into little paper cups by color.

Sensory Rainbows (1)

I decided it would be least confusing to glue on the items one color at a time, so first asked Travis to make drops of glue on the red line and presented him with our red cup of items.

Sensory Rainbows (2)

Once he grasped the idea of what we were doing, he was very determined and excited to decide where each item would go. It was a bit exhausting, so we didn’t finish all in one session, letting the glue dry in between.

Sensory Rainbows (4)

As you work, talk about the textures! Our beads were hard, our pom poms were soft, our buttons were smooth etc. As a final sensory touch, I glued on cotton ball clouds.

Sensory Rainbows (6)

Wishing everyone a Happy St. Patrick’s Day!

Sensory Construction Bin

Construction Bin (2)

This simple sensory bin is heaven for any kid who loves playing with construction trucks!

I ordered play sand from Amazon, and although the quantity I received wasn’t nearly what I expected, the amount ended up working well. I poured it into our plastic storage bin, just enough for a thin layer; this shallow sand meant we could make tire tracks, pile sand in some corners while leaving other spaces with only a thin cover, and otherwise have a grand old time. However, make the sand deeper if you want to!

Construction Bin (5)

When Travis woke up from his nap, I had the bin set up and ready to go – sand, trucks, and various materials to be construction truck lumber, including wooden craft sticks and some real wood chips we’d collected outside earlier in the day. The wood chips turned out to be home to a few tiny bugs, which gave our construction site a feel of authenticity!

Construction Bin (4)

Travis set right to, driving bulldozers, filling dump trucks, and making aforementioned piles of sand.

Construction Bin (6)

Soon, he announced he needed to wear his construction vest!

The craft sticks were great for setting up as the beams of a building.

Construction Bin (8)

We did this activity on our balcony in the sunlight, making for beautiful afternoon play.

Construction Bin (7)

Kool-Aid Dyed Pasta

kool-aid-pasta-4

We don’t drink the stuff, but I did purchase little packets of Kool-Aid powder to make this vibrantly hued pasta. The dyed pasta is fun all on its own for sensory play, but for even more games featuring our creation, stay tuned for blog posts in the coming days!

Kids will love helping mix up the dye. First, pour about 1 cup of ziti into each of 5 zip-top plastic bags (or more, depending how many colors you want to make, but I find that one box of pasta divides nicely into 5 portions).

kool-aid-pasta-1

Next, Travis helped sprinkle a powder packet over the pasta in each bag. We used one each of red, orange, green, blue, and purple.

kool-aid-pasta-2

The next step (just for grown-ups!) is to add 1 tablespoon of rubbing alcohol to each bag. Now seal and smoosh it all about with your hands to coat the pasta evenly.

kool-aid-pasta-3

Let the mixture sit for at least 20 minutes, before transferring to a pan to dry overnight. To contain any mess, make little packets of aluminum foil for each separate color.

100-happy-48

When the pasta dries, it makes for great sensory play just to mess about with in a bin. Or you could use it for a sorting game by color! As mentioned, stay tuned for future posts with even more ideas.

Pudding Paint

pudding-paint-2

Travis has surprised me recently, more into messy, hands-on activities than educational ones, but I’m more than happy to indulge him. What could be a better, more rewarding mess for tots than pudding paint? When you’re done playing, you’ll have a portion left over for a tasty snack!

I made vanilla pudding from European Gourmet Organic’s mix. It was easy to whip up in the evening, and then I let it chill overnight.

When we were ready to play, Travis helped me divide the pudding into 4 containers – 3 to color and 1 to set aside for snack time! He was practically shaking with excitement when I asked him to help me add food coloring – we used the yellow, red, and green from Color Kitchen.

pudding-paint-1

To my surprise, he was way more into just playing with the pudding than painting with it, even though I laid down paintbrushes and paper.

pudding-paint-3

Instead, he loved pouring the pudding from one cup to the other and seeing what colors he made, scooping it out with a teaspoon, and stirring it.

pudding-paint-5

Inevitably, he also dipped his fingers in!

pudding-paint-6

When this led to clean-up in the bath, we decided why not… and brought in the remainder of the pudding paint to paint the tub. It was easy to rinse off with water and a quick wipe after!

Finally, it was time to enjoy the final pudding portion as a snack, resulting in huge smiles. A great activity all around. If we do it again, I’ll be curious to see if he’s more into the painting itself!

pudding-paint-4

What does your child like to do with pudding paint? Please share in the comments!

Water Bead Sensory Play

water-bead-3

I never knew water beads existed until this game, but I’m so glad we discovered them. The soft, squishy beads – which are intended for use in planters, and are available at craft stores – start out the size of tiny pearls and expand in water. From there, the ideas for play are almost endless. You’ll definitely want to play this game with a child who is past the stage of putting items in their mouth.

Part of the fun was the magic of watching the beads expand. Before bed, Travis helped me dump the packet of beads into water, and we watched them inflate a bit – quite quickly in fact. In the morning, even I was surprised how large they had grown!


water-bead-2

Travis was so excited that he couldn’t even wait until after breakfast. I gave him a small dish of the beads to stir through while he dined.

water-bead-4

Then it was time to really play! I drained off the excess water and transferred the beads to a large bin where Travis could have at them – with a shovel, with a rake, and with our hands. Adults, jump in there! The soft squishy beads feel almost therapeutic.

water-bead-6

One of our favorite ways to play was to shovel them into an ice cube tray.

water-bead-7

Later in the day, we decided to add a batch of red beads, which we’d been watching expand all morning. Travis loved the way the colors mixed, since the pink and blue began to look purple once stirred together. We even hid Duplo people under the beads for him to uncover.

water-bead-8

Full disclosure: your child will probably discover that the beads bounce and roll. I let Travis experiment with this capability in a contained environment so that the beads didn’t become a health hazard to our cat. So do be sure to supervise water bead play closely, no matter your child’s age.

Fruit Loop Sensory Bin

fruit-loop-1

If sensory bins are great… edible sensory bins are even better! The original idea for this game called for Froot Loops, but for a healthier version, we used Cascadian Farm’s Fruitful O’s. They’re not quite as colorful as Froot Loops, but the colors are all natural and the cereal is vegan, meaning Travis could play and snack at the same time.

fruit-loop-7

To punch up the rainbow nature of the bin, I added colorful plastic cups, red craft foam cut into various shapes, a bright yellow beach shovel, and a few toy cars that fit the mood of the bin.

fruit-loop-2

Travis didn’t need any prompting to get started. He used the cups to pour the cereal back and forth…

fruit-loop-3

…and to load up the dump truck.

fruit-loop-4

It only took about three minutes before he took his first bite, and his eyes popped with delight. From there it was play a little, nibble a little, play a little, nibble a little, which I was just fine with since it was sort of the point!

fruit-loop-5

I threaded some of the cereal onto a pipe cleaner, thinking it might be fun to eat a “kebab” snack as he played, but to my delight, he preferred to thread loops onto his own pipe cleaner. Great for fine motor skills!

fruit-loop-6

He then requested a bucket, so I pulled out an old beach pail and he was busy shoveling the cereal into that for a while.

fruit-loop-9

Overall, an effortless game to put together with joyful rewards.

fruit-loop-8

Cloud Dough

cloud-dough-2

Let’s be honest: the giggles and joy are so worth it when we break out a big tray of flour and let our toddlers go wild, but as a parent, you have to psych yourself up for it… Am I right? Flour is going to fly up in the air, flour dust is going to get everywhere, and you’re probably going to wind up mopping the floor.

Solution? Baby oil! Flour + baby oil results in a fantastic mixture that is as fluffy as a cloud, but sticks together in your hands when you squeeze it. This not only means you introduce novelty to your child’s flour play, but clean-up is much easier. I’m not saying you won’t get messy, just that clumps are easier to clean than flour dust!

So this game is totally worth the effort. In a bowl or tray, combine about 2 cups flour and 1/4 cup baby oil. Travis of course had to help, as soon as he saw me break out the measuring cups.

cloud-dough-1

Knead the mixture until you have something that is fluffy and light, but sticks together when pressed, adding more oil if needed.

At first Travis just wanted to sprinkle the mixture all around, but I soon showed him we could shape it into “snowballs.” He was fascinated, and his favorite thing to do was use a car to smash the snowballs, which went on for some time.

cloud-dough-4

Then, to experiment with the mixture’s other texture possibilities we made it “snow” down on the cars softly.

cloud-dough-7

He also loved pressing the mixture until it was very firm in the bottom of the pan, at which point you can make hand prints…

cloud-dough-6

or roll toy cars across for tire tracks.

cloud-dough-3

From a purely sensory point of view, the mixture feels fantastic, almost therapeutic – so parents, dive right in there and get your hands messy!

cloud-dough-5

Cornmeal Play

cornmeal-play-1

Making finger sketches for F week inspired me to pull out the cornmeal later in the week for good old messy fun.

My original idea was to set up a dinosaur stomping ground, adding a layer of cornmeal and Travis’s collection of small plastic dinosaurs to a baking tray. I thought he’d enjoy making dinosaur footprints, and the fact that the cornmeal looked like Jurassic desert sand. Surprisingly, he was uninterested… until I added a small cone of paper to be a volcano.

cornmeal-play-2

This piqued his interest, but he soon discovered that it was much more fun to sprinkle the cornmeal outside the baking tray than to stomp the dinosaurs inside it – a reminder that toddlers will make of games whatever they choose! He loved “sweeping” the cornmeal, and was happy doing so for quite some time.

cornmeal-play-4

Finally the dinosaurs entered back into the game, with Travis burying them in a separate container under a layer of cornmeal.

cornmeal-play-5

He started using the “volcano” as a funnel/scoop to bury them, which I thought was quite inventive on his part!

cornmeal-play-6

The game turned out to be such a hit, even if not in the way I intended, that he asked to play again later in the afternoon.

cornmeal-play-3


Dyed Rice

Dyed Rice (4)

Here’s a simple idea to take your sensory play with materials like rice or pasta up a notch. I’ve read about versions of this game using Kool-Aid powder, but since I’m leery of a few of the ingredients in Kool-Aid, I wondered if I could copy the method with natural paint powders. The result wasn’t quite as vibrant as Kool-Aid… but that’s probably a good thing!

Set-up is a little messy. If your child is under 3, you’re probably going to need to do most of the work, although I let Travis sit in on the action. Place about 1 cup rice in large zip-top freezer bags, making as many portions as you want colors. Add 1 to 2 teaspoons paint powder to each bag. Travis did enjoy this part, so I didn’t mind a little mess!

Dyed Rice (1)

Add 1 teaspoon rubbing alcohol to each bag, then seal the bags and let your toddler shake or knead to incorporate the color.

Dyed Rice (2)

Transfer the colored rice to a foil-lined baking sheet. Note: you may want to separate each color with a strip of foil as well, until they are dry. Let dry overnight.

Dyed Rice (3)

The next morning, it’s exploration time! I poured the rice into a bin for Travis, and he was amazed to see colors instead of plain white. First we explored the rice by hand.

Dyed Rice (5)

Then of course it was time to mix them all together!

Dyed Rice (6)

Travis would fill a smaller container and then dump it back into the larger bin, talking about the colors as they poured. Overall, the game was a nice variation, since regular rice has become old-hat around here.

Pom Pom Play

toddler 24 (1)

I sometimes forget that the best games for a toddler might involve the simplest things. This game, which I’ve pulled out twice in the past week, is a huge hit and easy for us moms and dads to set up.

Save your next paper towel tube roll and tape it to a door or cabinet. Present your little one with a bag full of large pom poms and let them go to town!

Travis started out dropping the pom poms down the chute, as I expected, and that was fun in and of itself. But his two favorite variations on the game were trying to fill the tube from the bottom up:

toddler 24 (3)

And, stuffing multiple pom poms down the tube at once, while crying out, “So many!” We’d squish them and then see how long it took for the clogged pompoms to get squeezed all the way down the tube so we could start pulling them from the bottom.

toddler 24 (2)

For slightly more intellectual play, I later presented Travis with mini pom poms in a muffin tin. Much to my surprise, he asked for tongs to move them from cup to cup, but when this became frustrating he had no problem using his fingers or a spoon. He clearly had some imaginative game going in his head, because he told me the pom poms were “still warm” and then “perfect temp” and that we had a to wait a few minutes, so I know he was imitating the way he plays with toy food (and also mimicking the things I say at dinner time, haha).

toddler 24 (7)

My favorite moment, though, was when he spied a blue in the green bin – and made sure to place it back with the other blue ones! When we had fun dumping all the pom poms out, (which of course we did multiple times), he would sort them back into the tins by color.

toddler 24 (6)

At long last, the concept of sorting!