Slide Painting Activity

Slide Painting (6)

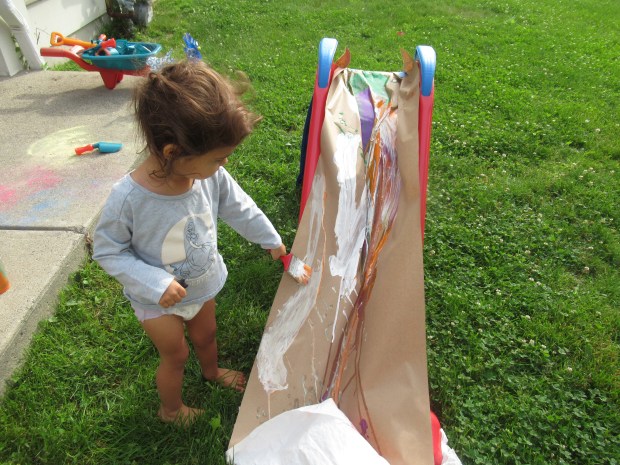
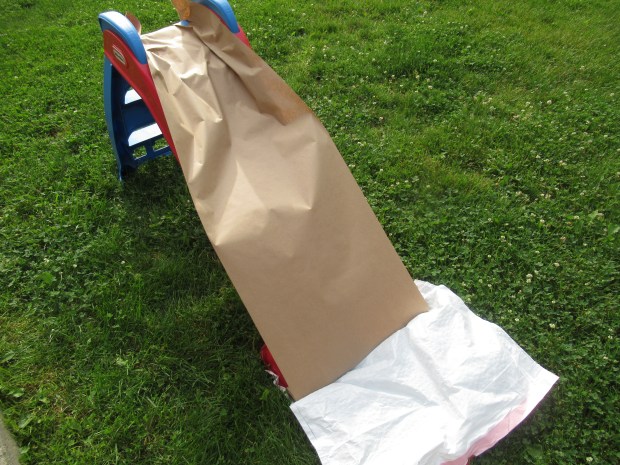
Summer weather has us moving our painting to outdoor canvases, and today we found a way that was completely novel and new! To start, I lined our toddler slide with a large sheet of craft paper, securing with masking tape. It was also helpful to place an empty trash bag flat at the bottom of the slide, since this would protect the grass underneath from paint.

Slide Painting (1)

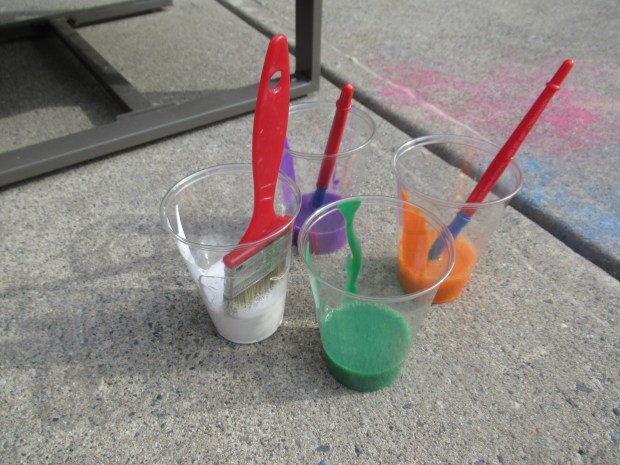
I then poured washable paint into plastic cups, thinning each with a little water.

Slide Painting (2)

Veronika’s task was to climb the rungs of the slide, and pour each cup of paint down. The colors instantly mix and run together in neat ways.

Slide Painting (4)

And then your child can help with the process along with a paintbrush.

Slide Painting (5)

The surface of the slide made such a neat impromptu “easel”!

Slide Painting (7)

When your child is done, simply gather up that messy paper, stuff it in the trash bag that’s already on hand, and clean-up is done!

Tin Foil River with Mini Ice Boats

Tin Foil River Ice Boats (4)

With summer officially here, it’s time to get out in the backyard for water play! We have so many ideas for this summer, but I started things off with a simple game for Veronika today, an idea originally spotted at Reading Confetti.

First I needed to make the boats; freeze water in the compartments of an ice cube tray, adding food coloring if desired. When the ice has just started to set, insert a toothpick into the center of each cube to be the boat’s mast.

Tin Foil River Ice Boats (1)

Once the cubes were set, I cut triangles from construction paper, and taped these to the masts for the sails.

Tin Foil River Ice Boats (2)

Veronika immediately loved these little boats, and might have been happy just to play with them, but now we needed a river!

Tin Foil River Ice Boats (3)

Take a long piece of aluminum foil and curl up both sides to form a channel down the middle. If you want to have a constant running river, you can start the garden hose and simply set place at one end of the foil.

Tin Foil River Ice Boats (5)

Veronika loves to pour from our watering can, though, so I decided to let her play the role of Mother Nature and add more water whenever the river ran dry. I set up the foil on a slightly sloped section of lawn, so as soon as the ice boats were in the water, they slipped “downstream”.

Tin Foil River Ice Boats (6)

Veronika loved watching the boats move faster and further every time she poured in more water!

Tin Foil River Ice Boats (7)

Of course this being summer, the ice bots didn’t last long. But even once the boats had melted away, she loved adding more water and playing with leftover masts and sails in the river. Your kids might want to set nature treasures afloat, too!

Tin Foil River Ice Boats (8)

Sidewalk Chalk Fun

Sidewalk Simon (4)

Sunny days call for sidewalk chalk! Here are two fun ways Veronika played with chalk today.

The first was a take on the old game of Simon, a handheld memory game that repeats a sequence increased by one step each time. But nix the technology and you can play Simon on the sidewalk, too!

Sidewalk Simon (1)

First, I drew a full rainbow of colors with chalk (rather than just the original Simon’s four colors), which was great for a quick ROYGBIV review. Then I had Veronika stand in the center and called out, “Stand on purple!”

Sidewalk Simon (2)

She jumped to purple, and then went back to the center. “Stand on purple, then stand on orange!” I instructed.

Sidewalk Simon (3)

At age 2, Veronika’s limit was about 3 steps (we made it through: purple, orange, green), but big kids can not only act out longer patterns, but also see who can remember the most steps!

Then we noticed our shadows behind us, short and squat and funny in the afternoon sun. I invited Veronika to trace mine (though it was a rough approximation, of course).

Sidewalk Simon (5)

Use chalk to fill out your new chalk friend with an outfit and a silly face.

Sidewalk Simon (6)

It’s also fun to trace the shadows of other objects, so next we tried her Duplo doll. Shadows were so short that this one barely showed up, but we colored in the doll’s outfit, too.

Sidewalk Simon (7)

I caught Veronika sideways, so traced her shadow this way before we added silly clothes and features.

Sidewalk Simon (8)

For older kids, consider coming back and making these sidewalk “portraits” throughout the day, watching them change from tall to short to tall again. You might also try having your child “fit” his or her body back into their shadow, almost like a puzzle piece!

Sidewalk Simon (9)

Pop Art Popsicles

Today we made popsicles that really popped, just in time for a 90 degree day.

To start, add gummy candy to popsicle molds. Parents magazine demonstrated with Airheads, but we used vegan sour rings from Whole Foods, thinking the sour combination would pair nicely with sweet juice.

That said, don’t use too sugary a liquid, since the sour rings are still loaded with sugar. We filled half of our molds with coconut water and the other half with lime seltzer. Freeze until set. (Ours took about 8 hours).

When it came time for the big reveal, the kids were wowed by the candy circles trapped in frozen liquid!

Half the fun was looking at them but the other half was in eating them of course, unlocking each candy circle in turn before moving on to the next. What candy will you freeze for pop art pops? Please share in the comments!

Messy Wading Pool Play

Spaghetti Splash (6)

We’re about to store away the inflatable wading pool that’s been on the patio all summer, so it was time for a messy last hurrah! On a final hot morning, I dressed Veronika in her bathing suit and we headed outside for two games.

First up was Spaghetti Splash. The night before, I cooked up a box of spaghetti. You could even use two or three packages of spaghetti if you really want to make an impact with this game.

Toss the spaghetti into the baby pool, along with 1/4 cup vegetable oil and a few drops of food coloring. We chose blue! Mix it all up with your hands.

Spaghetti Splash (1)

Veronika loved getting her hands right into the mixture. She would reach for a big handful…

Spaghetti Splash (2)

…and then make it splat onto the bottom of the pool.

Spaghetti Splash (3)

And of course lots ended up on the patio.

Spaghetti Splash (4)

If your child wants to, encourage him or her to climb right in! Veronika was hesitant though, and much preferred using her hands for this game. So then it was time to segue-way to the next messy game: Jell-O Jumping!

Spaghetti Splash (7)

Out went the spaghetti and in went 4 packages of prepared vegan jel dessert (try Simply Delish). This time, not only was Veronika willing to put her feet in…

Jello Jump (1)

…she loved it! She stomped through it and squished it between her toes.

Jello Jump (2)

Before I knew it, she plopped right down. “I’m lounging,” she announced, and she sure was. She delighted in scooting her bare legs and toes all through the jello.

Jello Jump (3)

Believe it or not, even the clean-up was fun because we pulled out the hose. Hose down the tub (and kids!) and then tuck that wading pool away until next summer.

Jello Jump (4)

Beachy Creature Feet

Beachy Creature Feet (4)

It’s just about the end of summer, which means by next year any current flip-fops are not going to fit your kids’ feet anymore. So here’s a fun way to transform those flippies as the season winds down!

Beachy Creature Feet (1)

I had each of the kids select which kind of “creature” paws they wanted, care of a few suggestions in Highlights magazine, then helped trace and cut the shapes out on craft foam.

Beachy Creature Feet (2)

If your kids truly won’t be wearing their flip-flops again, you can use tacky glue to adhere the foam, as well as additional foam dots or stripes for decoration. If you want a more temporary version (we still have a few beach days left!) use double-stick tape for a fun, reversible transformation.

Beachy Creature Feet (3)

They loved stomping around as creatures for a little bit!

Beachy Creature Feet (5)

I’d say these were the cutest critters on the beach.

Beachy Creature Feet (6)

DIY Sprinkler

DIY Sprinkler (3)

Childhood + summer + sprinklers pretty much never gets old, but if you need a quick sprinkler reboot after the umpteenth hot day of the summer, here’s a homemade version that will delight toddlers and big kids alike.

Use a hammer and nail to make holes in the bottom of an empty gallon water jug. I worried the plastic would be too thick, but this is actually remarkably easy to do. That said, the nail made very small holes so we did then widen them slightly with a rotary tool.

Toddler DIY Sprinkler (1)

To then transform it into a sprinkler, insert a hose, turn on the water and the water will rain down through the holes.

DIY Sprinkler (1)

I simply held this by hand, but you could also rig it up for lasting fun; anything tall like a basketball hoop or tree branch would work, in which case you might want duct tape to hold it all in place.

The kids loved to take turns holding it, too, turning it into almost a watering can over the bushes…

DIY Sprinkler (8)

…and sidewalk.

DIY Sprinkler (9)

Veronika loved stomping in the leftover puddles!

DIY Sprinkler (6)

Travis was thrilled he could make patches of mud.

DIY Sprinkler (7)

And of course they loved catching the water drops as they rained down.

DIY Sprinkler (2)

My kids are hesitant about actually jumping right under a sprinkler, but yours might want to shower directly under the spray!

DIY Sprinkler (5)

Baby Pool Games, 3 Ways

Ball Splash (4)

It’s late in the summer but still hot outside, so it didn’t feel too late to invest in a baby wading pool. Here are three ways Veronika has loved to play in it so far!

First up was a classic toddler fishing game. I had a pack of fish-shaped sponges that were perfect for this, although you can cut normal sponges into fish shapes if you’re feeling crafty.

Ball Splash (6)

Attach a paper clip to each fish so it will be magnetic, then tie or glue a kitchen magnet onto a string and attach the string to a stick or dowel. I showed Veronika how to go angling for the little fishies!

Ball Splash (8)

It turned out that the sponges were hard to lift once saturated with water, so next time we might play this while the pool is dry.

Ball Splash (10)

After the fishing fun, it was time to make a splash! Simple grab a bouncy ball and toss it into a baby pool filled with a little water. This was fun from outside the pool…

Ball Splash (11)

…or inside it! And it was equally fun whether with a small bouncy ball or larger beach ball.

Ball Splash (1)

“Splash!” Veronika cried out happily each time.

Ball Splash (2)

For extra ball fun, we didn’t just use one ball; I poured in our whole bag of soft play balls.

Ball Splash (13)

This made for lots of extra splashing, sitting on, tossing, and otherwise playing with the balls in the pool.

Ball Splash (12)

One thing is for sure: this girl is keeping cool in the pool!

Ball Splash (14)

Outside Summer Learning

Outside Summer (3)

If you want to squeeze in a little learning even on vacation, here are three quick ways to hone observational or STEM skills, in the guise of simply having fun!

I was actually excited to wake up one vacation morning to a rainy day because I wanted Travis to observe… raindrops! Stand someplace protected with your child and watch them fall down. I asked Travis his guess as to what shape the droplets would make.

Outside Summer (1)

His hypothesis was an oval, so I played devil’s advocate and guessed a circle. We decided they were more circular but some were larger in diameter than others. They also made neat beads on the screen doors. Throughout the day, we watched them make big puddles on the car sunroof, or diagonal streaks on the patio when the wind whipped harder.

If your budding scientist wants to, record any findings in a notebook using words or pictures!

The next day we had sunshine and squeezed in a quick mapping exercise, in the guise of a treasure hunt. Travis decorated a bag with seashell stickers (you could also use an old shoebox) and hid a few pieces of “pirate treasure” inside.

Outside Summer (4)

Travis hid the treasure to be guarded by a sleepy gnome. Now, his job was to direct a family member to the booty using only three clues. I was so proud he devised these on his own: there was a dirt path, there were steps, and someone was sleeping nearby!

Finally, we returned to a classic sort of color hunt, but this time Travis had to spot five colors from inside the house first, and then find those same five colors outside. A huge art kit full of crayons was the inspiration. Outdoors he matched beige to a mushroom…

Outside Summer (5)

…and vivid reds and purples to the flowers.

Outside Summer (6)

There’s nothing like the palette of a vacation spot to inspire some learning!

Outside Summer (7)

Toddler Beach Day

1st Vacay (3)

It might seem daunting to take a toddler to the beach, but here are a few tips I’ve found that make it easy, even during the summer of coronavirus.

First up, of course, are the essentials. Definitely pack a kid-formulated sunscreen in SPF 50 or higher, plus a sun hat. If your toddler hates having cream formulas rubbed in, consider an easy spray.

1st Vacay (4)

Veronika has a tendency to pull her hat right off, though, so for added security, I bring shade: an umbrella that is. I find that an umbrella is plenty, without having to lug along a pop-up crib or tent.

Now for the activities! We have a dedicated bag of sand toys they can be played with right at the edge of the blanket…

1st Vacay (2)

…or brought down to wetter sand at the water’s edge when she wants to cool off.

When it comes to snacks, think ones that won’t get sandy. Applesauce pouches are ideal, but I also stash granola bars, juice boxes or water bottles, and easy chips like veggie stix.

1st Vacay (1)

Veronika stayed safe, entertained, hydrated and fed. And it was as easy as a day at the beach!