Fabulous Felt Fruit

Felt Fruit (9)

This adorable project from High Five magazine is the perfect centerpiece for your Thanksgiving table this coming Thursday! Kids will be so proud to tell relatives that they put it together (nearly) all by themselves.

To start, you’ll need sheets of adhesive-backed felt in red, green, brown, and orange. This item isn’t even something I knew existed, but it’s sold right by single sheets of felt at the craft store. I could not find orange with the adhesive backing, so read on for how I solved that dilemma.

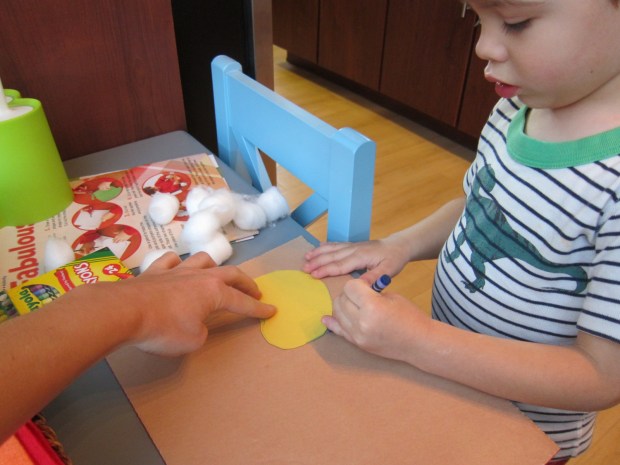
To start, trace the shape of an apple and pumpkin onto paper and cut out. Those closer to age 5 can trace their own fruits, but I made the shapes for Travis and he worked with safety scissors to help cut.

We then traced the templates onto our felt sheets (great tracing practice!). You’ll need two of each shape for one finished piece of fruit.

Felt Fruit (1)

I cut the felt shapes out, since the material was tough for Travis’s hands. He wanted to try though!

Felt Fruit (2)

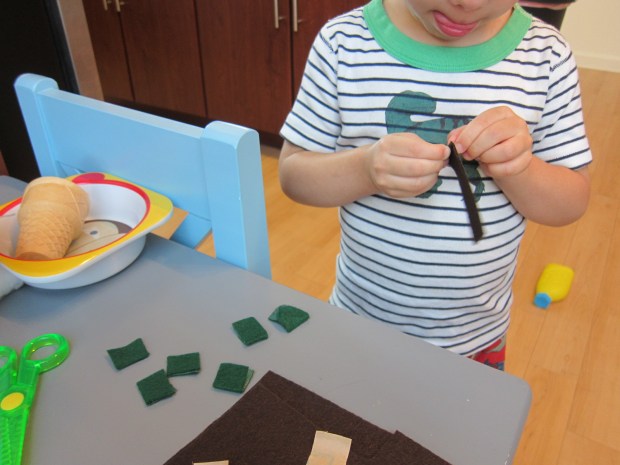
Finally, we cut out rectangles from the green felt to be apple stems and one bigger rectangle from the brown felt to be our pumpkin stem. Remove the adhesive backing from the stems and fold in half; set aside.

Felt Fruit (3)

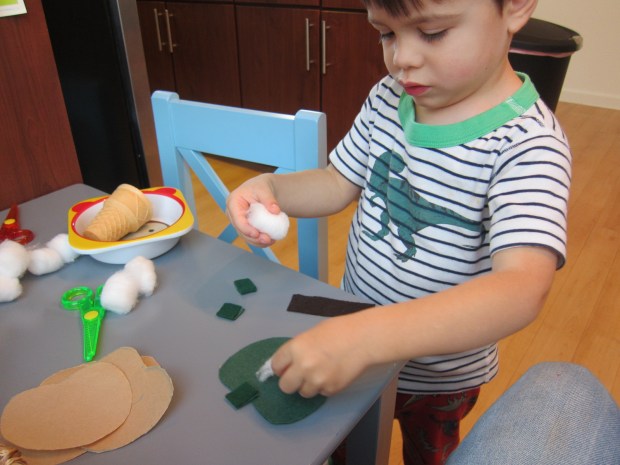
To assemble a fruit, remove the backing from one apple shape. Place two cotton balls on top, and one green stem at the center.

Felt Fruit (4)

Remove the backing from a second apple shape and place the sticky sides together. Travis insisted on doing this step himself (which I loved!) which meant our edges didn’t always line up perfectly, but the sticky felt is very forgiving.

Felt Fruit (5)

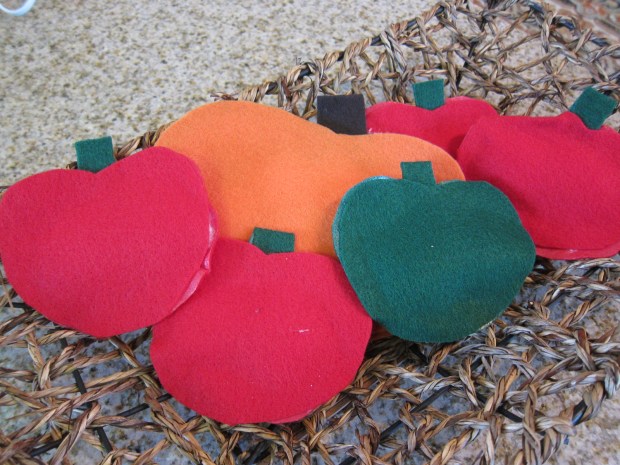
He loved that we made a few green apples, since those are his dad’s favorite, and then he told me the red ones were for his grandparents.

Felt Fruit (6)

For the pumpkin, we followed the same method, but I used my hot glue gun to seal the two sheets of non-sticky orange felt together and to attach the brown stem at the top.

Finally, we nestled our adorable felt fruit into a straw basket, the perfect touch for our Thanksgiving table.

Felt Fruit (8)

Pretend Lasagna

Pretend Lasagna (6).JPG

I love getting my son in the kitchen with the kid-friendly recipes from High Five magazine, and this month’s recipe was particularly ingenious. Lasagna made with ravioli instead??? This is a hack grown-ups are going to want to steal as well! Vary the amounts or types of veggies below, to suit your family’s taste.

Ingredients:

  • 1 (24-ounce) jar pasta sauce
  • 1 (10-ounce) package ravioli (such as Soy Boy), thawed
  • 1 cup shredded Daiya mozzarella
  • 1 cup chopped baby spinach
  • 2 tablespoons sliced black olives
  • 1/4 cup diced red bell pepper
  • 1/2 cup sliced mushrooms
  • 1 teaspoon dried Italian herbs
  1. Have your child spread a thin layer of the sauce in the bottom of a 13×9-inch baking dish.Pretend Lasagna (1)
  2. Top with half of the ravioli.Pretend Lasagna (4)
  3. Sprinkle with half of the veggies and half of the cheese. Repeat the layers (sauce, ravioli, veggies), ending with a final layer of cheese. Sprinkle with the herbs.Pretend Lasagna (2)
  4. Adults, cover the dish with foil and bake at 350 degrees F for 30 minutes. Uncover and bake a final 5 minutes. Let stand at least 10 minutes before serving.Pretend Lasagna (5)

Duck, Duck, Goose Dress-Up

Duck Duck Goose (13)

There’s no time like October to embrace the glee of dress-up. Whether you’re planning out your actual Halloween costumes or just having fun around the house, kids seem to just morph when they are in costume, If you want, save this one (an adorable suggestion from Highlights High Five) for Halloween; it would be perfect for a parents and a child or for a group of siblings. Or just get silly like we did during a morning of play and use for creative costume play!

Travis thought the project was a delight from start to finish, intrigued right away by all the materials as we gathered them.

Duck Duck Goose (1)

First up was making our hats – two yellow ducks for mom and dad, and a white goose for Travis. Buy solid color hats from a craft store, then trace the visors of the hats on orange felt, leaving an outer edge about 1/4-inch longer than the brim for the “beak.”

Duck Duck Goose (2)

I cut them out, trimming slightly to make sure they fit the brim, and then glued on. You can have your child help you with regular glue, or use hot glue for slightly better adherence.

Duck Duck Goose (3)

To make the eyes, draw black dots with marker on styrofoam balls. Travis had fun drawing one very wobbly eye, but then asked me to fill in the circles on the others.

Duck Duck Goose (4)

Use Velcro dots to add the eyes to each hat. Neat, they stick!

Duck Duck Goose (6)

To make our shirts, we made long lines of glue on the sleeves of plain t-shirts from the craft store – two yellow, one white – and stuck on feathers in the corresponding colors.

Duck Duck Goose (9)

Travis thought this part was endlessly fun, so we covered the bellies of the shirts as well.

Duck Duck Goose (10)

Let your costumes dry completely. While we waited, Travis gathered leftover feathers and pretended it was the duck’s nest! Leftover Styrofoam became the “eggs.”


Duck Duck Goose (12)

The next day, it was time to play! I thought Travis might find the feathery shirt uncomfortable, but he was so excited to be a goose, instantly honking up a storm.

Duck Duck Goose (14)

And insisting that Mommy Duck quack, of course, so here I am:

Duck Duck Goose (17)

Even Daddy Duck got in on the action. We played many rounds of Duck, Duck, Goose of course, and Travis wanted to wear his shirt the rest of the morning. If you do opt for these costumes on Halloween, wear white or yellow rain boots to complete the look.

Duck Duck Goose (15)


Stomp with Dino Feet

Stomp Dino (6)

What’s more fun for a preschool tot than stomping around the house? Stomping around with dinosaur feet of course! Get out some sillies with this cute idea from High Five magazine.

To start, adults will need to trace a dinosaur foot shape on a large piece of craft foam. I really have no idea what a dinosaur footprint looks like, but a three-toed creature seemed to fit the bill!

Stomp Dino (1)

Cut an X into the foam with scissors near the ankle of each foot – this is how your child will wear the dino feet.

Stomp Dino (2)

Travis loves practicing with kid-safe scissors, so although cutting the dino foot was beyond his skill, he helped me snip out a few triangles that we would need later on. “Dinosaurs need lots of triangles!” he told me very seriously.

First though, we had to paint our dino feet! Travis smeared on some pink, and I added a few orange dots for contrast.

Stomp Dino (3)

Let the paint dry, then add the final adornment with the smaller pieces of foam you cut out.

Stomp Dino (5)

And now it’s time to stomp!

Stomp Dino (7)

Spread Your Wings

Butterfly Wings alt

Butterflies are everywhere this time of year, whether flitting past us on the beach, at the playground, or in the nearest batch of pretty garden flowers. If your little one wants to bring home the butterfly beauty, try out this creative suggestion from High Five magazine.

To start, grown-ups need to cut a butterfly wing shape from a large piece of cardboard.

Butterfly Wings (1)

To make our wings shiny, we covered them first in strips of aluminum foil – this part was a huge hit, since Travis loves the way foil looks and feels. Plus glue is always fun!

Butterfly Wings (3)

Once the glue dried, it was time to decorate our aluminum foil. Use anything crafty you have, including markers and paints.

Butterfly Wings (4)

Butterfly stickers added a whimsical touch.

Butterfly Wings (5)

To attach the wings to your little butterfly, punch holes in the middle where the wings meet. Thread string through the holes, and then tie over your child’s shoulders.

Butterfly Wings var

Time to flutter away!

Butterfly Wings


Rock On!

Rock On (3)

As any parent of a rock collector knows, rocks pretty much, well, rock! We’re always finding great stones to add to our collection, but I loved this project from High Five magazine because it upped the stakes a little – we needed to find flat rocks in order to make the project work.

Luckily an outdoor foray yielded just enough smooth flat ones to build a sculpture.

Rock On (8)

The first step was to paint them. I thought we’d use all three primary colors, but yellow didn’t show up very well on the dark gray rocks, so we mostly had a blue and red result.

Rock On (6)

This mama was particularly proud of a green shade she mixed, until a toddler came along and turned it brown – such is motherhood!

Rock on (9)

Let your rocks dry completely.

Rock On (1)

Once dry, we used our largest rock as the base and began gluing them together into a sculpture.

Rock On (2)

And of course what sculpture doesn’t need a healthy heaping portion of extra glue on top?

Rock On (4)

Overall, a very cute twist on rock collecting. What does your sculpture look like? Please share in the comments!

Overnight French Toast

Overnight French Toast (4)

I adapted this recipe slightly from High Five magazine to veganize it. It’s a great recipe that will have kids whisking, mixing, arranging, and pouring batter – so many great steps, and Travis wanted to do them all!

First, adults should cut a 16-ounce loaf of day-old French bread into 1-inch thick slices; set aside.

In a bowl, have your child whisk together: 2 Ener-G eggs, 2 tablespoons chia seeds, 1 and 1/2 cups hemp milk, 1/2 cup non-dairy creamer, and 1/3 cup maple syrup.

Overnight French Toast (2)

Now it’s time to arrange the bread slices in a baking dish. Travis placed his slices in very importantly; I did a little tidying up once he had finished just so the slices were in an even layer.

Overnight French Toast (3)

Help your child hold the bowl to pour the batter evenly over the bread slices. Cover with foil and refrigerate overnight.

In the morning, remove the dish from the fridge at least one hour before baking. Bake at 375 degrees F for 35 minutes.

To serve, combine 2 tablespoons melted Earth Balance butter with 2 tablespoons maple syrup and drizzle evenly over the slices.

Overnight French Toast (5)

Carrot-Raisin Salad

Carrot-Raisin (4)This salad is simple enough that kids can help prep it with you – squeezing lemons and oranges is sure to be a hit! The perfect salad for busy bunnies in springtime!

Ingredients:

  • 1 pound shredded carrots
  • 1 cup raisins
  • 1 lemon
  • 1 orange
  • 1/4 cup brown sugar
  • Pinch of salt
  1. Combine the carrots and raisins in a bowl; set aside.
  2. Cut the lemon and orange in half, and squeeze with a juicer. Add the juices to the carrot mixture, along with the brown sugar and salt.

This recipe was the first that I’ve gotten my son to eat with raw carrots instead of cooked – a winner!

Carrot-Raisin (1)

Recycled Band

Recycled Band (5).JPG

Toy instruments from the store are great… but involving kids in making them can be even better! Even I was impressed with how these instruments – made of common household items – turned out.

For the Shoebox Guitar, I first cut a circle from an old shoebox (tape the lid down with duct tape first, if you like).

Travis loved helping me find three elastics stretchy enough to stretch lengthwise around the box – although putting them on was definitely a grown-up job.

recycled-instruments-2

At this point, the strings sound very dull… But now it was time to slip a pencil under the strings on either side.

recycled-instruments-4

Immediately, you get resonance – and your elastics will even play different notes if they are different widths. Travis couldn’t wait to pick it up and start strumming.

recycled-instruments-7

To make our Sandpaper Blocks, cut sandpaper into strips so you can wrap it around the middle of plastic cups.

recycled-band-3

Secure the sandpaper to the cups with duct tape. We had fun experimenting with two different grades of sandpaper – extra fine and coarse – to see how they sounded.

recycled-band-4

Travis then took additional cups and placed them around himself as a “drum set” – great imagination!

recycled-band-1

And then of course it was time to march around in a parade. Thanks to High Five magazine for the musical idea.

Valentine’s Day Breakfast

valentine-breakfast-5

Kids can help with most of the steps for this heart-themed breakfast, either to enjoy themselves, or to serve as a treat to Mom or Dad!

For the Red Berry Smoothie, have your child help measure out 1/2 cup vanilla non-dairy yogurt (we used coconut), 1 cup frozen raspberries, 1 cup frozen strawberries, and 1 cup almond milk, and add to a blender.

Help your child slice a banana with a toddler-safe knife – great practice for little hands! Add the banana to the blender, and gave it a whirl.

valentine-breakfast-2

To make the Heart Toast, press a heart-shaped cookie cutter into a piece of bread, and then toast it lightly (adults only for the latter step!).

valentine-breakfast-3

Have your child help spread on a thin layer of vegan cream cheese, followed by a dollop of red jam.

valentine-breakfast-4

Note: For a savory version, top the cream cheese with a slice of your favorite vegan deli meat instead.

valentines-breakfast

Happy Valentine’s Day!