Mix and Match Monsters

Mix and Match Monsters (7)

After playing with felt faces to make happy and sad people, it felt like it was time to get a little more Halloween-y and play a version with… felt monsters!

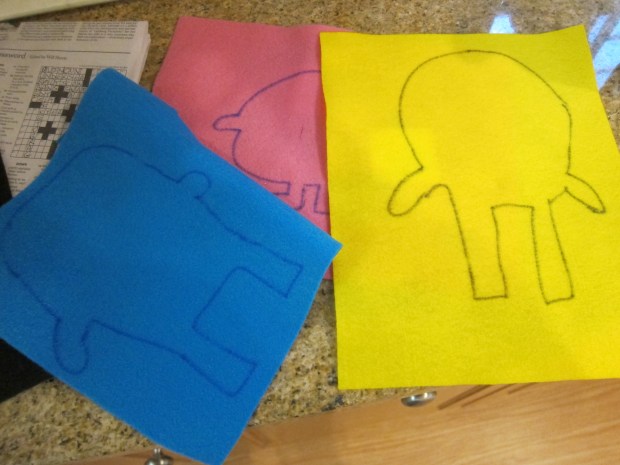
For each monster body, I simply drew free-hand on a piece of felt and cut out the shapes. My monsters were fairly cute and definitely not threatening. Think bubbly round buddies and short stubby limbs.

Mix and Match Monsters (1)

I then hot-glued black felt onto white circles for a few monster eyes, but mostly, I relied on pre-cut pieces of felt to form additional facial features.

Mix and Match Monsters (2)

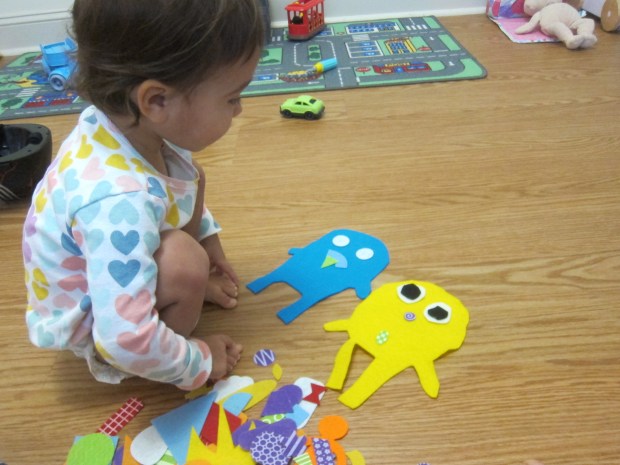
Time to make some silly faces! Veronika was delighted as soon as she saw what we were up to. She loved making a three-eyed monster with a smile. “She’s happy!” she told me (happily). So this very quickly turned into a lesson on emotional learning, too.

Mix and Match Monsters (3)

We made grumpy monsters and surprised monsters.

Mix and Match Monsters (4)

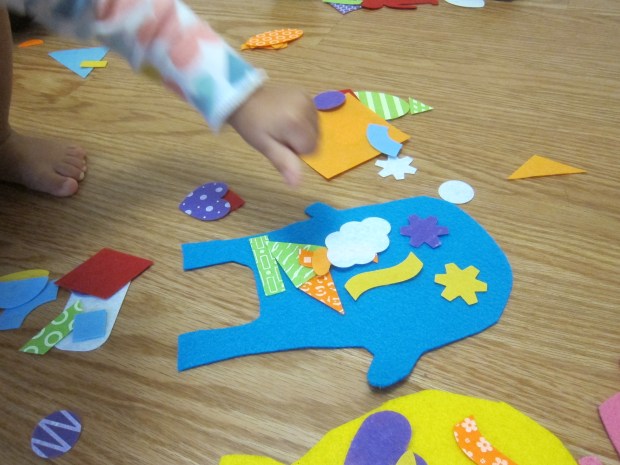
Then she wanted to get them dressed. This one, according to Veronika, was wearing pants and his shirt.

Mix and Match Monsters (6)

I loved watching the way she interacted with these little creatures.

Mix and Match Monsters (5)

And nothing was too spooky!

Halloween Countdown Day 13: Monster Sensory Tub

Monster Sensory Tub (1)

This activity doubled as the day’s sensory play and a way to tick off a box on our countdown to Halloween. And it couldn’t have been easier!

I filled a tub with purple water beads and water so the beads could grow to full size. The kids were so impatient to play, though, that I handed over the bin when the beads were only half as big as they could eventually get. To add spooky monsters, all we needed were large wiggle eyes.

Monster Sensory Tub (2)

At first the eyes were floating on the surface. But Travis loved burying them as deep under the water beads as he could, and then unearthing the “monsters”.

Monster Sensory Tub (4)

They were so eerie swimming to the surface. Veronika jumped right in to copy him!

Monster Sensory Tub (5)

She also loved scooping up handfuls of the water beads and then letting them trickle back down.

Monster Sensory Tub (6)

Before I knew it, the game changed slightly. Star Wars Stormtroopers needed to escape from the monsters!

Monster Sensory Tub (9)

This kept the kids so busy and happy the entire time I was prepping dinner. A definite spooky win.

Monster Sensory Tub (8)

Monster Headbands

Monster Headbands (4)

Here’s a fun costume craft from Travis’s latest Highlights magazine, perfect for spooky dress-up in October! We made two of the four suggested versions.

To start, wrap craft feather boas around plain headbands from the drugstore. You can simply wrap the boas, or use hot glue or adhesive dots to secure at the ends for more security.

Monster Headbands (2)

Our first monster had three big eyes on top. Glue black felt pupils onto white ping pong balls, and hot glue on top. If you want the eyes further above the head (which we did not do), attach them to the ends of boa-wrapped pipe cleaners instead.

Monster Headbands (3)

For the second monster, we made one big cyclops eye. I glued a large piece of felt onto a thin piece of cardboard, with two pipe cleaners glued in between. Add two more colors of felt, followed by a black felt pupil. Wrap the pipe cleaners around the top of the headband to secure.

Monster Headbands (1)

Note: You could also use this method of felt-glued-onto-thin-cardboard to make horn shapes, too, another version that we skipped.

Monster Headbands (5)

Travis loved making silly monster faces.

Monster Headbands (6)

And we even had an appearance from Baby Monster!

Monster Headbands (7)

Monster Balloon Decorating

Halloween Balloon (8)

Blow up these “monsters” to decorate the house on the eve of Halloween! The LED lights should last about 48 hours.

Halloween Balloon (1)

Travis was thrilled with the little balloon lights (you can find these at party stores). Turn one on and slip into an uninflated balloon, then blow up.

Halloween Balloon (3)

I had pre-cut a few monster features for Travis on sticky-back black craft foam. As an alternative, you can make mouths, eyes, and noses on black cardstock and use a glue stick to attach to the balloons. But we found that the sticky backing made things very easy!

Halloween Balloon (4)

Our monsters were wiggly and wobbly as we decorated them; it was ultimately easier to hold them between my legs than to tape them onto a table, which we had tried first.

Halloween Balloon (7)

The darker it gets, the more your monsters glow!

Halloween Balloon (6)

Travis loved having these creatures around to set the mood for Halloween.

Halloween Balloon (9)

Huff and Puff Monsters

Huff and Puff (7)

We’ve made monsters “silly” a few times so far this October – it’s the first year that Travis has really been cognizant of monster decorations around Halloween, and he’s starting to feel a little afraid of them. The sillier and more fun we can make monsters seem, the better!

To prepare the project, pour a little tempera paint into cups, and thin each cup with water, one spoonful at a time. You want each batch of paint to have the consistency of cream.

Huff and Puff (1)

I placed construction paper and the paint cups on the floor (cover your work surface, things are about to get messy!) and invited Travis over. We used dark construction paper as the background for a Halloween feel, but white or any other color would work just as well.

Spoon some of the paint onto your paper, then cut straws in half, and get down low to blow out the shapes of your monsters.

Huff and Puff (2)

Travis soon decided he didn’t love the blowing part of the project, but he loved spooning blobs down, and then watching our creatures appear.

Huff and Puff (3)

“Don’t forget here!” he would instruct, pointing to a thicker portion of paint.

Huff and Puff (4)

We decided the white blobs were “baby bear monsters.”

Huff and Puff (5)

Once the paint dries, finish your new silly friends with a glue stick and eyes. I always seem to be out of googly eyes these days, but mini pom poms did in a pinch.

Huff and Puff (6)

Spooky, not scary!

Huff and Puff (8)

Spaghetti Monsters

spaghetti-monster-7

If ever there was a time for oopy goopy fun, Halloween is it! Travis is too young for classic Halloween gags like a bowlful of spaghetti “brains,” but it’s the perfect time to play with cooked spaghetti and make friendly “monsters” instead.

Present your child with a bowl of cooked and cooled spaghetti. Demonstrate how to take a handful of spaghetti, dip it in a shallow plate or pie tin filled with tempera paint, and then smear onto construction paper.

spaghetti-monster-2

I thought Travis might be hesitant to get so messy, but he dove right in! He had so much fun dipping the spaghetti in the paint that I had to remind him to transfer over to the paper on occasion.

spaghetti-monster-4

When the paint is dry, finish your friendly “monsters” with googly eyes and any other scraps you have on hand, like ribbon, yarn, or fabric.

spaghetti-monster-6

The silly looking monsters are a nice way to decorate with non-threatening creatures around the house, making sure the holiday isn’t too scary for little ones.

spaghetti-monster-8