Froot Loop St. Patrick’s Day Fun

Froot Loop St Pats (11)

If ever there’s a day for rainbow cereal fun, St. Patrick’s Day is it. Here are a few ways we incorporated Froot Loops into the day to mark the holiday.

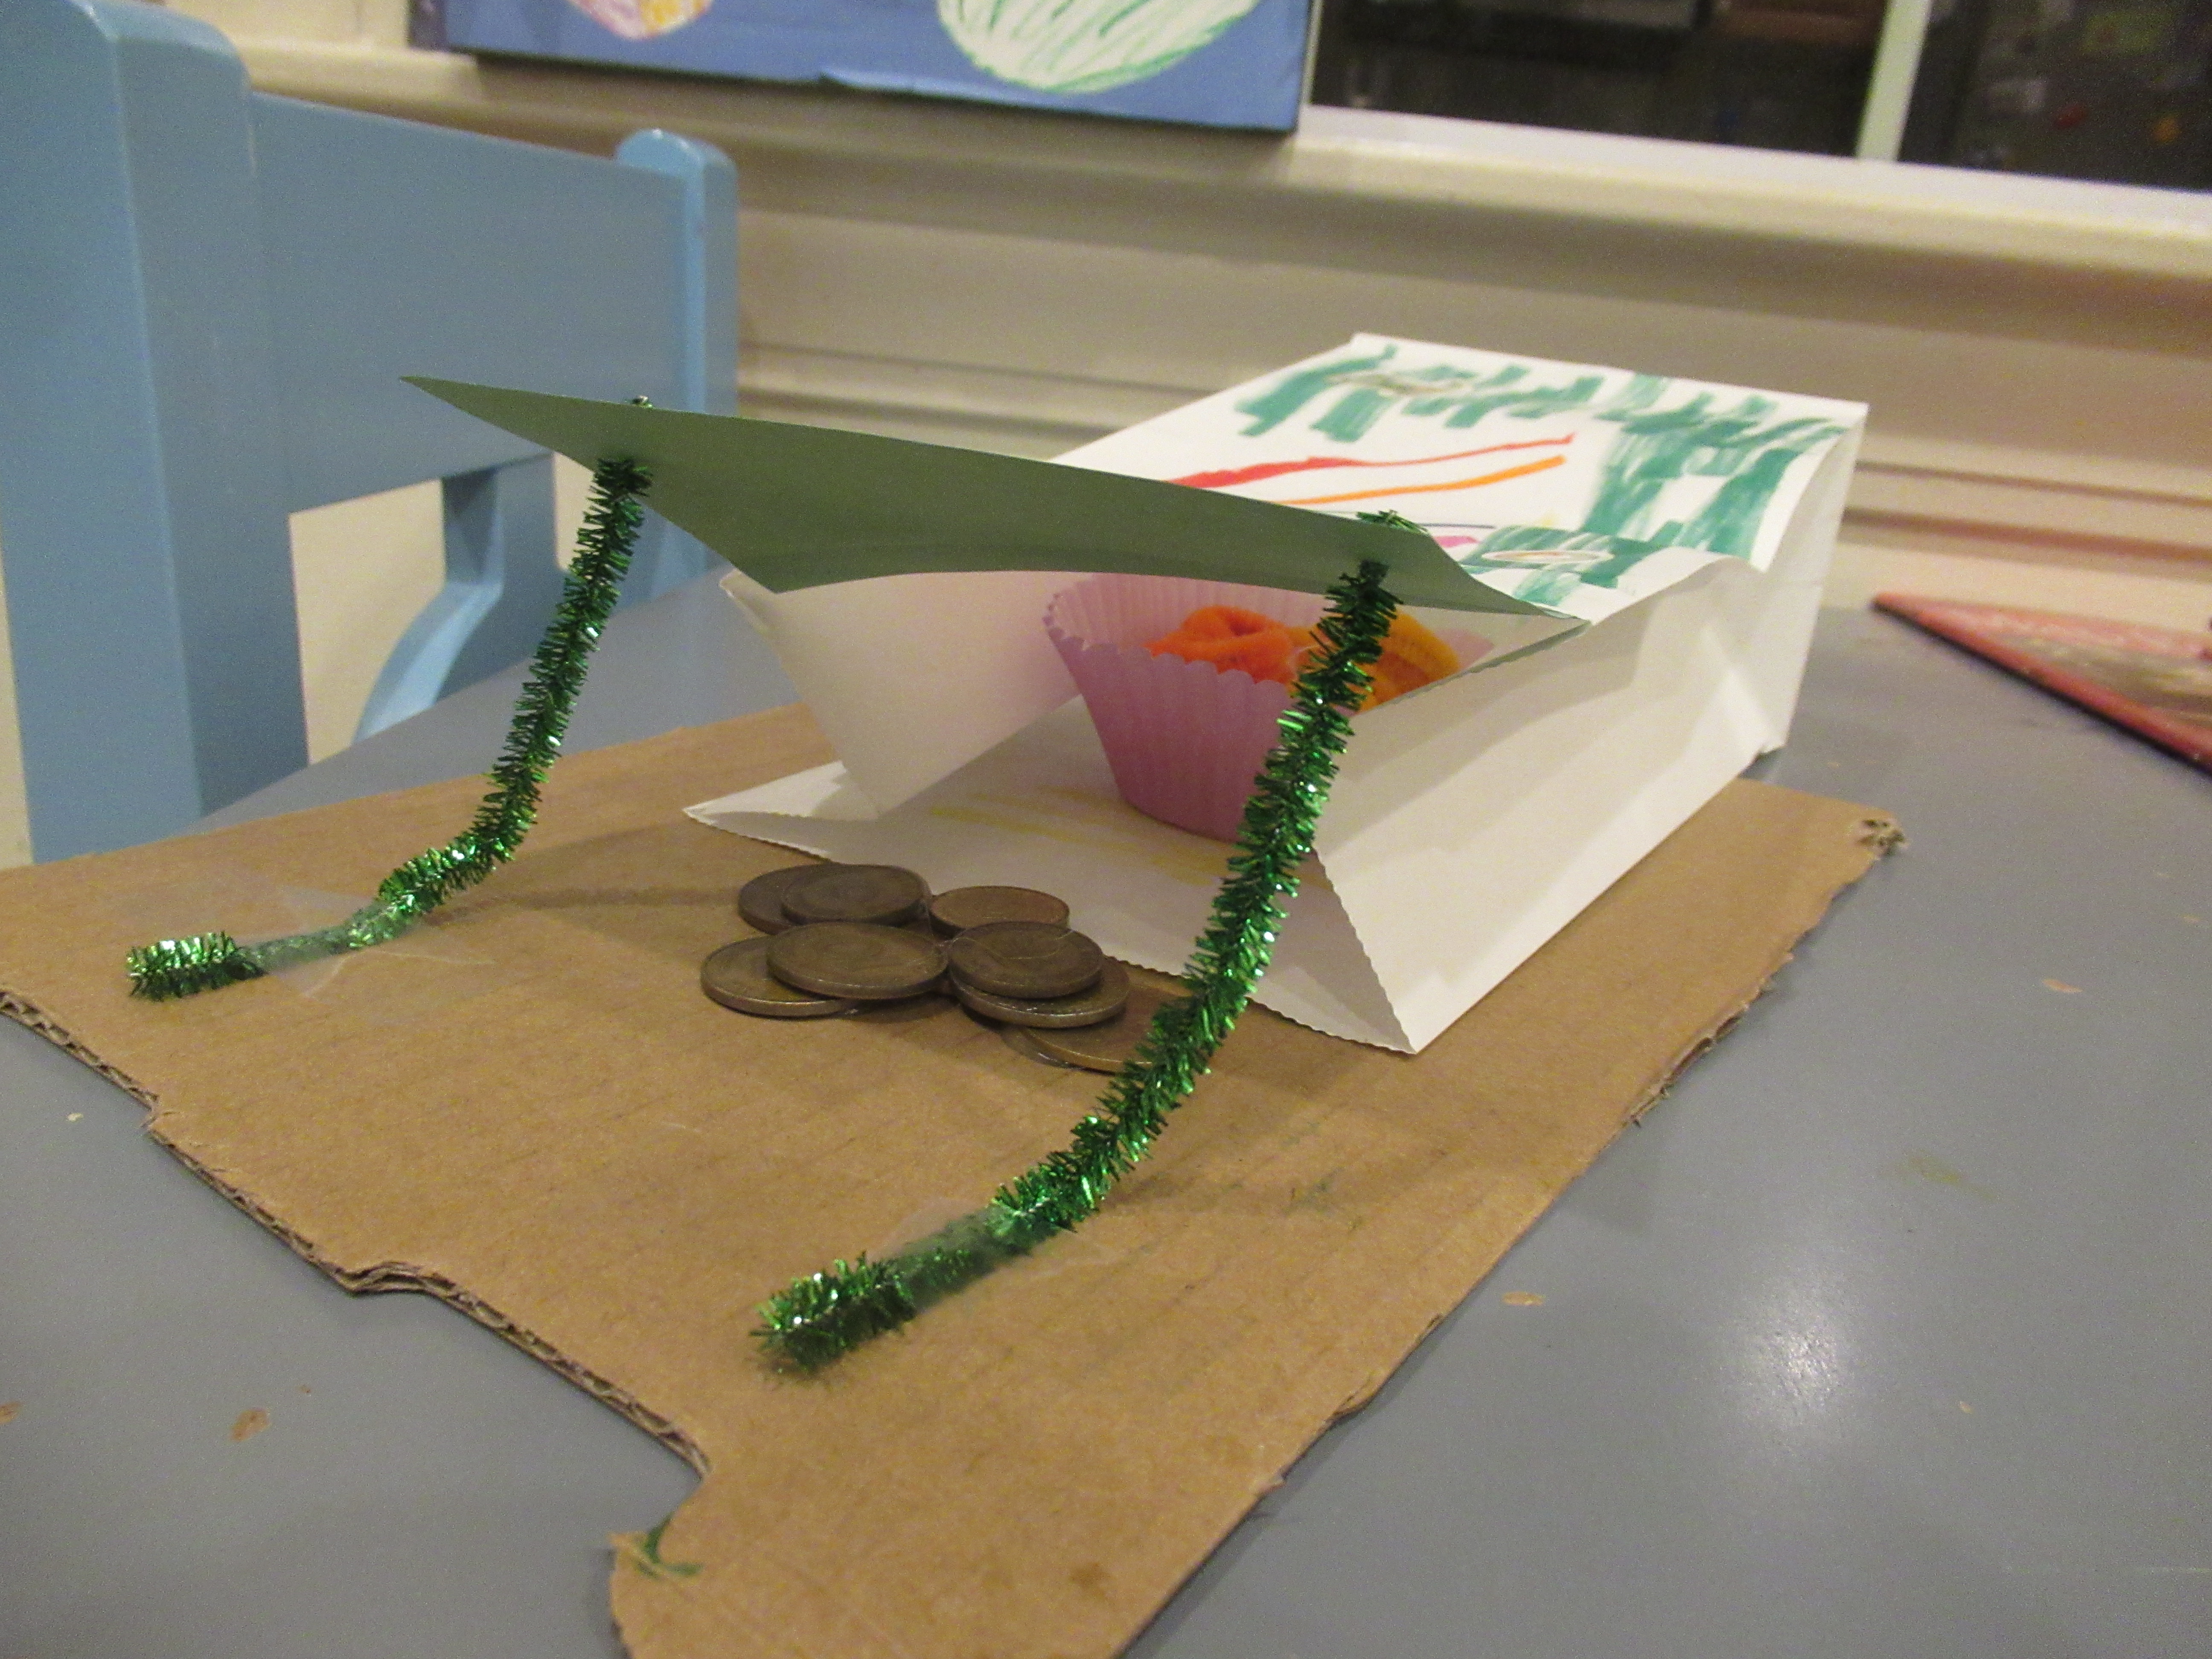
To start, surprise your kids in the morning by pretending a “leprechaun” visitor left behind a rainbow. I threaded Froot Loops in rainbow order onto a pipe cleaner, then inserted the ends into two “pots of gold” (vegan mini muffins), following a tip from Painted Confetti.

Froot Loop St Pats (1)

Since Froot Loops aren’t vegan, I told the kids this was magical leprechaun food for decoration, not eating. Travis was too busy to care, since he was so busy peeking inside a homemade leprechaun trap to see if it was caught inside. Looks like the little fellow got away!

Froot Loop St Pats (2)

Later in the day, Veronika and I used extra Froot Loops for a pretty rainbow craft. I drew the arcs of a rainbow with marker, and then dumped some of the cereal onto a tray. (Since it would be unfair to allow no snacking during a craft like this, I gave her a bowl of vegan cereal on the side for munching!).

Froot Loop St Pats (5)

Working with one color at a time, we made a line of glue dots along that rainbow arc and found the right color cereal in the tray.

Froot Loop St Pats (7)

Veronika stuck with it for a few pieces in each color, and I filled in the gaps. Preschoolers can try to tackle the full rainbow by themselves.

Froot Loop St Pats (8)

Cotton ball clouds were the final touch!

Froot Loop St Pats (10)

I loved the touch of magic that these projects gave to our holiday, leaving the impression that the leprechaun had really been there. If you truly want to wow your kids this St. Patrick’s Day, here’s one final shenanigan: Sneak downstairs before everyone else is awake and add a little green food coloring to the toilet bowl. Travis couldn’t believe this final bit of leprechaun evidence!

Froot Loop St Pats (3)

Spring Swirl Fudge

Swirled Fudge (5)

This recipe is basically pure sugar, but for one afternoon of spring fun it was the perfect indulgent treat!

In a bowl, stir together 1 (11-ounce) jar vegan vanilla frosting and 1 (11-ounce) can sweetened condensed coconut milk, until well combined. Spoon the mixture into an 8-inch baking dish lined with parchment paper. Squirt green food coloring on top and swirl with a skewer to disperse the color through the top layer. Veronika loved this part, delightedly helping turn our mixture green.

Swirled Fudge (1)

For spring decorations, we added colorful sprinkles and Annie’s Bunnies & Blossoms cereal in flower and bunny shapes.

Swirled Fudge (3)

The little bunnies were hopping over to smell the spring flowers!

Swirled Fudge (2)

Refrigerate for at least 3 hours, until set. This won’t quite set like real fudge, but once chilled, you can slice into small cubes!

Swirled Fudge (4)

If your family is not vegan, give the fudge this quick St. Patrick’s Day twist: Use 16-ounces melted white chocolate in place of the vegan frosting, and then decorate with Lucky Charms marshmallows instead of the bunny cereal.

Little Passports: Ireland

IMG_2312

Just in time for St. Patrick’s Day, Travis’s latest package from Little Passports was all about Ireland. We loved delving deeper into the Emerald Isle than just leprechauns. After putting on his passport flag stamp and map push pin, Travis turned to the booklet.

LP Ireland (4)

Topics this month included Irish symbols like Celtic knots and Claddagh rings, but the activities were a touch advanced for a 1st grader, including spotting minute symmetrical differences and locating castles on a map.

Souvenir:

‘Sam and Sofia’ had included a magic paint book this month, each page featuring a fun fact about Ireland. Travis liked it and I appreciated that it got him doing some arts & crafts!

LP Ireland (1)

Further Activities:

Online activities included a pretty coloring page of Celtic knots, as well as lyrics to a popular Irish folk song. The topic had us instantly searching online to hear a version of it, which led to watching some Irish dancing online as well. That’s the next best thing since we can’t attend a performance in person this year!

I was a touch disappointed there were no more hands-on crafts with this particular kit, but Travis has just made a leprechaun trap as a school assignment.

LP Ireland (6)

Recipe:

As always, our tummies got to enjoy the country exploration, too. We made this loaf of Irish Soda Bread to enjoy for breakfast on St. Patrick’s Day.

Irish Soda Bread (1)

Ingredients:

  • 4 cups flour
  • 2 tablespoons sugar
  • 1 teaspoon salt
  • 1 teaspoon baking soda
  • 4 tablespoons Earth Balance butter, chilled
  • 1 cup raisins
  • 2 tablespoons lemon juice
  • Scant 1 and 3/4 cups soy milk
  • 1 Ener-G or flax egg
  • 1 teaspoon grated orange rind
  1. In a large bowl, combine the flour, sugar, salt, and baking soda; set aside.
  2. Cut the butter into a small pieces and add to the flour mixture; mix with your fingers until the mixture is like coarse crumbs. Stir in the raisins.
  3. Meanwhile, pour the lemon juice into a liquid measuring cup. Add enough soy milk to equal and 1 and 3/4 cups. Let stand for 5 minutes to clabber the mixture (like dairy buttermilk).
  4. Add the Ener-G egg, orange rind, and soy milk mixture to the dry ingredients, stirring to combine; the dough will be sticky.
  5. Using floured hands, shape into a loaf and place on a greased baking sheet. Make 2 slits in the top of the loaf with a knife, then bake at 425 degrees F for 40 minutes.

Irish Soda Bread (2)

Sandpaper Shamrocks

Shamrock Threading (4)

I happened to have a sheet of green sandpaper, and realized it would be perfect for a few Irish shamrock crafts as we gear up for St. Patrick’s Day!

For the first project, I cut small shamrock shapes from the green sandpaper, and then used a hole punch to add a hole near the top of each. A piece of green lacing cord would be perfect for threading!

Shamrock Threading (1)

I encouraged Veronika to thread the lace through the hole of each clover. After a few tries, she seemed to tire of the task so I finished up her necklace.

Shamrock Threading (3)

She sure loved wearing this adornment, though! I realized it will make a great homemade alternative to the light-up shamrock bling the kids usually get at the St. Patrick’s Day parade (cancelled of course this year).

Shamrock Threading (5)

Note: If you don’t have green sandpaper, you can also cut the shamrocks for this necklace from green construction paper. A shoelace would work well for the thread!

For the second project, I cut several sizes of shamrock from green and orange sandpaper.

Shamrock Rubbings (1)

I placed these under regular white paper and showed Veronika how to rub over them with the side of a green crayon. The shamrocks are magically revealed!

Shamrock Rubbings (4)

She needed a little help for this step, especially rubbing the crayon with enough force, but she also proudly wanted to try it solo.

Shamrock Rubbings (5)

It was particularly neat to see how different textures of sandpaper came through; the rougher green sandpaper resulted in a darker and more pronounced rubbing than the fine-grained orange sandpaper.

Shamrock Rubbings (6)

“It’s a shamrock!” she said with delight each time. Both of these crafts are a great way to introduce toddlers to the symbolism and colors of St. Patrick’s Day.

Shamrock Rubbings (8)

Potato Stamped Crafts

Potato Stampers Press (11)

It just doesn’t feel like St. Patrick’s Day without a little potato art, a fun way to introduce a new painting “tool” to toddlers. The simplest of all is to make potato prints and here are a few fun ways to make that oldie-but-goodie feel novel.

Potato Stampers Press (1)

First, I set out a dish of green paint (for the Emerald Isle of course) and showed Veronika how to dip the cut sides of a raw potato in the paint, then press onto a piece of paper. Cover the paper with lots of prints and you have a pretty little piece of artwork!

Potato Stampers Press (2)

For something with more of a design element, I showed Veronika how to press four prints together so they looked like the four leaves of a clover.

Potato Stampers Press (5)

All you need to do is add a stem with green marker!

Potato Stampers Press (12)

She also thought it was neat to dip the potatoes in paint and then smear across the paper instead of simply stamping.

Potato Stampers Press (7)

We got some really neat swirls and designs like this!

Potato Stampers Press (4)

Of course there’s no need to stick with green paint, or even the St. Patrick’s theme, especially if you try this craft at another time of  year. To wit, Veronika chose a little pink paint and we made a few pink-stamped ovals with it.

Potato Stampers Press (3)

Once the paint dried, I cut out triangle and oval shapes from pink construction paper to be a pig’s ears and snout. She loved gluing these down, along with wiggle eyes.

Potato Stampers Press (8)

“He says oink oink!” she told me proudly.

Potato Stampers Press (9)

I drew on a few final facial features, so then she wanted to draw too, telling me she was adding “three black cheeks”.

Potato Stampers Press (10)

All of the above would make beautiful decorations to your home for St. Patrick’s Day, or cards to send in the mail!

St. Patrick’s Day Wreath

St. Patrick's Wreath (8)

Here’s a pretty front door decoration for St. Patrick’s Day, with steps that kids can help out with, too! This is a riff on a similar wreath we made for Valentine’s Day, and the inspiration for both is care of the ever-fabulous Hands on as We Grow.

To start, you’ll need a cardboard circle as the base. A pizza box would have been ideal, but I used poster board and hot glued two layers together for added durability, since we had no pizza in the house.

I then set out a plate of green paint along with squares of green and orange tissue paper (for the colors of the Irish flag). As I wadded up each tissue square into a little “flower”, I handed it to Veronika. Her job was to dip in the green paint!

St. Patrick's Wreath (2)

We made dollops of glue on the white wreath background and pressed down the flowers. She loved helping with the glue even more than the paint. I left a little of the white cardboard showing, too, as the third color of the Irish flag.

St. Patrick's Wreath (4)

While the glue and paint were drying, I also cut hearts from green construction paper. Three hearts taped together become a shamrock! These made a nice touch here and there on the wreath.

St. Patrick's Wreath (6)

Finally, I cut strands of orange and green ribbon and hot-glued onto the back of the wreath, then looped over the hook on our front door.

St. Patrick's Wreath (7)

Here’s wishing you the luck of the Irish this St. Patrick’s Day!

St. Patrick's Wreath (9)

Messy Potato Drop Painting

Messy Potato Drop Paint (10)

It’s almost St. Patrick’s Day, which means cue the potato painting projects! Today, Veronika and I painted with potatoes in a way that made a delightful mess, plus it got us outside in a first burst of spring warmth.

To set up, you’ll need cooked and cooled potatoes cut into chunks of various sizes. You can use all one type of potato, but for novelty I used one sweet potato and two red ones. Next time I would add in tiny new potatoes, too!

Messy Potato Drop Paint (5)

I unrolled a long piece of butcher paper on the grass and then set out plates with paint in the colors of the Irish flag: green, orange, and white. To make your artwork, pierce each soft piece of potato with a craft stick and dip in paint. Hold it up over the paper…

Messy Potato Drop Paint (4)

…then drop!

Messy Potato Drop Paint (9)

Veronika immediately needed a turn. She loved that she could dip the potatoes in the paint without getting messy thanks to the craft stick handles. The first time she held a potato aloft over our paper, she seemed unsure that she was really supposed to drop it.

Messy Potato Drop Paint (3)

At first, she would bend down and use it more like a stamp. But then she grew braver, and…

Messy Potato Drop Paint (7)

Drop! Each landing potato makes a great splattered print on the paper. Have fun experimenting and dropping the potatoes from different heights, as well as using them like stamps with the craft stick handles.

Messy Potato Drop Paint (8)

We even covered one round red potato with paint and then rolled it along with a craft stick as a paddle, leaving a trail of green paint behind. As mentioned, I think small new potatoes would be fun dipped in paint and then scattered down onto the paper, so we’ll add those in next time.