Baking Soda Ocean Art

Baking Soda Ocean Art (17).JPG

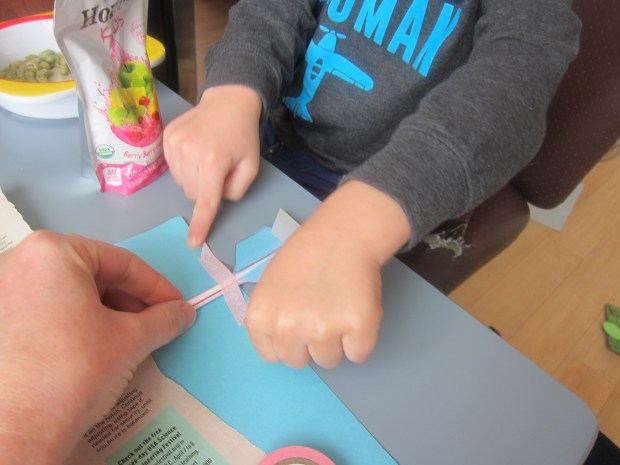
Travis and I made a batch of a neat baking soda dough today! Originally we hoped to craft a few ocean creatures and corals. It turns out Travis also just had a blast playing with the dough in his own way while I did more of the actual sculpting, but that means it was a win-win all around.

To make the dough, combine 1 cup baking soda, 1/2 cup cornstarch, and 3/4 cup water in a bowl. Travis loves whenever we make “potions” like this.

Baking Soda Ocean Art (2)

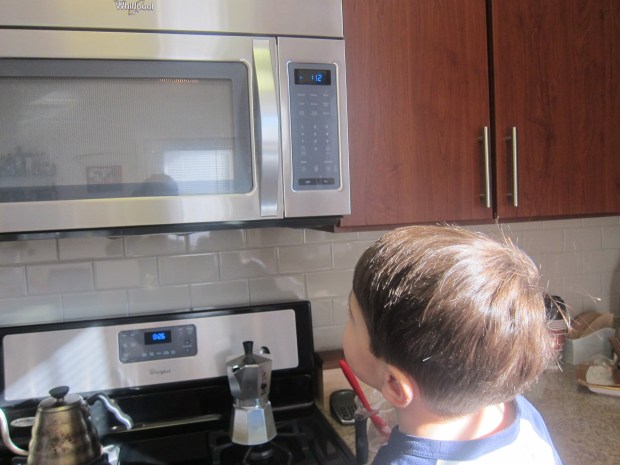
Microwave for 1 minute, then stir. Microwave for a second minute and then stir; you’ll notice it is starting to thicken around the edges.

Continue to microwave at 20 second intervals thereafter, until the mixture is thick and creamy like mashed potatoes. Travis was the button presser for this part, as you can see! We needed about 3 or 4 intervals.

Baking Soda Ocean Art (3)

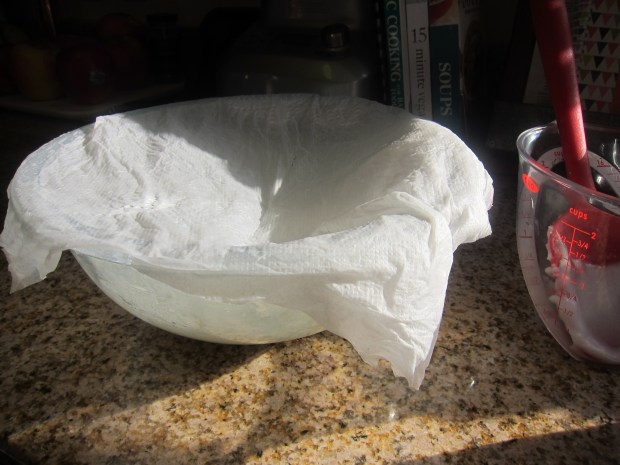
Cover the bowl with a damp paper towel, and let cool.

Baking Soda Ocean Art (4)

(Note: if your child is antsy during this waiting period, put leftover baking soda to good use with a classic volcano).

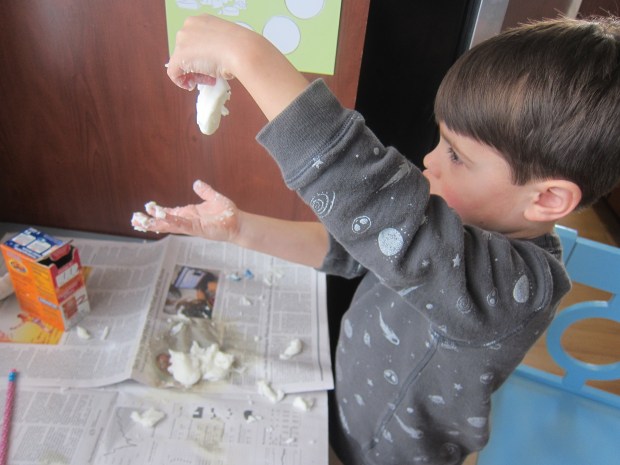
I tested the dough to make sure it had cooled completely, and found it to be quite sticky. I sprinkled in additional baking soda, and needed quite a lot; I wasn’t measuring, but probably close to 1/4 cup. If your dough is also sticky, add a little baking soda at a time and knead in after each addition. If you find you have the opposite problem (a dough that is too stiff), add a little extra water.

Travis loved the way it felt!

Baking Soda Ocean Art (5)

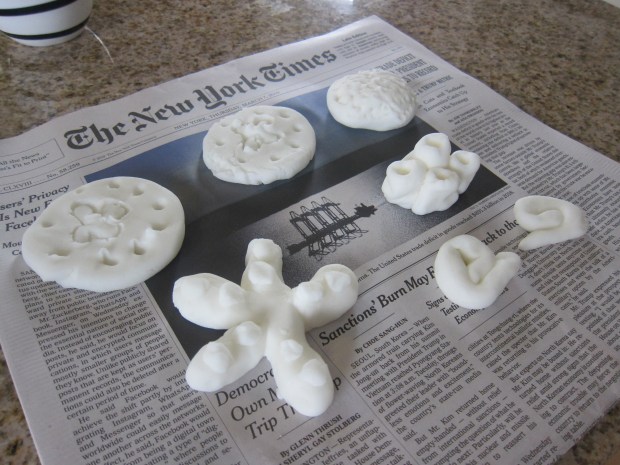
At first he wanted to know how to make sea creatures, especially the starfish: Form 5 teardrop shapes, and attach them together.

Baking Soda Ocean Art (6)

Some extra dots of dough give the starfish bumpy texture.

Baking Soda Ocean Art (8)

Coral was also fun; form a round ball, then add marks with a pencil for texture.

Baking Soda Ocean Art (9)

From there, Travis had his own game going, happily getting his hands into the dough over and over again.

Baking Soda Ocean Art (12)

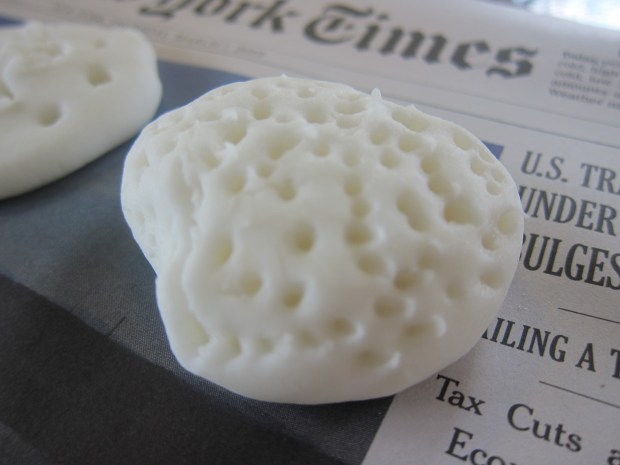
I rounded out our ocean collection with a few more sea creatures. For a sand dollar, roll a ball and then flatten. Draw a flower shape in the center with the tip of a pencil, and add a few holes around the edges.

Tube sponges were the neatest to make: Roll a few log shapes, then attach together, and punch a hole in the center of each with a pencil.

Baking Soda Ocean Art (14)

Finally, we rolled up a few cute sea snails.

Baking Soda Ocean Art (16)

Travis really wanted to play with these right away, which you can do if you bake at 175 degrees F for about 45 minutes. But when he learned that this would mean the dough turning brown, he – maturely! – decided he could wait the day or so you’ll need for the dough to dry completely.

Baking Soda Ocean Art (13)

Definitely worth the wait.

Baking Soda Ocean Art (15)


Liquid Hourglass

Liquid Hourglass (9).JPG

Are you passing the hours during a snow day, or the latest winter storm, or just having a day that’s too cold to venture outside? Then this hourglass project is for you! It will make watching the passing hours into a fantastically cool experiment.

To start, you need two identical bottles (we used empty water bottles that were 1 liter).

Liquid Hourglass (1)

Hot glue the caps together, pressing for a tight seal.

Liquid Hourglass (2)

Next add a piece of duct tape, to make a water-tight seal.

Liquid Hourglass (3)

Mark two dots where you will insert straws, then (grown-up step!) drill through the holes.

Liquid Hourglass (4)

Cut straws into pieces that are 2-inches long. Insert one straw 1/3 of the way into one of the holes. Insert the other straw 1/3 of the way in the other direction.

Liquid Hourglass (5)

Fill your first bottle with vegetable oil. Definitely use the cheap stuff here, folks, since the bottle needs to be filled completely. We used a funnel to avoid any mess.

Liquid Hourglass (6)

Fill the second bottle with water. We added blue food coloring for visual effect.

Liquid Hourglass (7)

Now screw one half of the bottle cap onto the bottle with oil. Quickly and carefully, flip over and screw onto the bottle with water. Immediately you’ll get a big bubbling result as the two liquids start to mix.

Liquid Hourglass (8)

After a few minutes, the bubbles will settle down and you can really see what’s happening. Because the oil is less dense than water, it will bubble up, bit by bit through the straw, at the same time that the water bubbles down.

Liquid Hourglass (13)

First, we were simply in awe of how cool this looked.

Liquid Hourglass (10)

Then we decided to get more scientific: Had we really created an hourglass? We timed it and discovered it took 45 minutes on the dot before we had one completely blue bottle, and one completely oil bottle.

Liquid Hourglass (16)

And then there’s the fact that this is simply mesmerizing to watch. Seriously, I could have meditated in front of these bubbles.

Liquid Hourglass (14)

And Travis’s glee made it apparent he felt the same.

Liquid Hourglass (15)

Although not necessary, you can decorate your bottles, too. Since the blue and yellow effect reminded us of sand and water, we added a little octopus and his cave…

Liquid Hourglass (11)

…and these fishy friends.

Liquid Hourglass (12)

What a way to watch the hours pass!


Fresh Water, Salt Water

fresh water (4)

This activity from Travis’s January issue of High Five magazine provided a nice dose of STEM learning, alongside the usual monthly craft. We’ve done a similar experiment before, but liked the set-up for this version!

Fill 2 large clear glasses with 1 and 1/2 cups warm water each.

fresh water (1)

Add 1/3 cup salt to one cup, and stir until dissolved.

fresh water (2)

The instructions said to tint the other cup blue with food coloring so you can tell them apart. Because the salty cup is cloudy, this step isn’t really necessary, but blue water is cool, so why not!

Now add the same object to each of the two cups, and observe any differences. We tried the magazine’s suggestions of aluminum foil balls, which floated to the top in both versions.

Next we tested plastic dinosaurs. Both sank. Hmm, no difference!

fresh water (5)

Finally, when we tried tomato slices, the tomato in the salt water seemed to pop above the surface with more buoyancy.

fresh water (6)

But why hadn’t the others been different? We added more salt to the salty cup, liberally pouring in and stirring. After two more tries, we had a crayon that floated!

fresh water (7)

The crayon in the opposite cup, down at the bottom, helped illustrate buoyancy best for Travis.

fresh water (8)

Overall, he loved the set-up and scientific nature of the project, plus adored pouring the salt. Great for budding scientists.

Glass Symphony

Rainbow Symphony (5)

We started off our day with a rainbow of sound! This neat homemade “xylophone” is a great way for kids to visualize the vibrations created in a basic glass symphony.

Fill glasses of the same shape and height with different levels of water. You don’t have to be exact about this, but I found it easiest to add water in 1/2 cup increments.

Add food coloring to the glasses so you have a pretty rainbow of colors. (Note: I use the all-natural coloring from Watkins, but I always find that the green looks very blue in water; instead, use the blue and yellow to mix a truer green).

Rainbow Symphony (1)

Now it was time to hand Travis a spoon, and see what he discovered. I asked him what was different about each glass. First he pointed out the obvious: different colors. But as he dinged each one with a spoon, he was delighted to find the sounds changed.

Rainbow Symphony (2)

“Sort of a low note,” he described.

Rainbow Symphony (3)

“Even higher!” he exclaimed.

Rainbow Symphony (4)

“Really high!”

Your mini Mozart can even try making up a song.

Here is my attempt at Hot Cross Buns, although I would have had to take some time to get scientific if I wanted the notes to be exactly right.

This project is a delight for all!

Rainbow Density Cylinder

Rainbow Density (7)

Here’s a neat visual way for even young kids to grasp the concept of density. You’ll get messy in the kitchen, mix up some colors, and sneak in some science to boot!

Rainbow Density (1)

While Travis was napping, I set up paper cups and all of the liquids we’d be using for the project, in this order of density:

Corn syrup (or carob syrup)

Maple syrup

Water

Almond milk

Vegetable oil

Dish Soap

Rubbing alcohol

Note: Feel free to adapt this list, depending what you have at home, including agave nectar or honey for non-vegan families.

Travis was so intrigued at the set-up, and we talked briefly about how some liquids sit on top of (are less dense) than others. Was he ready to see how it worked? Yes!

Rainbow Density (2)

We tinted a few of our liquids with food color for a better visual effect: green for the water, red for the dish soap, and blue for the rubbing alcohol.

Rainbow Density (3)

Carefully help your child pour the liquids, in order of density, into a glass container. Thinner containers will work better, such as a recycled jam jars or an old dressing jar.

Rainbow Density (6)

It may take your layers a few minutes to settle, making a rather goopey mixture at first!

Rainbow Density (5)

After we gave it a moment, our layers were more apparent – we loved the hit of bright blue from the alcohol at the top!

Oddly, the blue alcohol layer disappeared when we returned to the jar about an hour later, but here you can see some of the layers even more clearly.

Rainbow Density (9)

Travis had so much fun that I gave him extra cups and additional food color to mix up for some time.

Rainbow Density (8)

A fun afternoon in the kitchen!

Leave a Trace

Trace (2)

It may be the middle of summer now, but fall is just around the corner, and I’m already thinking ahead to when Travis will start pre-K in September. One of the skills that pre-K teachers emphasize is tracing, great for learning pen control and pre-writing. How to make that fun in the summertime? Use the sun!

Set a large piece of poster board or craft paper in a sunny spot, and arrange your child’s toys on the paper. For beginning tracers, keep shapes simple.  Building blocks are great, in rectangles, squares, and triangles. Older kids might enjoy the challenge of tracing around complicated objects, like animal figures, cars, or dinosaurs.

Trace (1)

Encourage your child to follow the lines of shadow that the sun casts on the paper. This was tricky for Travis and he didn’t have the patience for it that I hoped on this particular morning, but we got in a little practice!

Trace (3)

If your kids are into it, try coming back to the activity over the course of the day; the shadows will shift (shortest at noon), which is a neat little lesson on the Earth’s rotation.


Candle in the Wind

Candle Wind (3)

Now that we’ve the got the wind in our sails (haha), we’re having lots of fun finding out about other properties of wind. Will wind be able to travel around an obstacle in its way? This experiment is an easy illustration of the fact. Parents be aware: You will need a candle with a flame for the experiment to work. Supervise very closely, and only do so if you know your children won’t touch the flame.

Candle Wind (1)

To start, light a small sturdy candle, and place behind an object with square corners – a vase worked well for this step.

Candle Wind (2)

Travis huffed and puffed, but the wind couldn’t reach the candle this way. Onto the next attempt!

Place an object with round sides between your child and the candle, such as a water glass.

Candle Wind (5)

The wind will make it around the sides and poof – out goes the candle.

Candle Wind (4)

Looking for more windy fun? Check out our recent experiment with hot air spinners.


Hot Air Spinner

Hot Spinner (4)

This was the perfect science experiment to do hot on the heels of our wind-themed kit from Koala Crate. You’re illustrating for children that warm air is less dense than cold air. So if you hold something above a heat source (like an uncovered lightbulb), the cold air pushes the warm air up and makes it spiral!

First, draw a circle on construction paper, and then pencil in a spiral shape. Cut out.

Hot Spinner (1)

These kinds of projects are great practice for Travis – he gets to mimic my movements (drawing circles, cutting with safety scissors) while I make the version that is precise enough for a science experiment.

Hot Spinner (2)

Next we needed to staple a thread (be sure to use sewing thread; twine or yarn will be too heavy) to the center of the spiral – by far Travis’s favorite part!

Hot Spinner (3)

The next step was a bit tricky to catch on camera! Wrap the other end of your thread around a pencil and hold over a lightbulb (we put a lamp on the ground and removed the shade). Stay still until the spiral comes to a stop, then carefully observe – in moments it will start to whirl!

Hot Spinner (5)

Some good STEM fun to kick off our summer!

Juice-Pouch Stomp Rocket

Juice Rocket (5).JPG

Don’t toss that juice pouch from your child’s next snack time. With just a few embellishments, your kid will have him- or herself their very own rocket launcher!

First, make sure the juice pouch is completely empty and rinse any juice from the straw. Reinsert the straw into the pouch; this is your launcher.

Cut a regular straw in half; discard half and keep the rest as your rocket.

Trace 3 trapezoids onto colored paper – littlest kids might need help with this one. The shapes should measure 3 inches on the bottom, 1 inch on the sides and 3/4-inch on the top. Cut out, and cut one of them in half vertically, leaving the other two full.

Tape the 2 full trapezoids to each side of the straw as the rocket fins. Add the half pieces of trapezoid at the bottom with more tape.

Juice Rocket (2)

Travis decided that he wanted to add a few strips of washi tape as embellishment, too.

Juice Rocket (1)

Seal the end of the straw with a little ball of clay. Now your rocket is ready to soar!

Blow into the straw of the juice pouch to make sure it is full of air.

Juice Rocket (3)

Slide the “rocket” onto the straw of the juice pouch. Now stomp (or press) on the pouch and watch your rocket soar!

Juice Rocket (4)

You can teach your little scientist that this project works thanks to compressed air from the pouch, otherwise known as pneumatics!


How Much Water Is in Snow?

Water in Snow (4)

Here’s a super-simple experiment for the next time it snows. It combines a whole host of scientific ideas, from talking about liquid vs. frozen states of matter to making a hypothesis.

First, we needed to fill a clear glass jar with snow. For the best results, make sure to tamp the snow down so your jar is truly filled all the way.

Water in Snow (1)

We took the jar inside and measured the snow (15 cm) and made guesses as to how much water would be left once it melted, keeping in mind past lessons on how ice takes up more space than water.

Water in Snow (2)

Travis guessed really low, at 2 cm! I chose 5 cm to keep things interesting. I tried marking our guesses directly on the jar, but since it was still a little wet, we found that masking tape worked better.

Water in Snow (3)

Next we needed to be scientific and record our results. We took measurements at one hour intervals over the next three hours with the following results:

3.27 pm – 15 cm

4.27 pm – 12 cm

5.27 pm – 7 cm

6.27 pm – 4 cm – all water!

Water in Snow (5)

It was neat to see that it took a full 3 hours, as well. Next time, we’d make hypotheses about the timing as well, and record that at the start.