Tissue Paper Night-Lights

Tissue Night-Light (6)

This is such a beautiful craft for any child afraid of shadows in their room at night. Not only will they feel the pride of having put it together, but the result is comforting and beautiful!

First we needed to tear multiple colors of tissue paper into small pieces. Any excuse to rip through tissue paper is welcome in this house!

Tissue Night-Light (1)

Once we had a pile of scraps, we mixed together glue with a splash of water in a cup.

Tissue Night-Light (2)

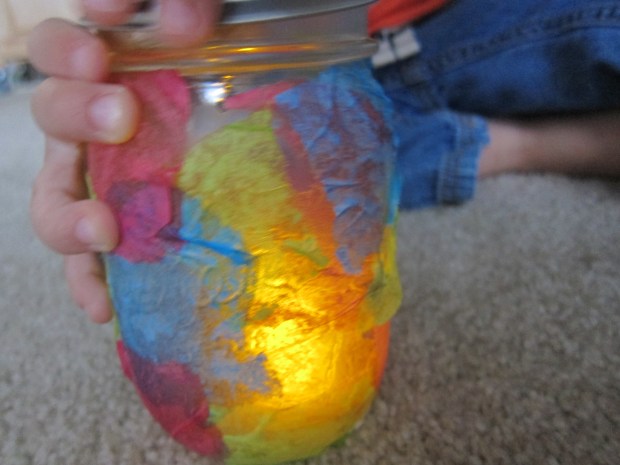
Travis loved painting every inch of our mason jar with the glue mixture – so much so that he wanted me to layer on the tissue paper while he continued to add more glue. He wasn’t content until every inch was covered!

Tissue Night-Light (4)

We set our mason jar aside to dry, and by naptime, it was ready!

Tissue Night-Light (5)

Use any battery-operated tea light, and place inside the jar. Travis loved taking the tea light in and out and screwing on the lid, testing the nightlight in several parts of his room until he found his favorite. What a success!

Tissue Night-Light (7)

Tissue Paper Globe

Tissue Globes (6)

Our Earth Day fun continued with this very easy tissue paper project. It’s a cute way to celebrate this beautiful planet we call home!

First, encourage your child to trace a circular shape onto the paper you’ll use as a background, which is great fine motor skill practice! Our paper plate was larger than our paper (whoops!) so I did some quick thinking and cut off the outer rim.

Tissue Globes (1)

Then it’s time to cut blue and green tissue paper into squares. Travis still can’t quite master this of course, but he had fun playing at it beside me while I cut up lots of little squares. (Note: No cats were harmed in the making of this project!)

Tissue Globes (2)

I showed Travis how to wad up the paper, dip in glue, and apply to his circular Earth, which was fun for a moment…

Tissue Globes (3)

…but then he quickly decided it was way more fun to use his finger as the glue applicator!

Tissue Globes (4)

I indulged this messy impulse, and added a wad of tissue paper wherever he had made our Earth sticky.

TIssue Globes (5)

Happy Earth Day!

Four Seasons Tree Pictures

Tissue Paper Tree (6)

The buds are on the trees, and we’re discussing the annual cycle of a tree and the seasons a lot this week! It was the perfect time to make a beautiful picture showing all the stages of a tree throughout the year.

To set things up, I cut 4 trunks from brown construction paper (preschoolers can help with this step!) and glued them down to poster board.

Tissue Paper Tree (3)

Then it was time to rip up tissue paper for our 4 different trees – Travis was an eager participant for this part! We used pink for spring flowers, green for summer leaves, and orange and yellow for the fall. I had intended to use white tissue paper for winter snow, but we decided cotton balls would be more fun!

Tissue Paper Tree (1)

I set out a dish of glue, and showed Travis how to wad up each piece of tissue paper, dip in the glue, and then apply. So he wouldn’t get confused, we worked on one season at a time, starting with bright pink flowers for spring.

Tissue Paper Tree (5)

He was definitely proud to determine where each leaf or flower should go, and very seriously told me, “I’m all done!” when finished with one season and moving on to the next. A very cute way to talk about the seasons.

Tissue Paper Tree (7)

Toddler Stained Glass Window

stained-glass-14

This art project is gorgeous in a window hit by direct sunlight, and your toddler will be unable to resist the sticky surface!

While Travis was asleep, I cut scraps of multi-colored tissue paper and crepe paper, and arranged them in a bin. I then drew little floral motifs and various shapes on a large piece of contact paper with permanent markers.

Tape the contact paper, sticky side out, to a window and leave it for your toddler to find. In the morning, it only took Travis about 5 minutes. “Mom, you drew clouds!” (Well, I was going for flowers, but good enough!)

stained-glass-1

Now that he had spotted it, I brought over the tissue paper scraps and showed him how they adhered to the paper.

stained-glass-5

He tested out a few pieces, and then became very interested in the tissue paper itself for a while.

stained-glass-4

His favorite way to attach the pieces was by crumpling them into balls first, an idea I hadn’t even considered!

stained-glass-7

It was a project that we didn’t do all at once, bur rather one that he returned to over the course of the day. He also discovered how sticky the contact paper felt if he pressed it with his fingers!

stained-glass-9

The project was best when we had gorgeous sunlight spilling in at midday. “Look at our stained [glass]!” he exclaimed, and added a few more pieces.

stained-glass-11

Because I wanted him to have a real-world reference for the art we had created, we also popped into a local cathedral to marvel at the stained glass there.

stained-glass-15

Be sure to leave your artwork up in the window for a few days to enjoy it!

stained-glass-13