Rubber Band Launchers, Two Ways

Spider Launcher (13).JPG

Ok, we’ve launched marshmallows from cups and rockets from straws, so now it was time for Travis to play around with how he could launch things with rubber bands!

First up, thanks to a renewed fascination with bugs, was a Spider Launcher. This project was a little tricky; we had to redo it twice before we got the elastics right!

First, cover a sturdy cardboard tube (such as an empty roll of packing tape) with construction paper.

Spider Launcher (1)

We chose orange because, well, spiders and Halloween and all that, but any color would work. Glue or tape the paper on.

Glue 4 lollipop sticks around the tube so that they form a square.

Spider Launcher (2)

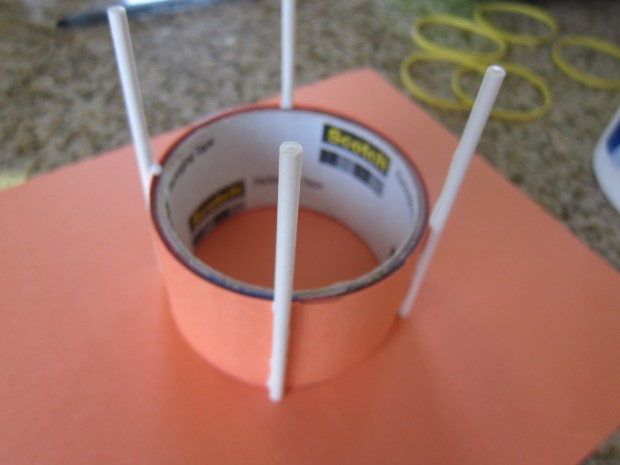
Leave these to dry for at least 2 hours, so your structure is sturdy. Full disclosure: we did have one pop off, and I duct-taped it back on.

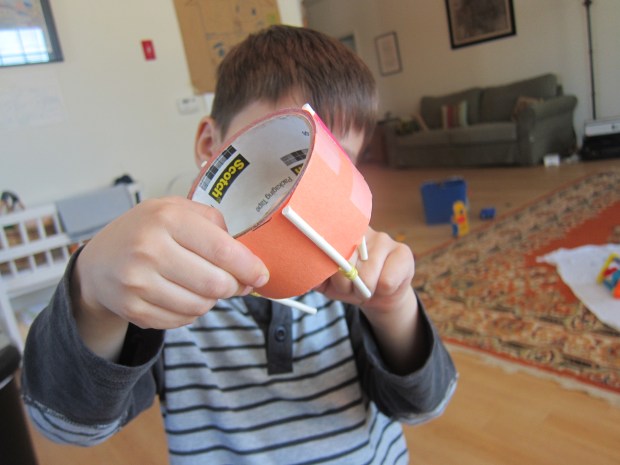
To make your “web,” slip an elastic over all 4 posts. Loop it around each post, then push down to the bottom of the sticks.

Spider Launcher  (4).JPG

Slip a second elastic over the post. Completely lift the first one up and over the second elastic (so only your second elastic is now looped on the lollipop sticks, if that makes sense).

Spider Launcher (6)

Repeat with a third elastic, slipping it around the post, and then lifting the second elastic completely up and over it.

Repeat with a fourth elastic, slipping the third elastic completely up and over it. Confused yet? I hope the visual helps!

Spider Launcher (12)

Now place a toy spider in the middle. Pull back on the tautest, center of your web. Snap the elastic back, and spider flies!

Spider Launcher (10)

This was tricky for my four year old, but he could do it with help for bigger launches, and by himself for shorter launches.

Spider Launcher (9)

Even better, his bug toys now had a web to call home, so overall it was a success!

Since this turned out to be so complicated, I also asked him if he wanted to make a much simpler rubber band launcher, using just with a couple of elastics and a cup. Here, then, is the Rubber Band-Powered Cup Launcher.

Rubber Band Rocket (5)

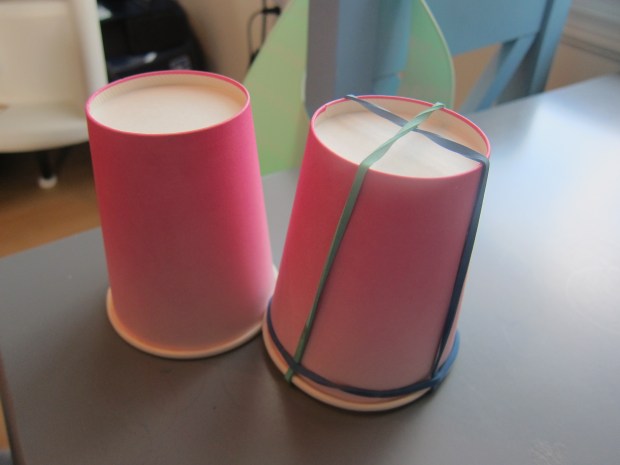
Put two rubber bands on a sturdy paper cup so they form a cross.

Rubber Band Rocket (1)

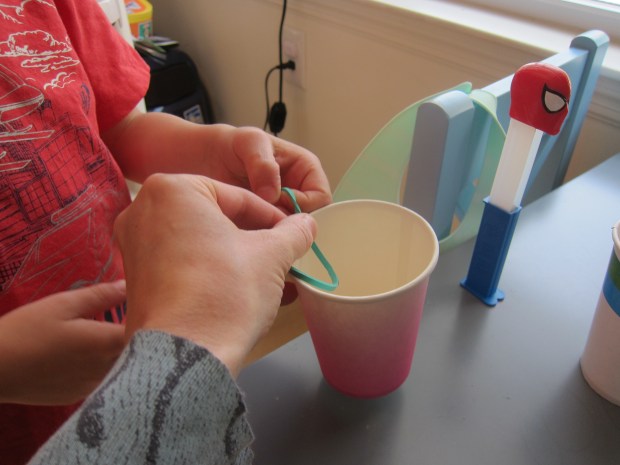
(Note: It may help to stretch your rubber bands out a few times to loosen them, or your paper cups will crumple).

Rubber Band Rocket (2)

Place a third rubber band around the cup to hold the other two in place.

Rubber Band Rocket (3)

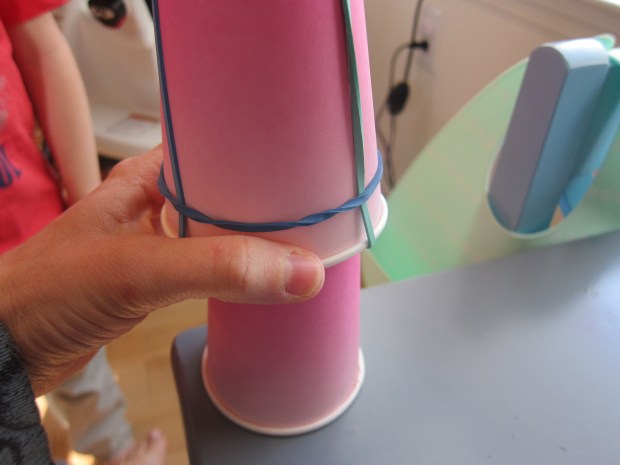
Press this cup down over a second paper cup. The elastics will go taut, and when you release… Boing!

Rubber Band Rocket (4)

This one is simple enough to do with a crowd of kids, and would be a fun one outdoors, perhaps for any upcoming Memorial Day barbecues!

Make a Father’s or Mother’s Day Gift

Father's Day (8)

With Mother’s and Father’s Day just around the corner, here’s the perfect idea for your spouse: Put together a gift featuring photos or sounds of your little ones. The following gifts will actually be mine to my husband in June, but adapt them for a special mom this coming Sunday, if you’d like!

There are so many websites on which you can make photo projects. I used simple software at Zazzle for two versions.

Father's Day (1)

The first was a tote bag, featuring one big photo of the kids.

Father's Day (3)

The second was a mug, which was able to feature three pics, plus a sweet inscription.

Father's Day (5)

As a final photo touch, I added a picture of Veronika to the front of a card.

Father's Day (6)

The final piece of the gift was auditory: a recording of Veronika’s babbles to be a ringtone!

Father's Day var.JPG

These personalized gifts are sure to make a mom or dad feel special, whether it’s the first Mother’s/Father’s Day, the tenth, or beyond!

Father's Day (4)

More Piggy Toes

Piggy Toes (6).JPG

How is Vernoika six months old, and yet I’ve barely played “This Little Piggy” with her? After all, doesn’t every baby get tickles after that little piggy runs wee wee wee all the way home? It was time to remedy the situation!

Piggy Toes (1)

No doubt you’re familiar with the rhyme, but I have two silly vegan variations that I always use. For the first:

This little piggy went to market.

This little piggy stayed home.

This little piggy had roast beef,

But this little piggy was vegan!

And this little piggy went wee wee wee wee wee all the way home.

The second version goes:

This little piggy went to market.

This little piggy stayed home.

This little piggy had tofu,

And this little piggy had none!

And this little piggy went wee wee wee wee wee all the way home.

Piggy Toes (2)

Wiggle one toe for each line, working your way from the big toe to the smallest, then run that little last toe up for tickles. Veronika’s sweet spot is her armpit!

Piggy Toes (3)

To add to the day’s play, I pulled out a few plastic pig toys.

Piggy Toes (5)

She of course didn’t make the connection, but loved playing with them and their barn!

Piggy Toes (7)


Balancing on a Ball

Balance Ball (4)

The last time I put Veronika on a beach ball, she was only about three months old, and the goal was to strengthen her core muscles.

Today’s time on the ball was for a slightly different purpose, more about learning where her body is in space.

Say what? This is a funny concept for grown-ups; of course you know where your hands and feet and limbs are! But it’s all new to babies, and at six months old, they still have to look at their hands to know where those hands are and where to put them. Moving around on a ball will help strengthen spacial awareness. And of course the sooner baby knows where his or her hands are, the sooner he or she can reach out to grab things like toys or oh, all those yummy bites of food they’re old enough for now!

Today’s activity was simple then. I put Veronika on a ball, holding her firmly around the middle, and rocked her back and forth.

Balance Ball (1)

And side to side.

Balance Ball (3)

She seemed a little surprised at times, but soon warmed up with big smiles.

Balance Ball (2)

If you don’t have a beach ball, try a yoga stability ball, or even a big sibling’s toy ball hopper.

Set the Alarm

Set Alarm (2)

When your baby is a newborn (i.e. the fourth trimester), naps are all over the place. But now at six months old, those naps should hopefully be a bit more predictable. Even Veronika, who naps when and where she can on big brother’s schedule, has settled into a routine of 3 naps a day – a quick morning one, a longer one late morning, and a third one mid-afternoon to get her through to the evening.

One secret about naps is that they are reliably 45 minutes long, unless a baby is startled awake. Why? Because that’s the length of a sleep cycle. When a baby matures enough to fall back asleep, that 45 minutes turns into a full 90 minute nap. That gives you lots of time, if you use it wisely!

And I hear you busy parents; naps are crucial for getting things done! But they’re also crucial for self-care. I’m as guilty as the rest, so here’s a new trick I’m implementing: Set an alarm for 30 minutes, then take time to relax.

She’s out! Time to set the timer.

Set Alarm (1)

For those 30 minutes, I power through whatever needs to get done: bills, writing, cleaning, organizing, you name it. But when the 30 minutes are up, it’s time to relax.

Set Alarm (3)

That might mean having a cup of tea, or reading a book. For me, it’s usually a pot of coffee and a magazine. And then if I’m lucky and she stirs at the 45 minute mark, I can take her in my arms and she might – just might! – settle back in for a second 45 minutes on me. Which is the best.

Travis vs. Veronika

Trav v Vron (13).JPG

If you have more than one child, six months old is a great age to take stock of a few things. I thought it would be fun to look through the monthly photos I’d taken of each kid and do a side-by-side comparison. Looking through the pix will be fun for the whole family, too.

I printed wallet-sized sets of the pictures so I could put them in a book for both kids to enjoy. Let’s take a peak!

Here they are at birth, each one only hours old.

Trav v Vron (3)

Little 1 month olds!

Trav v Vron (4)

2 months old – I feel like their little personalities are starting to show up in their expressions.

Trav v Vron (5)

It looks like I have a thing for pastel pants at 3 months old!

Trav v Vron (6)

But I definitely didn’t plan it that way!

Trav v Vron (7)

And for navy blue at 4 months old.

Trav v Vron (8)

By 5 months, I can really see the boy Travis will become.

Trav v Vron (9)

Will the same hold true for Veronika?

Trav v Vron (10)

And finally, my 6 month old kiddos:

Trav v Vron (11)

It was also interesting to go back and make a few notes on when they each reached milestones. For instance, I found in my baby journal that Travis first rolled at only 2 months – but he only rolled sporadically thereafter. Veronika, on the other hand, waited until she was 4 months old – but then she never stopped, and spent all her time on her tummy!

Veronika was the first one to sit, just before her 6 month birthday. It took Travis longer, until nearly 8 months before he was truly stable on his own. Some other differences? Travis’s first food was pea puree; Veronika’s was banana mash. Travis was 6 lb 3 ounces at birth; Veronika was 6 pounds 11 oz.

It was adorable to go through the pictures with the kids during snuggle time.

Trav v Vron (12)

We’ll see how they compare with crawling and walking and other milestones, as time goes on!


Bubbling Bath Fizzies

Bath Fizzies (6).JPG

If you’re still wondering what to make for grandmas, moms, aunts, or any other special mother-figure this mother’s day, Travis and I have got you covered with this treat for the toes from Highlights magazine. The gift is equal parts craft and science, which makes it a fantastic way to engage kids in the spirit of gift-giving.

Bath Fizzies (2)

In a large craft bin, Travis mixed up the following ingredients:

1 cup baking soda

1/2 cup citric acid

1/2 cup Epsom salts

3/4 cup corn starch

Make sure to tell your child that the mixture isn’t edible, even though most of the ingredients are, especially if you’re used to cooking together!

Bath Fizzies (1)

In a small bowl, we whisked together 2 tablespoons olive oil and 1 tablespoon water. Add the liquids to the mixture slowly, stirring until combined. Kids will want to wear goggles (or sunglasses, in a pinch!) to protect their eyes, since it will bubble as you stir.

We also added blue food coloring for a pretty tint and a few drops of vanilla extract for a nice smell. The downside was that this made our mixture a little too liquidy (you want it to be slightly dry and crumbly). It seemed all right at first, but as our bath bombs dried, they puffed out. Note Travis in his too-cool-for-school sunglasses, ha!

Bath Fizzies (3)

Use an ice cream scoop to scoop out each portion, and pack down tightly. Gently release onto a paper towel and let dry for a full 24 hours.

Bath Fizzies (4)

Package the bath bombs in any pretty tissue paper or parchment paper.

Bath Fizzies (7)

We also added a little gift tag with instructions for treating those tootsies!

Bath Fizzies (8)

And of course we saved one to test out at home! Travis loved watching it fizz, before putting his feet in to soak. Don’t forget to give a quick explanation of why it all fizzes up – the baking soda and citric acid reacting together once in water, of course, which releases CO2 gas (ergo, bubbles).

Bath Fizzies (9)


Baker’s Baby

Baker's Baby (2).JPG

Today, I played a little game with Veronika involving the classic rhyme Pat-a-Cake, but in subtly new ways.

First, I sat her on my lap. Instead of clapping my hands, this time I clapped hers along  to the first verse. As a reminder, say:

Pat-a-cake, pat-a-cake baker’s man

Bake me a cake as fast as you can

Roll ’em and roll ’em and mark ‘e with a B…

(Here, I rolled her arms, and then traced a little B in her palm. Alternatively, trace the first letter of your child’s name).

And toss ’em in the oven for baby and me.

Point to your child on the word ‘baby’, of course, and to yourself on ‘me’.

Baker's Baby (1)

Then I lay her on her back and repeated these motions with her feet, clapping them together, cycling her legs, and tracing the B onto a little foot.

Baker's Baby (3)

She loved it!

Baker's Baby (4)

For a little extra baker’s fun, I gave her a toy bowl and rubber spatula to play with.

Baker's Baby (5)

Mixing up a familiar nursery rhyme in subtle ways like this is great for baby’s brain. Or as an alternative, don’t forget to seek out new rhymes!

Gallant Challenge: Bugged

Bugged (7).jpg

Last month, Travis took on his first Gallant Challenge from Highlights magazine: to spread kindness to neighbors!

This month’s column was about a girl who loved bugs but was bullied by friends at school about her interest. After her mom wrote of her plight, entomologists from all over reached out and encouraged her not to give up her dream of working with bugs.

This article was a great jumping-off point to talk about bullying. I asked Travis if he ever saw similar behavior at his school, to which he (thankfully!) replied now. But we talked about what to do if anyone ever bullies him or he witnesses bullying. Highlights encouraged kids to write in their own stories of being bugged about an interest, but we left that bit to older readers!

And then to make the lesson fun, we headed off to see just how cool bugs were, in support of the girl in the article.

A museum near us has a fantastic bug exhibit, and we spent the whole afternoon marveling.

Bugged (8)

This was the biggest cricket we’d ever seen!

Bugged (3)

We got to marvel at butterflies just emerging from the chrysalis.

Bugged (2)

This rhinoceros beetle was almost as big as Travis’s arm!

Bugged (5)

Travis introduced the little toy centipede he bought in the gift shop to a real centipede.

Bugged (4)

Exposing your child to something new or different can be a great way to combat bullying, or following along a crowd that bullies another child; after all, so much of bullying stems from ignorance or not understanding another person’s viewpoint. Needless to say, Travis was captivated by bugs the entire outing. Hey, these ants seem to have the right message!

Bugged (1)

Mother’s Day Hat Card

Mother's Day Card (8).JPG

This adorable card in the shape of a hat, which evokes Kentucky Derby season and all things springtime, makes a wonderfully whimsical card for a special someone on Mother’s Day! When Travis and I spotted the craft in Highlights, we knew we needed to put one together for his grandmother.

Cut a large circle from colored cardstock; we chose a royal purple. I was impressed with the way Travis followed the lines along the circle I drew – I hadn’t realized his cutting skills had grown so precise!

Mother's Day Card (1)

Then we cut the rim from a paper bowl for a smaller circle.

Mother's Day Card (5)

Cut a tab into your cardstock near the middle, and glue onto the bowl. It should be able to lift open and closed.

Mother's Day Card (3)

Next we glued purple ribbon around the bowl, and also affixed a purple bow.

Mother's Day Card (4)

Once the glue dried, we added our Mother’s Day message to grandma under the hat!

Mother's Day Card (6)

Hats off to this cute idea!

Mother's Day Card (7)