Custom Kicks

Custom Kicks (6)

Kids take great pride in things they’ve made, and that goes for clothing as well as crafts. Give them a little extra kick in their step by customizing sneakers for school this fall!

You’ll need to start with blank canvas sneakers; the ones from Kikiz Kids are made of non-animal materials, and inexpensive enough that you won’t mind unleashing your mini Picasso on them.

Custom Kicks (1)

If you want to make the project into a bit of a lesson, try stenciling in lines with a pencil first, and encouraging your child to trace along the lines. We used glitter pens, but you can also use paint pens for the project.

Custom Kicks (2)

Travis had his own plans, and soon his shoes were a riot of colors.

Custom Kicks (4)

We also liked practicing our tracing around the eyelet holes!

Custom Kicks (3)

Now those are some kool kicks:

CUstom Kicks (5)


Glass Symphony

Rainbow Symphony (5)

We started off our day with a rainbow of sound! This neat homemade “xylophone” is a great way for kids to visualize the vibrations created in a basic glass symphony.

Fill glasses of the same shape and height with different levels of water. You don’t have to be exact about this, but I found it easiest to add water in 1/2 cup increments.

Add food coloring to the glasses so you have a pretty rainbow of colors. (Note: I use the all-natural coloring from Watkins, but I always find that the green looks very blue in water; instead, use the blue and yellow to mix a truer green).

Rainbow Symphony (1)

Now it was time to hand Travis a spoon, and see what he discovered. I asked him what was different about each glass. First he pointed out the obvious: different colors. But as he dinged each one with a spoon, he was delighted to find the sounds changed.

Rainbow Symphony (2)

“Sort of a low note,” he described.

Rainbow Symphony (3)

“Even higher!” he exclaimed.

Rainbow Symphony (4)

“Really high!”

Your mini Mozart can even try making up a song.

Here is my attempt at Hot Cross Buns, although I would have had to take some time to get scientific if I wanted the notes to be exactly right.

This project is a delight for all!

Rainbow Sugar Cookies

Rainbow Cookies (8).JPG

Kids are all too often over-scheduled these days, and I’m as guilty of it as the next parent. That’s why I love the afternoons that I deliberately keep wide open for my son and me. It’s the perfect excuse just to play or, one of our favorites, to bake! This cooking project is messy, that’s for sure, but so worth the smiles.

To start, we made a basic sugar cookie batter. In a bowl, cream together 2 sticks (1/2 pound) Earth Balance butter and 1 cup sugar using a wooden spoon or fork. Travis loved this step! Usually we use our stand mixer, and it was so fun to get in there with muscle power.

Rainbow Cookies (2)

Add 2 Ener-G eggs and 2 teaspoons vanilla extract, stirring until combined.

Carefully stir in 2 and 1/2 cups flour just until blended. Travis pretended he was a stand mixer on “slow” setting for this step. Loved it!

Rainbow Cookies (3)

Now for the messy part. Divide your dough into about 4 or 5 portions on a floured surface. Working with one portion at a time, knead in colors of the rainbow. We didn’t make a full rainbow, but soon had red, yellow, green, and blue portions, using the all-natural food coloring from Watkins.

Rainbow Cookies (4)

You’ll notice Travis took a moment to steal some leftover batter!

Rainbow Cookies (5)

Wrap each portion of dough individually in plastic wrap and place in the fridge for at least 1 hour (longer is fine).

Rainbow Cookies (6)

When it’s time to bake, coat a baking sheet with cooking spray. Pinch off a section of each color and roll into a long worm, then make rainbows on the baking sheet.

Rainbow Cookies (7)

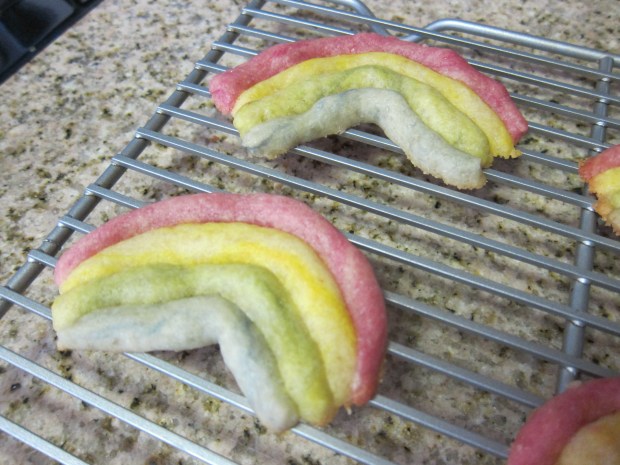
Bake at 375 degrees F for 7 minutes. Transfer the cookies to a wire rack and repeat with the remaining dough until gone. (Note: we made two batches today, and the dough easily freezes for future rainbow-making).

Rainbow Cookies (9)

Seasoned Pretzels

Seasoned Pretzel (6)

Kids will love shaking up this snack… literally! Prepare the pretzels in the morning, and they’ll be ready after school for an afternoon nibble.

You’ll need a 2-gallon zippered plastic bag to make the pretzels. I only had 1-gallon bags on hand, so we divided the pretzels into two portions, and for all of the quantities below, we divided in half among each bag.

Place the plastic bag (or bags) in a large bowl, and fill with 1 (16-ounce) bag mini pretzels.

Seasoned Pretzel (1)

Add 1/2 cup olive oil.

Seasoned Pretzel (2)

Sprinkle in 2 teaspoons garlic powder, 2 teaspoons dried dill, and 4 teaspoons ranch-dressing seasoning (note: try the Saucy Ranch Seasoning from The Vegetarian Express). Travis loved smelling each herb!

Seasoned Pretzel (3)

Now the fun part: seal the bag and shake!

Seasoned Pretzel (4)

Leave the pretzels to marinate at room temperature for at least 8 hours before snacking.

Seasoned Pretzel (5)

Thanks for the great snack idea High Five magazine!

What’s the Weather? Frame

Weather Frame (6)

Chances are, if your child is in preschool or kindergarten, circle time in the morning involves checking the weather and talking about what it’s like outside that day. This make-at-home frame, care of High Five magazine, is a great way to keep up the routine on weekends or holidays.

To start, peel the backing off 2 magnetic sheets (available at craft stores), and cover with paper, trimming the edges of the paper to fit if necessary.

Weather Frame (1)

Cut one sheet into 4 long strips. These will be the 4 edges of your frame. Travis and I sat down and talked about different kinds of weather. He enjoyed drawing a “sun,” and what he decided was a “purple storm cloud” and some “raindrops” before hurrying to affix them to the fridge. (Kids will love the magnetic component of this project!)

Weather Frame (4)

A quick confession: I was briefly disappointed that Travis didn’t take more care in his coloring, perhaps trying to draw ovals for raindrops, or more of a proper cloud or sun. That said, he was proud of his work, and it was a reminder that “imperfect” art projects are still a great source of learning and creativity for our kids.

Weather Frame (2)

Meanwhile, I drew 4 pictures on the other magnetic sheet with different kinds of weather we might see. Travis asked for: sun, storm, rain, and snow.

Weather Frame (3)

Cut out the weather magnets, and then head to the nearest window to see what it’s like out there. Hang the right magnet inside your frame for the day. Don’t forget to check the weather tomorrow!

Weather Frame (5)

Ribbon Wands

Ribbon Wands (5)

My son loves gadgets. My son loves music. Was this project the perfect mix of the two? Hint: it involves a power tool.

In general, musical props like scarves or wands help kids enjoy movement and music that much more as they find the rhythm and beat of a song. So get drilling and put together these cute dancing wands!

The wands are simple, but you will need a drill, as well large craft dowels. Make sure you don’t buy thin dowels, or your drill bit will be much too large to bore through.

Adults: Make sure the dowel is on a tool bench or otherwise clamped down, and carefully drill a hole near one end, going all the way through.

Ribbon Wands (1)

Travis loved watching (with safety goggles on!) and sweeping up the sawdust after. Use sandpaper to smooth down any rough edges or splinters.

Ribbon Wands (2)

Next, I cut lengths of ribbon for Travis, until we had a nice pile and variety.

Ribbon Wands (4)

Help your child guide the ribbon through the holes of the dowels until you’ve filled each with 4 to 5 ribbon pieces. Gather into a knot and tie off.

Ribbon Wands (6).JPG

And now it’s time to dance!

Greater Than and Less Than Gator

Greater Gator (8).JPG

A chomping alligator who can help teach your child the less-than and greater-than symbols? What a cute way to kick off some math for the school year!

This project didn’t work out exactly as planned for us, largely because I had to upcycle egg cartons that were not my own, and as I result used half-dozen cartons, not a full dozen… Needless to say, our final product wasn’t quite a long alligator snout (perhaps more of a hungry dinosaur!) but the lesson remained the same.

Cut apart the tops and bottoms of two egg cartons; paint the tops green and the bottoms white. Let dry completely.

Greater Gator (1)

Here is where things got a little difficult: Punch holes in the green portions, and use yarn to thread first through the holes of the bottom “jaw” and then the holes of the top “jaw.” This is great lacing practice for kids! Tie off with a knot at the end.

Greater Gator (2)

I then hot glued the white “teeth” into each portion of the jaw. (You may need to trim about half a row of the teeth away, for it to nest properly inside the top portion of the carton.

Greater Gator (3)

You now have a hinged puppet who can open and close its mouth to chomp up… numbers!

For our counting game, I affixed block dot stickers to construction paper in various combinations – 2 dots is less than 3; 5 dots is greater than 4; and so on.

Greater Gator (4)

Travis had a bit of difficulty with the actual mechanism of our gator’s jaw, but aside from that, I loved watching him complete each task we put up on the easel. For each, he would count the dots first, then declare which was greater.

Greater Gator (7)

When your child tires of the math lesson, they’ll have a fun gator puppet to play with! Ours was soon involved in superhero games.

Greater Gator (6)

Tambourine

Tambourine (6)

Well, it’s official. My preschooler has left behind the sweet tunes of childhood music class, and now demands pop radio when we travel in the car. But I adore his passion for music and dancing, and we had some quality time making this tambourine, which we then used to play along to his new favorite tunes!

To start, punch holes around the rims of two paper plates, making sure the holes line up. Place the plates so the bottoms are both facing outwards.

Tambourine (1)

Thread a ribbon through one of the holes, and tie on a bell. Continue threading and tying bells until you’ve worked all the way around.

Tambourine (3)

Travis helped with a bit of the ribbon…

Tambourine (4)

…but was far more interested in decorating the surface of his tambourine with foam stickers. We soon developed a symbiotic relationship, mama threading and knotting, Travis decorating, until the tambourine was finished.

Tambourine (5)

Time to play!

Tambourine (7)

What’s your child’s favorite instrument to play along when their favorite tunes come on? Please share in the comments!

Tambourine (8)

Kid-Friendly Granola Bars

Kid Granola Bars (4).JPG

These granola bars are kid-friendly in two senses – both to make them and to eat them – and they are chewier and have far less sugar than store-bought brands. Adults love ’em too, especially to nibble on before or after a workout! Feel free to vary the ingredients below depending what kind of nuts or dried fruit you have at home.

Kid Granola Bars (1)

Ingredients:

  • 1 and 2/3 cups rolled oats
  • 1/2 cup sugar
  • 1/3 cup almond flour
  • 1/2 teaspoon salt
  • 1/4 teaspoon cinnamon
  • 1 and 1/2 cups raisins
  • 1/2 cup chopped almonds
  • 1/2 cup shredded coconut
  • 6 tablespoons melted Earth Balance butter
  • 1 teaspoon vanilla extract
  • 1/4 cup maple syrup
  • 2 tablespoons cane sugar syrup or corn syrup
  • 1 tablespoon water
  • 1/3 cup peanut butter
  1. In a large bowl, mix together the oats, sugar, flour, salt, cinnamon, raisins, almonds, and coconut. Set aside.
  2. In a second bowl, whisk together the melted butter, vanilla, maple syrup, cane sugar syrup, and water.
  3. Add the wet ingredients to the dry ingredients, along with the peanut butter, and stir until the mixture is moist.
  4. Press into a 9-inch baking pan coated with cooking spray. If it’s sticky, place a piece of plastic wrap on top so you can easily press the mixture into an even layer.
  5. Bake at 350 degrees F for 40 minutes.

Note: Our bars came out a bit crumbly. I would add a little more liquid sweetener or water next time, for even better results!

Kid Granola Bars (3)

Leaf-Shaped Crayons

Leaf Crayons (5).JPG

Back-to-school plus a drop in the temperature around here has us thinking about all things fall, even though it’s not quite autumn yet. Making leaf-shaped crayons was the perfect way to kick off the season!

First, we dumped out all of our crayons and I asked Travis to help me select the ones in fall colors – browns, oranges, yellows, and reds. This was a nice reminder for him of the upcoming season and what we can expect to see on the trees.

Leaf Crayons (1)

Grown-up step: peel the paper from the crayons. (Note: making a slit with an X-acto knife first helps).

Travis was a big fan of helping to snap the crayons into small pieces!

Leaf Crayons (2)

We filled a leaf-shaped silicone mold (available at craft stores or Amazon) with the small pieces.

Leaf Crayons (3)

Place in the oven at 300 degrees for 15 to 20 minutes, until the crayons are completely melted. It will help to place your silicone mold in a larger baking dish, so you can easily remove from the oven.

Leaf Crayons (6)

Let cool completely, then pop the crayons from the mold and get drawing!

Leaf Crayons (7)