Destination: Meow Cat Parlor

Meow Parlor (2)

Here’s the latest in my series of day trips for children if you’re in the New York City area. Meow Parlor was the first cat cafe in New York, modeled after similar spaces in Japan. The idea is to go in and spend time with cats, who are all available for adoption.

If you’d like to visit Meow Parlor with kids, plan in advance! There are only special time slots available to children ages 8 and under, including select weekdays at 4 p.m. and every other Sunday at 11 a.m. You have to book online in advance.

With our reservation underway, we headed off to the city.

We arrived a little early, which gave us the opportunity to check out the sister store next door, the food component of the Parlor. Travis was ecstatic to try his first vegan croissant!

croissant

Then we headed next door to play with the cats. There are only 10 to 15 cats on site at a time, making it feel manageable and intimate for both humans and felines.

Meow Parlor (1)

The cats have ample room to roam around, get up high, and sneak behind custom-designed cabinets with multiple entrances and exits, so none ever seemed bothered by even very loud or assertive children in our group.

Meow Parlor (6)

Travis was over the moon. The hour passed surprisingly quickly, between petting cats, dangling toys for those who wanted to play, and simply marveling at their antics.

Meow Parlor (7)

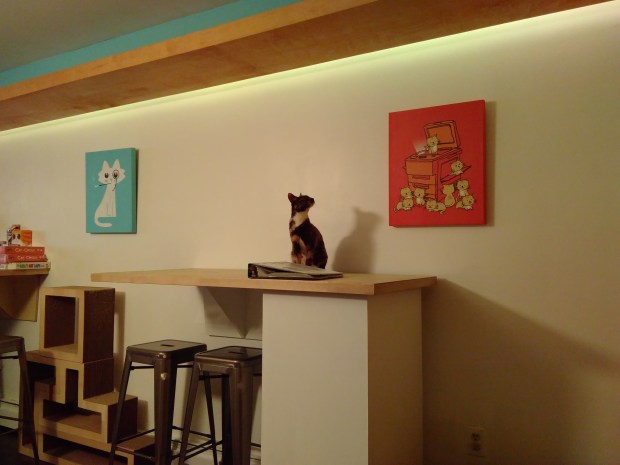
For kids who want additional stimulation, the Parlor provides crayons and markers, books about cats, and pictures of successful adoptees.

Meow Parlor (8)

We couldn’t take a cat home today, but we loved the experience! We capped off our city afternoon with brunch at the mainly-vegan Dirt Candy before heading home.

Trip Date: February 2018

Ages: 0 to 8 (designated times only), 9+ (any time)

Useful Links:

Giant Medals

Giant Medal (10).JPG

The Olympics are well underway, and we’ve already had fun making our own bobsleds and dining on medal cookies. These medals aren’t for eating, but they make for fantastic pretend play if your little athletes want to climb up onto the podium!

First, find a circular object to trace for the outline of your medals – go for big here, the idea is a giant medal!

Giant Medal (1)

Next, we piped designs onto our medals with puffy paint. Older kids can get very detailed with this – writing out 1st, 2nd, or 3rd, or the year, or making laurel leaf designs. Travis just adores squirting puffy paint, so I knew his would take forever to dry, and put together a few medals with a lighter hand on the puffy paint.

Giant Medal (2)

Set aside to dry.

Giant Medal (4)

Next our medals needed a metallic coat of paint. We only had silver and gold, but you can add a bronze or coppery-colored one if you have it!

Giant Medal (5)

Again, Travis was heavy-handed on the paint, but I loved watching his enjoyment of the project, and set aside a few more useable medals. We left them to dry overnight.

GIant Medal (6)

In the morning, we punched a hole into the top of each medal and threaded red ribbon through.

Giant Medal (8)

And the medal goes to…!

Giant Medal (9)

Felt Play Mat

Felt Mat (7)

Felt play mats are a great way to occupy the kids while you’re getting work done around the house or cooking dinner. Set out a large sheet of felt for each child, along with customizable mix-and-match pieces, and let the entertainment begin!

My original plan for this game was to set Travis up with a Medieval castle scene, but he wasn’t that interested. Instead, we recreated objects from his current favorite show, Fireman Sam.

Felt Mat (1)

I let Travis decide which pieces he wanted, and cut them from corresponding felt colors – red firetrucks, yellow houses, green trees (“and we need brown trunks!” Travis made sure to add), blue water etc.

Felt Mat (2)

Kids who are 5 and up should be able to cut out their own felt pieces, but Travis was excited just watching me to so!

Forgive my lack of artistic skills, but here was our mountain rescue center with a radio and “flares.”

Felt Mat (4)

Once we had enough pieces, the play began! We had a little orange “fire” that could be moved around the scene, and his firetruck rushed in to the rescue.

Felt Mat (3)

We decided we did need a few people, so added Playmobil figures.

Felt Mat (10)

As he played, I added further shapes like a castle, a pond with fish, and a few more nature elements.

Felt Mat (9)

Now he could mix and match games and create imaginative tales to his heart’s content!

Felt Mat (8)


Forced Perspective Photos

Perspective Photo (1)

For kids who love playing with cameras and learning about photography, this nifty trick is a great way to sneak in learning with the fun. Stage photos with one object near the lens and one person far away for a lesson on perspective!

The idea is to show your child how something close to the lens looks giant, and something further away looks smaller. You can have lots of fun with this, holding up your child’s toys near the lens, and staging various scenes, as with Travis blowing up a giant balloon, above.

And here he is hoisting a whole helicopter!

Perspective Photo (2)

Here’s one that didn’t work quite so well, trying to push a police car out of the way:

Perspective Photo (6)

He got such a kick out of seeing the photos as we scrolled through after, and wanted a chance to try as well.

Perspective Photo (3)

I can’t say that his snaps with the Instax instant camera came out perfectly, but he sure had fun trying!

Perspective Photo (5)

What silly scenes will you capture to show perspective? Please share ideas in the comments!

Perspective Photo (4)

Creamy Tomato & Sausage Pasta

Sausage Pasta (1)This hearty pasta is a crowd-pleaser for grown-ups and kids alike. Weeknight dinners are solved, at least in this house!

Ingredients:

  • 12 ounces penne pasta
  • 1 tablespoon olive oil
  • 2 Tofurky Italian sausage links, finely chopped
  • 5 ounces baby spinach, chopped
  • 1 and 1/2 cups jarred marinara sauce
  • 1/4 cup plain non-dairy creamer
  1. Cook the pasta according to package directions. Drain, reserving 1/4 cup cooking liquid, and set aside.
  2. Meanwhile, heat the olive oil in a large skillet over medium-high heat. Add the sausage and cook for 4 to 5 minutes, until browned.
  3. Add the baby spinach; cook for 1 to 2 minutes, until wilted.
  4. Stir in the marinara sauce and creamer. Bring to a simmer.
  5. Add the pasta and the reserved cooking water, tossing to combine.

Sausage Pasta (2)

Moving Dollar Trick

Moving Dollar (2)

We always love to find new spins on our magnet play, so I thought Travis would enjoy the humor behind this little trick. It’s fun on any random afternoon… or file this one away for April Fools!

To set up, you’ll need two neodymium magnets, the small metal silver ones. I have no idea if our fridge magnets are actually neodymium, but they worked just fine! Tape one magnet onto a dollar bill.

Moving Dollar (1)

Tape the other to a piece of string; make sure to tape securely, as these magnets are strong.

Moving Dollar (5)

Now place your dollar on a table, and clip the magnets together underneath the tabletop. To fool any passer-by, ask them to pick up the dollar, then gently tug on the string to move it away from the other person’s hand. The key here is to tug gently or the magnets may pull apart from each other.

Moving Dollar (4)

Travis loved the trick! He had to move our dollar around the table in all directions and loved snapping the two magnets together again from underneath the table.

Moving Dollar (3)

We weren’t truly trying to trick anyone, so a piece of blue twine worked just fine. If you’re in it for the trick, make sure you use a clear-colored thread that will be nearly invisible, and act as casual as possible.

Either way, this is a neat method to show how strong magnetic attraction can be, even through a tabletop!

Pumpkin Emotion Learning Tool

Pumpkin Emotion (7).JPG

Okay, we probably should have made this jack o’ lantern-themed craft back in October, but it was still cute to play with here in February! With a lot of big preschooler emotions going on lately, the craft is a fantastic way to get talking about emotions, facial expressions, and sorting through the big feelings your kids might be feeling, no matter their age!

The first step is to upcycle an empty baby wipes container (the kind in a plastic bin), by covering it with orange felt.

Pumpkin Emotion (1)

We tried using regular school glue, but waiting for it to dry proved too much for Travis, so I hot glued the felt on.

Pumpkin Emotion (3)

Next, I set out craft sticks and asked him to help me brainstorm emotions. In addition to common ones (sad, happy), he said a few that made me laugh, like “when I’m waiting to play with Daddy’s camera stand.”

Pumpkin Emotion (2)

Next, I cut shapes out of black felt to go with the emotions we had created, and set all the pieces out in front of him.

We put our craft sticks in the top of the wipe container, and pulled one out – “surprised” was the first.

Pumpkin Emotion (8)

I asked Travis which mouth went with surprised, and so on. This turned into a great game not only for identifying the emotions we feel, but also what other people look like when they experience those emotions.

Pumpkin Emotion (5)

And of course, it’s just fun to set up the pumpkin with silly faces.

Pumpkin Emotion (6)

As a bonus, all of your craft sticks and felt pieces will store inside the wipe container when you’re done, ready for the next time you want to play.

Pumpkin Emotion (9)

Yogurt Hearts

Yogurt Hearts (4)

This sweet idea from our February issue of Ranger Rick Jr. was just one way to eat hearts this Valentine’s Day. And of course you can make them any day you want to share some love!

I set up a plate with two heart-shaped cookie cutters, one large and one small, and a container of non-dairy yogurt – for the prettiest result, choose a red berry flavor like strawberry or raspberry.

Yogurt Hearts (1)

Travis was a great helper scooping the yogurt into the big heart, and I filled up the trickier small one.

Yogurt Hearts (2)

Put in the freezer for 2 hours, until firm. If you need to, run a little hot water around the cookie cutters to release your hearts.

Yogurt Hearts (3)

The middle of the heart stayed a little mushier, more like soft-serve ice cream, and we worked our way out to the more frozen edges.

Yogurt Hearts (5)

Yum!


Pizza Hearts and Sweet Stuffed Celery

Pizza Hearts (4).JPG

Here’s the perfect little lunch to put together for your kids this Valentine’s Day! Serve it at home, or pack it up for school; it travels easily in the compartments of a lunchbox.

For the deli slices, you can use a good vegan pepperoni (such as Yves Veggie) if your children like the taste. My son finds pepperoni too spicy, so I use milder deli slices from Field Roast, torn into small pieces.

Ingredients:

  • 1 pound refrigerated pizza dough
  • 1/3 cup pizza sauce
  • 1/2 cup shredded Daiya mozzarella
  • 1 package vegan deli slices or pepperoni
  • Celery sticks
  • Non-dairy cream cheese
  • 1 red bell pepper
  1. To prepare the pizza hearts, divide the dough in half. Working with one half at a time, roll into a 14×7-inch rectangle. Spread the dough with half of the sauce, leaving a 1/2-inch border free of sauce along one long edge.
  2. Sprinkle with 1/4 cup cheese, and cut the rectangle into 10 strips. Top the strips evenly with half of the pepperoni or deli meat.
  3. Roll up two strips towards the unsauced end, leaving the end unrolled, and place next to each other on a baking sheet lined with parchment paper. Pinch the tips of the “heart” together to seal. Pizza Hearts (1)
  4. Repeat with the remaining strips, and then repeat steps 1 through 3 with the remaining half of the dough for 10 hearts total.
  5. Bake at 425 degrees F for 18 minutes, until cooked through.
  6. To prepare the stuffed celery, fill celery pieces with your favorite vegan cream cheese.
  7. Wash and core the bell pepper. Using a small heart-shaped cookie cutter, punch out heart shapes and top each celery piece with a heart.

Pizza Hearts (2)

Hope your kids eat their heart out!

Pizza Hearts (3)

Friendship Heart Necklace

Friendship Heart (13)

Here’s the final craft we’re putting together this Valentine’s Day, this time thinking of a few special friends. Even if it’s not Valentine’s, this is a great craft to ask your kids who their best friends are, and to talk about budding concepts of friendship and the emotions that go with it. Also, the idea of keeping half of something for yourself and giving the other half away was a bit novel for my preschooler, so I’m glad we did the activity!

First, we needed simply to have fun with clay! Travis has become quite adept at rolling clay between his hands to form a ball.

Friendship Heart (1).JPG

From here, I showed him how to flatten the balls into discs, and I asked him how we might cut out a heart shape. You can just use cookie cutters, but Travis is very into his chisel tool, so we chiseled. It helped if I made the outline of a heart for him to follow, first.

Friendship Heart (3)

Next, chisel each heart in a zig-zag down the middle, so you have two halves for each one.

Friendship Heart (7)

Punch a hole into each heart piece near the top with a chisel or straw, then let the clay air-dry overnight.

Friendship Heart (8)

The next day, we decorated. First, Travis applied a coat of watercolor. He decided the jagged halves looked a bit like teeth, ha!

Friendship Heart (10)

Then we painted on a layer of tacky glue so he could adhere beads and confetti pieces. Glitter would be pretty, too.

Friendship Heart (11)

We had the perfect beads with letters on them that could be used for friends’ initials, a great find in the craft bin!

Friendship Heart (12)

I cut strands of colored twine for necklace strings, and then our friendship hearts were ready to be shared with good buddies.

Friendship Heart (14)