Rolling Wheels

Rolling Wheels (3)

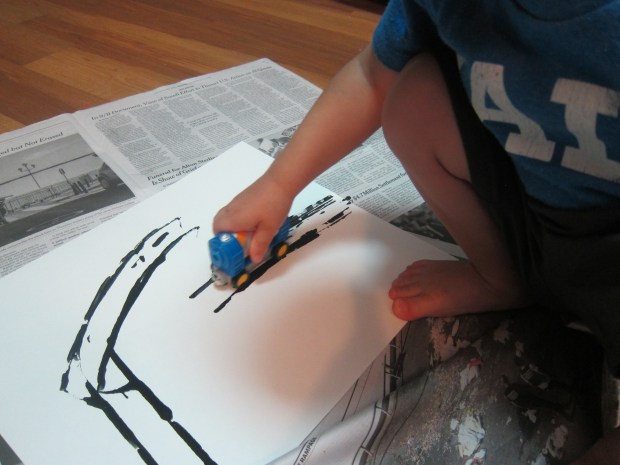
I have yet to meet a little boy who didn’t love all things with wheels – buses, cars, trucks, bulldozers – you name it! So what better way to paint than to create “tire tracks” in your own home?

Tuck the paintbrushes aside for the day, and instead set a variety of small trucks and cars alongside paper plates or foil pie tins filled with a different paint colors. Black is an obvious choice, to make authentic-looking tire tracks, but we had fun with green and orange paint too. Sturdy construction paper or poster board are good for this project.

Rolling Wheels (1)

Travis loved dipping his cars in the paint, and seemed surprised every time he saw the resulting color on the page, after giving a vroom. “It’s green!” he would declare with delight.

Rolling Wheels (4)

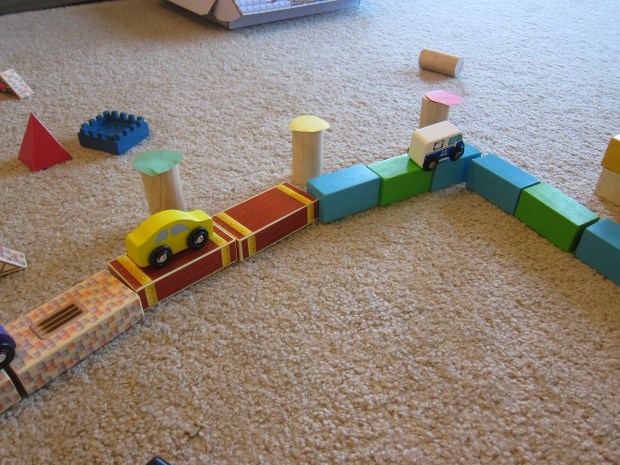
For variety, try using cars with wheels of varying thickness. A Brio train made nice big tracks.

Rolling Wheels (5)

When we were cleaning up, Travis invented a new method of painting: he dipped a wet wipe in the paint trays and rubbed all over the newspaper we had layered on the floor – quelle artiste!

Rolling Wheels (6)

Pirate’s Treasure

Pirate's Treasure(6)

Travis has lately been enthralled with finding “gold” rocks, leading to rock hunts all around our courtyard and when we visit the beach. Usually, I call any yellow or white ones we find “gold” rocks to make them special… but I decided to give Travis a real surprise at home!

Although normally it’s fun to do paint projects with your toddler, do this one while they’re sleeping – shh, it’s a surprise! Paint various rocks yellow (if your child still puts objects in his or her mouth, make sure they are too big to be choking hazards). For even truer color, you can spray paint them gold, but I have yet to find a spray paint that’s vegan. Let the rocks dry overnight.

The next day, bury them in a sandbox. If you’re indoors, a pan filled with coarse salt, oatmeal, or even flour makes a great sand substitute.

I told Travis I had a special surprise for him, and handed him a shovel. The hunt begins…

Pirate's Treasure (1)

What’s that he sees?

Pirate's Treasure (2)

The joy on his face was absolutely priceless.

Pirate's Treasure (3)

He was so ecstatic from having found “real” gold rocks that he hardly knew what to do with himself. He reburied them a few times so he could dig them up again, and then we played with them all around the house.

Pirate's Treasure (5)

I can think of a few ways to expand the game: creating a “treasure chest” to keep them in; pretending to be pirates on an island… Let me know what variations you and your child come up with in the comments!

Backyard Grill

Backyard Grill (9)

This one’s a little complicated, parents, but I promise it’s worth it!

The idea came from our August High Five magazine, and although I wondered if Travis would understand the concepts – we’ve never grilled dinner with him! – he has lately been very curious about the grills in our building’s courtyard, and took to the whole game with alacrity.

You’ll need to do some set-up the day before. Cut sponges into circles and have your child paint some brown and some yellow to make (veggie) burgers and buns. Our yellow is on the brown-ish side anyway, but if yours is bright yellow, you might want to tone it down with a drop of brown for better bun color.

Backyard Grill (2)

Travis had a blast painting the sponges, proudly saying, “We’re making burgers!” Make sure to let dry overnight – the sponges will absorb a lot of paint.

Backyard Grill (1)

While he slept, I did a little mommy work: roll toilet paper tubes in yellow tissue paper, and tuck in the ends. Add a piece of green tissue paper to one side, securing with tape; twist the overhanging end and secure with a rubber band. Draw on corn kernels with brown pen. Now you have corn on the cob!

Backyard Grill (7)

If your child is a preschooler instead of a toddler, they can probably help out with this part too!

Backyard Grill (10)

In the morning, I told Travis we were setting up the grill, and he was so excited. We used castle blocks as the base, but any blocks or Duplo you have around the house will work. We crumpled up black construction paper for charcoal, and then I told Travis we needed to add fire so our grill would be hot like the oven. He loved adding wads of red and yellow tissue paper, and helped me blow on the coals to start our fire!

Backyard Grill (3)

We added a cookie rack as the grill itself. Then it was time to cook our burgers!

Backyard Grill (4)

Travis became an expert burger flipper:

Backyard Grill (5)

Added green tissue paper “lettuce”:

Backyard Grill (6)

And liked the corn even though he seemed very unsure what it was:

Backyard Grill (8)

And after about 20 minutes of good fun, toddler happened:

Backyard Grill (11)

A good ending!

Shoebox Golf

Shoebox Golf (3)

Develop hand-eye coordination with this toddler version of mini golf, no golf club required!

For visual fun, decorate the inside of a shoebox lid with crayons, before cutting a hole in the center large enough for a golf ball or ping pong ball to roll through. Travis wasn’t a fan of coloring the lid because he kept running up against the edges, so I designed a mini golf course for him – grass and a flag!

Shoebox Golf (1)

Use masking tape to secure the lid, upside down, on top of the shoebox, and place the ball inside. Now show your child how to maneuver the lid until the ball drops through the hole – goal!

Travis had a hard time gripping both the lid and box at the same time, so we actually just took the top off, and let the ball drop onto the ground with each goal. This method also eliminates the need to untape the lid every time your toddler “scores” and retrieve the ball from inside the shoebox, so I think it’s a better solution all around. Try it both ways and see which you prefer!

Shoebox Golf (2)

Apologies for the blurry photos – all our pics were action shots for this game, of course!

What other shoebox games have you and your toddler come up with? Let me know in the comments!

Horse-Themed Day!

Horse Theme (1)

Occasionally, I’ll introduce a “theme” for the day, a nice way to give a loose structure to our play and spark ideas for creativity. Travis and I made today all about horses!

As a fine motor skills project, I thought it would be fun to use yarn as the mane on a coloring book cut-out of a horse. Surprisingly, since he loves yarn, Travis wasn’t in the mood to do the gluing or pressing down of the yarn, but it was a great way to introduce ‘mane’ into his vocabulary. He then enjoyed finishing the picture with watercolors (his request!) and crayons.

Horse Theme (2)

For gross motor play, I turned an old wrapping paper roll into a “hobby horse,” taping it closed at intervals and adding play scarves as the mane. Travis ignored the game in the morning, but surprised me mid-afternoon by picking the tube up and trotting about the apartment.

Horse Theme (4)

To add to the fun, we sang familiar horse ditties (“Trot Trot to Boston” “This is the Way the Ladies Ride”) as he galloped around.

Horse Theme (3)

To round-out your horse-themed day, pull out other toys around the house that contain horses (plastic barns and toy animals, stuffed animals etc). You can also read any books you have at home about horses.

Horse Theme (5)

And to end the day on a sweet note, sing ‘All the Pretty Little Horses’ as a lullaby!

Cloud Blobs

Cloud Blobs (4)

This simple art project was a fun way to introduce Travis to the idea of cloud-watching, and is also great for sparking imagination.

Use any dark-colored construction paper as the background, since you’ll be using white paint. I chose blue and black so we could have clouds in both a “daytime” and “nighttime” sky.

Have your toddler dip a spoon into the white paint, and drizzle in the middle of the paper. Travis was very into the novelty of using a spoon instead of a brush, and needed to cover a few more sheets of paper once we’d completed the project itself.

Cloud  Blobs (1)

Fold the construction paper in half and smooth down, then open back up again – you’ll have a “cloud” blob of white paint. Encourage your child to tell you what he or she sees in the image. I joked that this was a little like a toddler Rorschach test!

Cloud Blobs (3)

To wit, I thought our cloud on blue paper looked like a bee, but Travis told me he saw an octopus. If you like, have your toddler use white crayons (or other colors) to embellish the paintings, but Travis mostly lost interest at that point.

Cloud Blobs (5)

To end the fun, we took a trip outside to look at real clouds, and I encouraged him to spot shapes in the sky as well. Overall, a nice introduction to the wonderful art of cloud-watching!

Cloud Blobs (2)

Flags for Breakfast

Flags for Breakfast (4)

Get patriotic with this adorable American flag breakfast! My husband has proudly taught Travis to say the words “American flag” so he was very excited to recreate one in our kitchen.

Toast one slice of whole wheat bread, and spread with about 1 tablespoon non-dairy cream cheese. Even the littlest toddlers can help with this part, although you’ll likely have to spread to the edges.

Flags for Breakfast (2)

Add four stripes of strawberry jelly across the toast with a small spoon. If you’re child is old enough, they can help out with this part as well!

Flags for Breakfast (3)

Finally, arrange blueberries in the upper corner of the toast for “stars.” Travis loved helping with the blueberries, even if they didn’t all quite make it to the right place.

The taste brought a huge smile to his face – a sure winner for Independence Day and beyond.

Happy 4th!

Fireworks Circle Prints

CIrcle Prints (5)

This easy art project is a fun way to talk about a specific shape. Travis and I used circles, but if you’d rather focus on squares, triangles, or any other shape, it lends itself perfectly!

For the circle version, seek out a variety of round items in your home that you can dip into paint – jar lids and small (washable) circular toys work well.

Circle Prints (1)

Fill pie tins or paper plates with paint in two or more colors, and show your child how to press the circular objects in the paint and then onto the paper. Travis quickly picked up on the fact that we were making only circles, and had fun playing with the different sizes and making small circles inside larger ones.

Circle Prints (2)

Although we used purple and red paint for this project, the purple was so deep it dried nearly blue. When Travis had finished, I realized the resulting, overlapping circles looked like fireworks bursting in air!

Circle Prints (4)

It turned out to be very appropriate for so soon before the Fourth of  July, and will hang on the fridge in celebration for the next week or so.

Toy Airplane

Toy Airplane (5)

Here’s a trick for when you need to devote your attention to packing up for vacation – but have a toddler to entertain in the meantime! Pick an easy craft, ideally one where not only the end product but also the various components used during construction make for a great solo play.

Since we’re headed on vacation, I figured what better craft to make than a toy airplane?

Cut two slits in the sides of a paper towel tube. Cut “wings” from poster board, and slide into the slits. Squirt a little glue in the bottom of a paper cup and attach to one end of the tube as a “cockpit.” Make sure you let the glue dry before moving on to decoration!

Travis enjoyed helping glue on pieces of old tissue paper with a glue stick.

Toy Airplane (4)

If you have the time, add windows or other airplane embellishments with markers. We skipped that part, and probably for the best; in full honesty, Travis soon discovered it was more fun to tear the tissue paper off his plane than it had been to glue it on!

Toy Airplane (7)

As mentioned, although the assembly of this craft is largely for adults, the supplies (poster board, a few extra paper cups, tissue paper), are all materials that foster great creative play in toddlers. Travis was very happy with his crafty items while I went about packing. The paper cups in particular were a huge hit, both for stacking and for playing games of “kitchen.”

And then of course there’s the plane itself! Travis loved piloting his plane from on top of my suitcase:

Toy Airplane (2)

And while running around the apartment:

Toy Airplane (6)

It also makes for great shadow play. And now, bon voyage!

Toy Airplane (1)

Traffic Light

Traffic Lights (3)

This week, I made red, yellow, and green “traffic” lights, which lend themselves to so many games! The set-up is easy, although just for the grown-ups. Cut red, yellow, and green construction paper to fit paper plates, and staple on. If you like, secure a popsicle stick handle to the back of each with duct tape.

Travis’s favorite game by far with these props was to drive a “car” past the traffic lights. I made him a small cardboard “wheel” and he ran about the room driving an imaginary car. When he passed the green sign, it was time to Go! full speed.

But if he passed yellow, he had to slow down.

Traffic Lights (2)

When he reached the red stop sign, it was time to stop of course, until I shouted ‘Go!’ again.

Traffic Lights (1)

You can also make mini versions for toy cars. I taped small red, yellow, and green circles to a few of Travis’s blocks to line the roadway of the block city we built.

Traffic Lights (5)

Another fun option – and a way to get your kids exercising – is to play music while holding the signs. Your little one gets to dance fast when you hold up green and slow for yellow. Here’s Travis racing about in a fast jig:

Traffic Lights (8)

And here he is doing a very careful, slow bell dance:

Traffic Lights (7)

Then they need to freeze when you hold up the red. You could also press pause on the music you’re playing, for added effect.

Once all those games at home are done, tuck the signs into your diaper bag and bring along for a car ride. Ask your child to be your traffic cop, holding up the red sign when you come to a red light, and the green when the light changes.

Traffic Lights (9)

Ready, set, go!