Water Beads Sensory Bin for Boats

Water Bead Boats (1)

How had I possibly forgotten about water beads? They’re one of the greatest ways to keep a toddler busy plus engage them in sensory play, but I literally had forgotten they exist. Well, a friend happened to remind me, and it was high time for Veronika to get her first experience with this awesome material.

If you’re not familiar with water beads, they start out the size of about a mustard seed, but expand overnight into marble-sized squishy balls. Look for them in the floral section of craft stores. As with all small, round objects, supervise play closely to avoid choking.

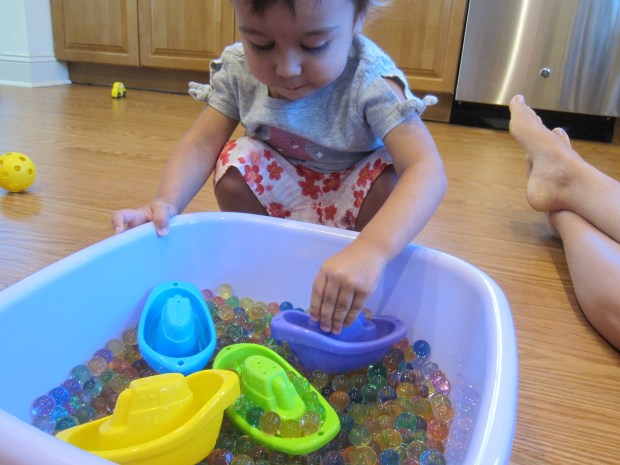
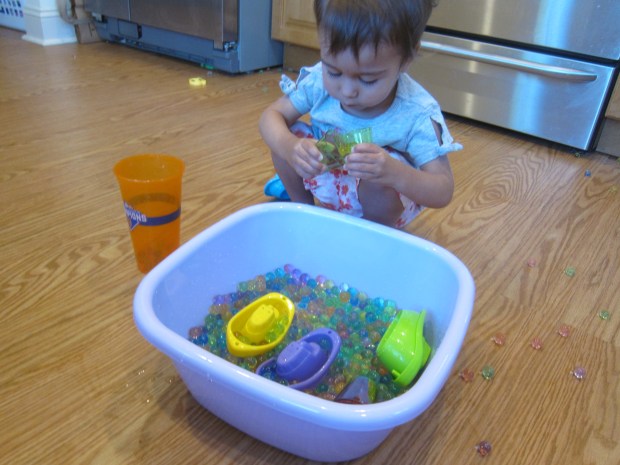
I soaked the water beads in a bin and then in the morning we added… boats! I thought the maritime theme would be perfect for summer.

Water Bead Boats (2)

Veronika loved that she could sail the boats through the beads. She also loved loading the beads into one boat and then pouring them into another.

Water Bead Boats (4)

At first our bin didn’t exactly look like an ocean since I had all the colors of the rainbow. I started to separate out just the blues and greens. It was starting to look a bit more like the Atlantic…

Water Bead Boats (5)

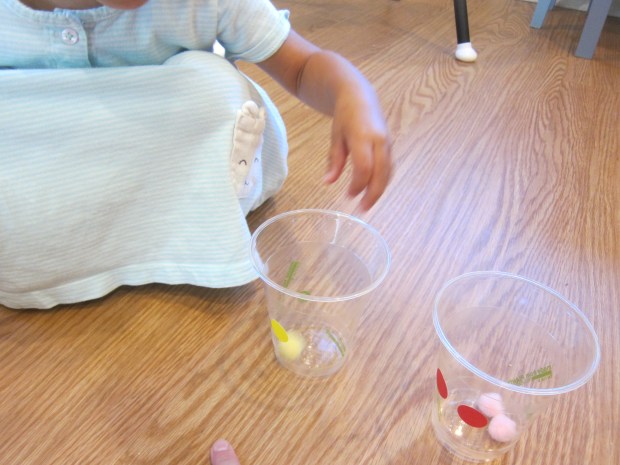
I didn’t finish the task, though, because then Veronika wanted the cup I was filling with the non-ocean colors so she could practice her pouring and scooping.

Water Bead Boats (6)

She then started carrying some of the beads around in the cups, at which point I had to direct her back to the bin. Because yes, the one problem with water beads is that they get real messy if you let them escape!

Water Bead Boats (3)

Pull Box

Pull Box (3)

Your toddler will be so proud of this little box, his or her very own toy to pull, push, fill, or play with any way they see fit. Veronika dubbed it her “wagon”, and played with it all morning.

And all I did was pierce a hole in an old box and loop a piece of string through. (Note: thick rope would have been easier for her to grip onto, since the string was a bit slippery. I solved this by wrapping a little masking tape near the top almost as a handle).

Pull Box (1)

I asked if she wanted to decorate the box with crayons, but the lure of tugging it around was too great. She was off!

Pull Box (2)

At first she had to walk backwards and pull it towards her. As the day went on, she mastered the art of facing forward and tugging it along behind her.

Pull Box (7)

After a few trips around the house, we took it outside!

Pull Box (8)

Her “wagon” was prefect for filling with treasures we found along the way, like little pebbles, flowers, and leaves.

Pull Box (5)

Back inside, it was the perfect spot for her dolls to ride in.

Pull Box (10)

She loaded it up with her favorite doll and other toys and walked circles around the apartment for at least half an hour. A box and a string, that’s it folks!

Grocery Store

Grocery Store (2)

I’ve been saving up empty snack boxes from our pantry for a few days so that Veronika could go shopping in her very own grocery store! Toddlers love to be just like mommy or daddy, so I knew she would love being able to do the “shopping”.

Save up empty boxes (think: crackers, cereal, snack bars, etc.), and tape closed securely with duct tape. You could also include empty juice or water bottles, and some play food. We added fruits and veggies from Veronika’s kitchen set for a “produce section”.

Grocery Store (1)

I gave her a small paper bag and then set her loose in her little store! “Look, crackers!” Veronika said when she saw the “shelves”. I showed her how to put an item in her bag and then keep shopping.

Grocery Store (4)

She was mildly frustrated a few times to learn that favorites (ahem, fruity bunnies) were empty and not really there for a snack. But then she loved going through the veggies and filling up her bag.

Grocery Store (5)

Then she headed over to her kitchen to unpack! This is a fantastic activity to get a toddler playing, imagining, and helping.

Grocery Store (6)

Giant Tissue Paper Sensory Bin

Tissue Paper Sensory (4)

Sure, you can give a baby a bag filled with tissue paper and consider that a sensory activity. But you’re not going to impress your toddler with something so mundane! Nope: today I made tissue paper play on a giant scale for Veronika!

I emptied out one of our toy storage containers, then took out a bulk package of tissue paper. Veronika was immediately delighted by all the thick piles of color.

Tissue Paper Sensory (2)

I showed her how to separate out a thin sheet of tissue paper and crumple it up, then toss it into the bin. This was of course a delight. “Clean up clean up!” she started to sing, which made me laugh since we were of course just making a mess.

Tissue Paper Sensory (3)

Once we had filled the bin deep with crumpled paper, I lifted her up and set her right inside.

Tissue Paper Sensory (5)

She looked so surprised! She kicked her feet and ran her fingers through the pieces. But then surprisingly she preferred to be back on the other side, tossing sheets of tissue paper in.

Tissue Paper Sensory (6)

We set aside sheets of tissue paper just to crumple and kept them out of the container so we could toss them in the air.

Tissue Paper Sensory (8)

Whether in the bin or out, this game was a delight!

The Floor is Lava!

The Floor is Lava (7)

Veronika is learning how to hop, and this silly game is the perfect way to add a little imagination into the mix.

I taped down sheets of construction paper in all the colors of the rainbow; technically you can use only one color, but this meant I could throw in a little color learning with the jumping.

The Floor is Lava (4)

In retrospect, I should have done the set-up while Veronika was napping. She was eager to “help”, asking for pieces of tape, and I had to work quickly before she pulled pieces of paper off the carpet in curiosity!

The Floor is Lava (5)

But phew, we laid out all the paper pieces, and then I announced, “Oh no! The floor is hot lava. Quick jump onto the islands!”

The Floor is Lava (3)

Well of course she doesn’t know what hot lava is, but she sure felt my excitement and saw my speed and watched me jump on a piece of paper. “Jump!” she said, and hopped onto purple.

The Floor is Lava (2)

Can you jump to blue?” I asked her, and she happily jumped over (“jumped” being a relative term, still more of a quick walk/hop). She loved going from piece to piece, and naming the color. If her feet were on the rug I reminded her, “Oh no the carpet is hot lava!” This had her giggling and playing along.

The Floor is Lava (8)

This is the kind of game that’s great to pull out periodically, and I have no doubts we’ll play again. Older toddlers will be even more into the role play portion (eek, lava!) and will hone their jumping skills each time.

It’s a perfect way to get out some energy when kids feel cooped up, too!

Skin Therapy Play Dough

Skin Therapy Play dough (6)

This is the softest play dough in the world, thanks to a recipe based on silky quick oats with zero salt. It’s a great homemade alternative store-bought play dough. Just note that because there is no salt, it will only last for a day or two.

To make the play dough, stir together 1 cup flour, 2 cups quick oats, and 1 teaspoon vanilla extract. Add 1 cup water and 2 tablespoons olive oil, stirring to form a dough.

Sprinkle on extra flour as needed, if the dough is still a little sticky.

Skin Therapy Play dough (1)

You can add food coloring, but we decided to leave ours natural. I liked this because it really looked like cookie dough! But instead of mommy using it all up for cookies, this dough was all Veronika’s to play with.

Skin Therapy Play dough (2)

She loved using it with a play dough kitchen set, including pots and pans, cookie cutters, and little spoons and knives.

Skin Therapy Play dough (3)

We even rolled up mini cookies.

Skin Therapy Play dough (5)

She later transferred the dough over to her tea set, and was pouring cups of play dough “tea”.

Skin Therapy Play dough (7)

This kept her busy for so long! And I loved knowing how natural and safe it was for her skin and hands.

Skin Therapy Play dough (4)

Wave Bottles, Three Ways

Wave Bottle (8)

Summer means lots of empty sparkling water bottles in our house, and before recycling them I wanted to turn a few into fun sensory bottles for Veronika. There are so many ways to do this, and here were three I put together as a set this morning. She loved going back and forth between them all day!

For version number one, I filled a bottle 1/3 of the way with water. Add a drop or two of food coloring, then some fun items to swirl around; we used large glitter and small pony beads. Fill the rest of the way with baby oil. Seal the cap with hot glue.

Wave Bottle (1)

She loved this one, immediately delighted by the colors and shine.

Wave Bottle (2)

“Look at the beads!” she said, watching things swirl around.

Wave Bottle (3)

For version number two, I used a larger 1.5 L bottle. Fill the bottle 1/3 of the way with water. Add a few spoonfuls of tempera paint (we used red), then add 1/3 cup dish detergent. Seal the lid with hot glue. Shake it up and watch the colored bubbles!

Wave Bottle (4)

She loved how bubbly this one was.

Wave Bottle (5)

It was also fun to roll it on the floor and give chase!

Wave Bottle (6)

For the final version, I snipped a few pieces of brightly colored yarn to about 6 inches in length. Add to an empty bottle, add water, and seal the cap with hot glue. Now the yarn lengths dance and swirl in the bottle. They almost look like jellyfish!

Wave Bottle (7)

She loved watching this one. The more you swirl it, the better the yarn “dances”. I loved watching her move the bottles around all day, sometimes rearranging them on shelves, or shaking them, or just picking them up in her playroom and looking at them. A great way to fill those summer hours!

Wave Bottle (9)


Pompom Counting Fun

More Pom Pom Fun (3)

Veronika and I have been exploring early math concepts lately, and here was another fun way to do so using simple materials that she loves: stickers, plastic cups, and pompoms!

I marked three clear plastic cups with dot stickers, each cup with a different color. The first cup had 1 yellow sticker, the second had 2 red stickers, and the third had 3 blue ones.

More Pom Pom Fun (1)

I then showed Veronika the one dot on the first cup, and told her there was one sticker. “Can you add one pompom?” I asked her. I chose to color-coordinate the pompoms to the dot stickers for clarity, but you don’t have to.

She dropped in one pompom!

Now I held up the second cup and we counted the stickers. One sticker, two stickers. “Can you add two pompoms?” Plink plink into the cup!

More Pom Pom Fun (2)

We repeated for the third cup with three pompoms. Obviously I was directing the game very clearly, which helped her get each answer “right”; don’t expect a toddler to do this game solo. But the activity reinforces the notion of counting up, and that numerals are attached to a tangible amount.

More Pom Pom Fun (4)

It would be been coldhearted not to let her play with the extra materials after that! There were more stickers she could happily dot onto extra cups, and lots more pompoms to play with and keep herself busy for a while.

More Pom Pom Fun (6)

While we were at it, we could talk about a few opposite concepts, like over the cup and under the cup.

More Pom Pom Fun (7)

So this activity is definitely a winner.

More Pom Pom Fun (8)

Wet and Dry Sensory Play

Wet and Dry Sensory (4)

Veronika is at the age where’s she’s starting to understand opposites: empty and full, tall and short, loud and soft, etc. Here was a fun pair to play with in a sensory way: wet and dry!

We started with a shallow tray of dry oatmeal on the kitchen floor. She immediately ran curious fingers through the flakes of oats and loved the sensation. We talked about how the material was very dry and soft.

Wet and Dry Sensory (1)

I asked her to help me pour a little water from a measuring cup onto the oats. Whoops, the first cup went all over the floor! So I carefully poured a second cup of water into the oats without toddler “assistance”.

Wet and Dry Sensory (2)

Now they began to clump together and grow softer. But oh no, she didn’t like how it stuck to her fingers!

Wet and Dry Sensory (3)

We rinsed her off, dumped that batch, and then poured in a new dry material. I had intended to use cornmeal, but was all out. Dry breadcrumbs worked in a pinch! Again, she was immediately digging through, as we talked about the dry coarse crumbs.

Wet and Dry Sensory (5)

Again I poured in some water. Now the bread crumbs expanded and grew softer. Again she preferred dry to wet!

Wet and Dry Sensory (7)

Another clean off and another dump. For the final experiment, I poured dry cornstarch into the tray. She loved stirring through this with a giant spoon!

Wet and Dry Sensory (8)

I added water and of course now we had classic ooblek. She didn’t want to touch it, but she sure liked watching the way I could grab a solid clump and it would drip down through my fingers.

Wet and Dry Sensory (9)

I would definitely repeat this activity with other materials in the future (even wet and dry paper!), because it was a great way to teach the concepts of wet and dry.

Wet and Dry Sensory (10)

Mailbox

Mailbox (8)

Veronika is very into the mail truck lately, wanting to watch our postal worker deliver the mail every chance she gets. She even got to peek inside the back of the truck! So today we recycled an old toddler favorite, with a homemade mailbox. Now that she’s older, she understands the role play involved, too.

First was the arts & crafts portion of the game: we needed to decorate a mailbox! I set out stickers and construction paper, along with an old box. She loves glue sticks and happily smeared onto strips of colored paper, which we then stuck onto the box.

Mailbox (2)

I had ocean-themed stickers, which felt appropriate here in the summertime. What a beautiful mailbox!

Mailbox (3)

I cut a slit in the top with a craft knife, and then showed Veronika how to stuff old junk mail through the slit.

Mailbox (4)

Sometimes she had to turn a letter a little to make it fit…

Mailbox (5)

…or give it an extra push to slide all the way through…

Mailbox (10)

…but she was delighted with each success.

Mailbox (9)

Time to open up the mailbox and see what she received!

Mailbox (11)

One pamphlet just happened to have images of sheep and cows, and she was so happy. “Cow is in the mail!” She wanted to send and receive this “letter” over and over.

Mailbox (6)

She also loved being able to take the lid off and put it back on all by herself, a big important toddler feeling of accomplishment.

Mailbox (13)

We then decided to write a few of our own letters for big brother Travis. She loved scribbling with marker before adding her notes to the mailbox.

Mailbox (12)

I could tell she was so proud to have her very own mailbox today, and left it out so she could return to it over the course of the afternoon.