Salt Water vs. Fresh Water

Salt v Fresh (5)

With so much time spent at the beach over the summer, the topic of salt water is bound to come up – that big ocean contains so much water, but it’s no good for drinking! Here’s a neat way to explore some of the different properties of salt versus fresh water at home.

First, pour a generous amount of salt into a cup of water, and stir to dissolve. Pour a second cup full of fresh water.

Salt v Fresh (!)

Next, we added ice cubes to each.

Salt v Fresh (2)

Finally, we mixed up a batch of red food coloring; a dark color is best here, so you can fully see the results.

Salt v Fresh (3)

Slowly pour the food coloring into the top of each glass. Your child will see that it sinks in the fresh water, but stays on top of the salt water.

Salt v Fresh (4)

A quick and easy early lesson on density!

Travis had fun playing with leftover colored water and ice cubes for some time, making this activity a big hit.

Salt v Fresh (6)

Yummy Soft Pretzels

Soft Pretzel (10)

Soft pretzels are a summer staple – at baseball games, ocean boardwalks, city parks, you name it. But nothing beats pretzels baked fresh at home! Kids can get hands-on and messy with this delicious version.

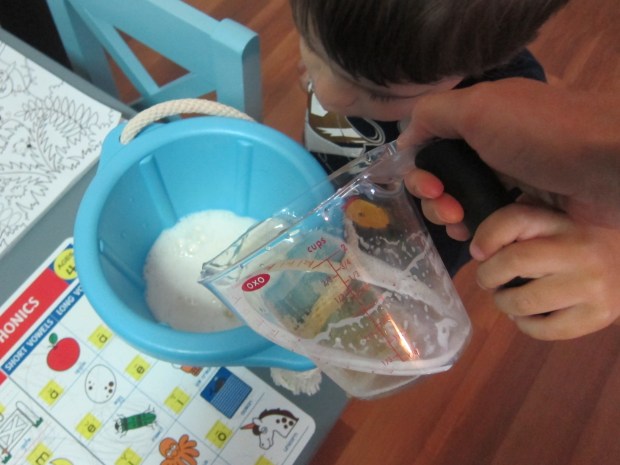
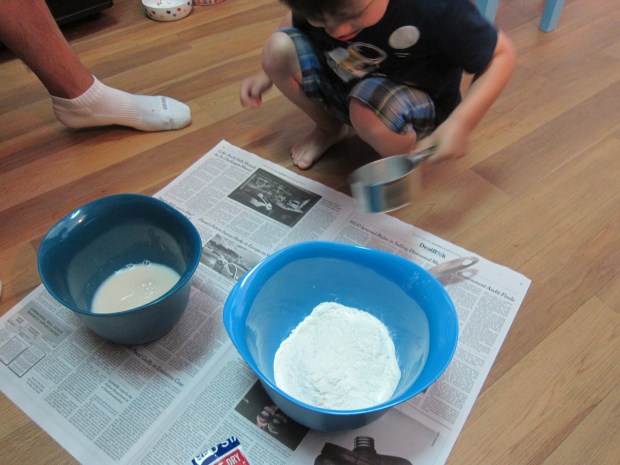
To start, dissolve 1 packet dry yeast in 1 cup warm water; let stand for 5 minutes – you’ll get to see the yeast bloom, like tiny little fireworks in a bowl. Super exciting!

Meanwhile, combine 2 and 1/2 cups flour, 1 teaspoon sugar, and 1/2 teaspoon salt in a large bowl. Add the yeast mixture and stir until you have a soft dough.

Soft Pretzel (1)

Using floured hands, knead the dough for about 5 minutes. This step was fun but too messy to photograph!

Place the dough in a large bowl, cover with plastic wrap and let rise for 30 minutes.

Soft Pretzel (2)

Next up came some fun math – we needed to divide our dough into 8 portions, which meant slicing in half, then each of those in half again, then each of those in half again! Travis loved pretended we were Peg + Cat for this step, and cut to use the pizza cutter under close supervision.

Soft Pretzel (3)

Flour your hands again and roll each portion into a long rope. From here, you can have as much fun as you want.

Soft Pretzel (4)

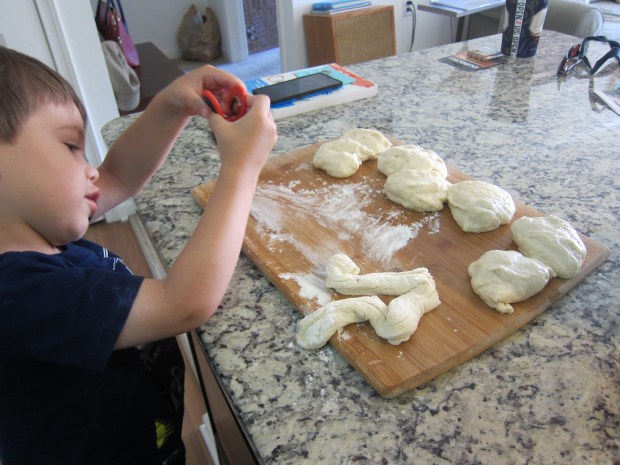
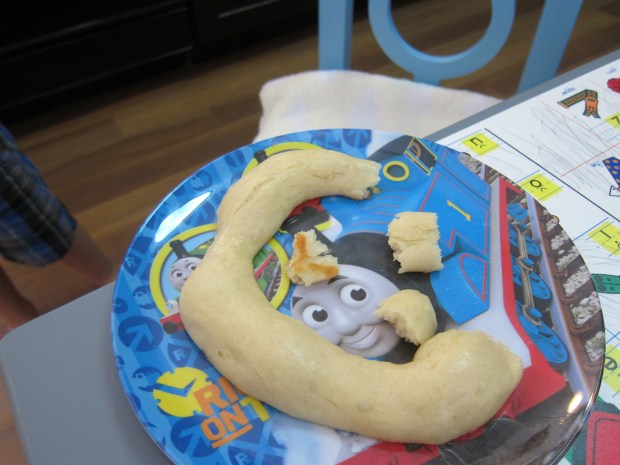
Shape the dough into traditional twists, letters of the alphabet, or whatever else your kids want. Travis requested a square!

Soft Pretzel (5)

Dip the pretzels quickly in a bowl of water, then transfer to a buttered baking sheet (we used Earth Balance). Let rise for 10 minutes.

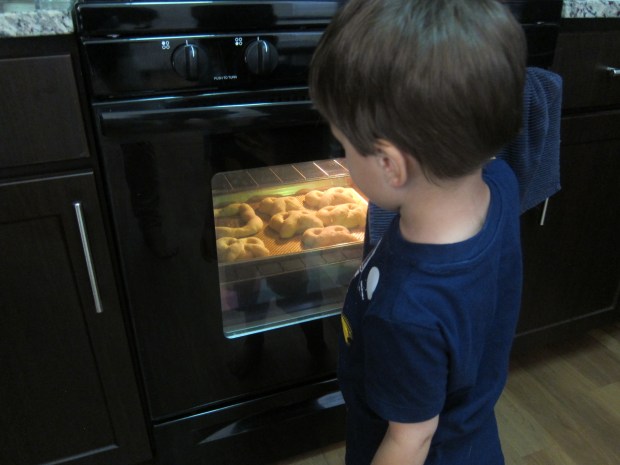
Bake the pretzels at 450 degrees F for 10 minutes. Peek-a-boo, little pretzels!

Soft Pretzel (6)

Brush the tops with a little more Earth Balance and serve – they are best served warm, we think! If you prefer, you can also sprinkle some of the pretzels with salt, and others with a mix or cinnamon and sugar, but Travis requested his plain.

Soft Pretzel (9)

Jack Frost

Jack Frost (5)

Frosty windows in July? As a follow-up to a recent “Christmas in July” event we attended, it was fun to be silly and bring a little winter to our hot summer home with homemade frost.

The concoction for this game is decidedly adult, so as a warning, do supervise closely to be sure that none of it is ingested.

First, mix together 5 tablespoons Epsom salts and 1 cup beer. The mixture gets so foamy right away – fun!

Jack Frost (1)

Let the mixture stand for 1/2 an hour, then head on over to a window to make frost. Note: I recommend covering the floor or any window sills with an old towel.

Jack Frost (2)

Using a sponge, dip into the mixture and dab onto the windows. Travis loved this part.

Jack Frost (3)

We then dabbed with a wet paper towel, before letting the mixture dry. To be honest, the final sparkling effect was not as noticeable as I had hoped, but we did have little streaks that looked like winter morning frost!

Jack Frost (4)

And then perhaps the most enjoyable part for my little helper, we got to wipe the windows clean.

Jack Frost (6)


Indoor Skip-Count Hopscotch

Indoor Hopscotch (5)

This last-minute game for a slightly cloudy morning turned out to be a huge hit, though we somewhat adapted regular hopscotch rules. All you need to take the game inside is a roll of painters tape.

To start, I laid out the shape of a hopscotch board on our floor. Be sure to alternate single and double squares.

Indoor Hopscotch (1)

For the numbers, I overlapped several pieces of tape so marker didn’t get on the floor. Use permanent marker for the numbers so it doesn’t rub off on feet!

Indoor Hopscotch (3)

Travis wanted to help make the board, so some clear tape let him play along!

Indoor Hopscotch (2)

I numbered the board in even numbers only, for fun with counting by twos (skip-counting), but you can number yours traditionally if you prefer.

Once the board was set up, we pulled out the bean bags. I gently introduced the idea of hopscotch – tossing the bean bag and hopping to your number – but didn’t harp on the rules since Travis is a bit young for the game.

Indoor Hopscotch (4)

He loved counting his hops as he retrieved each bag. He often would toss several bean bags at once, and pick them up as he went along.

Hopscotch has the bonus of working his gross motor skills, since getting all the way off the ground in a hop is still a challenge. Bigger kids can practice alternating hopping on one foot with landing on both in the double squares, a nice challenge.

The board then became a vehicle for his imagination! He self-narrated for quite some time with bean bags and hopping while I was busy making lunch.

Counting Caterpillars

COunting Caterpillar (7)

Ever since our Number Crate arrived from Koala Crate, Travis can’t get enough of counting anything and everything – magnets on the fridge, berries in his bowl, chairs in a waiting room. These adorable fuzzy caterpillars let us have crafty fun with his interest!

While he napped, I cut out “caterpillars” from poster board, increasingly long in length. The caterpillars can then be numbered 1 through 10 (or even higher, although we only went up to 6, because we ran out of pom poms!).

Counting Caterpillar (1)

If you cut the caterpillars from green construction paper, even better! Luckily Travis didn’t mind coloring them in with the help of a fat green crayon.

COunting Caterpillar (2)

Then it was time to make our caterpillars fuzzy. I asked him to tell me the number on each one, and once he supplied the answer, he could proudly apply that many blobs of glue. This part of course was super fun.

COunting Caterpillar (5)

Each blob of glue got a pom pom, until we had correctly filled in all our caterpillars.

Counting Caterpillar (4)

Let them dry and then have fun playing with your furry little friends!

COunting Caterpillar (6)


Mason Jar Terrarium

Mason Jar Terrarium (6)

Here’s a beautiful project if you want to save any treasured finds from your summer walks!

Knowing that I wanted to put a terrarium together, we first purchased dry moss at a craft store, because I didn’t want to rip any real moss from nature. This element turned out to be the biggest hit of the craft.

Mason Jar Terrarium (1)

Travis fell in love with the way it felt – how fluffy it was, the way he could pull strands of it apart, etc. So before we began the terrarium, we played with it for a while in a large bin. Then it was time to add the moss to a clear glass jar.

Mason Jar Terrarium (3)

Next we were off to find other treasures! We returned to add rocks and a few leaves to our terrarium.

Mason Jar Terrarium (5)

A little sleeping squirrel added a whimsical touch.

Mason Jar Terrarium (7)

You could keep your terrarium on display for quite some time. However, ours lasted barely a day before Travis wanted to play with the elements inside again. Back to the bin we go!

Mason Jar Terrarium (8)

Number Bead Stringing

Number Bead Stringing (5)

This project is great on so many levels! It keeps little hands busy if you’re doing chores around the house, works their number skills, and helps hone their fine motor skills.

The original post I saw for the game said to thread beads onto pipe cleaners, but I didn’t have any at home. Instead, we have several laces from a bead lacing kit, so I attached a piece of masking tape to the end of each and numbered them 1 through 10.

Number Bead Stringing (1)

The task was then to thread the correct number of beads onto each string.

Number Bead Stringing (2)

Travis loved counting along as he threaded, and said his creations were necklaces for mommy and daddy – how sweet!

Number Bead Stringing (6)

Don’t fret if your child doesn’t complete threads 1 through 10 in one sitting, this is the kind of game you can leave lying around for a little while.

Number Bead Stringing (4)


Chalkboard Frame

Chalkboard Frame (6)

I keep hearing about how fun chalkboard paint is, so it was finally time to give it a try! With a simple coat of paint, you can transform a room, wall, or object.

We opted to start out small; a wooden picture frame (picked up cheap at a craft store) made the perfect canvas. Parents, be forewarned: If you’re used to using washable paint with your toddler or preschooler, you’re entering the big leagues here. Chalkboard paint is acrylic, and won’t wash out nearly as easily.

Chalkboard Frame (2)

After we carefully covered our work surface, Travis was so excited at the novelty of the paint. He made sure his black paint got all the way to the edges.

Chalkboard Frame (3)

Ok, and he was so excited he painted over the glass in the middle where a photo would go!

Chalkboard Frame (5)

Aim for 2 layers of paint; Travis was so enthusiastic we probably ended up with closer to 3 or 4.

We had to wait awhile for the chalkboard paint to dry, so this was a good project for the morning. Our busy day distracted him until I could present him with the dry frame.

Now it was time to break out the chalk!

Chalkboard Frame (7)

He loved that he could color over it however he liked, and was thrilled when I said this time there was no need for chalk to dry. A very cute project that would make a nice gift, too.

Chalkboard Frame (8)

Numbered Photo Puzzles

Number Puzzle (5)

This craft turned out to be the perfect diversion when rain hampered our outdoor plans for a summer day – it takes several hours from start to finish, which suddenly made the afternoon indoors far less daunting!

First, we needed to select photos to become our puzzle pieces, making this a great activity to talk about relatives you haven’t seen in a while, or about your child’s favorite memories.

Make sure it’s a photo you don’t mind cutting up though! Adults: Cut the photo into pieces the width of the craft sticks you will be using. We made 8 piece puzzles, but you can go bigger or smaller.

Number Puzzle (2)

Next we applied a layer of Mod Podge to the craft sticks and adhered our photo pieces. Travis didn’t like how messy his fingers got pressing the slim pieces of photo on so precisely, so soon he was involved with his own (slightly) cleaner Mod Podge game while I finished up the photo gluing.

Number Puzzle (1)

And p.s. YES, Mod Podge is vegan! How have we never used this stuff before?

We had to let the project dry, and then we applied a second layer of Mod Podge on top of the photos to set them completely, which meant another round of waiting for it to dry.

But finally it was puzzle time! Adults: Number the sticks of each puzzle with a sharpie in order 1 through 8. (Or, you know, reverse your 1 and 2 by accident, like I did in the photo below).

NUmber Puzzle (4)

Your child will easily be able to form the image by following along in number order.

Number Puzzle (6)

Travis loved the way each puzzle came together, and was so proud lining up the numbers. A fantastic way to make counting into a game.

Number Puzzles alt.JPG

Paper Plate Frog

Paper Plate Frog (9)

Travis has just started camp, and every day the teacher gathers everyone together for craft time. It has renewed his interest in simple hands-on activities – painting, gluing – which lately he seemed to have tired of when it was just mom in charge! Now he comes home and wants to play camp, so we threw together this easy frog with items we had on hand.

For the mouth, fold a paper plate in half; paint the outside green, and the inside black. Travis didn’t even want my help making sure the paint got all the way to the edges.

Paper Plate Frog (1)

For the legs and arms, I drew simple outlines on green craft foam and cut them out.

Paper Plate Frog (3)

Travis was a big helper putting on globs of glue so we could set the legs and arms in the right place once the paint was dry. A pink construction paper tongue was added as well.

Paper Plate Frog (4)

I glued on googly eyes as the final touch. When the frog was ready, Travis decided all on his own that we needed to make flies to feed it. “Let’s paint them white!” White flies? Why not!

Paper Plate Frog (7)

A hoppin’ good time.

Paper Plate Frog (8)