Clothespin Apple Trees

Clothespin Apple Tree (8)

Autumn is by far my favorite season (apple trees! pumpkin spice! fall foliage!) and although Veronika is a bit young for it, there are so many apple crafts I want to make with her once her fingers become more dexterous and her understanding of the season increases.

But it’s never too early to throw in a cute craft about the changing seasons. So today was her first apple craft!

Clothespin Apple Tree (1)

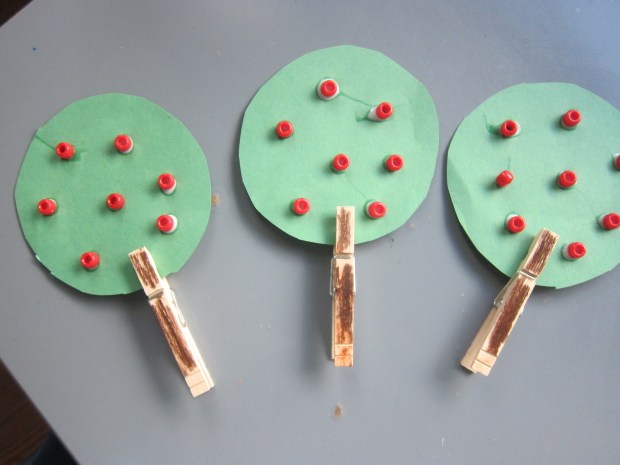
We cut green circles from construction paper for the leaves. Older toddlers can practice tracing around any round item to make these and can also practice with safety scissors to cut them out. Meanwhile Veronika loved pointing out to me that these were circles.

Clothespin Apple Tree (2)

She then helped dot white glue onto the paper. Dotting glue is fantastic for strengthening little fingers!

Clothespin Apple Tree (3)

We added a red bead to each dot of glue. Red sequins would work, too!

Clothespin Apple Tree (4)

Of course, Veronika had just as much tendency to pull a red bead off the glue as to leave it on, but we managed to get a few finished trees.

Clothespin Apple Tree (5)

For the trunks, use brown marker to color on spring-type clothespins.

Clothespin Apple Tree (6)

Clip one on to each green circle once the glue dries.

Clothespin Apple Tree (7)

This would be a fantastic activity to do either before or after a trip to a real apple orchard.

Clothespin Apple Tree (9)

Harvest Coasters

Harvest Coasters (6).JPG

These coasters are a great project to have your kid feel involved in Thanksgiving prep, whether or you’re hosting and need extra coasters for guests, or whether you bring them as a hostess gift.

Harvest Coasters (2)

I helped Travis draw a few common fall fruits and veggies onto different colors of craft foam. He tackled a round red apple, while I made trickier shapes like a green bell pepper, yellow butternut squash, and orange pumpkin.

Harvest Coasters (1)

We added a few details like leaves and stems with marker, and cut out.

Harvest Coasters (3)

Cut circles from thin cardboard to fit the back of each shape and glue on with tacky glue.

Harvest Coasters (5)

Let dry completely before putting your festive drink on top.

Harvest Coasters (4)

Holiday nog anyone?

Harvest Coasters (7)

Acorn Animal Craft Challenge

Acorn Animals (4).JPG

Travis’s craft challenge from Highlights this month was to make little animals using nothing more than acorns, wiggle eyes, and paint.

We collected a whole bunch of acorns (about 20) from oak trees nearby, which was no easy feat in 10 degree weather!

Acorn Challenge (1)

Inside, I asked him what colors he wanted to paint, thinking about what animals he might end up with. He opted for gray, so we mixed black and white together. Because he didn’t want to get his fingers messy on the small acorns, I held them while he painted.

Acorn Challenge (2)

For variety, we made a few pink acorns as well.

Once the paint dried, we glued together a few simple creatures. The stems on the acorn caps made us think of curly pig tails, so two pinkish acorns were glued together as pigs. Travis glued on the googly eyes, although the large size of the eyes made it hard for them to stick while the glue dried.

Acorn Animals (3)

The gray acorns made us think of little owls, who also received eyes.

Acorn Animals (5)

If Travis were older, I would have encouraged him to paint on little feathers, but I knew that sort of fine detail was too much for him. In sum, a cute project but not our favorite craft challenge to date.

Autumn Potpourri

Autumn Potpourri (4).JPG

How can you keep the house cozy for your kids when an early winter blast comes barreling through in November? Set this heavenly-scented potpourri to a simmer on the stove, and the whole house will be hygge in no time.

I gave Travis a quick reminder of what potpourri is before we set to work: any fragrant mixture of plant materials, like herbs, spices, fruits, flowers, or wood. Simmering the mixture on the stove gives a stronger scent than dry potpourri in a bowl, plus it adds moisture to dry air!

Autumn Potpourri (2)

Travis loved helping me slice up an orange to start. We added the orange slices to a saucepan, then added:

  • 3 cinnamon sticks
  • 1 tablespoon whole cloves
  • 1 tablespoon vanilla extract

Autumn Potpourri (3)

Take the time to make this a sensory activity, too. Travis loved smelling the spices, and even licking an extra cinnamon stick!

Autumn Potpourri (1)

Add water to the pot until it’s about 2/3 full. Bring to a boil, then reduce heat and simply let simmer. If the pot runs low on water, add more as needed. We kept ours on a gentle simmer all evening and hardly noticed the cold knocking at the windows!


Shades of Nature

Shades of Nature (1)

Here’s a fun twist for your next nature walk, as the last few days of vibrant fall colors leave us behind. Bring along some paint chips (these are free at any local hardware store) and hunt for fall colors!

Travis and I stopped to pick up paint chips in the morning, making sure we selected lots of yellows, oranges, reds, and browns. Next stop: a local trail!

Travis noticed lots of browns right away, spanning from dark brown leaves…

Shades of Nature (2)

…to light brown grasses.

Shades of Nature (3)

Our local area is past peak leaves, but we managed to spot some deep reds left in the bushes..

Shades of Nature (4).JPG

…as well as fallen yellow leaves.

Shades of Nature (6)

Our favorite was these orange beauties!

Shades of Nature (7)

In sum, this was a nice way to add purpose to a weekend family stroll, and Travis enjoyed playing color detective!

Shades of Nature (5)

Cranberry Chemistry

Cranberry Chem (6)

The cranberry harvest has hit the shelves, making it the perfect time of year to experiment with this under-appreciated berry. Okay, so this quick science trick uses cranberry juice, not whole fresh cranberries, but it’s still a fun seasonal project for kids!

I set up a few test tubes about 1/3 of the way full with cranberry juice and laid out baking soda and lemon juice.

Cranberry Chem (1)

First, Travis added 1 teaspoon baking soda to one test tube. It fizzed instantly, always the most exciting part.

Cranberry Chem (2)

When the bubbles settled, the cranberry juice was noticeably more yellow.

Cranberry Chem (3)N

ow add 1 teaspoon lemon juice (or citric acid) to the same test tube. It will return (almost) to the original color. The color became sort of striated in ours, so the return to normal was clearest near the bottom of the tube.

Cranberry Chem (5)

The science at work here is base (baking soda) first neutralizing the anthocyanins in the juice, and then the acid returning it to normal. Travis had fun simply experimenting from there! He thought we might make it extra yellow by adding 2 teaspoons baking soda (that one was really fizzy!).

Cranberry Chem (4)

Next time, we’ll think of other solutions we can add, like soda or baking powder.

Scarecrow Craft Challenge

Scarecrow Challenge (4)

This month’s craft challenge from Highlights was a chance for Travis to raid the recycle bin: what fun! Anything that normally might be off limits or taboo always seems to appeal to kids, it seems.

Scarecrow Challenge (1)

Travis first pulled out an empty gallon water jug. This would be perfect for the face! He proudly drew on features with a marker.

Scarecrow Challenge (2)

We found an empty brown bag that would be just the right size for the body. Crumpled newspaper worked perfectly as stuffing. I tied the handles of the bag tight to seal in the newspapers.

Scarecrow Challenge (3)

He decided that empty soda cans would make good arms and legs for our stubby little fellow. I knew waiting for regular glue to dry would frustrate him, so swooped in with the hot glue gun.

We finished by decorating the brown bag torso with marker “clothing”. This was a great chance to watch Travis’s imagination at work! What might your recycled scarecrow look like? Please share in the comments!

Scarecrow Challenge (5)

Leaf Chromatography

Leaf Chroma (9)

You can show your children a visual rainbow of molecules with this simple science experiment. It’s a great way to explore what happens to leaves in the fall!

Travis and I had been waiting to do this activity all season, but the leaves were stubbornly slow to change. Finally we spotted a landscape of vibrant reds, oranges,  and yellows, and couldn’t wait to take them home and experiment.

Leaf Chroma (1)

First, tear up the leaves into pieces, and divide into glass bowls, one color per bowl. Travis loved the tearing!

Leaf Chroma (3)

Mash the leaves slightly using a pestle or muddler.

Leaf Chroma (4)

Ooh, next up was a grown-up ingredient: Rubbing alcohol. Travis very carefully helped me pour enough in each bowl just to cover the leaves. Place the bowls in a baking dish and add a few inches of hot water.

Leaf Chroma (6)

Now cut a coffee filter into strips, and drape over chopsticks (or kebab skewers, or pencils – anything long and straight), letting one side dangle down into the rubbing alcohol. Place the entire baking dish some place dark and let sit overnight.

Leaf Chroma (7)

In the morning, you’ll see bands of color on each filter strip! This shows the layers of color that were in each leaf, slowly revealed as chlorophyll breaks down in cold temperatures. To be honest the yellow and orange were a bit underwhelming, but it was neat to see several layers of color exposed in our red leaves.

Leaf Chroma (8)

In sum, a neat science experiment!

Pineapple Pumpkin (and More Pumpkin Fun)

Pineapple Pumpkin (8)

We had so much fun at the pumpkin patch this year; Travis needed to come home and carve one right away. We even sorted and saved the seeds for roasting (full recipe below). With our final three pumpkins, we got a little craftsier, putting together these three painting projects.

First up was Mr. Pineapple Pumpkin. Paint your pumpkin with a layer of yellow acrylic paint and let dry overnight.

Pineapple Pumpkin (1)

Once dry, I added upside-down V marks with a sharpie to mimic the exterior of a pineapple.

Pineapple Pumpkin (4)

Travis helped glue on two eyes, and we used dot stickers (cut in half and slightly overlapped on the top) for the mouth.

For the pineapple stem, attach two pieces of green sticky-back craft foam together, leaving a sticky overhang on either side. Cut leaf-like shapes into the foam. Attach one sticky portion to the stem, then wrap tightly and use the remaining sticky edge to hold the “stem” in place.

Deck out your pineapple fellow with a blingy pair of shades for the final touch!

Pineapple Pumpkin (5)

Needless to say, this particular pumpkin craft required significant adult help for a four-year old. For something he could do entirely on his own, I set Travis up with puffy paints and a whole pumpkin.

Pineapple Pumpkin (2)

He loved squeezing out all the colors, which almost looked like goopy spider webs.

Pineapple Pumpkin (7)

Kids who are too young to carve might also love attaching feathers to a pumpkin, or sticking on pre-cut foam shapes for a funny face. Many sets of facial features come available in craft kits, and Travis enjoyed selecting this goofy look.

Pineapple Pumpkin (6)

What pumpkins are adorning your stoop this year? Please share in the comments!

I’ll leave you with this easy pumpkin seed recipe:

Scoop seeds from 1 pumpkin (about 1 cup). Rinse well and pat dry. 

On a baking sheet, drizzle with 1 and 1/2 tablespoons melted butter and sprinkle with 1 teaspoon salt.

Roast at 200 degrees F for 40 minutes. Increase the heat to 325 degrees F and roast a final 5 minutes.


Leaves + Contact Paper = Fall Placemat

Fall Placemat (5).JPG

It’s been a rather disappointing autumn for leaf color in our neck of the woods, with oddly warm temperatures keeping the leaves stubbornly green. Happily, we returned home from a recent nature walk with enough leaves that had managed to turn shades of red, orange, and yellow, and knew we needed a quick project for them. Here we are on the hunt – it’s finally cold!

Nature alph (4)

If you want to make this a science project as well as an art one, talk about how the leaves stop producing chlorophyll this time of year, which reveals the hidden autumn shades under the green. I touched on the matter briefly, but really we were just happy to come home with pretty finds.

Fall Placemat (2)

To easily preserve your leaves, make this placemat:

Place a piece of contact paper, sticky side up, on a work surface. Travis got impish at first, and wanted to stick his hands to the paper a few times!

Fall Placemat (1)

Encourage your child to arrange the leaves in whatever manner they see fit, varying the shapes, size, and colors until they are happy with their arrangement.

Fall Placemat (3)

Seal the leaves by placing a second sheet of contact paper, sticky side down, on top. Trim to size and voila – you have the perfect fall placemat.

Fall Placemat (4)

If you have the inclination and enough leaves, go ahead and make several; these would make wonderful holiday placemats. For Thanksgiving decor, perhaps?

Fall Placemat (6)