Santa’s Sleigh Automaton

Santas Sleigh (5)

I originally purchased this special holiday crate from Kiwi Co thinking it would be fun to put together with Travis. It turns out that it was so complicated even mommy had trouble with it! But we now have a very cool decoration to last until the holiday is over.

The sleigh works as an automaton, a machine that is pushed into motion, and the instruction booklet included neat STEM learning about other examples of automatons (think jack-in-the-boxes or vending machines), and also a detailed explanation at the end about how you’ve built a “cam”. Here’s a rough outline of what we did:

First we made a frame, slotting together the provided wooden pieces and foam stickers to help hold them in place.

Santas Sleigh (2)

We then needed to build the crank part of our cam by attaching wooden circles to a crank in the proper order.

Next up was the part of the cam that would go up and down. This required fitting plastic rods into the wood stand, securing them onto a paper square at the base, and adding a paper straw and foam donut to hold them in place. Here is where the machine seemed a bit faulty, with the paper squares not staying firmly on the wheels of the crank. Hmmm…

But we forged on, adding the felt reindeer, Santa and sleigh (quite tiny!) to each of the plastic rods. Secure them all with the provided string for a leash.

Santas Sleigh (4)

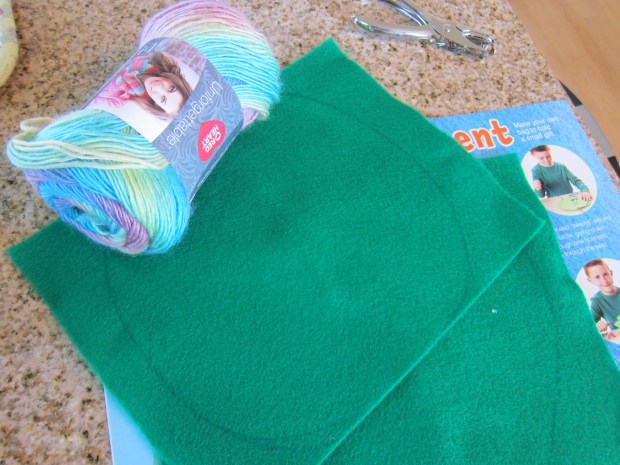
There is a decorated backdrop with felt houses and trees to attach. Now Santa’s sleigh and team are ready to fly!

Santas Sleigh (3)

Travis does indeed enjoy turning the crank, so there is holiday magic (and science!) to be had in the final product.


Egg Carton Mini Wreath

Egg Wreath (12)

Full disclosure: Travis and I had hoped to make this adorable wreath around the holidays, but I didn’t have anyone to borrow an empty egg carton from – talk about #veganproblems! We’ve now gladly upcycled one from Travis’s grandma, so why not make it a Valentine’s Day wreath? In fact, depending what colors you choose for the wreath, it could work to adorn your door at almost any holiday.

First, we needed to tear the egg carton into separate compartments. Nothing like ripping things apart to get out some energy on a snow day.

Egg Wreath (2)

Travis then used a pencil to poke a hole through the center of each segment, which might have been even more fun than the ripping!

Egg Wreath (3)

He then threaded all of the compartments onto a long white pipe cleaner (you can choose the color for this based on any holiday, too). He thought it looked like a snake at this point – fun!

Egg Wreath (5)

Once all the segments are threaded, you’ll need to bend the pipe cleaner and space them out evenly until you have your cute little wreath. Secure the two ends of the pipe cleaner together by twisting.

Egg Wreath (6)

We painted our wreath with green watercolor paint. In retrospect, I would paint first, let dry, and then thread them on the pipe cleaner.

Egg Wreath (8)

Once dry, Travis helped glue on little gems, pom poms, buttons, and other red items.

Egg Wreath (9)

We finished our wreath with a little bow. I added a second pipe cleaner that could be the handle, and hung it from our front door.

Egg Wreath (10)

Happy Valentine’s to all our readers!

Egg Wreath (11)


Magic Reindeer Food

Reindeer Food (6).JPG

It’s Christmas Eve! Reindeer might like carrots, but you can also try this magical mix to guide Rudolph and his team right to your home. Kids will love the sparkle and magic of the project.

Travis and I set out two bowls, and added 1/2 cup sugar to each.

Reindeer Food (1)

In one, we added drops of red food coloring, and we turned the other green.

Reindeer Food (2)

Stir in 1/2 cup oats to each bowl. Look at that sparkle!

Reindeer Food (5)

Your kid can taste the reindeer food if they want to, although Travis declined! It’s not that this version is perfectly edible, as opposed to using glitter, since any animals who nibble won’t be harmed.

Reindeer Food (3)

Pour the reindeer food into jars, and add a holiday ribbon for a nice touch.

Reindeer Food (7)

If you want to share the fun with friends or cousins, put some of the mix in a zip-top bag, along with instructions. We printed out this little rhyme:

Sprinkle this reindeer food outside tonight

The moonlight will make it sparkle bright

As the reindeer fly and roam

This will guide them to your home

Reindeer Food (9)

Before bed, we sprinkled some on our lawn. Travis loved shaking out big handfuls of it!

Reindeer Food (12).JPG

Now we wait for St. Nick!

Reindeer Food (10)


Host a Cookie Swap

Cookie Swap (7)

Travis doesn’t know it yet, but he’s about to receive a subscription to Raddish Kids as a gift this holiday season. Having gotten a sneak peak, I’m already impressed with the company. A suggested further activity from his upcoming December package was a holiday cookie swap. I instantly knew I wanted to make this happen, but it had to be quickly, even before he opens up his first box on Christmas morning. Could we pull off a cookie swap in just a few days? Yes!

First, we decided on a date for the party, then downloaded the invitation template and sent off to a few buddies. Come to Travis’s cookie party!

Cookie Swap (16).JPG

The day of the party, we set our computer to play holiday tunes…

Cookie Swap (2)

…and added festive decorations around a cookie table, including garlands, pinecones, and various crafts we’ve made this holiday season.

Cookie Swap (5)

We offered 4 kinds of cookies to our guests:

Classic Thumbprints

Peppermint Chocolate Brownie Cookies

Caramel Cracker Bark

and Snowball Cookies

Cookie Swap (10)

Now it was time for guests to arrive, each bearing their own plate of cookies!

Cookie Swap (6)

I recommend keeping things manageable – 3 to 8 friends, depending on your child’s age and the size of your home. Older kids may want to do an organized tasting, sitting down and rating each cookie. Little kids just loved running around and occasionally stopping to chomp a cookie! Meanwhile grown ups got to sit around, enjoy sweet treats, and chat.

As a couple of extras, we also added gingerbread men ice cubes to fruit punch for the kids, and I provided gift bags for everyone to take home the cookies they wanted.

Cookie Swap (14)

This was an absolutely perfect afternoon – I’m so thankful to Raddish for a suggestion I’d never have come up with otherwise, and can’t wait to see what Travis receives in his official first December kit. You can be sure there will be a blog post about it!


Picture Frame Winter Scene

Picture Frame Winter (5).JPG

Here’s one of those crafts that didn’t exactly turned out as I imagined! My little artist had his own plans, but the whole point was the fun and the crafting moment together, not perfection.

To start, you’ll need a simple frame (you can find these cheap at a craft store, measuring about 5×7 inches). Travis loves the mechanics of removing the back off a frame, so was delighted to discover our project enabled him to do so.

Picture Frame Winter (1)

Cut a piece of leftover holiday wrapping paper to fit the glass of the frame, and insert.

Picture Frame Winter (2)

I set out acrylic paints and invited Travis to draw any winter-themed scene that would fit nicely with our Christmas tree background. He chose white for snow, and I encouraged him to paint a snowman, thinking of how the body is made up of various circles.

Picture Frame Winter (3)

Travis had his own plans, making a big snowy blanket of white. “It’s covering the trees,” he insisted.


Picture Frame Winter (4)

Luckily at this point I snapped a pic, because he soon decided he needed to “snow” over the trees completely with white paint. I laughed but didn’t tell him this rather negated the point of having wrapping paper inside the frame.

He then wanted to mix other colors over his white. “I’m an artist!” he declared, doing swirls of paint.

Picture Frame Winter (6)

Well, we didn’t end up with a winter scene, but we did end up with a good time!

Picture Frame Winter (7)

I encourage you to have fun with these, though. Your children could paint something quite beautiful in front of the wrapping paper background, whether snowmen or ornaments or anything else that fits the season. I’d love to hear what they come up with in the comments!

Reindeer Bell Necklace

Reindeer Necklace (5)

This adorable necklace is just right for rockin’ out to your famiiy’s favorite holiday tunes. May I suggest ‘Jingle Bell Rock’ and ‘Run, Run Rudolph’, in particular?

Ideally, I would have used larger jingle bells as the body of the reindeer, but the craft store was clean out of just about every Christmas supply! We found sparkly, medium-sized silver bells instead, which were intriguing to Travis, if not perfect for the craft.

Reindeer Necklace (1)

To make the antlers, cut a pipe cleaner in half and thread one half through the bell. Twist to secure.

Reindeer Necklace (2)

Cut the other half in two again (so now you have quarters) and wrap a quarter around each branch of the other pipe cleaner, to form antlers. Travis needed a bit of help with this step.

Reindeer Necklace (3)

We glued two eyes and a red pom pom nose onto each bell, and set them aside to dry.

Reindeer Necklace (4)

Once the glue dried, it was time to shake our jingle bells! I tied a string to each reindeer to form a necklace, and we could rock out.

Reindeer Necklace (6)

Jingle bells, Jingle bells!

Reindeer Necklace alt

Yarn Christmas Trees

Yarn Tree (10).JPG

Be forewarned: This holiday decoration project is a messy one! In other words, perfect if your kids love getting their hands dirty and helping deck the halls around the house.

For materials, you’ll need Styrofoam cones (available at craft stores) with the plastic wrap still on. You’ll also need red and green yarn. I had pastel shades of each in my craft bin, which would look lovely if you’re taking a pastel approach to decorating this year! Ideally, I would have had darker red and green, but we were eager to do the project so made do.

Yarn Tree (1)

Cut the yarn into pieces about 20 feet long. Yes you read that right, 20 feet! Travis loved helping measure out the long lengths by standing at the opposite end of the apartment from me.

Yarn Tree (2)

Next we needed glue. You can use watered down store-bought glue, but we made a neat homemade version simply by mixing 1/2 cup flour with water until the consistency of a thick paste.

Yarn Tree (3)

I worried Travis might not get his hands in there, but to my surprise, he was eager to see how it felt. Goopy!

Yarn Tree (4)

Soak your stands of yarn in the “glue,” one strand at a time. Once it’s coated, wrap around one of the Styrofoam cones, wrapping and wrapping until completely covered – the more the better!

Yarn Tree (5)

The key is not to let the yarn get tangled, or you’ll wind up with a clump you can’t continue to wrap. After a few successful trees, we encountered a tangle. Whoops!

Yarn Tree (6)

Luckily the cone was just covered enough.

Let dry overnight. Travis had to come over and touch our flour glue occasionally, to see how the drying process was coming along.

Yarn Tree (7)

In the morning, snip the plastic wrap from the cone, and slide the yarn tree off – you’ll have to tug the cone out a bit forcefully. Remove the inner plastic, and the yarn tree now stands alone.

Yarn Tree (8)

We thought it might be fun to decorate one with little gems and beads, although it was hard to get them to stick on, as the beads were heavy.

Yarn Tree (9)

Pinecones made lovely tree toppers though!

Yarn Tree (11)

Classic Thumbprints

Classic Thumbprint (2).JPG

This classic Christmas cookie is the perfect recipe to make with little kids: an easy dough that comes together with few ingredients, plus the magic of shaping the cookies with the best instrument of all – your child’s thumb!

Classic Thumbprint (1)

Note: to make Ener-G egg yolks, use 1 tablespoon powder in 2 tablespoons water. For other vegan egg substitutes, aim for a similar volume.

Ingredients:

  • 2/3 cup Earth Balance butter, softened
  • 1/2 cup sugar
  • 2 Ener-G egg yolks
  • 1 teaspoon vanilla extract
  • 1 and 1/2 cups flour
  1. Beat the butter in a stand mixer until creamed. Add the sugar and beat until combined.
  2. Add the Ener-G and vanilla; beat until combined.
  3. Gradually beat in the flour. Shape the dough into a ball and wrap in plastic wrap. Chill for 1 hour.
  4. To bake the cookies, roll into 1-inch balls and place on cookie sheets. Press your thumb into the middle of each cookie.
  5. Bake at 375 degrees F for 11 minutes. If the thumbprint starts to puff up during baking, press back down with the back of a teaspoon.
  6. Let cool on wire racks before filling as desired. For

For a uber-classic version, use strawberry jam. We updated ours with a carrot cake jam filling!


Cinnamon Ornaments

Cinnamon Ornaments (10)

Did you know you could make dough just from cinnamon and applesauce? Nor I, but here’s the perfect dough to craft holiday ornaments, thanks to Travis’s Ranger Rick Jr.. Once the cinnamon is in the oven, your whole house will smell like Christmas!

Travis loved concocting the dough. Simply dump in 1 (2-ounce) jar of cinnamon into a bowl. Careful to pour slowly so you don’t get cinnamon in your face!

CInnamon Ornaments (2)

Add 4 ounces applesauce, stirring until very well combined.

Cinnamon Ornaments (3)

Turn the dough out onto a cutting board and use a rolling pin to flatten to about 1/4-inch thick.

CInnamon Ornaments (5)

Travis was so excited we got to use our holiday-shaped cookie cutters for the first time since last Christmas.

Cinnamon Ornaments (6)

He loved selecting which shape to use each time we rolled the dough.

Cinnamon Ornaments (7)

Carefully transfer to a baking sheet.

Cinnamon Ornaments (8)

Use a toothpick to poke a hole in each ornament, then bake at 200 degrees F for 20 minutes.

The instructions says to thread pretty ribbon through the holes, but the toothpick holes were much too small for this. Next time I would punch out holes with a straw. Thinking quickly, we threaded the ornaments onto pipe cleaners, instead.

Cinnamon Ornaments (9)

Thread several onto one pipe cleaner (or ribbon) for a pretty garland, or make singles to hang as ornaments. Either way, these would also be wonderful to give away as gifts!

Pouch Present

Poudh Present (8)

We’ve loved the edible gift suggestions from High Five magazine in the past – perfect for teachers this time of year! The craft in Travis’s latest December issue was a bit different – the wrapping for the gift, instead of the gift itself. Put the pouch together now, and fill it with a little token of appreciation for teachers this holiday season.

There is a bit of adult prep-work for this one. Cut a circle from a 9×12-inch piece of felt. Green felt seasonably appropriate.

Pouch Present (1)

Punch about 12 holes around the edges of the felt. This is definitly a grown-up step, since felt is much tougher to hole punch than paper.

Pouch Present (2)

Finally, cut a piece of yarn that is 36 inches long, and tie to a paper clip; this will be your child’s “needle.”

Pouch Present (7)

Now it’s the kid’s turn! Encourage him or her to decorate the bottom of the felt with markers. Travis made scribbles, but your kids might prefer to draw something seasonable, like Christmas trees or ornaments.

Pouch Present (6)

Travis was so proud lacing all the way around the felt pieces with his needle and thread. He insisted he could do it all by himself, including knowing when to sew up and when to sew down.

Pouch Present (4)

Once you’ve gone all the way around, leave the two ends of yarn dangling. Pull the felt slightly, and it will cinch closed.

Pouch Present (5)

What will you gift your child’s teachers this year? Do share in the comments!