Water Blast Game

Water Squirt (5)

We headed outside this morning for some good old-fashioned fun in the sun – and what could be easier than a squirt gun?

To set up a simple target practice, all you need is a piece of Styrofoam and golf tees. Travis loved setting the pegs up in the Styrofoam!

Water Squirt (1)

Balance ping pong or golf balls on the pegs, then let your little one take aim.

Water Squirt (2)

Travis loved trying this from far back…

Water Squirt (4)

…and sometimes from right up close!

Water Squirt (3)

Then he told me he’d invented a new game: “Look, Mom, I’m moving the ball around in the grass!”

Water Squirt (6)

Of course then there was just the delight of shooting the water gun for a while. A great way to get some sunshine!

Water Squirt (7)

Playground Crate

koala playground (9)

What fun! We discovered that our Koala Crate this month had a big emphasis on gross motor skills – something we definitely need more of around here. Of course there were also crafts and learning thrown in. And as always, you can replicate these projects with materials from a craft store.

Before we jumped into those gross motor skills, though, we put together the Balancing Seesaw. I loved that this was a math lesson disguised as playground play, since what is a seesaw really if not a balance scale?

koala playground (4)

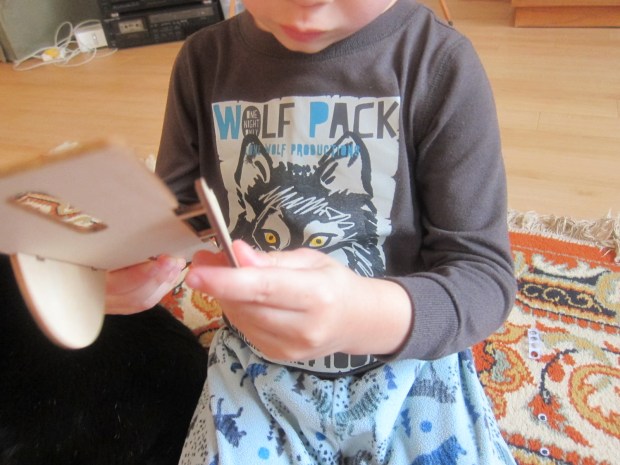
Travis enjoyed the mechanics of building it, sliding wooden pieces together and securing with foam buttons.

koala playground (5)

Next we decorated the provided wooden beads with felt stickers to be little animals (Travis particularly loved the googly eyes).

koala playground (8)

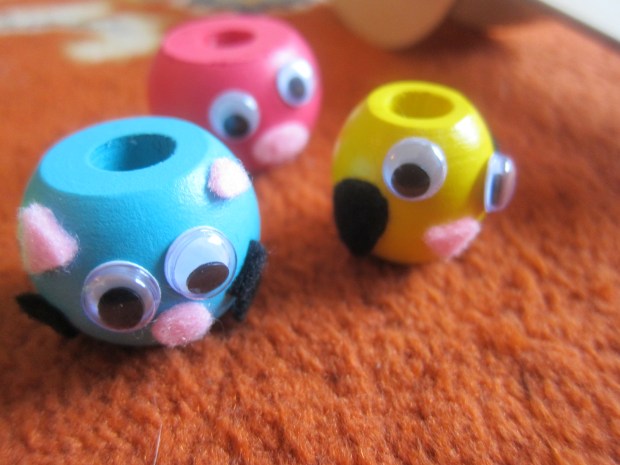
The challenge was to put the animals on and observe what made the see-saw lean one way or the other, and if we could balance it. Neat!

koala playground (7)

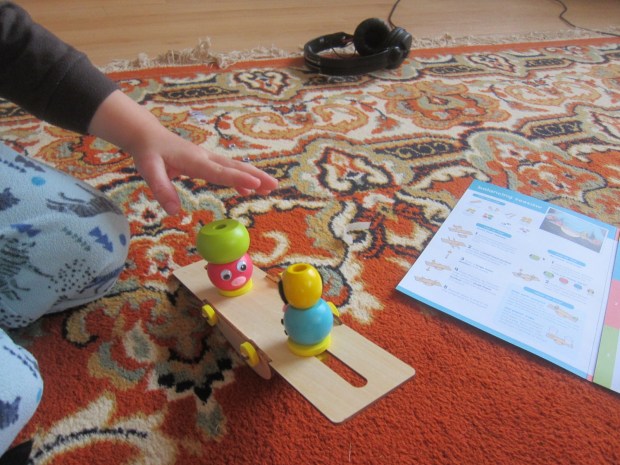
For extra fun, we placed two paper cups on the see-saw’s posts instead. Fill with coins or other items around the house, and again challenge your child to find the balancing point.

koala playground (22).JPG

Travis was not very into the second activity, a playground scene Jigsaw Puzzle. Aside from a few crayon scribbles, he left mama to color in the rest.

koala playground (3)

But he did later take some time to piece it together.

koala playground (17)

The next day we followed the kit’s suggestion and taped a coloring book page to a cereal box; cut into pieces and voila, you have a homemade jigsaw puzzle!


IMG_0002

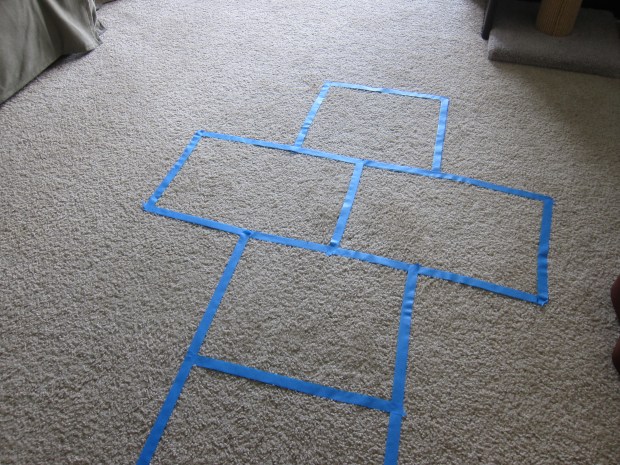
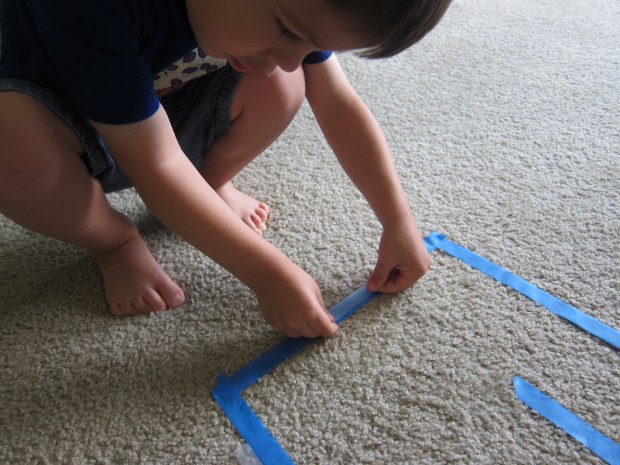
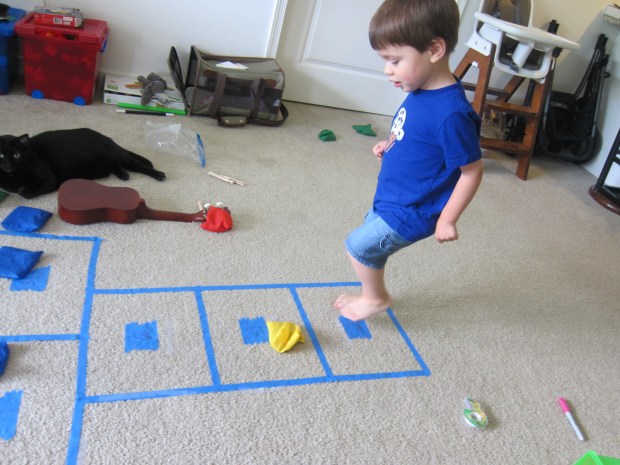
Finally, it was time for the aforementioned gross motor skill fun: an Indoor Playground. This involved using the provided washi tape in orange and blue to set up various obstacle courses or challenges. Of course the washi tape itself was a huge hit.

koala playground (1)

Travis was not very into the long jump…

koala playground (10)

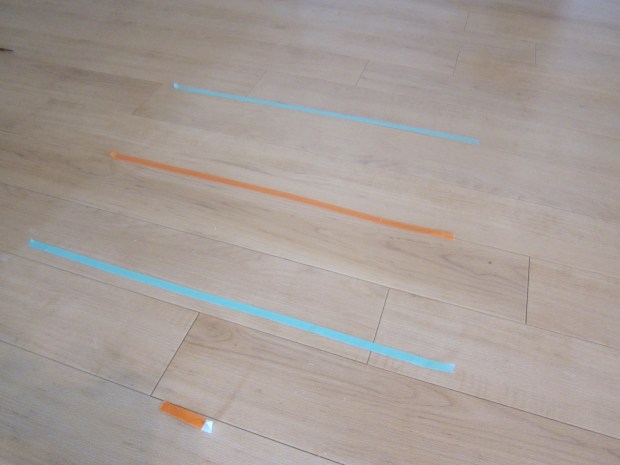
…but he did some neat moves along the lines I set up on the ground, following the kit’s suggested movements like jump, tip-toe, walk backwards, or dance.

koala playground (15)

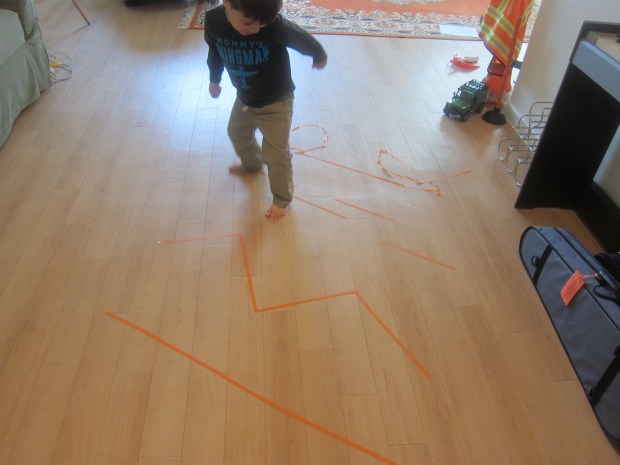
There was also a miniature inflatable ball to make part of the games; we set up a “maze” with the washi tape and had fun kicking or rolling it through.

koala playground (2)

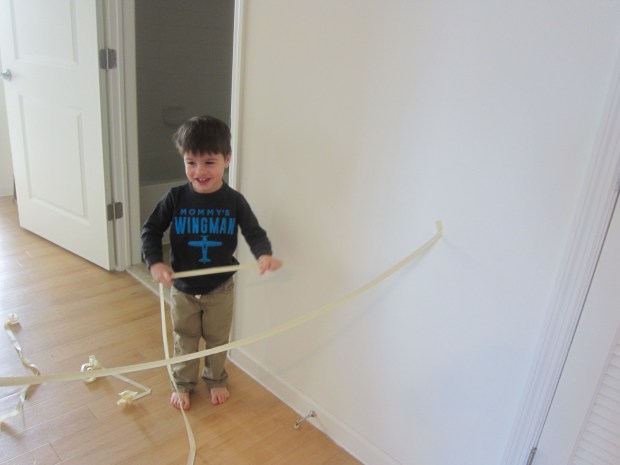
We ran out of washi tape (the rolls aren’t big) by the time we got to the spiderweb suggestion… so plan on having some extra masking tape on hand! Travis absolutely adored this challenge of going over and under the sticky strands…
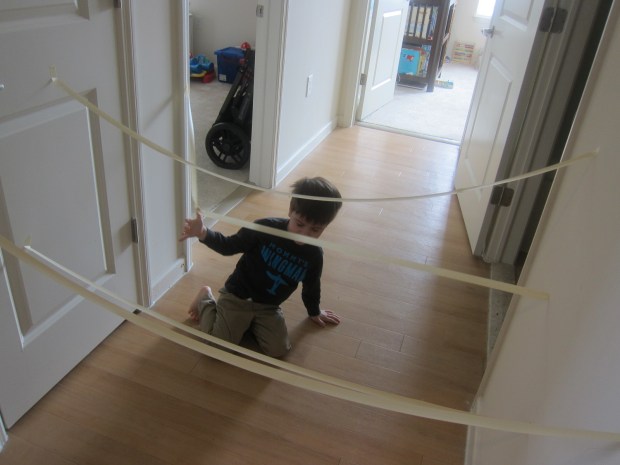
koala playground (13)

and loved ripping off the sticky tape after!

koala playground (14)

The Imagine magazine included even more ways to get moving, dancing to the rhythm of your favorite song like you are jumping rope, swinging from monkey bars etc.

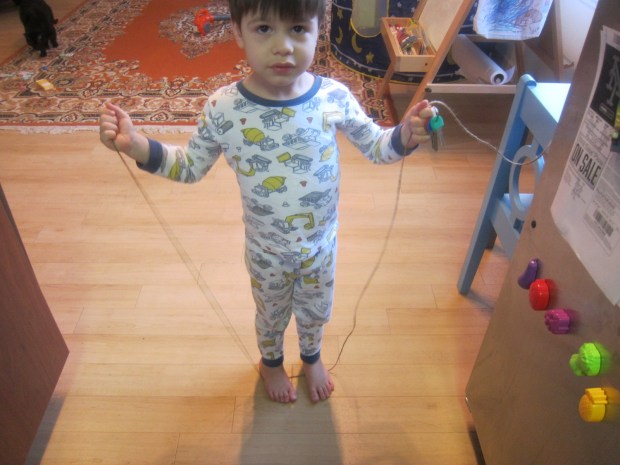
As a final project, we put together the suggested DIY jump rope – a simple trick of straws and duct tape! Ideally use nylon cord as the thread, but a piece of twine worked just as well.

First, have your child stand on a length of the cord or twine, so that it stretches armpit to armpit. Here is a slightly-skeptical Travis wondering what we were up to.

Jump Rope (1)

Knot one end, and wrap around the knot with duct tape for the first handle.

Jump Rope (2)

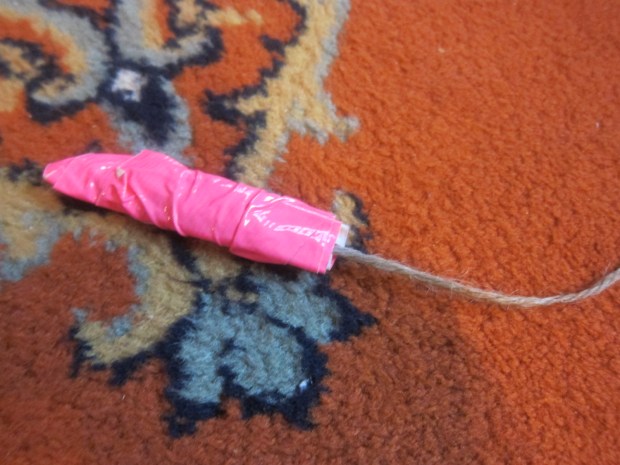
Cut plastic straws into pieces about 2 inches long and thread onto the cord until nearly filled. Knot the other end and secure with a second piece of duct tape. Jump away!

Jump Rope (5)

Overall, I loved the way this crate got us moving. Now it has us even more eager for outdoor spring weather and a big playground to run around on!

koala playground (16)

Life Size Board Game

Board Game (3)

We loved this giant take on a board game, using our own bodies as the playing pieces! It’s a great way to burn off some physical energy indoors, plus work on counting skills, turn taking, and playing a game by the rules.

To set up your “board” all you need is painter’s tape. I made squares around the carpet in a pattern for us to move forward. If you want to make the game a bit more complex, add another shape (such as diamonds) that mean “move back one space.”

Board Game (7)

I threw together a very quick giant dice by taping construction paper on the sides of a tissue box and adding pips with a sharpie. If you have the time, glue on your construction paper for a more elegant look!

Board Game (1)

Now it was time to toss the dice. Travis delighted in throwing the giant cube.

Board Game (2)

He was quicker than I would have guessed at counting the pips, yelling out the numbers and then taking proud giant steps from square to square.

Board Game (4)

We have a winner!

Board Game (5)

We also played a version using big toy cars in a car race, driving them the right number of spaces forward with each roll.

Board Game (6)

If you create a giant board game, please share any variations or ideas in the comments, we’d love to hear!

Penny Toss

Penny Toss (6).JPG

On the heels of our Mouse Hole Roll, Travis and I added a penny toss to our indoor circus and carnival games!

To start, we needed three different colors of construction paper and round items to trace. You can turn this into a hunt for circular items around the house if your kids are learning their shapes. Records were perfect for the middle and smallest circles, but I had to free-hand the largest circle since we didn’t have anything round that was quite that big.

Penny Toss (1)

Glue the circles together and let dry.

Penny Toss (2)

Colored-in clown templates add a nice decorative touch.

Penny Toss (4)

Then it’s time to play!

Penny Toss (5)

Travis wasn’t quite as into the penny toss as he was with the mouse hole game, but we got in some good tosses.

Penny Toss (7)

His first few attempts bounced quite far off the circles, which I could see surprised him. So it was good motor skills practice to learn more precise aim.

Penny Toss (8)

Bullseye!

Color Hopscotch

Color Hopscotch (5)

Travis was late to jumping… so all the more reason to celebrate his new accomplishment with this fun game! It had us exercising our brains and our muscles. Instead of leaping from number to number, in this version you’ll be hopping from color to color or shape to shape.

To play, use foam sheets to cut out a variety of shapes. Ideally use two sheets of foam in each color so you wind up with two red triangles, two green squares, two blue circles, etc.

Color Hopscotch (2)

Arrange the shapes in any pattern on the floor, then have fun calling out instructions to leap.

We had fun testing shape combinations, like “Circle, Rectangle, Triangle!”

Color Hopscotch (8)

Or color ones: “Yellow, Black Green!”

Color Hopscotch (3)

Travis also made up silly ways to cross the shapes, such as jumping feet onto one row, then putting your hands down on the second. I loved seeing his creativity with the suggestions.

Color Hopscotch (6)

For bigger kids who are readers, consider making a spinner for the game. Write out different instructions in each space of the spinner, and then perform the motion on the space you spin to.

Color Hopscotch (7)

Pumpkin Leapfrog

Pumpkin Leap (2)

Wondering what to do with all those pumpkins from the pumpkin patch? Get in a little exercise before you carve them!

Pumpkin patches are such a fantastic outing this time of year; ideally head to one where your child can truly see where pumpkins come from (attached to the vne), instead of a big lot where pumpkins have been placed in a row.

Fall Bucket (4)

Travis was so proud picking out our pumpkins, especially since he could lift them all by himself. At home, I asked if he wanted to play pumpkin leapfrog, which earned an eager and curious “Yes!”

Pumpkin Leap (1)

Set your pumpkins up in a line (use as many as you’d like – we had 4, but you could go up to 8 or even higher, if you want to make the course harder), and cut a line of string to mark the start and finish of your course.

Pumpkin Leap (3)

Take turns leaping over the pumpkins, and see how long it takes! You can make this competitive for older kids by using a timer, or just be silly with it for younger ones.

Pumpkin Leap (4)

Next we ran a slalom “S” course around the pumpkins, great for practicing fancy footwork.

Pumpkin Leap (5)

From there, go on and make up your own silly versions. Travis loved straddling each pumpkin, running circles around them, and more.

Pumpkin Leap (6)

The perfect activity to tide us over until its time to carve, and yet another fantastic suggestion from our Barefoot Books Kids Garden set.


Indoor Skip-Count Hopscotch

Indoor Hopscotch (5)

This last-minute game for a slightly cloudy morning turned out to be a huge hit, though we somewhat adapted regular hopscotch rules. All you need to take the game inside is a roll of painters tape.

To start, I laid out the shape of a hopscotch board on our floor. Be sure to alternate single and double squares.

Indoor Hopscotch (1)

For the numbers, I overlapped several pieces of tape so marker didn’t get on the floor. Use permanent marker for the numbers so it doesn’t rub off on feet!

Indoor Hopscotch (3)

Travis wanted to help make the board, so some clear tape let him play along!

Indoor Hopscotch (2)

I numbered the board in even numbers only, for fun with counting by twos (skip-counting), but you can number yours traditionally if you prefer.

Once the board was set up, we pulled out the bean bags. I gently introduced the idea of hopscotch – tossing the bean bag and hopping to your number – but didn’t harp on the rules since Travis is a bit young for the game.

Indoor Hopscotch (4)

He loved counting his hops as he retrieved each bag. He often would toss several bean bags at once, and pick them up as he went along.

Hopscotch has the bonus of working his gross motor skills, since getting all the way off the ground in a hop is still a challenge. Bigger kids can practice alternating hopping on one foot with landing on both in the double squares, a nice challenge.

The board then became a vehicle for his imagination! He self-narrated for quite some time with bean bags and hopping while I was busy making lunch.

Toddler Olympics

o-week-15

Although not exactly timely, we had some random fun playing “Olympic games” this past week.

For an adorable version of toddler discus and javelin throw, mark a bull’s eye on a sheet of paper. Paper plates become your discus and plastic straws make the perfect javelin.

o-week-1

Get the whole family in on the action and see who comes closest to the target! Or just have fun launching the plates all around, as Travis did.

o-week-3

We followed up with a bean bag race. Our favorite version was crawling with the bean bag on our backs, seeing who could last the longest, but you could also try running from a start to finish line with the bean bag on your head, or see who can toss the most bean bags into a basket.

o-week-8

Finally, we made an Olympic ring craft. Although I largely had to piece it together, it was great practice for Travis to see how a straight strip of paper can fold into a circle. Once our rings were complete, I showed him the true Olympic logo online, and he was delighted to see that ours matched, including the colors in the same places.

o-week-14

What other toddler “sports” would you add? Please share in the comments!