Learning to Reach

Reaching Game (6).JPG

Veronika is six months old! This is such an exciting age for babies, with so much that happens right around now: rolling if your baby hasn’t already; sitting up unaided; and making the first moves toward crawling.

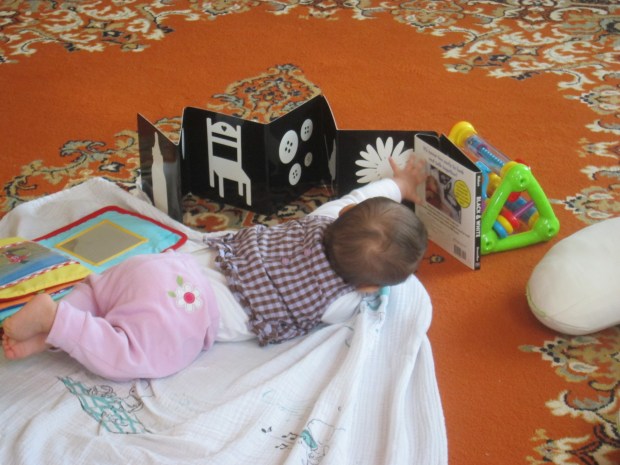
We do lots of tummy time with Veronika, which is one way to encourage crawling. Right now she pushes with her legs but arches her arms back like a swimmer doing the butterfly and screams when she can’t reach something. She’ll figure it out eventually!

Reaching Game (10)

Another way to encourage crawling, other than tummy time, is to have your baby sit and lean forward. This not only builds the abdominal muscles for sitting, but can actually turn into a crawl, if a reach forward turns into a belly flop.

Today, I sat Veronika up with a supportive pillow, and placed a few tantalizing toys just out of reach.

Reaching Game (1)

We soon found that this worked best with her foam blocks.

Reaching Game (4)

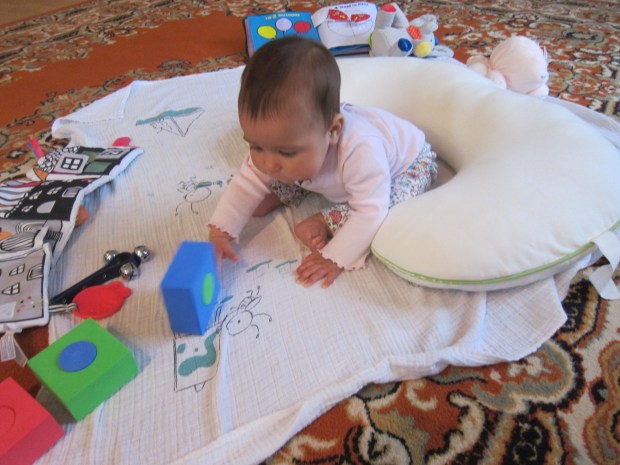
She really wanted to reach them.

Reaching Game (5)

As she reached, I gave lots of encouragement. Resist the urge to move the blocks or toys closer, and let your baby truly stretch.

Reaching Game (9)

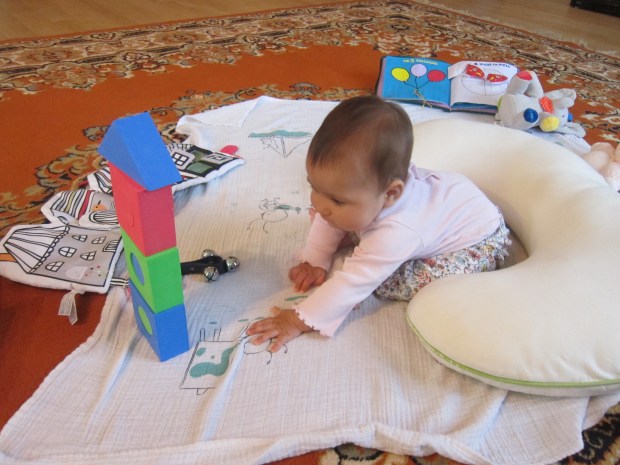
One time she did flop forward onto her belly and looked quite surprised, but then happily was at her target. The other times, she was simply stretching as far forward as possible, so happy and so determined.

Reaching Game (7)

I can say with 100 percent certainty that this game was the difference between a day where she was still sitting with a wobble, and the next day where she suddenly had the muscle control to stay steady. Will it lead to crawling next? I’ll report back once we have a crawler!

Balloon Propeller

Balloon Propeller (6)

We were dealing with big stuff for a four-year-old today! After our disk launchers from Kiwi Co introduced Travis to physics in a way even a preschooler could grasp, now we were talking about Newton’s laws of motion. Full disclosure: this required some review for mommy, who hasn’t touched this kind of material since college!

Here’s my quick recap: Newton’s third law of motion states that for every reaction, there is an equal and opposite reaction. So if the air from a balloon is escaping in one direction, the balloon will try and move forward in the opposite direction, making it spin, in this case.

Here’s how we set it up:

Slightly tug on a balloon and partially inflate it, just to loosen it up – don’t tie off. Now tape the balloon securely to the end of a straw (on the non-bendy side).

Balloon Propeller (1)

Travis immediately wanted to test out if he could blow up the balloon through the straw – neat!

Balloon Propeller (2)

Hold the straw on your fingers to identify the point where the straw balances. This is where you’ll insert a straight pin. Poke the pin all the way through the straw, then down into the eraser of a pencil.

Balloon Propeller (3)

Now blow up the balloon. Have your child hold the pencil, making sure their hand and arm won’t interfere with the motion of the balloon.

Balloon Propeller (5)

Let go and watch! The balloon will deflate, which causes it to spin around on the pin (Note: You may have to tug on the pin or spin the propeller by hand a few times to loosen things up enough).

Balloon Propeller (7)

We did this experiment over and over – a great visual of forces and energy, understandable even at the preschool level!

Balloon Propeller (8)

Mirror Play

Mirror Magic (2)

There are so many ways to play with babies and mirrors, and they just keep getting more fun as your little one gets older! Today – on Veronika’s six month birthday! – we tried out a few new variations.

First, I sat her down in front of a mirror to do some body part and language learning. To the tune of “Here We Go Round the Mulberry Bush,” I sang:

This is what I call my head,

Call my head, call my head.

This is what I call my head,

Listen, look, and see.

Repeat for other body parts, making sure to touch each one as you sing about it.

Mirror Magic (3)

For the final verse, I sang:

Now I know the parts of me,

Parts of me, parts of me.

Now I know the parts of me.

Listen, look, and see.

Mirror Magic (1)

From there, we played around with some of those parts! Once we’d identified the tongue, for example we could wiggle it around.

Mirror Magic (5)

Once we’d identified the cheeks, we could puff them up with air.

Mirror Magic (7)

Once we’d identified the mouth, we could blow a big kiss. Big brother Travis loved helping with these demonstrations!

Mirror Magic (6)

If your baby happens to make a silly expressions, copy that back to him or her!

Mirror Magic (4)

We finished off the day’s mirror play by bringing in a stuffed animal friend. Use any favorite toy or stuffed animal for this part, and have it talk into the mirror or interact with baby.

Mirror Magic (9)

Veronika got a big kick out of this!

Mirror Magic (10)

Game of Soccer

Game of Soccer (4).jpg

Now that spring is here, I’m taking Veronika on more outdoor excursions. One great way to spend time with your almost-six-month-old is to catch a local game of soccer! Not only will watching the action strengthen his or her eye muscles and tracking skills, but there is so much to see and talk about, and great new vocab to teach.

For Veronika, the soccer “game” was actually big brother’s practice. If you don’t have a big sib or friend to watch play, consider catching a local elementary school game, or even watching the big kids from a high school nearby!

Either way, Veronika seemed to love the atmosphere right away, soaking up the sun on a blanket despite an unusually chilly spring morning. I brought along a little ball so she could enjoy the tactile element, as well.

Game of Soccer (2)

We watched the big kids move down the field. I pointed out all their motions to her, which involved some great verbs. Running:

Game of Soccer (1)

Kicking:

Game of Soccer (5)

Drills where they dribbled or tapped cones with their feet:

Game of Soccer (7)

She was very absorbed watching it all – quite the little spectator!

Game of Soccer (6)

In sum, a game of soccer is a beautiful way to spend some time with your baby, long before he or she is old enough to play.

Game of Soccer (3)


Rainbow Science

Make a Rainbow (8).JPG

With all the talk about rainbows this month, whether cooking or crafting, it was time to get scientific. What exactly makes a rainbow appear? Today Travis and I answered the question in two ways, one more scientific, and one more artsy!

First, following the lesson plan provided by Raddish Kids, we did a visualization exercise. This was a first for Travis, but with a few prompts he got the idea. I told him to close his eyes and imagine and rainbow. He said he could see his rainbow through the trees in the morning, and it was star-shaped! Guide your child through this: what does the air feel like? Where is the rainbow? What time of day is it?

Next we did the quick run-down on the science. Raddish Kids provided two great video links to add some visual fun to hte science.

Make a Rainbow (1).JPG

We watched a few suggested video clips, to understand the science behind refraction. Raddish provides a very detailed write-up that older children can study, too.

Make a Rainbow (2)

Next up was a challenge: Could Travis make a visual of a rainbow that not only showed all the colors, but also showed how the rainbow is formed? It turns out this is called process art, and I laid down lots of material for Travis to choose from but provided little direction beyond that.

Make a Rainbow (3)

He decided he wanted a ribbon rainbow, so used lots of glue to adhere the lengths.

Make a Rainbow (4)

I was so proud when he realized he was gluing in the wrong order, and fixed things with his red placed first!

Make a Rainbow (5)

Next he needed to add the science part. He chose to use marker for sun and rain drops, and cotton balls for clouds. Now he had all the ingredients necessary for a rainbow to form!

Make a Rainbow (7)

I made a second version alongside him to show him how open-ended this project is: cotton ball clouds, tin foil raindrops, and pom poms for my sun and rainbow.

Make a Rainbow (6)

Finally, we formed a rainbow with science! Place a prism in a glass of water. Shine a flashlight or other light source on it.

Make a Rainbow (9)

Hold up a piece of white paper behind the glass, and you should see a rainbow reflected on the paper. It’s a bit tough to see in the photograph, but it was there!

Make a Rainbow (10)


Easy Backyard Spy Fort

Backyard Fort (4).JPG

Travis has been into being either a secret agent or a ninja lately – so we needed a proper screen from which he could spy on the goings-on about the neighborhood, of course!

Plant two lengths of PVC pipe into the ground, spaced wide enough apart for an old pillowcase to drape over both. I bought pre-cut lengths of pipe at Home Depot that were two feet long, but wish I had opted for longer – we really had to crouch behind our fort!

Backyard Fort (1)

Cut an eye hole in the pillow case, then slip over the PVC frame.

Backyard Fort (2)

You can now camouflage your fort with paint. If you want to be sneaky, make sure to paint in shades of brown and green. Mostly though, we just had fun painting on this novel canvas, so our colors were perhaps a bit too bright for any actual hiding.

Backyard Fort (3)

Now see what you can see!

Backyard Fort (6)

As mentioned, our fort was quite low to the ground, which made spying tough. But Travis liked peeking through at all the activity going on down below. This fort would also work great for games of hide and seek, at least with younger kids!

Backyard Fort (5)

Teach Your Cat to High-Five

Cat High Five (4).JPG

Here is an adorable challenge from Travis’s Highlights magazine: Can you teach your cat a trick? Travis was gamely up for trying, and although we didn’t exactly succeed, our cat was an eager participant! It was a great way to engage my son with our companion animal in a new way – cat and boy both enjoyed it!

The goal was to teach our cat, Krishna, to high-five with his paw touching our hand.

Hold a cat treat in your right hand.

Cat High Five (6)

Hold your left hand up just slightly above the cat’s head, as if you’re waiting for a high-five. Now hover the hand with the treat in front of that. The cat will (hopefully) paw for the treat.

Cat High Five (2)

We gave praise, and then tried again, over the course of a few days!

Cat High Five (5)

Okay, so we never got a paw to palm, since Krishna wanted to go in each time with his nose. But it was fun to have his nose nuzzle up to the palm.

Cat High Five (3)

In sum, what great inter-species play! Has your child ever taught the family dog or cat a trick? Please share in the comments.

Bubbles and Squirty Water

Bubble Squirty (4).JPG

With Veronika sitting up in the tub, the fun continues to bubble over in new ways!

I mean that literally tonight; it was time to introduce her to the great joys of bubble baths. Make sure you’re using a baby-safe, tear-free formula, especially because your little one is likely to touch mouth or eyes with a sudsy hand at some point. Luckily Veronika seemed unfazed when this happened.

First I just showed her the bubbles as we ran the water.

Bubble Squirty (1)

Once in the tub, we hid a favorite toy, a bright yellow ducky. She loved digging for it in the bubbles!

Bubble Squirty (2)

I also blew bubbles gently onto her back and tummy, for a giggly sensation.

Bubble Squirty (3)

Then we got squirty! I used an empty dish soap bottle to squirt water, both over the bubbles and onto her skin. She wanted to catch the stream of water!

Bubble Squirty (5)

You can also do this with a funnel.

Bubble Squirty (7)

Or with a sieve (we have a bath cup with little holes that’s perfect, and better-sized for baby hands than an actual sieve). I drizzled a little stream of water over her toes and palms, which she loved!

Bubble Squirty (6)

How do you make bath fun for your baby at this age? Please share in the comments!

Easter Egg Granola Tarts

Easter Granola alt

These adorable tarts will get things off to a perfect start on Easter morning! Bake the night before and they’re ready to go as soon as you wake up.

Ingredients:

  • 2 cups rolled oat
  • 1/2 cup shredded coconut
  • 1/2 cup sunflower seeds
  • 1/4 cup whole wheat flour
  • 1/3 cup agave nectar
  • 1/4 cup canola oil
  • Plain or vanilla non-dairy yogurt
  • Fruit or food coloring for garnish
  1. Combine the oats, coconut, sunflower seeds, and flour in a bowl. Set aside.
  2. Combine the agave and canola oil in a saucepan and cook over medium heat for about 3 minutes, until warm. Drizzle over the dry ingredients, and stir to combine.
  3. Pat the mixture into 4 egg shapes on baking sheets lined with parchment paper. It will be quite crumbly, but will set as it cooks.
  4. Bake at 300 degrees F for 25 minutes. Turn off the oven but leave the pans inside with the door propped open to cool completely. You can even leave them this way overnight!
  5. In the morning, spread with the yogurt. Decorate with berries to resemble decorated eggs, if desired, or make stripes by swirling through a little natural food coloring.

Easter Granola var

Go to the Zoo

Go to Zoo (10).JPG

Now hold on; as my readers know, normally I don’t advocate taking children to zoos. There are too many sad stories of animals who are unhappy in captivity, and your money is far better spent at a sanctuary. But today, we were invited to an Easter event at a local petting zoo, and I will say that Veronika seemed delighted in this chance to see the animals. So with some hesitation, here is my post about it as a field trip.

For the most part, this place was more petting zoo than exotic zoo. That meant lots of chances to see familiar animals up close, like pigs, goats, cows, and ponies.

Go to Zoo (9)

The goats seemed to love Veronika! She also enjoyed seeing her brother feed them special cones filled with treats.

Go to Zoo (11)

As we paused by each animal enclosure, I pointed out the name and the animal’s features, and made the appropriate sounds (moo, oink, maa) to turn it into a learning experience.

Go to Zoo (8)

I will say, it was neat for a moment to see small primates, such as lemurs, who were kept in an enrichment environment.

Go to Zoo (2)

If you do find yourself at a zoo, there probably is a lot more for a young infant to look at and enjoy than just the animals. Veronika also got to see the train ride:

Go to Zoo (14)

Enjoy lunch time at a picnic table:

Go to Zoo (16)

Take in a silly chicken puppet show:

Go to Zoo (12)

Observe a playground with kid-sized houses:

Go to Zoo (20)

And so much more. She sure did look happy.

Go to Zoo (6)

We kept up the fun at home, going back over some of the animals we’d seen that day in her baby books.

Go to Zoo (21)

She seemed to especially like the fluffy bunnies that she’d seen at the special Easter event.

Go to Zoo (23)

You can also sing Old Macdonald Had a Farm while using a farm playset.

Go to Zoo (24)

It was good “review” of everything she’d seen in the afternoon!

Go to Zoo (25)