Movie Pillow Fort

Movie Fort (4)

You’ll score points as the coolest parent on the block if you trot out this idea on a cold winter afternoon. Arm yourself with this idea for the winter school break ahead, and you won’t get cabin fever!

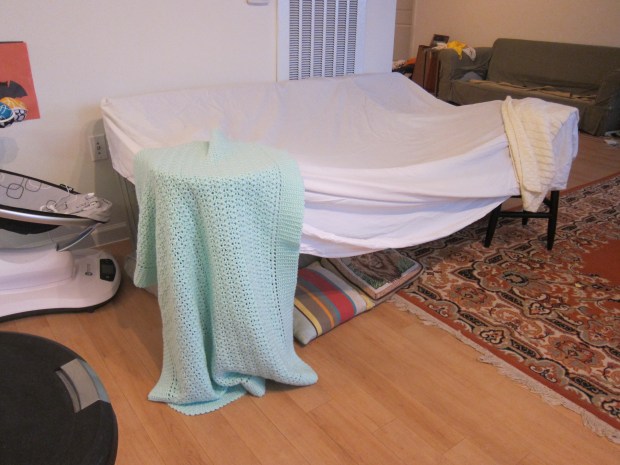
I told Travis that we were going to make a fort – not necessarily an unusual occurrence – but this time for a special purpose. He was so intrigued, and trotted about gathering pillows, blankets, and stools for his special fort.

Movie Fort (1)

We made it bigger than we ever had before, with an entire bed sheet for the ceiling. Soft pillows made the perfect floor.

Movie Fort (2)

He loved testing a flashlight inside. Neat shadows!

Now for the big reveal – I brought in a computer so we could watch a holiday movie right inside the fort.

Movie Fort (7)

Of course you could do this with a regular movie any time of year, but something about it felt so cozy and right for the holiday season. Don’t forget to arm yourself with yummy snacks!

Movie Fort (3)

The fort was just the right size for a boy and his movie – peek-a-boo!

Movie Fort (6)

Even better, make it big enough for the whole family, and you can all snuggle in there together, matching holiday pajamas optional of course.

Movie Fort (8)

Was this the coziest winter afternoon ever, or what? A big hit!

Make a Speedy Bobsled

Bobsled (6)I love how timely the craft in our monthly issue of High Five always is. This month, Travis learned how to make a bobsled just in time for the start of the Olympics!

Of course it made no sense to put together a bobsled when Travis had no reference point, so first we watched a few videos of past teams. He was then super revved up to create one at home.

All you need is an empty toilet paper tube to be the bobsled, and a long piece of cardboard for the track. Ideally use a three foot long piece of cardboard as your track; I only had two feet in length, which worked just fine, but it meant our bobsled couldn’t race as far downhill.

Cut the tube open along one side, and then paint.

Bobsled (1)

I asked Travis if he wanted to paint his sled in the colors of a particular country. Actually, the red white and blue here isn’t America but Australia – he’s big into an Australia phase.

Bobsled (2)

I suggested making the track white for ice, but Travis wanted an Australian-flag colored track as well.

Bobsled (3)

We left the track and bobsled to dry while he was at school, and returned to an afternoon of Olympic fun!

To finish the sled, simply tape two plastic straws on the bottom (decorative washi tape was pretty, though not a must), with the bent parts of the straw pointing upwards like sled runners.

Bobsled (5)

Woosh! Action shot!

Bobsled (7)

We took turns launching the bobsled and rating its runs on a scale of 1 to 10. We give a gold medal to this craft, thanks High Five!

Bobsled (8).JPG


Cotton Swab Snowflake Craft

Cotton Snowflake (9)

I’ve never been a fan of cut-paper snowflakes as a craft. Quite frankly, I’m no good at it, and mine end up looking like circles with a few holes in them, instead of lacy flakes! But with pretty sparkling snowflakes outside our window, we wanted some indoor craft to bring the snow inside, and this cotton swab version was much easier to pull off.

To be honest, Travis was a little young for it. Older kids may be much more into shaping and designing their six-pointed flakes, and can really get creative with the process. As to Travis, he still had lots of fun, just in his own preschool way…

…starting with ferrying the cotton swabs over to me by “forklift.” Shipment received.

Cotton Snowflake (1)

He thought it was fascinating to watch me clip the cotton swabs in half (which, fyi, is not easy to do, the stems are tough; adults may want to help even older children with this step).

Cotton Snowflake (2)

Next I showed him how to arrange the cotton swabs into six-pointed shapes like snowflakes.

Cotton Snowflake (3)

We adhered ours to circles cut from blue constructions paper, but if you prefer, glue them together over wax paper and lift them off the wax paper once the glue has dried.

Cotton Snowflake (5)

Travis set about adding lots of glue and cotton swabs to his “snowflakes.” I loved watching his creative process, including smearing on the glue with a cotton swab at one point.

Cotton Snowflake (8)

As mentioned, older kids may want to create increasingly complex designs, and can cut the swabs into even tinier components.

Cotton Snowflake (7)

After the glue dried, we hung the snowflakes in the window.

Cotton Snowflake (10)

What beautiful flakes falling down!

Cotton Snowflake (11)


Snowy Road

Snow Road (3)

You’ll be the coolest mom or dad on the block if you give this simple twist to outdoor snow play: give your kids permission to bring their toy cars outside to join the fun! Travis was hesitant to venture into the cold, so I headed out first with a shovel and made a road in the snow. Once he saw what I was up to, he couldn’t resist.

He was very into the process of making the road itself, and started to shovel his own route next to the one I had created before he even turned his attention to the cars. Let your civil engineers take over the road building, too, if they prefer!

Snow Road (2)

We found that this game works best with bigger toy cars; little ones get bogged down in the snow.

Snow Road (6)

The best vehicle was our big dump truck, which of course had the added benefit that we could load it with snow…

Snow Road (4)

…zoom it to the dump, and then unload.

Snow Road (5)

What’s your favorite novel way to play in the snow? Let us know in the comments!

Snow Road (7)


Snow Ice Cream

Snow Ice (2)

My mother recently reminded me of this activity from my own childhood, the process of taking fresh-fallen snow and turning it into a marvelous melty cupful of snow ice cream. I couldn’t wait for the next snowy day to share it with my son!

To start, we needed to collect snow of course. Make sure you head out when it’s first tracks and the snow has just fallen glistening from the sky – otherwise you’re not going to want to eat it.

snow day

My “recipe” here is in exact, and you’ll want to vary the amounts according to taste. We took our full cup of snow inside and saturated the top with almond milk until it was a bit slushy. Next we stirred in about 1 and 1/2 teaspoons maple syrup.

Snow Ice (1)

Travis didn’t stop until he reached the bottom of the cup!

Snow Ice (3)

Expanding Snowman

Expanding Snowman (12).JPG

We’ve been waiting for a snowy day around here, because snow always lends itself to exciting winter games and science experiments. With leftover Alka-Seltzer tablets on hand, I had plans for exactly how we could use the snow this time around.

First, I drew a snowman’s face for Travis on a plastic bag. Note to self: next time use a sharpie! We had some inky orange and black hands later on…

Expanding Snowman (1)

Next we needed to collect fresh-fallen snow into our bag. Make sure you fill your bag almost to capacity with snow, or this experiment won’t work. We learned by trial and error!

Expanding Snowman (2)

Now drop in two Alka-seltzer tablets and seal the bag. You may want to place it on a towel, just in case the bag bursts…

Expanding Snowman (10)

Over the course of about an hour, we checked on the bag. The tablets slowly release gas that will make your snowman puff up more and more and more.

Expanding Snowman (11)

Here’s Travis poking a bag filled mostly with gas and leftover slush by the end.

Expanding Snowman (13)

I think the process would be even better if I had left the bag outside, so the snow didn’t melt simultaneously as the gas expanded – whoops!

The whole thing takes a while, of course, because the tablets react very slowly with freezing cold water. Because he grew impatient as we waited, I filled a second bag with hot water from the tap and we dropped in a few Alka-Seltzer.

Expanding Snowman (6)

They immediately fizzed and the bag puffed up with gas, and we talked about why the reaction happened so much faster in the heat.

Expanding Snowman (7)

Can’t wait for the next snowfall and the chance for more snowy games! What do you do with your kiddos to take advantage of a snow day? Please share in the comments!

Snow Storm in a Jar

Snowstorm Jar (4)

We’re always up for a glittery and bubbly project, and this one seemed well worth a try; I’ve seen this one popping up (pun intended!) all over the internet lately. The secret to creating a blizzard inside is a simple little Alka-Seltzer tablet.

First, we needed to mix together 1/4 cup water with enough white paint to make a nice, saturated color. Pour this mixture into the bottom of a glass jar.

Snowstorm Jar (1)

Fill the jar with 1 cup baby oil – the oil will sit on top of the water, which is precisely what makes this experiment work, the fact that water and oil won’t mix.

Snowstorm Jar (2)

Next we added glitter. Ideally, we would have used white glitter to be snowflakes, but our storm had blue glitter. Travis dumped in a whole lot more than I intended before I could stop him, oh well!

Snowstorm Jar (3)

To make the storm happen, simply drop in an Alka-Seltzer tablet. The tablet will create pressure upwards, which makes the water rise, but then the oil pushes it back down again. The carbon dioxide generated by the tablet and the water also keeps things nice and bubbly.

Snowstorm Jar (6)

And your child gets to watch beautiful snowflakes and snowdrifts while learning that little bit of science!

Snowstorm Jar (5)

A moving project like this demanded a quick video, so enjoy!


Hot Chocolate Science

Hot Chocolate (7)

Well now here’s a tasty way to bring some science into your winter afternoon. Or to add a sweet twist to your science. Whichever way you spin it to your kids, who can possibly protest a science experiment that ends a cup of hot chocolate?

I started out by posing a hypothetical to Travis. If we made him hot cocoa for a snack, which would dissolve fastest: cocoa in a cup of cold water, one of medium (room temperature) water, or one with hot water. He picked hot (great!), so I guessed cold to play devil’s advocate. Now it was time to test our hypotheses.

Set out three heat-proof cups and fill each with 6 ounces of water.

Hot Chocolate (2)

Travis proudly helped fill the first two cups. Use caution when pouring the hot water, a step best left to grownups.

Hot Chocolate (1)

We then added 1 tablespoon of hot cocoa mix to each cup, one at a time, starting with the cold water. We tried to be scientific by timing our results with a handy stopwatch, although I confess our scientific method was spotty.

Hot Chocolate (4)

The chocolate in the cold water didn’t go anywhere, remaining powdery and clumpy even after lots of stirring. Truth be told, we have no idea how long it would have taken to dissolve, but far past our attention span on the stopwatch.

Hot Chocolate (5)

The hot water dissolved the cocoa in 10 seconds flat – a neat comparison that grabbed Travis’s attention.

Hot Chocolate (6)

Results for our medium water were a little fuzzy because it was probably hotter than it should have been. I had hoped to have water exactly at room temperature, but it was warm from sitting in the tea kettle. So that only took about 16 seconds to dissolve.

Hot Chocolate (8)

Either way, Travis got to enjoy a cup of cocoa at the end (from the hot cup, of course), and picked up a little science about how heat breaks apart molecules along the way.

Rock Snowman

Rock Snowman (6)

A recent burst of warm(ish) weather got us outside over the weekend, and my little collector is always eager to bring home treasures from our walks. In fact, I always carry a zip-top plastic bag with me when we outside just for this purpose!

Rock Snowman (3)

Today we returned him with a variety of rocks and sticks, so thought we could build little winter snowmen.

Rock Snowman (1)

First the rocks needed a good coat of white paint, and we left them to dry overnight.

Rock Snowman (2)

When we settled in to build our snowmen, it turned out we really only had one rock large enough to be the base, which meant only one snowperson could be built. The rest of the rocks ended up as little “snowballs.”

Rock Snowman (5)

I put together the snowman for Travis with hot glue – three rocks glued together, two little sticks for the arms, and buttons and googly eyes hot glued on.

The finishing touch was a little top hat I simply made from construction paper.

Rock Snowman (7)

Don’t have rocks on hand to make a snowman? Check out our shredded paper or glowing bottle versions instead!

Snowman Stacking Cups

Snowman Stack (5)

There are so many uses for these easy little snowman figures, from competitive stacking games to imaginative play. All you need are 12 Styrofoam cups and you’re ready to go.

The game couldn’t be easier to set up. First, we cut circles from adhesive-back black felt for the eyes. Whoops – at this point they looked almost like ghosts. Wrong time of year!

Snowman Stack (1)

Orange carrot noses and little dotted mouths helped set things right. Now they looked like snowmen.

Snowman Stack (2)

For older kids, you can stage great stacking games to see which formations you can come up with…

Snowman Stack (3)

…or who can stack them the fastest. Travis had a hard time getting the snowmen into a pyramid, but he loved running the stopwatch and timing while I tried! Note of caution: static electricity can make things especially funny and interesting when it comes to stacking Styrofoam.

Snowman Stack (4)

After that we used our cups more as a playful prop. Travis set all the snowmen up for a picnic with a campfire.

Snowman Stack (7)

We decided snowmen would melt if they had a hot campfire, so made it out of… shredded coconut snow!

Snowman Stack (8)

Nothing wrong with stealing a nibble.

Snowman Stack (9)

Again, for Travis as a preschooler, stacking into complicated arrangements wasn’t interesting. He preferred to pile the snowmen atop one another into one big stack.

Snowman Stack (11)

But big kids (and moms and dads!) can heat up the snowman stacking competition to see who goes the fastest, or who comes up with the best stacking arrangement.

Snowman Stack (10)

What games will you play with your snowmen cups? Please share in the comments!