Bubble Wrap Snowman

Bubble Wrap Snowman (7)

While we’re eagerly awaiting the next snowfall ample enough to build a real snowman, Veronika made do with this painted version today!

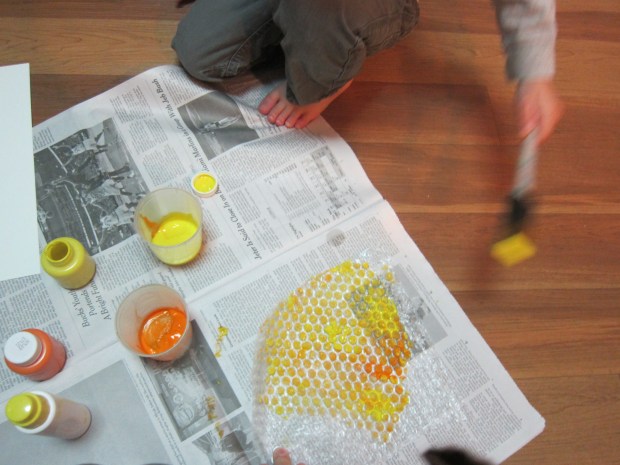
The novelty here was painting the snowman using only a piece of bubble wrap. Little bubble wrap pouches are better for this particular project than a sheet of bubble wrap, since they can easily slip over a hand.

Bubble Wrap Snowman (2)

First, we painted the bubble wrap in wintry shades of white and pale blue. While Veronika painted, I drew an outline of a snowman on white paper.

Bubble Wrap Snowman (1)

I slipped the bubble wrap over her hand like a mitten and showed her how to press down. She loved this, and also wanted to check out the way the painted bubble wrap felt with the other hand. I recommend having a pack of wipes handy, in case your toddler does the same!

Bubble Wrap Snowman (3)

Set your snowman aside to dry, then cut out and glue onto a blue construction paper background.

Bubble Wrap Snowman (5)

Finally, I cut out a few accessories for our snowman.

Bubble Wrap Snowman (6)

For a little vocabulary exercise, Veronika named all of these as we used a glue stick to attach them: a black top hat, red buttons, a red scarf, and an orange carrot nose!

Bubble Wrap Snowman (8)

Bubble Wrap Roads and Runways

Bubble Wrap Fun (11)

Having recently made a tape road, today’s giant road for Veronika was made out of bubble wrap instead! First, I taped a long rectangle of bubble wrap to the kitchen floor, securing it with painter’s tape.

Bubble Wrap Fun (1)

I encouraged Veronika to stomp on it with her feet to pop the bubbles, but she doesn’t weigh quite enough. Thinking quickly, we pulled out her heavy doll carriage.

Bubble Wrap Fun (4)

Now she got to enjoy hearing that pop pop pop! She zoomed the carriage back and forth a few times.

Bubble Wrap Fun (3)

Since we had moved on to vehicles, I pulled out additional cars and trucks for her to roll over the bubble road.

Bubble Wrap Fun (6)

Then, to add to her “city”, I cut a cardboard box into several pieces so we could make it into more of a parking garage, including a ramp along one side.

Bubble Wrap Fun (9)

She loved vrooming her cars off the road and into this garage. The empty roll from the painter’s tape made a great tunnel!

Bubble Wrap Fun (8)

If you want to get really creative, add additional boxes and have the bubble wrap road go right up and over them!

Bubble Wrap Fun (5)

When the car play was done, we went back to using the bubble wrap as a runway for our bodies. I showed Veronika how to crawl on it, and her little knees were rewarded with bubble pops.

Bubble Wrap Fun (10)

Next she sat down and tried popping individual bubbles with her fingertips. This is great for muscle strengthening!

Bubble Wrap Fun (14)

Big brother Travis wanted a turn running along our runway, too!

Bubble Wrap Fun (2)

I taped down a second rectangle, thinking the kids might want to race side by side. If your kids are close in age, you could even turn this into a competition to see who pops all their bubbles first, or whose runway is the loudest.

Bubble Wrap Fun (12)

However you play, bubble wrap is a great way to get out some energy inside!

Bubble Wrap Fun (13)


Bubble Wrap Bee Hive

Bubble Wrap Bee (4)

Travis loved when we painted with bubble wrap a few weeks back, so we did it again this morning – but with more precision!

Having recently seen a colony of bees buzzing at a local preserve, I thought that would make a good theme. I cut plastic wrap roughly into the shape of a domed beehive. Travis helped cover it with orange and yellow paint.

Bubble Wrap Bee (1)

We flipped the bubble wrap over to press the bubbles onto paper – leaving behind what look so much like honeycombs! Travis particularly loved that the back of the bubble wrap was dry during this step, knowing the front had been so wet.

Bubble Wrap Bee (3)

My original intent was for him to dip his thumb in yellow paint to make bees around the hive, but Travis balked at the idea (he doesn’t want to get messy, these days!) Instead, we used a yellow dot marker.

Bubble Wrap Bee (5)

Once the paint dried, I colored in the bees stripes, wings, and smiles. Bzzz!

Bubble Wrap & Paint

Bubble Wrap Paint (8).JPG

This project is messy but so worth it – paint, cool textures, exciting results… What more could a toddler want from an art project?

To start, I set Travis up with a disposable cookie sheet and paints, and told him he could squeeze on whatever colors he wanted. This alone was cause for excitement, since usually I measure out a portion of paint for him to use. He was very deliberate choosing which color should go where!

Bubble Wrap Paint (1)

Now it was time to smear it all together with a plastic spoon, which he loved.

Bubble Wrap Paint (2)

Once our baking sheet was filled with paint, we placed a piece of bubble wrap, bumpy side down, over the paint and pressed to make sure it was fully coated.

Bubble Wrap Paint (3)

Carefully peel up the bubble wrap and transfer to a piece of poster board. Press down again, then lift off and reveal your painting!

Bubble Wrap Paint (5)

We had to make several prints of course, adding new colors each time.

Bubble Wrap Paint (9)

Then Travis wanted to get his hands on the painted side of the bubble wrap, and pressed his painted hands onto a clean piece of bubble wrap, which was nearly as fun since it led to popping the bubbles.

Bubble Wrap Paint (7)

Great messy fun!

Bubble Wrap Paint (6)