Sticky-Treat Sushi

Sticky Sushi (8).JPG

There is an international festival coming up at Travis’s school, which has us talking about food from around the world. Here’s a sweet spin on the classic Japanese dish! This candy sushi was so fun for Travis to put together.

To start, make the “rice”: melt 2 tablespoons Earth Balance butter in a microwave-safe bowl, heating at 10 second intervals for a total for 30 seconds, or until melted.

Add 2 and 1/2 cups mini Dandies marshmallows. Microwave at 15 second intervals until melted (we needed about a minute total), stirring after each interval.

Sticky Sushi (9)

Stir in 3 cups rice cereal. If you need to use your hands, I recommend having a grown-up do so, as the sticky marshmallows will still be hot.

Sticky Sushi (1)

Spoon the mixture onto parchment paper. Cover with additional parchment paper and use a rolling pin to flatten about 1/4-inch thick.

Sticky Sushi (2)

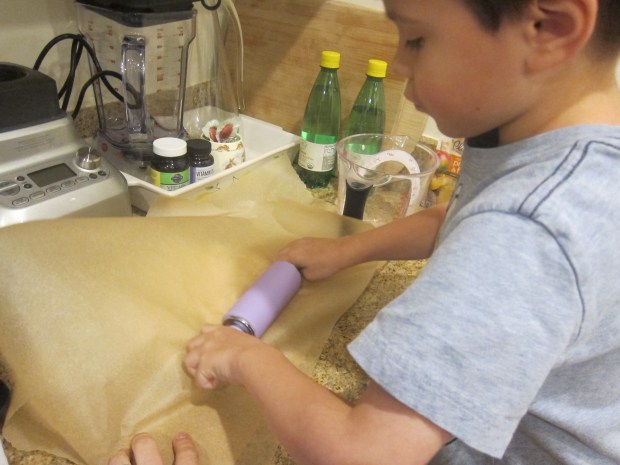
The rolling pin ended up being a little tricky, so we found it easier to pat with our hands.

Use a pizza cutter to cut into rectangles. Travis was so proud I let him use this tool!

Sticky Sushi (3)

Now you can make sashimi or sushi rolls!

For “sashimi”, place a Swedish fish candy (Wholesome DelishFish are vegan) on top of a rice rectangle. Cut a strip of fruit leather with a pizza cutter and wrap around the fish.

Sticky Sushi (4)

For a rolled version, cut a strip of fruit leather and cover with a rice rectangle. Top with pieces of candy (Travis chose organic Red Vines) and roll up.

Sticky Sushi (5)

If you really want to get creative, tint a little vanilla frosting with green food coloring for “wasabi”!

Sticky Sushi (6)

Acorn Animal Craft Challenge

Acorn Animals (4).JPG

Travis’s craft challenge from Highlights this month was to make little animals using nothing more than acorns, wiggle eyes, and paint.

We collected a whole bunch of acorns (about 20) from oak trees nearby, which was no easy feat in 10 degree weather!

Acorn Challenge (1)

Inside, I asked him what colors he wanted to paint, thinking about what animals he might end up with. He opted for gray, so we mixed black and white together. Because he didn’t want to get his fingers messy on the small acorns, I held them while he painted.

Acorn Challenge (2)

For variety, we made a few pink acorns as well.

Once the paint dried, we glued together a few simple creatures. The stems on the acorn caps made us think of curly pig tails, so two pinkish acorns were glued together as pigs. Travis glued on the googly eyes, although the large size of the eyes made it hard for them to stick while the glue dried.

Acorn Animals (3)

The gray acorns made us think of little owls, who also received eyes.

Acorn Animals (5)

If Travis were older, I would have encouraged him to paint on little feathers, but I knew that sort of fine detail was too much for him. In sum, a cute project but not our favorite craft challenge to date.

Gallant Challenge: Lived It, Learned It

Lived Learned (1)

Travis always loves the Goofus and Gallant page of Highlights magazine and the inspiring stories of kids with Gallant moments. We’ve even tried to replicate some. Today, it was his turn to be the Gallant kid and inspire others, because the challenge was…to share a Gallant learning moment and impart that wisdom to other kids.

Travis and I read the challenge and then I asked him to think about just such a teachable moment that he has experienced.

He decided he’d write about times at the playground where his friend is sad. Saying “I’m sorry”, he’s learned, helps make things better.

He drew a picture, including the rocks that they like to play on at the playground. I helped him use creative spelling for the word “sorry”, then wrote out the full story on the back of the page.

Lived Learned alt

For full ownership of the project, he even affixed the stamp before we mailed it off to Highlights. Travis was so proud to share!

Lived Learned (2)

Gallant Challenge: Endangered Animal Art

Endangered Animal (2)

Travis is inspired every time he reads the profile on Gallant Kids in his Highlights magazine. This month’s read was about a girl who paints pictures of endangered animals and sends the proceeds from her sales to charities that aid animals. We loved the idea, and immediately decided to make some pictures of our own.

Because Travis loves snakes, we looked up which species have populations that are decreasing or at risk.

Endangered Animal (1)

First, Travis drew a pit viper.

Endangered Animal (3)

He was so proud of the colors he blended together and immediately wanted to draw more snakes.

Endangered Animal (4)

Pretty soon, he had an “art gallery” wall filled with a snake pictures, featuring everything from a yellow-horned lancehead snake…

Endangered Animal (5)

…to mom and baby tropical forest snakes.

Endangered Animal (6)

Obviously Travis won’t be making money from these little drawings, but I loved how proud he was, how the activity got him thinking about conservation and protecting animals, and how it challenged his artistic skills as he thought hard about how a snake’s body and head should appear on the page.


Snack Animals

Snack Animals (8).JPG

Independence is so crucial to kindergartners, and I have loved watching Travis’s confidence grow since school began only a month ago. Now, he wants to do all the little steps himself each day, from buttoning shirts to buckling his backpack. Being able to serve themselves drinks and snacks is also key for kids’ independence at this age, so we created this adorable snack animal to keep easy snacks at hand!

To start, remove the lid from an empty oatmeal canister, and trace twice on cardboard. Note: I found an old cereal box easier than stiffer cardboard packaging for tracing and cutting out. That said, it means your final animal won’t be quite as sturdy and might sit on your counter instead of standing!

Draw legs below each circle and cut out; these will be the front and back of your animal.

Snack Animals (1)

Travis decided we should turn ours into a cow, but really any animal will work! Highlights magazine also suggested a pig or a deer.

Snack Animals (3)

For the cow, we painted the legs white with black spots.

Snack Animals (2)

I cut an additional shape to be the cow’s head, which we glued to one of the circles.

Snack Animals (4)

Don’t forget to paint the canister, too, which received its own coat of white paint and black dots.

Snack Animals (5)

Once the paint dries, glue the head piece to the lid of the canister. Glue the back legs to the back of the canister.

Snack Animals (6)

Let the glue dry, then stuff with treats! You can also add yarn for a tail, depending which animal you choose. Pink would have been cute on the pig version!

Snack Animals (7)

As noted, our cow kneels down a bit, but Travis loves that he can help himself to an afternoon treat.

Snack Animals (9)

Gallant Challenge: Kindness Bracelet

Gallant Bracelet (2)

After reading this month’s Gallant profile in Highlights magazine about a young girl who sends bracelets around the world with the message to do a kind deed, Travis was inspired to make bracelets of his own!

We had a kit at home to make bead bracelets on shoelaces (which were glow-in-the-dark for added fun). Older kids might enjoy weaving friendship bracelets or something else a touch more complicated.

Gallant Bracelet (1)

As he worked, Travis brainstormed who might like to receive one of the bracelets. Perhaps a waiter at a restaurant, he decided. Or his upcoming bus driver for Kindergarten!

Gallant Bracelet (3)

And of course family members! When he finished the first one for his grandmother, he was so proud.

Gallant Bracelet (4)

He presented it to her and explained that now she could do a kind deed to pay it forward, in whatever way she chose.

Gallant Bracelet (5)

This was such a simple activity, but such a great way to get kids crafting and thinking about the chain of events that can spread good deeds in the world. Thanks Highlights!

Picnic Scene Craft Challenge

Picnic Challenge (6)

Travis loves the open-ended craft challenge he finds in his Highlights magazine every month, having crafted robots and camping tents in the past, among others. Today, we wanted to make a picnic scene using nothing more than colored paper, cotton balls, and paint.

I loved the little method that Travis came up with. First he needed a paper base, and he chose green grass. We glued down a separate square of colored paper for the blanket.

Everything else in the little scene was made of cotton balls, which he dipped into paint and then glued on!

Picnic Challenge (1)

It definitely was a five-year-old’s take on a challenge for kids as big as age 12, but I loved watching his process. There was green cotton ball grass:

Picnic Challenge (3)

Orange cotton ball food:

Picnic Challenge (2)

And pink cotton ball people! He then made some black cotton ball ants.

Picnic Challenge (4)

He loved carefully pouring the paint onto each cotton ball before gluing them down, and enjoyed it so much that he wanted to make a second version. This time his pink person dined on yellow lemonade.

Picnic Challenge (5)

Butter Art

Butter Sculpture (8).JPG

Travis loves butter (our favorite is the original from Earth Balance!), so much so he’s been known to ask for it by the spoonful whenever we make recipes with butter. So when he read an article in his latest Highlights about a butter artist, we had to give sculpting with butter a try.

Butter Sculpture (2)

I pulled two sticks of Earth Balance from the fridge (the colder the butter the better) and gave him a dull knife to carve.

Butter Sculpture (1)

At five years old, Travis didn’t actually make anything recognizable, but that wasn’t the point. First he told me he had sculpted Darth Vader, and then he was at work on a city.

Butter Sculpture (6)

Every once in a while he’d have a nibble of course!

Butter Sculpture (9)

I felt a bit like a kid again as I put my own skills to the test on the second stick of butter. This one was a shoe:


Butter Sculpture (4)

And this one was a bed:

Butter Sculpture (5)

We had such a laugh during this whole activity, washed our hands really well after, and otherwise learned something new about butter and art. In other words, highly recommended!

Tricky Triangles

Tricky Triangles (5).JPG

These fun foam triangles are a homemade version of a tangram puzzle! We followed a template from Highlights magazine, which made for great puzzling on a Saturday morning.

First, follow the lines provided to divide a large sheet of craft foam into 8 triangles. Big kids can help with the lines and the cutting, but this was more of a craft that I set up for Travis than one we prepared together.

Tricky Triangles (1)

Soon I had 3 sets of triangles for him, in orange, green, and yellow foam.

Tricky Triangles (2)

We looked at the shapes in the magazine and he wanted to make the fish first: green triangles! Tangrams are wonderful for helping children think spatially and translate what they see on the page to a real model.

Tricky Triangles (3)

Travis needed help with the orientation of a few triangles, but mostly could see how the fish came together.

Tricky Triangles (4)

Next up was an orange fox! I had Travis point out where the biggest triangle went first as a starting point, and we worked our way outward from there.

Tricky Triangles (6)

He was quite proud when he saw the fox take shape.

Tricky Triangles (7)

Finally, he made the yellow cat. Add big googly eyes to any or all of these, if you have them!

Tricky Triangles (8)

As your child becomes skilled at copying the provided designs, branch out and make up your own! Next time I’m going to cut up a smaller version since these would be perfect to slip in a zip-top bag and turn into a take-along toy for car rides or waiting rooms.

Animal Craft Challenge

Animal Challenge (6)

Travis loved this month’s craft challenge from Highlights magazine: to make an animal using nothing more than an empty egg carton, pipe cleaners, pom poms, and googly eyes.

I was thinking something cute and fluffy, but Travis immediately knew he wanted a snake! Pipe cleaners were the obvious choice for the body.

Animal Challenge (1)

We twisted several lengths together to make long snakes. He wanted to attach eyes next, but I asked him if he thought the eyes would affix well to the pipe cleaners. He decided no, and realized an egg carton piece could be the head!

We poked holes through the egg carton segments to attach heads to bodies, and glued on the eyes.

Animal Challenge (2)

With leftover egg carton portions all around him now, he toyed around with gluing pom poms and eyes to single segments, but this didn’t work very well. Could we use the bigger, lid portion of the carton we wondered, for a body?

Animal Challenge (3)

Now Travis knew what he wanted: a spider! We threaded four pipe cleaners through from one side to the other, to make 8 legs. He wanted to glue on 8 eyes, but we only had room for 5 eyes to march across.

Then Travis decided it needed to be furry with pom poms – a tarantula! He was so thrilled with this spider that he couldn’t wait for the glue to dry.

Animal Challenge (4)

What a wonderful craft challenge, thanks Highlights!

Animal Challenge (5)