Stamp Pad & Eraser Art

Stamp Eraser (1)We’ve been playing with stamps a lot this week, including in a few new colors of washable ink. Travis literally greeted me first thing with a demand to use our new ink pads (note to self: don’t leave the ink out where he can see it from his bed), so I wiped the sleep from my eyes and dove into this novel stamping game. I thought the cute variation on dot markers would delight Travis!

First, outline a few shapes on paper for your child with cookie cutters – this part is optional, as of course you can just dot the paper at random, but the shapes mean you’ll have a nice craft at the end.

Stamp Eraser (4)

I set Travis up with a couple of pencils (unsharpened, but with good erasers!) and our washable ink in various colors, and he quickly took to pressing the eraser into the ink before transferring over to the shapes.

Stamp Eraser (3)

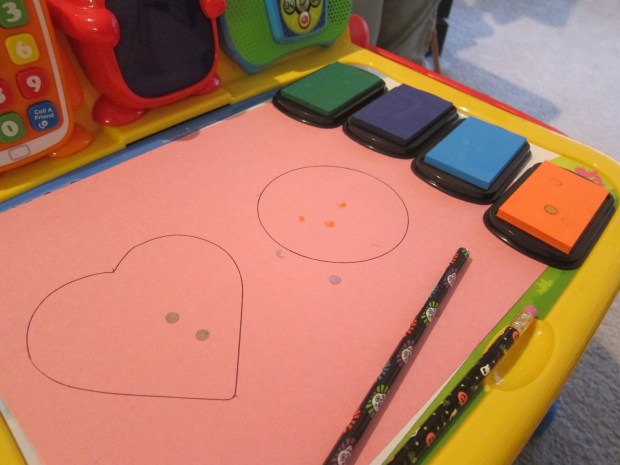
The craft turned out to be a little tricky for his hands! Most times he only pressed down a half-circle of eraser, instead of achieving a full circle. Also, you never realize how tiny a pencil eraser is until your child is trying to fill in a cookie cutter shape! When he got bored, I filled in a few final dots.

Stamp Eraser (5)

These looked pretty hanging in our window! Had we done them in the winter, they might even make cute homemade ornaments.

Stamp Erase r (6)

Ice, Water, Vapor

Ice Steam (2)

It’s been quite some time since I hopped over to Hands on As We Grow, but glad I stumbled upon this experiment and remembered what a treasure trove the site is for games and learning!

Parents, use your discretion before embarking on this activity. Kids will need to stand near a burner and hot pot on the stove. If you think they will reach out, wait until they are older. However, if you’ve started to include them as a little sous-chef in the kitchen and they understand the basics of kitchen safety, they are likely ready for it.

Travis loves playing with ice, and today I told him we’d take ice cubes all the way from frozen to steamy vapor. He was so excited to see how it would happen!

First, have your child help you count ice cubes into two pots. There really was no need to use two, except that it doubled the excitement of watching what happened during the experiment.

Ice Steam (1)

We placed the pots on the stove, where the ice quickly reached the next phase – water! I gave Travis a big wooden spoon to stir with so he could feel the difference between the chunky ice cubes and smooth water.

Ice Steam (3)

Very quickly, our pots started bubbling and we waited for the steam to appear. We had two ice cubes left over, and added them to the pot when it was at its hottest – Travis couldn’t believe how quickly they melted!

Ice Steam (4)

A great intro to states of matter.

Cardboard Postcard

Cardboard Post (6)

For kids interested in stamps and letters, this project is fantastic. Not only do they get to make a unique creation, but you can really mail it!

For sturdy backing, we made our postcards on cardboard, which I simply trimmed from a package that had arrived earlier in the week. Travis decorated with a “message” – he loves pretending to write words these days!

Cardboard Post (2)

I made sure to leave room on the side for lines and the address of our recipient.

Cardboard Post (1)

Turn the card over and decorate – we used glue and cut up pieces of tissue paper.

Cardboard Post (3)

If you like, use a paintbrush to deal your design with an additional layer of glue; this gives your creation a better chance of making it through the mail intact… though I confess we skipped this step!

Cardboard Post (7)

Once the glue dried, we were off to the post office! I think we made the clerk’s day when we showed her what we wanted to mail. Now your lucky recipient will receive a surprise in the mail!

Cardboard Post (8).JPG

Rock On!

Rock On (3)

As any parent of a rock collector knows, rocks pretty much, well, rock! We’re always finding great stones to add to our collection, but I loved this project from High Five magazine because it upped the stakes a little – we needed to find flat rocks in order to make the project work.

Luckily an outdoor foray yielded just enough smooth flat ones to build a sculpture.

Rock On (8)

The first step was to paint them. I thought we’d use all three primary colors, but yellow didn’t show up very well on the dark gray rocks, so we mostly had a blue and red result.

Rock On (6)

This mama was particularly proud of a green shade she mixed, until a toddler came along and turned it brown – such is motherhood!

Rock on (9)

Let your rocks dry completely.

Rock On (1)

Once dry, we used our largest rock as the base and began gluing them together into a sculpture.

Rock On (2)

And of course what sculpture doesn’t need a healthy heaping portion of extra glue on top?

Rock On (4)

Overall, a very cute twist on rock collecting. What does your sculpture look like? Please share in the comments!