Washing Toys Water Activity

Wash Toys (4)

Here’s one of the simplest yet best ways to keep a toddler happy: washing his or her own toys. Yup: between water, favorite toys, splashing, and imitating you the grown-up, this activity has it all!

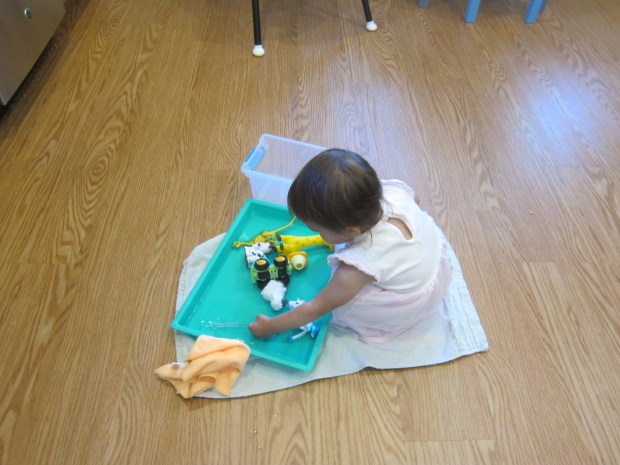
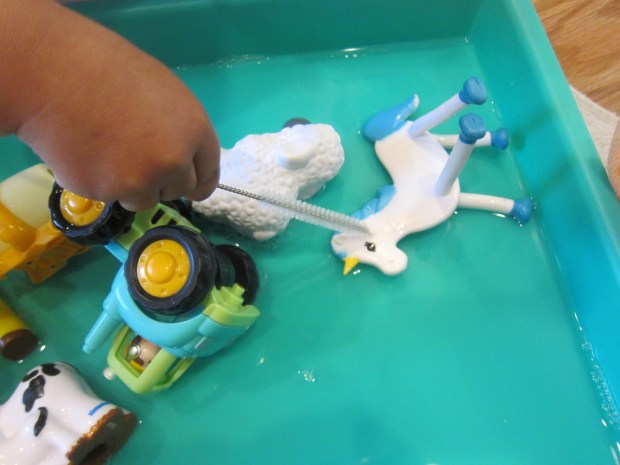
And it couldn’t be easier. This morning while I needed to keep Veronika busy, I simply set out two basins, one with clean water and one with a tiny bit of soap added, along with a towel underneath to catch inevitable sloshing.

Then I added a few favorite toys that can get wet, including trucks, animals, and a dinosaur. Plus her unicorn, otherwise known around here as Sparkly Neigh.

Wash Toys (1)

She immediately fell to washing them. I had given her a tiny bristles brush meant to clean out straws, and this was a perfect for giving cow and sheep and Neigh a good scrubbing.

Wash Toys (2)

In between washing the toys, she also just loved splashing her hands in the water.

Wash Toys (3)

When she seemed about to tire of the game, I handed her a cloth, and she lovingly fell to drying everyone off!

Wash Toys (6)

Beyond just the fun of cleaning the toys, toddlers love games like this where they can feel like a little helper. As long as you don’t mind a little water on the floor, this is a great way to keep your toddler busy.

Wash Toys (5)

Kindergarten Home School Week 14: Wednesday

Home School 74 g

It’s the second-to-last day of school! With an emphasis on tying up loose ends and having fun, here’s what we tackled today:

9-9.30: ELA. Travis filled out a page in his workbook with word tic-tac-toe, along with a page about punctuation marks like question marks and exclamation points. We finished with a real game of tic-tac-toe!

Home School 74 b

9.30-10: Math. Travis rocked his math lesson today, a workbook page counting penguins and then filling in ice cubes with numbers up to 100.

Home School 74 a

I surprised him with a break-the-ice board game (going along with the theme) after, which he absolutely adored.

Home School 74 c

10-10.30: Snack/recess. Little sister got artsy with mud while Travis played.

10.30-11: STEM. Travis watched a read-aloud of Bartholomew and the Ooblek before we made it hands-on with the classic experiment of making ooblek. We mixed together 1 cup water and 2 cups cornstarch for some of our best homemade ooblek to date.

Home School 74 f

Of course it needed to be green. Travis was unafraid to get his hands in, then filled out a worksheet describing it with all his senses.

Home School 74 h

11-11.30: Craft. We had fun with pool noodles!

11.30-1.30: Lunch/free play.

1.30-2: Class Zoom. For the final online session with his class, his teacher shared a slideshow of the year. What memories!

For evening storytime, we not only watched his teacher’s final read-aloud online (Only One You), but also took time to make shadow puppets.

Home School 74 i

Travis filled out a worksheet page drawing animals on provided shadow puppet templates before we tried our hand (ha!) at making our own. Travis was particularly proud of his spider!

Home School 74 j


Pool Noodle Marshmallow Poppers

Pool Noodle Marshmallow (3)

Travis’s latest issue of Highlights magazine featured tons of ways to craft with pool noodles. With summer mere days away, we decided to test out the first of the lot: a marshmallow launcher! This is similar to a project we made in the past using a cup, but the pool noodle makes a much sturdier version.

To start, cut 3-inch pieces of pool noodle, one for each popper.

Pool Noodle Marshmallow (1)

Tie a knot in a balloon, then cut off the top end of the balloon. Stretch over one end of a pool noodle piece.

Pool Noodle Marshmallow (2)

Secure with duct tape, and add other strips of tape for fun pops of color, if desired. Now fill the cavity of the pool noodle with mini marshmallow (we love Dandies of course!). Pull down on the knot of the balloon and… launch!

Pool Noodle Marshmallow (5)

In addition to great fun trying to catch the marshmallows and eat them, the poppers led to lots of silly marshmallow wars. Travis loved being pelted with them, or pelting me with them, or hiding around the corner waiting to ambush each other.

Pool Noodle Marshmallow (4)

You might just find yourself acting like a kid right alongside your kid! This craft is sure to add a sweet note to any summer day.

Pool Noodle Marshmallow (6)

Mud Painting

Mud Painting (5)

Instead of getting your patio or driveway messy with paint that needs to be washed off, stick with nature and paint with… mud instead!

The first thing you’ll need to do for this project is make the mud, which in and of itself was a delight for Veronika. She took my hand and toddled over to the trees with me to scoop some dirt into a bucket.

Mud Painting (2)

Once back on the patio, we added water to the bucket and stirred with a craft stick until the mixture was very muddy. If it gets too thin and watery, just add a little more dirt.

Mud Painting (3)

Then I provided Veronika with paintbrushes and thick paper, treating the mud like it was real paint.

Mud Painting (4)

At first, stirring the mixture in the bucket was such a joy that she focused on that. But then I showed her how to move her paintbrush over the paper, and soon she was happily swirling and dotting with her brown “paint”.

Mud Painting (7)

She eventually discovered she could use the craft sticks to scoop out thicker globs of mud from the bottom of the bucket and smear onto the canvas.

Mud Painting (8)

In fact when I moved one sheet of “painted” paper aside to dry in the sun, she started carrying blobs of dirt over to it to carefully balanced on her craft stick. Clearly the artist wasn’t done!

Mud Painting (9)

This kept her so busy in the sunshine for quite a while. Perfectly dirty and messy fun!

Mud Painting (6)


Bathtub Fingerpainting

Bathtub Fingerpainting (2)

If your toddler loves to fingerpaint but you worry about the mess, here’s the perfect solution: Get messy exactly where you’re going to clean off afterwards!

To wit, I stripped Veronika down to her diaper and sat her in a dry bathtub, then squirted generous amounts of fingerpaint on the tub walls. I used blue, yellow and green, which meant we had the possibility of playing with all three separately, or watching the blue and yellow combine into a new green.

Bathtub Fingerpainting alt

Veronika was hesitant at first, but the colors soon proved irresistible. Once her hands were messy, she began making big smears on the walls. She loved making a big mess with it…


Bathtub Fingerpainting (7)

…but also loved being more deliberate, dipping in one finger and then swirling color carefully on the tub or the tiles.

Bathtub Fingerpainting (4)

Or admiring the way the colors looked on her fingers.

Bathtub Fingerpainting (3)

It all looked like so much fun that big brother Travis jumped in to paint, too!

Bathtub Fingerpainting (5)

When her masterpiece was complete, I pressed a piece of newspaper over the fingerpaint, allowing us to capture a memento of the project.

Bathtub Fingerpainting (9)

Needless to say we made a huge mess.

Bathtub Fingerpainting (8)

But we were exactly where we needed to be to rinse off…kids and tub both!

Bathtub Fingerpainting (6)

Kindergarten Home School Week 14: Tuesday

Home School 73 h

It’s Travis’s last Tuesday of Kindergarten! When there’s ice cream involved at 9.30 in the morning, you know you’re shifting into summer mode…

9-9.30: Math. Travis counted fish in his workbook using the tens place and ones place, and he rocked this lesson. We made it hands-on with a round of our sight word fish game after. Travis was so proud of how quickly he reads most words now.

Home School 73 d

Even when there was interference from a cute fish in the pond!

Home School 73 c

9.30-10: Social/emotional learning. Travis’s next workbook page involved following directions, using the example of making an ice cream sandwich. What kind of mom would I be if I didn’t surprise him with a real ice cream sandwich thereafter? We even added sprinkles.

Home School 73 f

Needless to say, I had two happy kids, and I guess this counted as snacktime, too!

Home School 73 g

10-10.30: STEM. A leaky water bottle experiment had major wow factor, and got us outside for “recess” at the same time.

10.30-11: Art. We made a gift for the upcoming Father’s Day!

11-11.30: ELA. Travis first watched a read-aloud of Zoom Zoom Zoom, I’m Off to the Moon. He then colored in a rocket template and he picked his destination to write down: Mars. Home School 73 j

He finished up with 20 proud minutes on Lexia.

Home School 73 i

11.30-1.30: Lunch/free play. Little sister had a gym class!

1.30-2.30: Outside. We searched for animal homes in a gorgeous walk through the woods.

See you for the final Wednesday tomorrow!

Decorate A Cereal Bowl for Dad

Cereal Bowl for Dad (5)

Here’s a fantastic gift for dads this Father’s Day, care of Hands On As We Grow, that requires no fancy materials but will easily get daily use: decorate bowls with permanent marker so that every time Dad digs into his morning cereal (or afternoon soup, or evening ice cream, or anything in between!), he’s reminded of the kids.

The project requires Sharpies, which are not food safe, so be sure your children are only decorating the outside and bottom of the bowl. I knew the project would be perfectly safe for my kindergartner, but I supervised Veronika closely since the bowls were breakable and the marker was permanent!

Cereal Bowl for Dad (2)

Luckily she loved scribbling all over the sides and bottom of one bowl, and didn’t do any drawing on her skin, as she’s prone to do.

Cereal Bowl for Dad (3)

Travis, meanwhile, wrote “Dad” and drew a picture, and was so proud of his work. Finally, I wrote Happy Father’s Day on a third bowl.

Cereal Bowl for Dad (1)

Place the bowls in a preheated oven at 350 degrees F for 30 minutes. (Note: Be sure to check that the bowls you’re using are oven-proof, and check the company’s website for any heating details).

Cereal Bowl for Dad (4)

Let the bowls cool, then wrap and save for the big day!

Lemony Rice & Asparagus Salad

Lemony Rice Asparagus

From lemon to dill to asparagus, this rice salad is bursting with the flavors of spring.

Ingredients:

  • 4 cups water
  • 2 cups white rice
  • 1 bunch asparagus
  • 2 tablespoons chopped fresh dill
  • 1/4 cup olive oil
  • 1/2 cup lemon juice
  1. Combine the water and rice in a saucepan and bring to a boil. Cover, reduce heat to low, and cook for 20 minutes, until the liquid is absorbed. Transfer the rice to a large bowl.
  2. Meanwhile, trim the tough ends from the asparagus and cut into bite-sized pieces. Steam for about 5 minutes, or until tender.
  3. Add the asparagus and dill to the rice.
  4. In a small bowl, whisk together the olive oil and lemon juice. Pour over the rice mixture and stir to combine.

Lemony Rice Asparagus alt

Leaky Water Bottle

Leaky Bottle (6)

This easy STEM experiment has major wow factor, even for grown-ups!

In an empty water bottle, poke three small holes with a needle, one atop the other. Many water bottles these days are made of incredibly thick plastic: you’ll want to look for good old-fashioned thin plastic bottles if you’re going to pierce through with the needle easily.

Leaky Bottle (1)

We added a little blue food coloring to the empty bottle just for fun, although the experiment will work just fine with clear water.

Leaky Bottle

Begin pouring water in (a watering can is helpful to use), and of course water will begin trickling out of your three holes slowly. Once your bottle is full, twist on the cap.

Leaky Bottle (2)

The water stops leaking out!

Leaky Bottle (4)

After your child’s initial moment of wow, you can explain what’s going on: the bottle contains both air and water, but for more water to be pushed out, more air has to come in. Once the cap is on, the water molecules bunch together and create enough surface tensions against the tiny holes from the needle. If the holes were any larger, of course, this wouldn’t work so well! Then, once the cap is off, more air comes in and pushes the water right out again.

Leaky Bottle (5)

With that explanation out of the way, now Travis wanted to twist the cap on and twist the cap off over and over… Through three refills of the bottle!

Leaky Bottle (7)

There might have been a giggle factor to this project, too, since yes the bottle looks a bit like it’s going to the bathroom when the stream of water arcs out.

Leaky Bottle (8)

As you can see, both my kids were rapt! A fantastic STEM experiment outside on a hot day.

Leaky Bottle (3)

Tiny Tambourine

Tiny Tambourine (7)

Veronika’s online gym class always starts with shaking along instruments to the welcome song. I thought it would be fun to make at-home tambourines to shake along today!

You can use mini aluminum tart pans for this craft, but I decided to use mini paper plates instead so that Veronika could decorate them first. This girl loves using her markers!

Tiny Tambourine (2)

Once we had covered the plates in scribbles and shapes, I placed two plates together. I chose too different options for inside. Dried rice went into the first (which made a softer sound, more like a maraca)…

Tiny Tambourine (3)

…and pennies went into the second for a more jangly tambourine sound.

Tiny Tambourine (4)

Use a stapler to staple all around the edges. I recommend making sure your staples are right up against each other so none of the filling slips through the cracks.

Tiny Tambourine (5)

Time to shake along and start class!

Tiny Tambourine (8)

Veronika looked so proud of her homemade instrument.

Tiny Tambourine (6)