Banana-Split Popcorn

Banana-Split Popcorn.JPG

We love this salty/sweet popcorn mix, perfect for snacking on during a family movie, or as an afternoon treat. I like to divide the mixture ahead of time into snack-bag size portions, so we can grab one for the road in a pinch.

Ingredients:

  • 4 cups plain popped popcorn
  • 1/2 cup banana chips
  • 1/4 cup vegan chocolate chips
  • 3 tablespoons freeze-dried raspberries
  • 1/4 cup toasted walnuts
  • 1/4 teaspoon salt
  1. Combine all of the ingredients in a large bowl, tossing to combine. Serve!

Banana Popcorn alt


Baked Pita Pizzas

Pita pizza

These pizzas require only four ingredients and they bake in 6 minutes – need I say more? This one is perfect for your most hectic weeknights.

Ingredients:

  • 4 (6-inch) whole wheat pitas
  • 4 tablespoons marinara sauce
  • 1/2 cup shredded Daiya mozzarella
  • 12 meatless meatballs
  1. Spread 1 tablespoon sauce on each of the pitas, and sprinkle each with about 2 tablespoons mozzarella.
  2. Meanwhile, cook the meatballs according to package directions. Cut into slices, and divide evenly among the pitas.
  3. Place on a baking sheet and bake at 375 degrees F for 6 minutes. Let cool slightly before serving.

Pita Pizza alt


Starfish Friend

Starfish Friend alt

If clay is fun, then sand + clay is infinitely more so! You can find colored sand at craft stores, and use whatever color you like best for this project.

After a recent trip to a natural history museum’s touch tank, Travis was in love with the feel of sea animals, so we decided to make our own starfish at home. The project was great for using clay in multiple ways. First we rolled it flat.

Starfish Friend (1)

Then we needed to cut out our starfish. A big star-shaped cookie cutter would have worked great, but I couldn’t find ours, so a plastic knife did in a pinch.

Starfish Friend (2)

Now it was time for the extra special sand bit. It was amazing how much more fun this made clay play. Travis loved the way it made the clay look, so we couldn’t stop there – he began adding other denizens to our “touch tank” including “snails” and “crabs,” which all needed to be sprinkled in sand of course.

Starfish Friend (3)

These were “snail eggs.”

Starfish Friend (7)

Meanwhile, use googly eyes or buttons for the eyes to finish your starfish friend; we chose the latter, after which Travis loved pressing buttons into additional pieces of clay.

Starfish Friend (5)

For the final touch, we left our clay to air-dry slightly curved on a piece of newspaper; this gave it that real starfish look once it had dried!

Starfish Friend (4)

Fall Potpourri

Potpourri (14).JPG

We were a little aimless on Sunday morning, so I asked Travis if he wanted to help me make the whole house smell like fall. I’ve never made potpourri before, and to be honest, have always equated it with those little sachets of lavender that you put in the sock drawer. However, in looking up potpourri recipes online that were kid-friendly, I learned that potpourri doesn’t need to be tied into a sachet, and is often left on a bowl or container on the counter, simply to scent a home. This seemed like a wonderful way to invite fall inside!

To make a super-simple countertop potpourri, we started with juicy oranges, and cut them into 1/8-inch thick slices. Travis loved the smell already!

Potpourri (1)

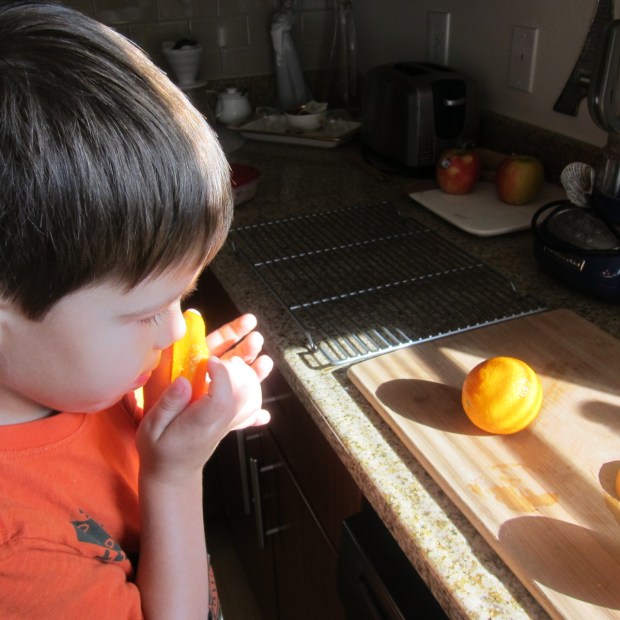
He helped me arrange the slices on a wire rack, after which they went into the oven at a low setting (250 degrees F) for a full 2 hours to dry out. We loved peeking at them through the oven door on occasion to check their progress, and the house already smelled lovely!

Potpourri (3)

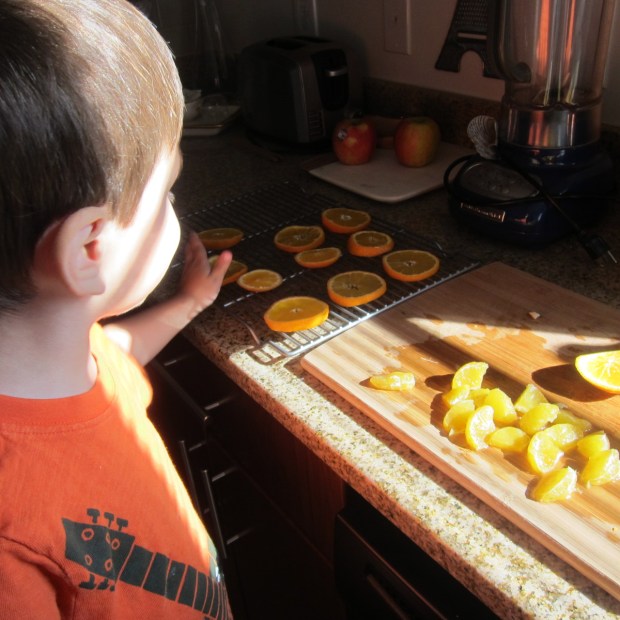
When the oranges had dried, we combined them in a bowl with cinnamon sticks, and set it out on the counter. Easy as that!

Potpourri (6)

For a version that would last a little longer, we re-used those orange slices and cinnamon sticks, but added a whole lot more. To make your potpourri, follow my guide below as closely or loosely as you like, using whatever appeals to you best. I had originally intended to use pine cones, but we haven’t brought any home recently from nature walks. It turns out I didn’t miss their omission, but feel free to incorporate into yours!

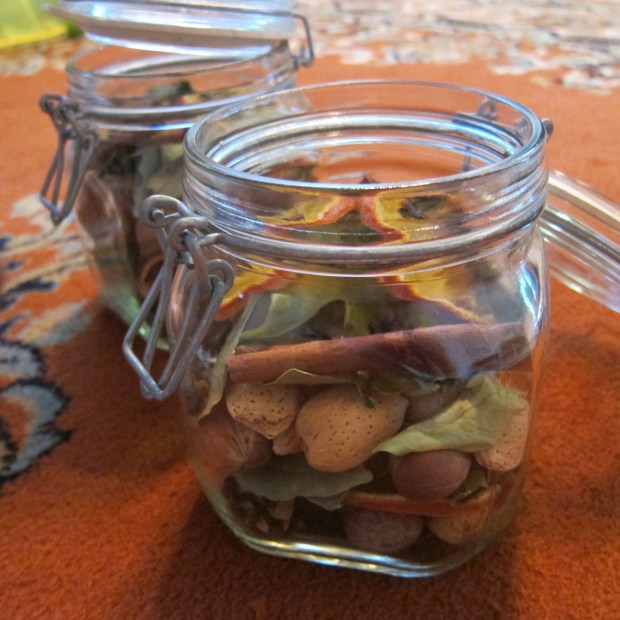
Instead, I laid out a tray for Travis with all sorts of goodies – whole nuts in the shell, orange leaves, bay leaves, whole clove, and of course the cinnamon and orange.

Potpourri (8)

I also set out options for essential oils to add, choosing three that seemed autumnal – clove, pine, and sweet orange.

Potpourri (7)

Travis loved the multi-sensory tray, needing to smell and touch everything on it! We simply filled our jars in whatever mood struck us, layering the items as we went.

Potpourri (10)

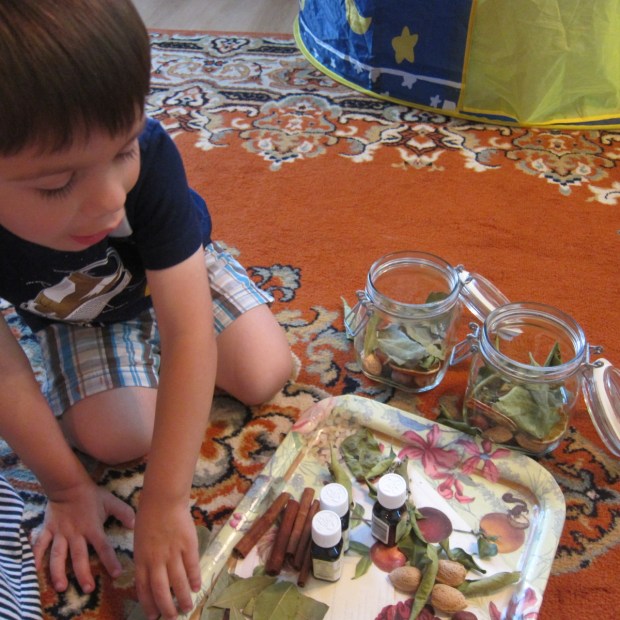
Sprinkling on cloves was a particular favorite.

Potpourri (11)

At the end, Travis decided he liked the clove scent best, so we sprinkled in a few drops of that essential oil to one jar.

Potpourri (12)

What a gorgeous final product!

Potpourri (16)

The clove-scented one found a home in his room, and we made a jar scented with pine for mommy and daddy’s room.

Potpourri (15)

Magnetic Fishing Game

Magnetic Fish (8)

Disappointed with the mechanics of two recent fishing games, we decided to make our own version instead!

As a bonus, this activity was less about the “fishing” and more about a little learning that I wanted to sneak in.

While Travis slept, I cut lots of fish from construction paper – you can use a template or just freehand the shapes.

Magnetic Fish (1)

Some of the fish received a letter, and others a shape, and then each one got a paper clip to make it magnetic.

For the wand, tie yarn to a wooden dowel, and secure the yarn with tape. Tie the other end of the yarn onto a magnet. I have a craft stick with a magnet glued to the tip, which makes for sturdier “fishing“, so used that here.

Magnetic Fish (3)

Now it was time to go fishing! (Or, as we like to say in this vegan household, “rescue” the fish).

Magnetic Fish (5)

For kids just learning the alphabet, you can simply ask them to find any letter at random. For older kids, this is a great name recognition game. We found T-r-a-v-i-s in both caps and lower case!

Magnetic Fish (6)

Next up was a shape hunt, which Travis loved. There are so many other variations you could do with this game, such as finding fish of all one color, or finding the biggest and smallest fish.

Magnetic Fish (2)

Travis ultimately decided that he liked fishing in a slightly different way, affixing the magnet to the paper clip by hand, then tugging up. Either way, I loved that this activity got him playing and learning at the same time.

Magnetic Fish (7)

Giant Bubble Wand

Giant Bubble (6)

I’ve been eyeing this project for over a year, but it looked too technical and difficult so I kept tabling it for another day; parents and caregivers, I’m here to reassure you not to be daunted! The wand was so simple to put together, and the result is fantastic. With 80 degree morning sunshine on our back patio, how could we not pop out for bubble play?

To make the wand, insert a push pin into one end of each of two dowels; a twisting motion works better than pushing, so you don’t bend the plastic bit by accident. Leave a little space instead of pushing the pins all the way in, as shown.

Giant Bubble (1)

Cut a four foot length of yarn, and tie one end to one exposed push pin. Insert that push pin fully to hold the yarn. Loop the yarn through a metal washer, then tie around the other exposed push pin.

Giant Bubble (2)

Finally, cut a smaller length of yarn (about 18 inches), and tie a few inches below the dowel on each side – you’ll wind up with a triangle shape when the dowels are held apart. This is now your wand.

Giant Bubble (4)

To make the bubble solution, combine dish soap and water in a 9-to-1 ratio – I used 1/3 cup dish soap and 3 cups water.

Giant Bubble (9)

I showed Travis how best to dip the wand for the first few tries.

Giant BUbble (7)

Wave it in the wind, and you’ll discover that this thing makes serious bubbles!

GIant BUbble (11)

It was hard for him to get the hang of holding a dowel in each hand, instead of gripping it with one hand, but that didn’t stop him from loving the mere sensation of wand and bucket.

GIant Bubble (5)

When we tired of bubbles, the wand made a fantastic “mop” for the patio, which kept Travis happy in the sunshine for quite some time.

Giant Bubble (10)

Fall Bucket List Part I

Fall Bucket (3)

Happy Autumn everyone! It’s my favorite season, and that has my head full of activities I hope to share and enjoy with Travis before the season ends. To make sense of all the ideas, what better way than to put it all on paper? This post is the first of a two-part series; the second will include images and tips from each item on our bucket list that we’ve checked off… But I wanted to make sure to post the Bucket List itself now so you can follow along on this fall journey!

I found a few suggested templates online, but none of them contained all of the items that I was anticipating, and most contained some activities that didn’t interest us. Instead, it was easy to type up the activities we wanted in a Word document, playing around with fun fonts.

Fall Bucket (1)

Since we don’t have a color printer, I printed the template in black and white, but this gave Travis the chance to fill it in with autumnal colors as I read off each item to get him excited about activities to come.

Fall Bucket (2)

“Can we do them all today?” he asked. Not quite!

Fall Bucket (4)

I filled in the final colors and hung the bucket list on our wall, and we can’t wait to check off the first one.

Fall Bucket (5)

Pasta Mosaic

Pasta Mosaic (14)

It’s finally happening… My little boy who used to happily jump at any art project I suggested has his own agenda now. And while I lament that he’s not quite so pliable or amenable to activities I’ve anticipated, I also am celebrating this three-year-old independent spirit and the imagination that accompanies it.

Cue this project as the perfect example. I thought sorting and making art with pasta might nicely fill some time on a Sunday morning since I had several boxes of dry pasta in the pantry. Sorting is a great skill for little fingers and minds, but silly me, every pasta I had was a variation on penne…in different lengths! It turned out we had regular penne, medium-sized pennette, and super-short ditalini.

Pasta Mosaic (1)

This turned the sorting into a neat challenge based more on length than shape, so Travis actually sat happily to help me sort for a while.

Pasta Mosaic (2)

My suggestion to paint the pasta after was met with indifference though! A bit miffed, I pulled out glitter paint. That made things decidedly more sparkly and fun, and we discovered that painting penne is quite silly and tricky since they roll.

Pasta Mosaic (3)

What worked best? Dabbing at them on a piece of wax paper and leaving them to dry? Tossing them into a whole bath of paint and swirling them around?

Pasta Mosaic (6)

Travis decided it was more fun to paint the bowls holding the paint, but eventually we had lots of sparkly painted pasta, and left it to dry.

Pasta Mosaic (5)

The final idea was to turn all that painted pasta into a mosaic, but Travis was completely uninterested…until I suggested that the glue was caulking, and the pasta was “ants” coming through the floor (a game based on a recent, real-life scenario….).

Pasta Mosaic (9)

Well then he couldn’t get enough! We caulked and caulked, and filled puddles of glue with “ants” trying to get into our kitchen.

Pasta Mosaic (10)

When I asked if he thought our paper was full enough, he pointed to the remaining pasta pieces and adamently told me, “No Mom, still more ants.”

Pasta Mosaic (11)

Once we’d used up all the pasta, he needed to “caulk” two more pieces of construction paper before he tired of the game.

Pasta Mosaic (13)

So there you have it, a valuable lesson on my son’s ever-growing independence, but also a reminder that incorporating his latest interests and imaginative play might still just get him to sit and make art with his mama.

Pasta Mosaic (12)

Greek Lettuce Wraps

Greek Wrap (2)

One lettuce wrap makes the perfect size meal for my preschooler – simply increase portion size based on the age and appetite of your little (or not so little) one! I like to use Nate’s classic flavor vegan meatballs.

Ingredients:

  • 1 (10-ounce) package meatless meatballs
  • Bibb lettuce leaves
  • 1/2 cup couscous
  • 1/2 cup water
  • 1 cup halved cherry tomatoes
  • 1 chopped cucumber
  • 1 tablespoon red wine vinegar
  • 2 tablespoons olive oil
  • 4 ounces creamy vegan cheese (such as Miyoko’s Creamery)
  • 1/2 cup plain non-dairy yogurt
  • 1/2 teaspoon grated lemon zest
  • 1 tablespoon fresh-squeezed lemon juice
  • 1/2 teaspoon chopped fresh oregano
  • Kalamata olives
  1. Heat the meatballs according to package directions; set aside. Rinse the lettuce leaves and pat dry; set aside.
  2. Meanwhile, bring the water to a boil in a saucepan. Add the couscous, then cover, remove from heat, and let stand for 5 minutes. Fluff with a fork and transfer to a large bowl.
  3. Add the tomatoes and cucumber to the bowl. Whisk together the vinegar and olive oil, then pour over the couscous mixture, tossing to coat. Set aside.
  4. In a blender, combine the vegan cheese, yogurt, lemon zest, lemon juice, and oregano. Process until smooth.
  5. To assemble the lettuce wraps, top each lettuce leaf with about 1/2 cup couscous salad. Finely chop the meatballs, and divide evenly among the lettuce wraps. Drizzle with the cheese sauce and sprinkle with chopped kalamata olives to taste.

Greek Wrap (1)

Leftover cooked meatballs? We love to simply dice them up and add to bowls of spaghetti, jarred sauce, and a sprinkle of vegan Parmesan for tomorrow’s lunch or dinner.

Spaghetti and Meatballs


Tablecloth Clip Creatures

Tablecloth Clip (6)

A recent dot painting extravaganza reminded me that it’s useful to cover our work space (also Travis’s table for eating), when a craft gets particularly messy; a tablecloth clipped onto a table does the job in a pinch – so why not make the clips to hold it functional and adorable?

Tablecloth Clip (1)

To craft these little creatures, we used small pom poms and clothespins. Travis actually lost interest in forming insects quite quickly when he discovered that he could pick up pom poms with the clothespins – but this was such great practice for his fine motor skills that I was happy to let him continue!

Tablecloth Clip (2)

Meanwhile, we ended up with a variety of bugs, including a butterfly, caterpillar, and bee. Older kids will definitely love mapping out how their creatures look, and selecting which materials work best for which insect. Construction paper made for easy wings, and pipe cleaner pieces were perfect for antennae.

Tablecloth Clip (3)

We’ll be busy and buzzy as bees at our craft table now!

Tablecloth Clip (5)

When not in use, our little creatures love hanging out at the windowsill.

Tablecloth Clip alt.JPG